If you’ve noticed water stains on your ceiling or damp insulation, a roof ridge vent leaking could be the culprit. A leaking ridge vent allows rain, snow, or moisture to enter the attic space and can lead to rot, mold, and reduced energy efficiency if not addressed promptly. This guide walks you through how ridge vents work, common causes of leaks, quick temporary fixes, permanent repair options, cost expectations, and steps to prevent future problems.
What Is a Ridge Vent and Why Leaks Matter
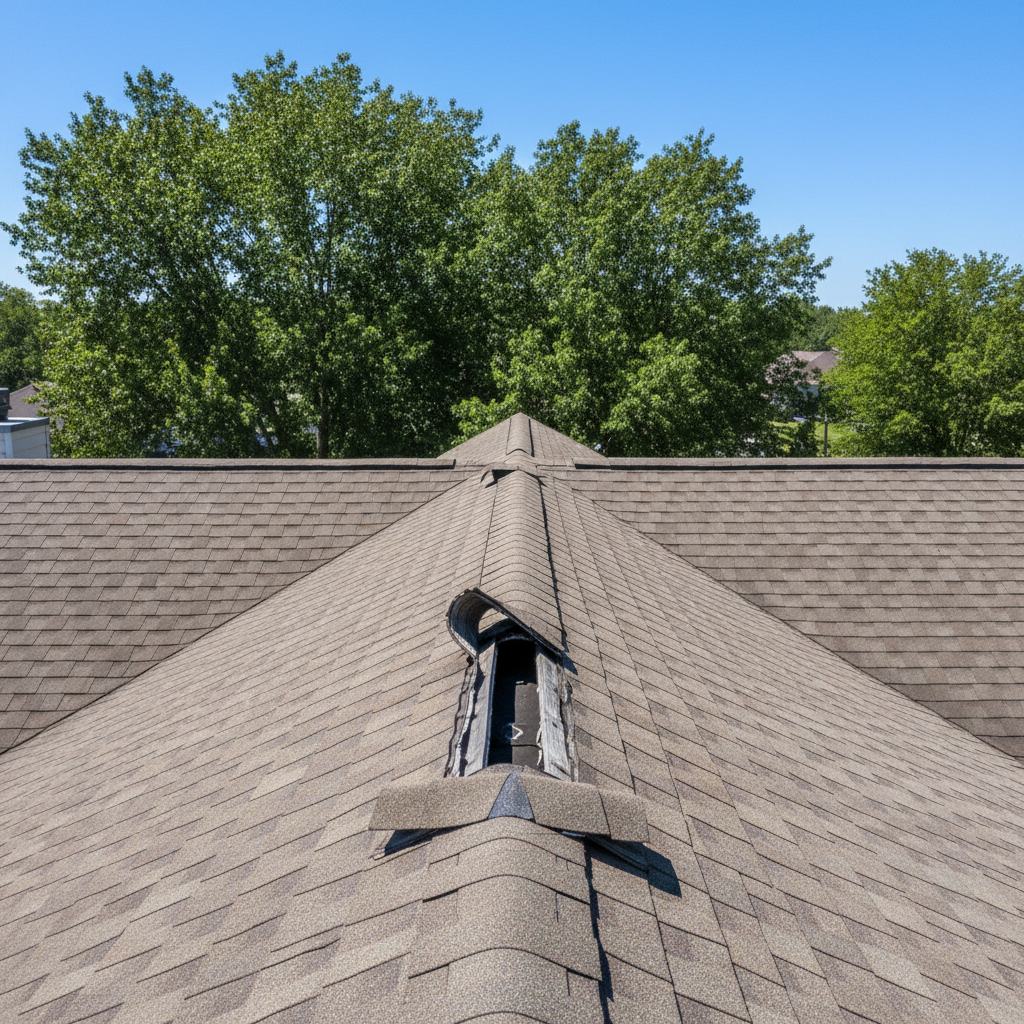
A ridge vent is a continuous vent installed along the peak of a sloped roof to allow warm, humid air to escape from the attic. Ridge vents are an effective part of a whole-house ventilation system when paired with soffit or eave vents. Because ridge vents run along the highest point of the roof, a leak here can be especially damaging: water that enters at the ridge can travel down rafters, wet insulation, drip into ceilings, and accelerate roof deck deterioration.
Common Causes of Ridge Vent Leaks
- Improper installation – Incorrectly fastened ridge caps, poorly overlapped shingles, or improper vent opening alignment can allow water infiltration.
- Damaged or missing ridge cap shingles – Wind, hail, or age can lift or remove ridge cap shingles, exposing the vent flange and creating an entry point for water.
- Clogged or compressed baffles – Vent openings sometimes get blocked by insulation, debris, or collapsed baffles, changing how water drains and increasing the chance of infiltration.
- Flashing failure – On some ridge vent systems, flashing or adhesive seals are used at joins and seams. Deteriorated flashing can leak.
- Poor roof slope or ponding – Low-slope areas near the ridge or poor roof geometry can allow water to collect and find its way into vent openings.
- Wind-driven rain or snow – Extreme weather can force precipitation under ridge cap shingles, particularly if the vent’s design lacks adequate wind resistance.
- Animal damage – Birds, squirrels, or raccoons can disturb or chew vent components, creating gaps.
Signs You Have a Ridge Vent Leak
- Water stains on attic rafters or ceiling plaster
- Wet or compressed attic insulation near the ridge
- Mold, mildew, or musty odors in the attic
- Visible gaps or lifted ridge cap shingles
- Water dripping into the attic during heavy rain or high winds
- Interior paint bubbling or peeling along the ceiling peak
How to Inspect a Suspected Ridge Vent Leak
Safety first: use a sturdy ladder and wear non-slip footwear. If you’re uncomfortable working on the roof, hire a professional roofer. When inspecting, follow these steps:
- Exterior inspection: Walk the roof or view it from a safe vantage. Look for missing or loose ridge cap shingles, visible gaps where the vent sits, torn vent material, and debris accumulation along the ridge.
- Check for flashing and sealant failure: Look at seams, end caps, and any penetrations near the ridge for failed sealant or lifted flashing.
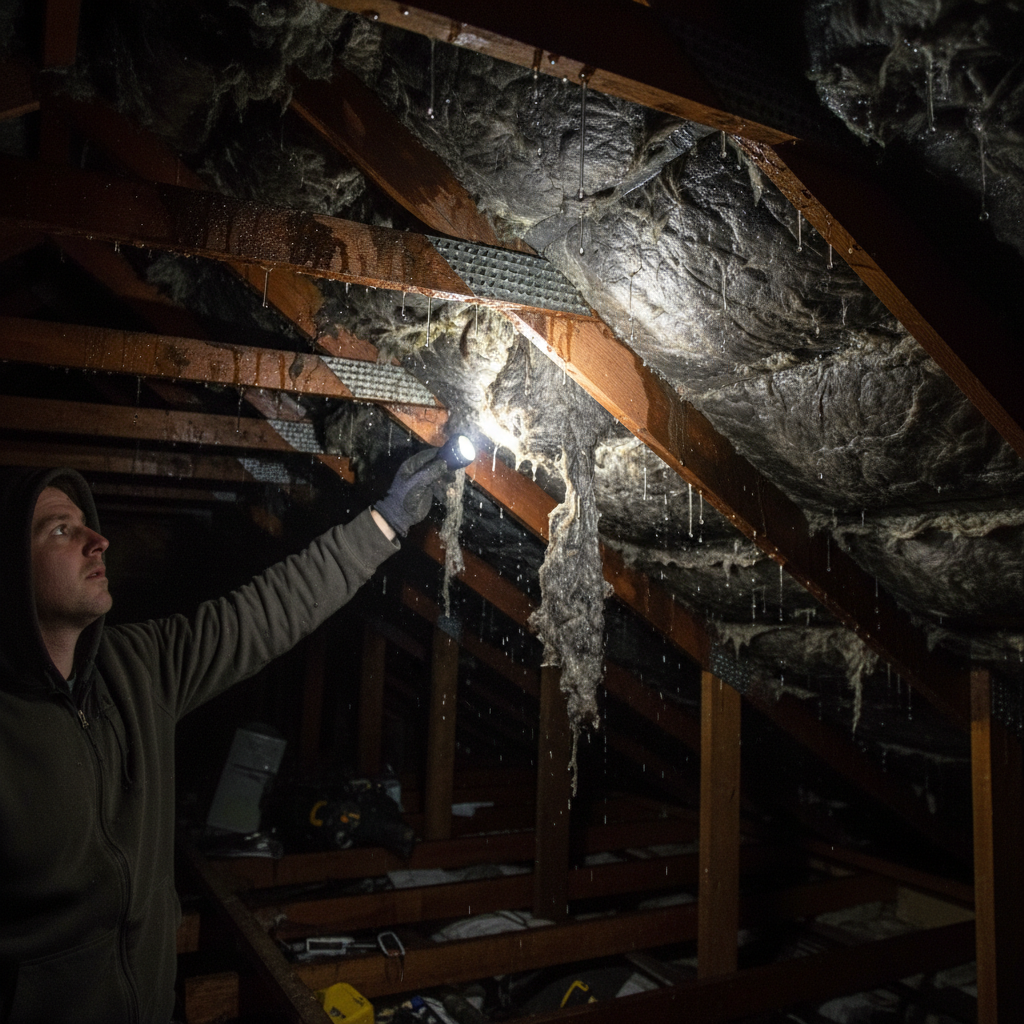
- Interior inspection: Enter the attic with a flashlight. Check the ridge area for active drips, damp wood, wet insulation, and mold growth. Follow any discoloration to find the highest point of intrusion.
- Perform a water test: If the leak is intermittent, have a helper spray a garden hose along a short section of ridge while someone watches inside the attic to pinpoint the leak.
Temporary Fixes You Can Do Quickly
Temporary repairs can slow damage until permanent work is scheduled. These are stopgap measures and not long-term solutions.
- Replace or re-seat ridge cap shingles: If the caps are merely loose, you can re-secure them with roofing nails and roofing cement to keep water out temporarily.
- Patch with roofing cement: Use exterior-grade roofing cement to seal small gaps or split vent flanges. Apply sparingly and smooth it into seams.
- Cover the ridge: For an emergency during a storm, a heavy-duty waterproof tarp secured over the ridge can keep the worst of the water out until the roof can be repaired.
- Clear debris: Remove leaves, shingle granules, or nesting material that may be directing water into the vent area.
Note: Do not rely on adhesive tape or indoor caulks for exterior roof repairs; they won’t hold against weather and temperature changes.
Permanent Repair Options
Permanent repairs depend on the root cause and the condition of the surrounding roofing system. Common professional options include:
- Reinstall or replace ridge cap shingles: If caps are damaged or improperly installed, a roofer will remove old material, inspect the vent flange, and install new cap shingles with proper nailing patterns and sealant where needed.
- Replace the ridge vent assembly: If the vent itself is damaged, updating to a modern, higher-quality continuous ridge vent system can improve both ventilation and weather resistance.
- Reflash and reseal seams: Repairing or replacing failed flashing and adding long-lasting sealant at joins and end caps stops leaks where components meet.
- Correct roof deck issues or replace decking: If the leak has rotted sheathing, the affected roof deck will need to be replaced before reinstalling vent components.
- Improve attic ventilation balance: Inadequate intake vents can cause pressure imbalances that complicate vent performance. Ensuring soffit vents are clear and properly sized helps the whole system work as intended.
DIY vs. Hiring a Professional
Minor repairs like re-securing a few ridge cap shingles or clearing debris may be reasonable for a confident DIY homeowner with proper safety gear. However, consider hiring a licensed roofer when:
- The leak is extensive or persistent
- The roof deck or framing is wet, soft, or rotten
- The repair requires replacing large sections of ridge vent or flashing
- The roof is steep, high, or difficult to access
- You want a warranty or long-term guarantee on workmanship
Expected Costs
Costs vary by region, roof size, materials, and whether additional deck or structural repairs are needed. Ballpark estimates:
- Minor patch or reseating ridge cap: $100–$400
- Replacing a short section of ridge vent: $300–$800
- Full ridge vent replacement on a typical home: $600–$1,800
- Extensive repairs including deck replacement or structural fixes: $1,500–$5,000+
Always obtain multiple quotes and request itemized estimates. A reputable roofer should inspect the attic and roof, document damage, and explain the recommended work.
Materials, Tools, and Safety Checklist
For small DIY tasks you may need:
- Replacement ridge cap shingles or a ridge vent kit
- Roofing nails and a roofing hammer or nail gun set to the correct depth
- Roofing cement or high-quality roof sealant
- Utility knife, pry bar, and caulking gun
- Sturdy ladder, fall protection harness (recommended), and non-slip shoes
- Work gloves and eye protection
If you’re uncomfortable working at height or the repair requires removing decking or flashing, hire a pro. Improper repairs can void roof warranties and create larger issues.
Preventing Future Ridge Vent Leaks
- Regular roof inspections: Check the ridge after storms and at least once a year for loose or damaged cap shingles and buildup of debris.
- Maintain attic ventilation balance: Ensure soffit and intake vents are clear so ridge vents function correctly.
- Trim nearby trees: Reduce the risk of falling branches and limit leaf accumulation along the ridge.
- Address animal access: Seal gaps where animals might enter and nest in vent areas.
- Use quality materials: Long-lasting ridge vent systems and cap shingles with strong wind resistance reduce future problems.
- Schedule professional roof tune-ups: Have a roofer inspect and touch up sealants and fasteners every few years.
How Ridge Vents Compare to Other Vent Types
Ridge vents are popular because they provide continuous, passive exhaust along the roof peak without protruding through the roof surface. Other options include box vents, turbine vents, and power vents. Each has pros and cons for airflow and weather resistance. If you’re considering an upgrade or replacing a problematic ridge vent, a ventilation assessment can determine the best system for your roof and climate. For general guidance on home ventilation and roofing, reputable home-improvement sources can be helpful; for example, Better Homes & Gardens offers practical roofing and ventilation insight.
Better Homes & Gardens roofing and ventilation resource
When a Leak Signals a Bigger Problem
Some ridge vent leaks are tame; others reveal more serious issues. Watch for these red flags that require urgent professional attention:
- Large areas of wet or sagging ceiling material
- Structural wood rot in rafters or roof decking
- Extensive mold growth in the attic or living spaces
- Repeated leaks after multiple repairs
If you notice any of these, schedule a full roof assessment. Early intervention minimizes repair costs and protects indoor air quality and structural integrity.
Frequently Asked Questions (FAQs)
How can I be sure the ridge vent is the leak source?
Inspect the ridge area from both outside and inside. Use a hose water test in dry weather: have one person spray water along a short section of the ridge while someone watches inside the attic for leaks. Follow any wet staining to the highest point—that’s often where water entered.
Is a ridge vent leak covered by roof warranty or homeowner’s insurance?
Coverage depends on the warranty and your insurance policy. Manufacturer warranties may void if improper installation occurred. Homeowner insurance typically covers sudden storm damage but not wear-and-tear or lack of maintenance. Document damage and check your policy or contact your warranty provider.
Can I replace a ridge vent myself?
Yes, if you have roofing experience, adequate safety gear, and the roof is accessible. For full replacement or when decking or flashing needs work, hire a licensed roofer to ensure correct installation and to maintain any warranties.
Will fixing the ridge vent improve my home’s energy efficiency?
Often yes. Proper ridge ventilation helps regulate attic temperature, reducing heat buildup in summer and minimizing moisture in winter. When the ventilation system is balanced, your HVAC system typically runs more efficiently.
How long should a ridge vent last?
With good materials and installation, ridge vents can last 15–25 years, similar to many asphalt shingles. Harsh climates, wind, and poor installation reduce lifespan.
Checklist: Steps to Take Right Now
- Inspect the ridge visually and from the attic for leaks or damage.
- Clear debris and ensure intake vents are unobstructed.
- Perform a targeted water test to locate the leak if safe to do so.
- Apply a temporary patch like roofing cement for small gaps or secure loose ridge caps.
- Get at least two professional roofing estimates for permanent work.
- Document all damage and repairs for warranty and insurance purposes.
Dealing with a roof ridge vent leaking can feel stressful, but a systematic inspection, temporary mitigation, and well-chosen permanent repairs will protect your attic and home from long-term damage. If you’re unsure about climbing the roof or the leak appears extensive, a licensed roofing contractor offers the expertise and warranty protections that minimize risk.
For more ideas on making interiors comfortable and how structural details like ventilation affect living spaces, you might enjoy exploring How to Design A Comfortable Modern Living Space.
How to Design A Comfortable Modern Living Space


