If you’ve noticed roof sheathing sagging in your attic or seen dips in your roofline, you’re not alone—roof sheathing sagging is a common problem that can point to moisture damage, structural stress, or ventilation issues. This guide walks you through how to identify the causes, assess the severity, weigh repair options (DIY vs. pro), estimate likely costs, and take steps to prevent recurrence so your roof remains safe and durable.
What is roof sheathing and why does sagging matter?
Roof sheathing (also called roof decking) is the layer of plywood, oriented strand board (OSB), or boards fastened to rafters or trusses that supports roofing underlayment and shingles. When that layer sags, it reduces the roof’s ability to carry loads and can lead to water infiltration, accelerated material failure, and safety hazards. Even a small amount of deflection can signal an underlying issue that needs prompt attention.
Common causes of roof sheathing sagging
- Moisture damage and rot: Persistent leaks, ice dams, or high attic humidity can cause wood sheathing to swell, soften, or rot, leading to sagging.
- Insufficient fasteners or incorrect installation: Undersized or missing nails/screws, or panels installed with incorrect spacing, can let the sheathing shift or bow under load.
- Overloading: Accumulated snow, heavy roofing materials, rooftop equipment, or storage can exceed design load and cause deflection.
- Undersized or damaged framing: Rafters or trusses that are undersized, cracked, or damaged by pests/rot will allow the sheathing to sag between supports.
- Age and material degradation: Older roofs or low-quality sheathing (thin boards, inferior OSB) naturally weaken and may sag over time.
- Poor ventilation and insulation problems: Trapped moisture from inadequate ventilation or thermal bridging from insulation issues accelerates sheathing decay.
- Structural movement: Foundation settling or shifts in framing connections can change load paths and cause localized sagging.
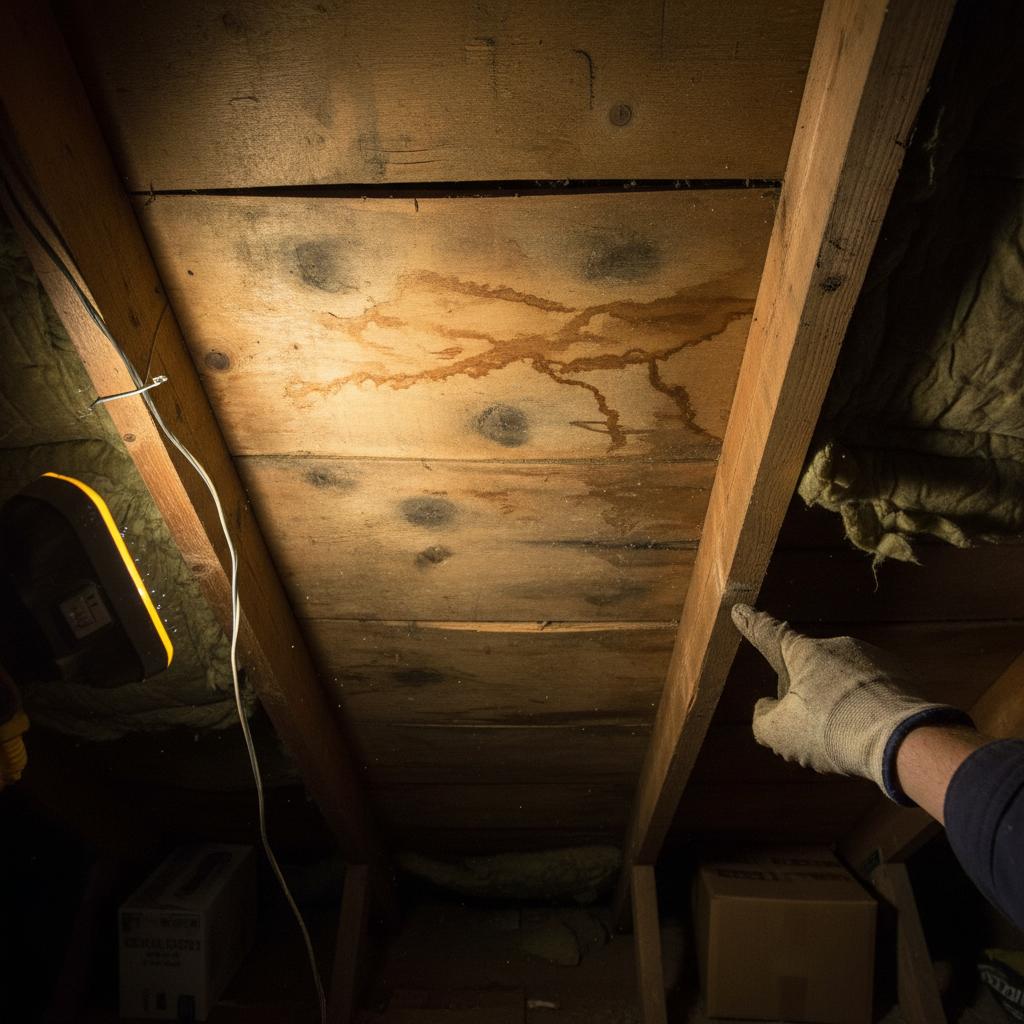
How to inspect for roof sheathing sagging — attic and exterior checks
Start with a careful visual inspection. Safety first: use proper lighting, wear fall protection if needed, and avoid stepping between joists (use a board to distribute weight).
Attic inspection checklist
- Look for visible bows or dips in the roof plane from below.
- Check for light gaps around fasteners or seams—this can indicate movement.
- Inspect sheathing for soft spots, delamination, or dark discoloration indicating rot.
- Locate water stains, active drips, or mold growth on sheathing or rafters.
- Check the underside of shingles (if visible) for blistering or wetness.
- Measure attic ventilation: ensure soffit and ridge vents are unobstructed.
- Note any sagging near roof penetrations—chimneys, skylights, or vents.
Exterior and roofline checks
- From the ground, inspect the roofline for dips or uneven ridges.
- Look for shingles that are cupped, buckled, or separating from the deck.
- Check fascia and soffit for signs of rot or outward movement.
- After a storm or heavy snow, observe how the roof handles load—excessive deflection is a warning sign.
When is sagging serious? Signs you need professional help now
Not all sagging requires emergency intervention, but certain signs mean call a professional immediately:
- Visible cracking, splitting, or severe localized deflection in the sheathing or rafters.
- Active leaks that are soaking sheathing and structural members.
- Sagging that has rapidly increased in a short period.
- Doors or windows that suddenly stick or won’t close—this can indicate structural movement.
- Large areas of soft or rotted sheathing you can press through with your hand.
Repair options: temporary fixes and permanent solutions
Appropriate repair depends on cause and severity. Here’s a hierarchy from short-term to long-term fixes.
Temporary fixes (short-term)
- Patch active leaks with roof cement or temporary flashing to stop water intrusion until a full repair can be scheduled.
- Remove heavy rooftop storage or snow to reduce load immediately.
- Support localized sag by installing temporary braces from the attic to distribute load—but this is strictly a stopgap measure.
Moderate repairs
- Refasten sheathing: add screws to pull plywood/OSB tight to rafters/trusses. This helps when poor fastening was the issue.
- Replace isolated rotted panels: cut out the damaged board and sister new sheathing to adjacent rafters.
- Improve ventilation and insulation to prevent recurring moisture problems.
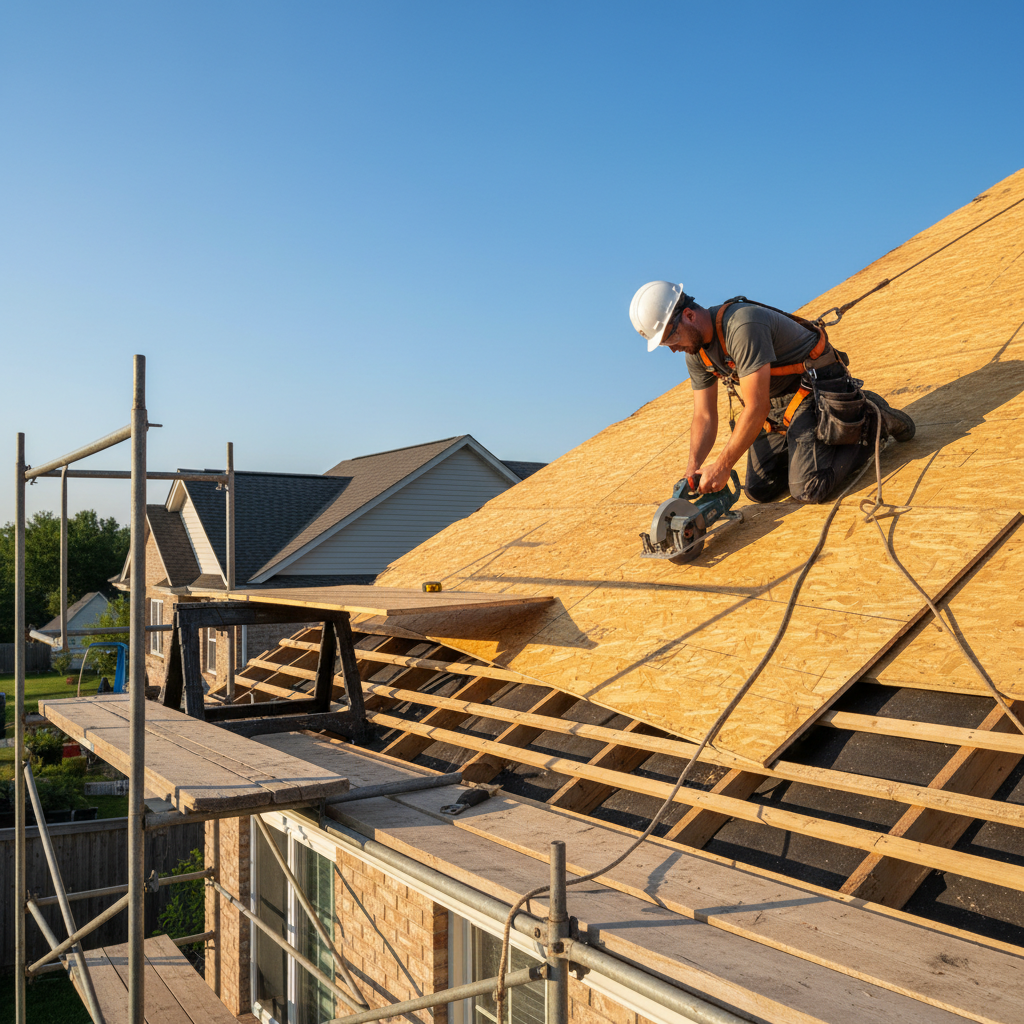
Major or permanent repairs
- Replace entire sheathing layer when damage is widespread. This typically requires removing shingles, installing new deck, underlayment, and re-roofing.
- Sister damaged rafters or trusses with new lumber or replace them entirely if compromised by rot/pest damage.
- Address structural problems at the source: add roof supports, improve load distribution, or reinforce framing per engineer recommendations.
- Upgrade to thicker sheathing or higher-quality OSB/plywood if the original deck was undersized relative to current codes.
DIY vs. hiring a professional
DIY tasks that a confident homeowner can consider:
- Attic inspection and minor repairs (refastening, patching, improved ventilation).
- Removing rooftop debris or clearing vents and soffits.
- Replacing isolated sheathing panels if you have roofing and carpentry experience.
Call a licensed roofer or structural engineer when:
- The sagging is widespread or sudden.
- There are structural cracks, compromised rafters/trusses, or active leaks undermining framing.
- You’re unsure of load distribution, local code compliance, or permit requirements.
Typical costs and what affects pricing
Repair costs vary widely by region, roof size, access difficulty, materials, and the underlying problem. Ballpark figures (U.S., mid-2020s):
- Small repairs (refasten panels, patch leaks): $200–$1,000
- Replace isolated sheathing panels: $500–$2,000
- Full deck replacement and re-roof (materials + labor): $5,000–$15,000+ depending on roof size
- Structural reinforcement or rafter/truss replacement: $2,000–$10,000+ depending on scope
Factors that increase cost: roof pitch and height, multiple layers of old roofing to remove, need for scaffolding, structural repairs, and lead time for permits or engineering assessments.
Code, materials, and best practices
- Current building codes specify minimum sheathing thickness and fastener spacing based on rafter/truss spacing; many older roofs built to older standards may be undersized.
- Plywood and OSB are the most common sheathing materials; exterior-grade plywood tends to resist moisture better, but modern exposure-rated OSB is widely used.
- Use ring-shank nails or deck screws designed for exterior sheathing to reduce pull-out and movement over time.
- Install proper underlayment and flashing when re-roofing; this reduces future water infiltration.
Preventing future sheathing sag
- Keep gutters clear and ensure proper roof drainage to minimize water pooling and ice dams.
- Maintain attic ventilation—balanced intake (soffit) and exhaust (ridge) vents helps control moisture.
- Control attic humidity: fix bathroom/kitchen venting that dumps moist air into the attic, and ensure vapor barriers where appropriate.
- Avoid storing heavy items on the roof; limit rooftop equipment and consult an engineer for heavy HVAC units.
- Schedule periodic roof and attic inspections, especially after storms or heavy snow seasons.
Choosing the right contractor and getting a proper assessment
Find a contractor with experience in roofing and structural repairs. For significant sagging, get a structural engineer’s written assessment before major repairs. When hiring:
- Request proof of insurance, licensing, and references.
- Ask for a detailed written estimate that separates labor, materials, and any subcontracted engineering fees.
- Confirm the scope includes addressing the root cause, not just cosmetic fixes (e.g., replacing decking without fixing ventilation issues is a short-term solution).
- Verify warranty coverage for workmanship and materials.
Real-world scenarios: examples and recommended approaches
Scenario 1: Localized sag near a chimney with active dripping
- Cause: flashing failure and rot of sheathing along the chimney base.
- Approach: stop water entry, remove damaged sheathing and replace with properly flashed, sealed deck material. Consider flashing upgrades and increased insulation/venting around the chimney.
Scenario 2: Widespread bowing across several roof bays on an older home
- Cause: undersized rafters and older thin boards combined with long-term moisture exposure.
- Approach: structural engineer evaluation; likely full deck replacement and rafter reinforcement or replacement. Upgrade sheathing thickness to meet modern spans.
Scenario 3: Slight dip after consecutive heavy snowfalls
- Cause: temporary live load exceeding design capacity.
- Approach: remove snow load promptly; inspect for plastic deformation or cracked rafters; add reinforcement if necessary.
How long do repairs take?
Small repairs and refastening can be completed in a day or two. Partial sheathing replacements typically take a few days. Full deck replacement and re-roofing often require multiple days to a week, depending on roof size, weather, and permit timelines. Structural remediation that requires engineered solutions may add time for assessment and fabrication.
Safety and health considerations
- Active leaks can create mold and rot—address promptly to protect indoor air quality.
- Walking on compromised sheathing is dangerous—use crawl boards and proper fall protection.
- When removing old roofing, be aware of nail hazards and asbestos risk in very old homes (have materials tested if in doubt).
Resources and further reading
For general roofing maintenance guidance and seasonal tips, reputable home publications provide useful, homeowner-friendly articles. For example, Better Homes & Gardens offers practical roofing advice and inspection checklists that complement the technical guidance in this article: Better Homes & Gardens — Roofing.
FAQ — Frequently asked questions about roof sheathing sagging
Q: Can sagging sheathing be fixed without replacing the roof?
A: Sometimes. If the problem is limited to a few panels or poor fastening, targeted repairs like refastening or replacing isolated sheets can suffice. But when rot, damaged rafters, or wide-area failure exist, a full deck replacement and re-roofing are often necessary.
Q: Will new shingles hide sagging?
A: New shingles will not fix underlying structural sagging and may mask the issue temporarily. Roofing hides defects and could fail prematurely if the deck remains compromised. Always address the deck and framing first.
Q: Is sagging covered by homeowners insurance?
A: Coverage depends on the policy and cause. Sudden damage from a storm may be covered, while wear and tear or maintenance issues usually are not. Document damage promptly and consult your insurer for specific guidance.
Q: How do I know if my attic ventilation is adequate?
A: Adequate ventilation typically uses a balance of intake vents (soffit) and exhaust vents (ridge, gable, or powered vents). Signs of inadequate ventilation include high attic humidity, mold, ice dam formation, and accelerated roof aging. A contractor can measure airflow or calculate net free vent area for your attic.
Q: Can I step on the sheathing during inspection?
A: Only step on sheathing if you’re certain it’s supported by joists below and is in good condition. Use a plywood crawl board spanning joists for safety. If you suspect rot or weakness, leave the inspection to professionals.
Roof sheathing sagging is a clear signal to dig deeper rather than patch over. With prompt diagnosis, targeted repairs, and improved ventilation and maintenance, most roofs can be restored to safe service life. If you’re unsure about the cause or extent of sagging, consult a licensed roofing contractor or structural engineer for a thorough evaluation.
Interested in how interior comfort and proper home design can reduce maintenance headaches and protect structural elements over time? Explore more on designing comfortable, resilient living spaces at How to Design A Comfortable Modern Living Space.


