Rotting wood around exterior windows is a common, unsightly problem that, if left untreated, can lead to bigger structural and moisture issues. In this guide you’ll learn how to identify wood rot, repair or replace damaged trim and sills, prevent future decay, and decide when to hire a pro—all with clear steps, tools lists, and safety tips.
Why wood around exterior windows rots
Wood rot around windows is usually caused by persistent moisture exposure. Water can enter through failed caulk, missing flashing, cracked paint, improper window installation, or roof and siding leaks. Once moisture soaks into window trim or sills, fungi that cause rot can grow and slowly break down the wood fibers.
Common causes
- Failed or cracked exterior caulk and sealants
- Poor flashing or damaged flashing tape around the window
- Siding or roofing leaks that direct water toward the window
- Paint failure (peeling or unmaintained finishes)
- Improperly sloped sills that hold water
- Condensation and interior moisture when ventilation is poor
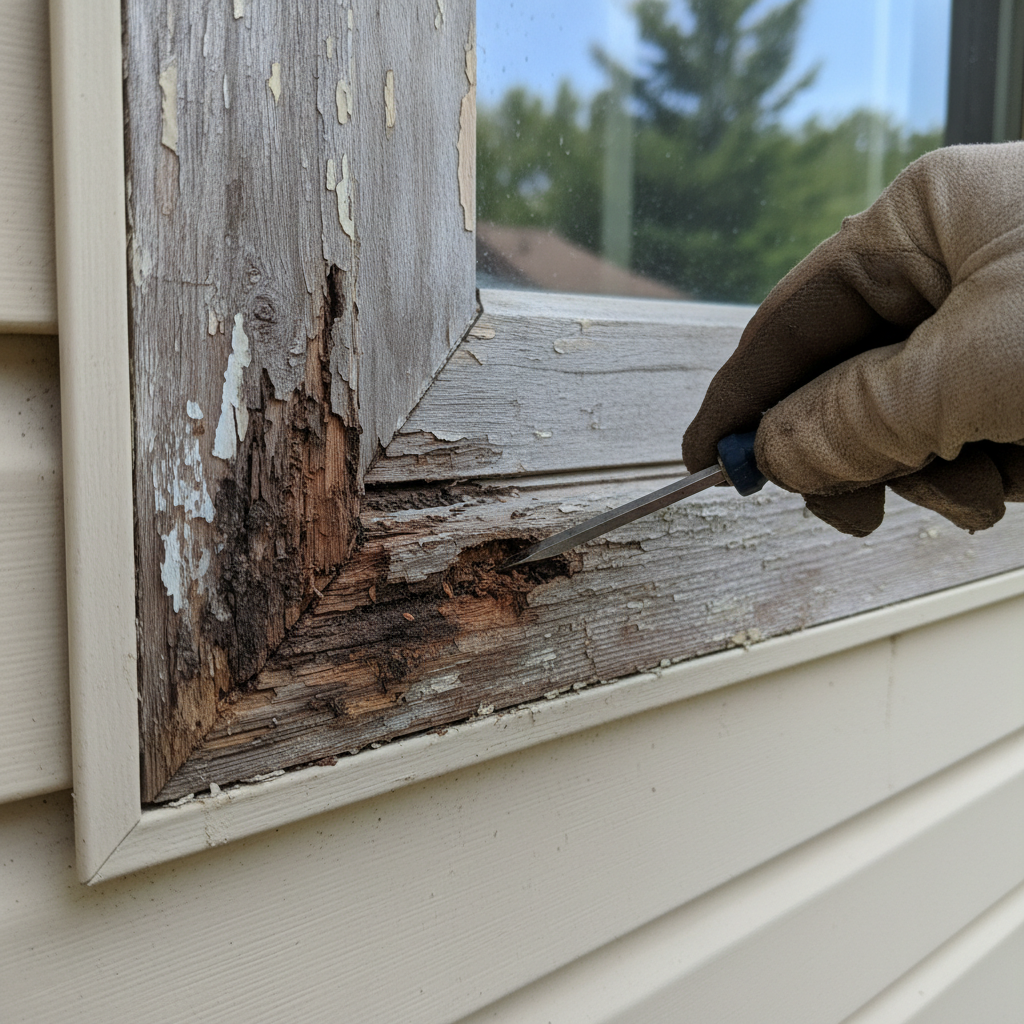
How to spot rotting wood around windows
Early detection helps avoid big repairs. Look for these visual and physical signs:
- Soft or spongy trim when pressed with a screwdriver
- Flaking or peeling paint limited to window trim
- Visible gaps between trim and siding or trim and glass
- Discolored or crumbling wood, often darker or brittle
- Water stains on interior walls beneath the window
- Mold or mildew growth at seams or inside the frame
Tools and supplies to inspect
- Screwdriver or awl (to prod suspicious wood)
- Moisture meter (helps confirm elevated moisture)
- Flashlight and small mirror for hard-to-see areas
- Putty knife to lift paint or cut caulk
Decide: repair vs. replace
How much you repair depends on the extent of rot and whether structural framing is affected.
- Minor surface rot or small soft spots: often repairable with epoxy consolidants and filler.
- Moderate rot confined to trim or sill: consider partial replacement of the damaged trim or sill boards.
- Extensive rot into framing, sill plates, or supporting structure: replacement of the window unit or professional structural repair is recommended.
Step-by-step: repairing small to moderate rot (DIY)
This method is ideal when rot is limited to trim or the outer sill. It restores integrity and prevents future water intrusion.
1. Prepare the work area
- Remove interior window treatments and lay down drop cloths.
- Wear gloves, eye protection, and a dust mask—especially if old paint could contain lead.
- Inspect for any signs of extensive mold; treat mold per local guidelines or hire a pro if widespread.
2. Remove bad wood
- Use a chisel, screwdriver, or oscillating tool to remove soft and crumbling wood until you reach firm timber.
- Cut back beyond visibly rotted areas by an extra inch to ensure all infected wood is removed.
3. Treat the remaining wood
- Apply a wood consolidant (epoxy penetrant) to strengthen remaining fibers. Follow manufacturer cure times.
- If insects or fungus are present, use an appropriate wood preservative.
4. Fill and shape
- Use a structural wood filler or epoxy wood filler to rebuild the profile. Apply in layers if deep.
- Once cured, sand to shape so the replacement matches the original trim or sill slope for water runoff.
5. Prime and paint
- Prime the repaired area with a high-quality exterior primer that bonds to wood and epoxy.
- Finish with two coats of exterior paint or stain designed for your climate. Make sure top edges and end grains are fully sealed.
6. Re-caulk and seal
- Apply backer rod where gaps are deep, then use a paintable exterior caulk to seal joints between trim and siding, and between trim and glass.
- Inspect flashing and add or repair self-adhesive flashing tape if necessary to divert water away from the window opening.
Step-by-step: replacing rotted sill or trim
When rot is too large for filler, replace the affected pieces. This requires more tools but yields the most durable result.
1. Remove the old trim or sill
- Carefully pry off the damaged trim, being mindful not to damage adjacent siding or interior finishes.
- If replacing a sill, you may need to remove interior stops and part of the interior trim;
2. Check the underlying structure
- Inspect the window buck, framing, and sheathing for rot. Replace any compromised framing members.
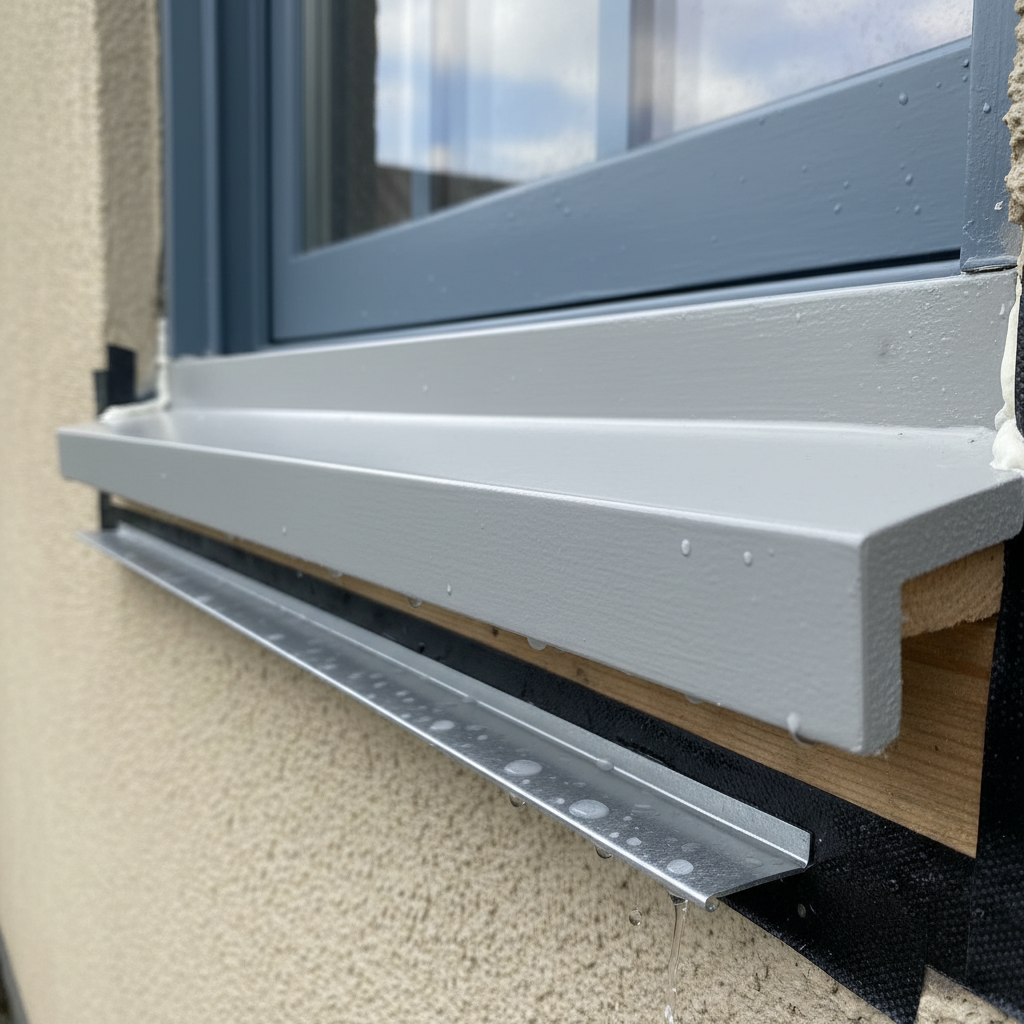
3. Install new sill or trim
- Cut new wood to fit; use rot-resistant wood species (cedar, redwood) or primed exterior-grade engineered wood or PVC trim.
- Pre-prime end grains and fastener holes. Fasten with corrosion-resistant screws or stainless steel nails.
- Shape the sill with a slight slope and drip edge to encourage water to run away from the house.
4. Flashing and sealing
- Install self-adhesive flashing tape under the new sill and up the sides. Integrate with housewrap or building paper for a weather-resistant barrier.
- Seal all joints with exterior caulk and finish with primer and paint.
Materials and cost estimates
Costs vary by region, material choice, and whether you hire a pro.
- DIY small repairs with epoxy and caulk: $30–$150 in materials.
- Replacing trim or sill with engineered wood or PVC: $75–$300 in materials per window, depending on complexity.
- Professional repair for moderate rot: $200–$700 per window.
- Window replacement or major structural repair: $800–$3,000+ per window depending on size and scope.
These are ballpark figures—get local contractor quotes for accurate pricing.
Preventing future wood rot around windows
Maintenance is the most cost-effective strategy. Follow these preventative measures:
- Inspect windows yearly for failing paint, cracked caulk, and gaps.
- Re-caulk seams and replace old caulk every 5–10 years depending on climate and product.
- Keep exterior paint maintained—paint is your first defense against moisture.
- Ensure sills slope outward and have a proper drip edge; standing water is the biggest enemy.
- Check flashing after storms or high winds and repair any damage promptly.
- Trim landscaping so plants don’t hold moisture against siding and windows.
- Improve roof and gutter drainage so water doesn’t overflow onto window areas.
Health and safety considerations
Rotting wood can harbor mold and attract insects. When working on older homes, take precautions:
- Wear protective gear: gloves, N95 mask, and eye protection.
- If you suspect widespread mold or black mold, consult a mold remediation specialist.
- If the home was built before 1978 and you’ll disturb painted surfaces, follow lead-safe work practices—consider hiring a certified contractor.
When to hire a professional
Call a licensed contractor when:
- Rot extends into the structural framing or interior studs.
- Large sections of siding, sill, or window buck need replacement.
- Window operation is affected or you suspect compromised flashing behind siding.
- Lead paint, asbestos, or extensive mold remediation is required.
- You prefer a warranty or faster, guaranteed results.
Choosing materials that resist future rot
Materials matter—here are durable choices:
- Rot-resistant wood: cedar, redwood, or pressure-treated lumber for sills (use sparingly and seal end grains).
- Engineered trim: fiber cement or primed engineered wood holds up well and is paint-ready.
- Cellular PVC or composite trim: very low maintenance and resists moisture but may have a different expansion profile—use compatible fasteners and adhesives.
- High-quality exterior caulk and paint: silicone-modified or polyurethane caulks offer strong adhesion and flexibility.
Maintenance checklist: season-by-season
- Spring: Inspect caulk and paint, check flashing, clear gutters and downspouts.
- Summer: Trim plants away from windows, touch up paint chips.
- Fall: Clean gutters, check roof valleys above windows, re-caulk before winter freeze-thaw cycles.
- Winter: Monitor for ice dams and interior condensation; address humidity levels inside.
Related resources
For additional detailed guidance on window repair techniques and finish choices, see this practical homeowner resource: Better Homes & Gardens: How to Repair Windows.
Frequently Asked Questions
How deep does rot need to be before I must replace the sill?
If rot extends into framing members that support the window or threatens the window’s structural seat—often seen as sagging, misaligned operation, or large soft areas—replacement is usually best. Small localized cavities can often be filled with epoxy after consolidating healthy wood.
Can I just cover rotted trim with new trim?
No. Covering rotted wood traps moisture and allows the rot to continue underneath. Always remove all soft wood to sound wood before covering or installing new trim.
How long will an epoxy repair last?
When done correctly with proper consolidation, priming, and paint, epoxy repairs can last many years. Longevity depends largely on addressing the moisture source and ensuring good drainage and flashing.
Is flashing tape necessary when I replace a sill?
Yes. Proper flashing is essential to divert water away from the window opening. Self-adhesive flashing tape integrated with the housewrap or building paper provides a continuous weather barrier that protects against future leaks.
Does replacing windows eliminate the risk of rot?
New windows help but won’t eliminate rot risk if the surrounding flashing, siding, and roof drainage are not installed or maintained correctly. Proper installation and ongoing maintenance are key to preventing future rot.
Final checklist before you finish
- All soft wood removed, remaining wood treated.
- Flashing and drip edges installed or repaired.
- Gaps sealed with appropriate backer rod and exterior caulk.
- Trim and sill primed and painted, including end grains.
- Gutters and roof above the window route water away from the wall plane.
Addressing rotting wood around exterior windows promptly preserves the appearance, energy efficiency, and structural integrity of your home. Whether you DIY a small repair or hire a professional for larger damage, the keys are finding the moisture source, removing compromised wood, and sealing and flashing properly to prevent repeat problems.
Interested in improving your overall living space while you’re tackling repairs? For ideas on comfortable, modern interiors that complement well-maintained exteriors, explore How to Design A Comfortable Modern Living Space.


