How to Fix a Cracked Rubber Boot Around Vent Pipe: Complete DIY Repair & Replacement Guide
If you’ve noticed water stains on your ceiling or a damp attic, the likely culprit could be a cracked rubber boot around vent pipe on your roof. This simple yet essential piece of roofing material seals the gap where plumbing or ventilation pipes penetrate the roof; when it fails, leaks, rot, and mold can quickly follow. In this guide you’ll find how to inspect, temporarily patch, and permanently replace a damaged vent boot—plus safety tips, tools, and cost estimates to help you decide whether to DIY or call a pro.
Why a cracked rubber boot around vent pipe matters
The vent boot (also called a vent pipe boot or roof boot) is the flexible rubber collar that fits around pipes and sits over flashing to prevent water entry. When it cracks or degrades—often from UV exposure, temperature cycling, or age—rainwater can run down the pipe and seep under shingles or flashing. Consequences include:

- Ceiling stains and interior water damage
- Rot to roof decking and framing
- Mold and mildew growth in attics and walls
- Increased heating and cooling losses if insulation gets wet
How to inspect a vent boot for damage
Regular roof checks help catch small problems before they escalate. To inspect a vent boot:
- Look for visible cracks, splits, or missing rubber at the base of the boot.
- Check the flashing for rust, bent edges, or separation from shingles.
- From inside the attic, scan for light coming through around the pipe or damp insulation.
- After rain, look for active drips or wet spots directly below the vent.
Use binoculars to check higher roofs if you’re not comfortable climbing. If the rubber looks dry, brittle, or shrunken, it’s time for repair or replacement.
Temporary fixes: quick measures to stop leaks
If a sudden leak appears or you can’t replace the boot immediately, temporary repairs can reduce damage until a permanent solution is implemented. Temporary options include:
- Roofing-grade silicone caulk: Apply a generous bead where the rubber meets the flashing and where the flashing meets shingles. Use only high-quality, exterior-grade silicone designed for roofing.
- Roofing tape (butyl-based): Clean the area, then press self-adhesive butyl tape over the crack to create a watertight patch.
- Rubber patch: Larger cracks can be covered with a small piece of EPDM or rubber secured with roofing adhesive.
Note: Temporary patches are not long-term fixes. They buy time and prevent interior damage, but the boot should be replaced as soon as practical.
When to replace the vent boot instead of repairing
Replace the vent boot if:
- The rubber is split in multiple places or has large gaps.
- The boot has shrunk and no longer fits the pipe snugly.
- Flashing is corroded, bent, or has separated from the roof deck.
- Previous patches have failed or water damage has advanced.
Choosing the right replacement vent boot
Replacement boots come in several types and sizes:
- EPDM rubber boots: Most common, flexible, and cost-effective for asphalt shingle roofs.
- Metal boots (aluminum, galvanized steel, or lead): Used for higher-temperature or specialized roofs; more durable but more expensive.
- Universal boots vs. size-specific: Universal boots fit a range of pipe diameters; size-specific boots offer a tighter fit.
Match the boot to your pipe diameter (commonly 1 1/2″ to 4″ for plumbing vents) and choose a boot designed for your roof type and pitch. For long-term durability consider EPDM with UV-stabilizers or a metal boot for steep or high-traffic roofs.
Tools and materials checklist
- Replacement vent boot (correct size and material)
- Roofing nails or corrosion-resistant nails
- Roofing cement or silicone sealant rated for exterior roofing
- Roofing tape (butyl) for extra seal
- Utility knife and tin snips (for metal flashing)
- Pry bar or flat bar (to lift shingles)
- Caulking gun
- Work gloves, knee pads, safety harness (for steep roofs)
- Ladder and stable roof access
Step-by-step: How to replace a cracked rubber boot around vent pipe
These instructions apply mainly to asphalt shingle roofs. If you have a metal roof, see the dedicated section below.
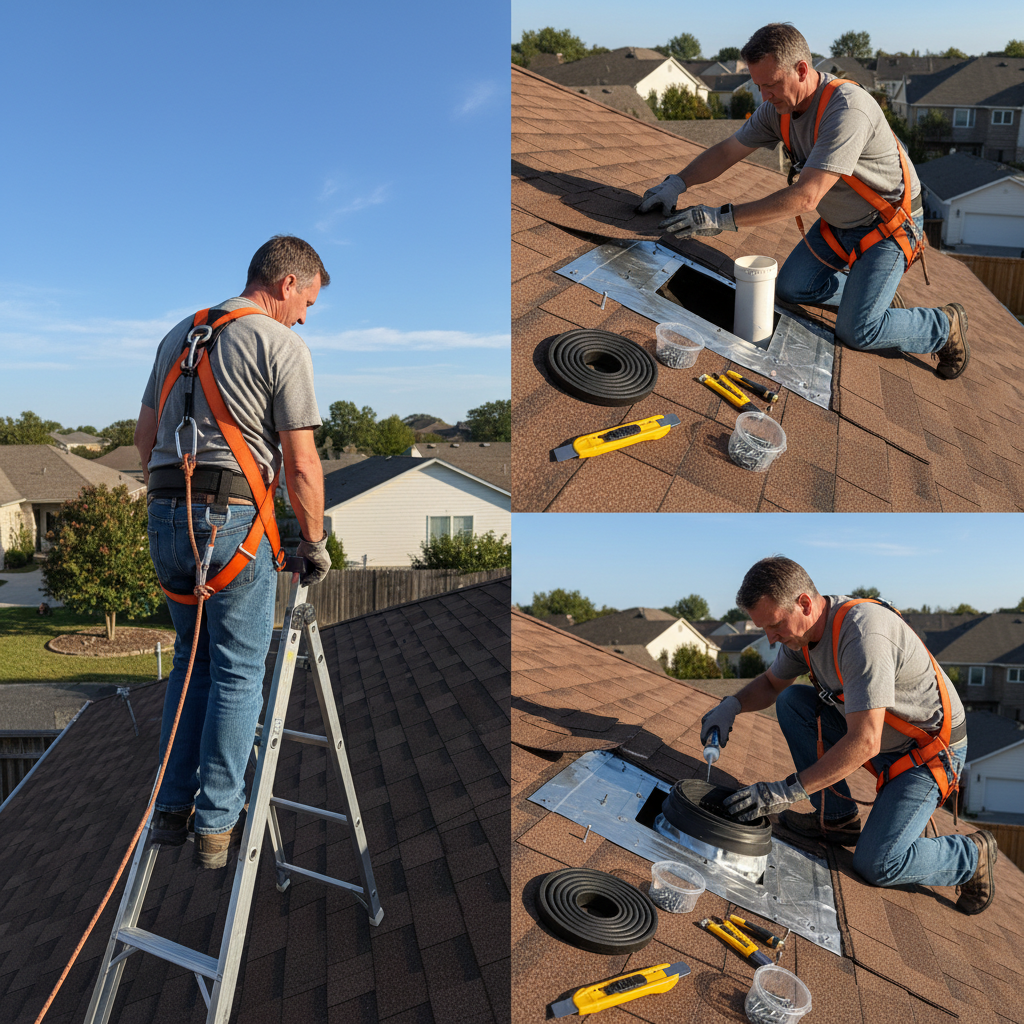
1. Safety first
- Only work on a dry day with low wind and adequate daylight.
- Use a sturdy ladder and have a partner hold it if possible.
- Wear slip-resistant shoes and consider a safety harness on steep roofs.
2. Remove damaged boot and flashing
- Use a utility knife to cut the old boot around the pipe at the top and carefully remove nails with a pry bar.
- Gently lift shingles above the boot—only lift enough to slide a new flashing under the shingles so the upper edge remains under the next course.
- Remove the old flashing or cut it away if nailed to the deck.
3. Prepare the roof and pipe
- Clear old roofing cement and debris. Inspect roof deck for rot—repair any soft wood before proceeding.
- Slide the new boot over the pipe. If the boot is too tight, trim the top section (follow manufacturer instructions).
4. Install the new flashing/boot
- Slide the top flange of the flashing under the shingles above, and lay the lower flange over the shingles below.
- Ensure the boot’s base sits flat and that the top flange is tucked securely under the upper shingles to direct water over the flashing.
- Nail the flashing at the top flange into the roof deck—but avoid nailing under the overlapping shingles where water runs. Use corrosion-resistant roofing nails.
5. Seal and secure
- Apply a bead of roofing-grade silicone or roofing cement along the edges of the flashing where it meets the shingle and pipe.
- Press roofing tape around the base of the boot where it meets the flashing for extra protection.
- Replace any lifted shingles and press them back into place. Seal the nail heads with roofing cement if exposed.
6. Final check
- Make sure the boot fits snugly around the pipe without gaps.
- Confirm the flashing lays flat and the shingles are not buckled.
- After a rain, check the attic for any signs of continued leakage.
Special notes for metal roofs
Metal roofs require different flashing and sometimes custom-fabricated boots. Metal roof boots are often formed to match the rib profile. Replacement steps usually involve:
- Removing and replacing a seam-matched boot or using a metal boot adapter.
- Sealing with manufacturer-approved butyl tape and high-quality metal roof sealant.
- Hiring a roofer experienced with metal profiles if the boot must be formed to match ribs.
Cost and time estimates
Costs vary by boot type, roof pitch, and local labor rates:
- DIY replacement materials: $10–$60 for a replacement boot and sealant (EPDM boots are inexpensive).
- Professional replacement: $150–$400 per boot on average, depending on access and roof complexity.
- Time: A comfortable DIYer can replace a boot in 45–90 minutes. Professionals typically complete the job faster.
When to hire a professional
Consider hiring a pro if:
- Your roof pitch is steep or unsafe to climb.
- There is extensive water damage, rotten decking, or mold.
- Multiple vent boots are failing or you prefer a warranty-backed repair.
- Your roof is metal and requires a specialized flashing match.
Qualified roofers can inspect the surrounding area, correct underlying issues, and install a long-lasting solution with proper warranties.
Preventive maintenance to extend boot life
- Inspect all roof penetrations yearly and after major storms.
- Trim overhanging branches that increase debris and shade (shade can promote moisture retention).
- Keep gutters clear to prevent water back-up against flashing.
- Apply UV-protectant products where recommended, and replace boots every 10–15 years or at the first signs of cracking.
Common mistakes to avoid
- Using generic caulk designed for indoor use—always use roofing-grade sealants.
- Nailing the top flange in a location that will be directly exposed to runoff (this invites leaks).
- Ignoring rotten sheathing under the boot—patching over rot leads to recurring failures.
- Rushing the installation or working in unsafe roof conditions.
Frequently asked questions (FAQs)
Can I patch a cracked vent boot, or must it be replaced?
Small cracks can be temporarily patched with butyl tape or roofing-grade silicone. However, for long-term reliability you should replace a boot that is brittle, heavily cracked, or shrunken.
How long do rubber vent boots last?
Typical EPDM rubber boots last 10–20 years depending on climate, sun exposure, and quality. Metal boots can last much longer but are more expensive upfront.
Will a cracked vent boot cause a leak immediately?
Not always. A crack may allow water in only during heavy rain or wind-driven storms, so leaks can be intermittent. However, even a small leak can cause significant hidden damage over time.
Can I replace the vent boot from inside the attic?
No. The boot and flashing are installed on the roof surface; interior access cannot provide a proper external water-tight seal.
What’s the difference between a boot and flashing?
The boot is the flexible collar that fits around the pipe. Flashing is the flat metal or molded plate beneath shingles that directs water away from the penetration. Together they create the waterproof seal.
Further reading and trusted resources
For general roof maintenance and home-safety tips consult reputable home-lifestyle resources. Better Homes & Gardens offers useful articles on roof care and repairs that pair well with this guide: Better Homes & Gardens roof repair tips.
Final checklist before you finish the job
- Confirm the new boot fits snugly around the pipe and the top flange is properly tucked under the shingles.
- Ensure all nails are sealed and no nail heads are exposed to direct runoff.
- Clean up tools and debris from the roof to avoid future damage.
- Monitor the area after the next rain to verify the repair.
Whether you opt for a quick emergency patch or a full replacement, addressing a cracked rubber boot around vent pipe promptly protects your home from costly water damage. If you’re unsure or the roof damage is extensive, schedule a professional inspection to protect structural integrity and indoor air quality.
Explore strategies for comfortable, well-designed living spaces and how roof and ventilation choices fit into broader home design by visiting How to Design A Comfortable Modern Living Space.


