Discovering moisture under bathtub can be alarming — it’s one of those hidden home problems that quietly damages structure, fuels mold growth, and raises repair bills if ignored. This practical guide walks you through how to identify the source, perform safe temporary fixes, plan long-term repairs, and prevent moisture under the tub from returning.
Why moisture under bathtub matters
Moisture that accumulates beneath a bathtub affects more than just the visible floor. It can rot the subfloor, compromise joists, reduce indoor air quality by encouraging mold and mildew, and damage finishes in adjacent rooms. Because much of the damage occurs out of sight, early detection and decisive action are crucial to avoid extensive repairs and health risks.
Common causes of moisture under bathtub
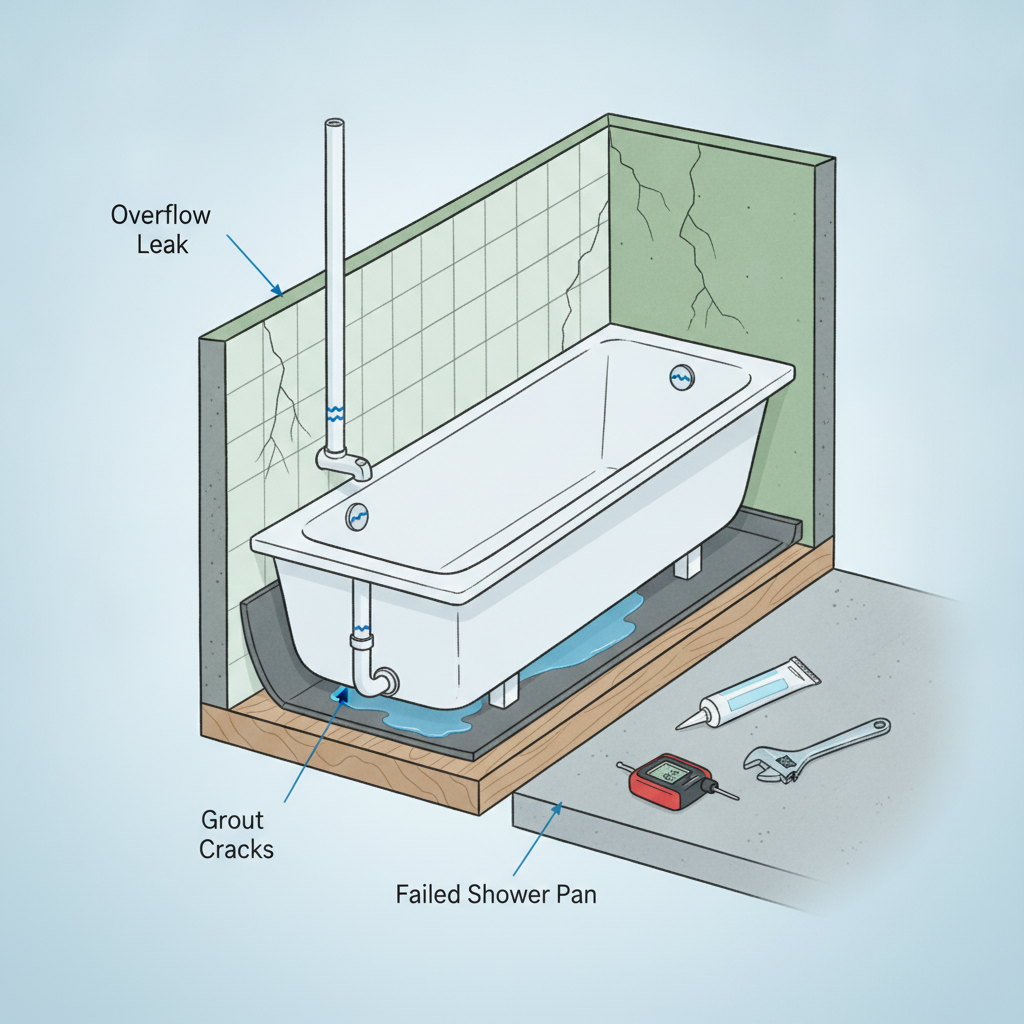
- Plumbing leaks: Loose or corroded drain connections, leaky overflow assemblies, or hidden supply line failures can drip water directly into the subfloor.
- Failed or missing shower pan: Older or damaged shower pans and liners allow water to seep past the tub onto the subfloor.
- Damaged grout or tile: Cracked grout and tiles let surface water penetrate and run down to the tub base and subfloor.
- Faulty caulk or sealant: Gaps at the tub/wall or tub/deck joints let water travel into concealed areas.
- Condensation: Poor ventilation can cause condensation to collect under or around the tub enclosure over time.
- Overflow or splashing: Repeated overflows or excessive splashing near the tub edge can erode barriers and saturate the framing below.
How to tell if there is moisture under the bathtub
Begin with visual and sensory checks, then use tools for confirmation.
Signs to look and smell for
- Musty or mildew odors from the bathroom or adjacent rooms.
- Stained or softened flooring near the tub (warping, cupping, discoloration).
- Peeling paint or bubbling on lower walls surrounding the tub.
- Visible mold or dark spots on trim, baseboards, or ceiling below (if multi-story).
- Persistent dampness even after cleaning and drying the surface.
Tools and tests you can use
- Moisture meter: A handheld moisture meter reads relative moisture in wood and flooring—useful for spotting high-moisture zones beneath the tub.
- Infrared camera or non-contact thermometer: These can reveal cold, wet spots behind walls or under floors.
- Paper towel or tissue test: Press a dry paper towel in suspicious areas after a bath to detect hidden dampness.
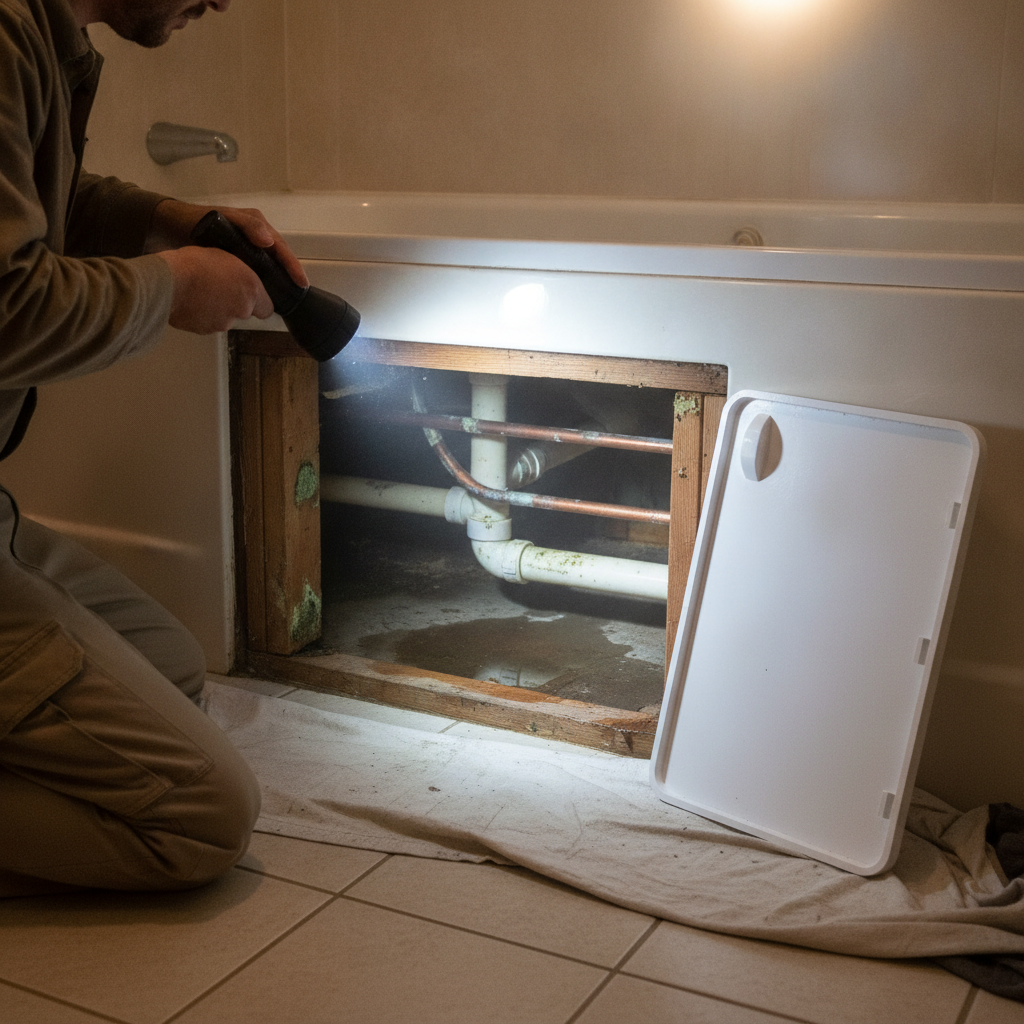
- Remove access panels: If your tub has an access panel behind it (common in alcove tubs), inspect the cavity for leaks, drips, and mold.
Step-by-step inspection you can do yourself
Follow these safe steps before calling a professional. If you’re uncomfortable with any step, stop and consult a plumber or restoration specialist.
- Dry the area: Thoroughly dry the tub surround and floor with towels and a fan; note where moisture returns first after a shower.
- Check the caulk and grout: Look for gaps, cracking, or mold in seams and tile joints.
- Inspect the drain and overflow: Run a small flow of water and watch the drain flange and overflow plate for leaks.
- Examine supply lines: Open the lower access panel (if present) and observe supply shutoff valves and flexible hoses for corrosion or dripping.
- Use a moisture meter: Scan areas around the tub and flooring to find elevated moisture readings (compare to unaffected areas).
- Look behind walls: If you see stains on the wall, consider a small inspection hole or use a borescope camera to inspect the cavity.
Temporary fixes you can try
Temporary measures buy time and reduce damage while you plan permanent repairs. They are not long-term solutions.
- Re-caulk seams: Remove failed caulk around the tub and apply a high-quality bathroom-grade silicone caulk, allowing full cure time before use.
- Tighten drain fittings: Hand-tighten the drain flange and overflow plate. If rubber gaskets look compromised, replace them.
- Turn off water supply to the tub: If a supply line is actively leaking, shut the valve until a plumber can repair it.
- Improve ventilation: Run exhaust fans, add a dehumidifier, and air out the room to lower humidity and slow mold growth.
- Position catch pans: If you have an access point, place a small tray or pan to collect drips temporarily and monitor volume.
Permanent repairs and when each is appropriate
Choose the repair based on the source of moisture. Below are typical repair paths with general guidance.
Plumbing repair or replacement
If the leak originates from a drain, overflow, or supply line, hire a licensed plumber to repair or replace corroded parts, reseal the drain, or replace flex lines. Plumbing repairs are usually the fastest and most cost-effective permanent fixes.
Re-caulk and regrout
For leaks caused by failed joints and grout, removing old grout, regrouting tiles, and re-caulking tub seams can stop water intrusion. This is a good fix when tile and mortar are intact behind the surface.
Replace the shower pan or liner
When the shower or tub pan is compromised, a new pan or an engineered pan liner system might be required. For older liners under tile, this can be a major job and often requires tile removal.
Subfloor repair and structural work
If moisture led to rotted subfloor or joists, the damaged wood must be removed and replaced. This may also require mold remediation and reinstalling a suitable floor underlayment.
Full tub surround replacement
In severe cases where the tub, surround, and substrate are heavily damaged, replacing the entire tub or shower enclosure and properly waterproofing the new installation is the safest long-term approach.
Estimated costs and timelines
Costs vary widely by region and scope. Below are approximate ranges for common repairs:
- Re-caulking and minor grout repair: $50–$300; 1 day.
- Plumbing repairs (drain/supply replacement): $150–$600; 1 day to 2 days.
- Shower pan replacement or tile rebuild: $800–$4,000+; 2–7 days depending on drying times.
- Subfloor replacement and mold remediation: $1,000–$6,000+; several days to weeks depending on severity.
- Full tub replacement: $1,200–$8,000+ depending on materials and labor; 2–5 days.
These are ballpark figures. Always get multiple estimates from licensed contractors, and ask for itemized bids.
Health risks: mold, mildew, and indoor air quality
Moisture under a bathtub creates an environment where mold can thrive. Mold exposure affects sensitive people, causing allergies, respiratory irritation, and other health issues. Visible mold behind walls or a persistent musty odor are signals that professional remediation might be needed. For general mold prevention and cleaning guidance, reputable home resources can be helpful; however, extensive contamination should be handled by certified restoration professionals.
Prevention: stop moisture before it starts
Once fixed, follow these maintenance habits to prevent moisture under the tub:
- Maintain good ventilation: Use an exhaust fan that vents to the exterior and run it during and after showers.
- Inspect and re-caulk annually: Check tub seams, corners, and grout for wear and reseal as needed.
- Upgrade to water-resistant materials: Use cement backer board and waterproof membranes when remodeling.
- Install an access panel: An access panel behind the tub enables quick inspections and earlier detection of leaks.
- Monitor moisture levels: Periodically use a moisture meter in suspect areas to catch problems early.
- Manage bathroom humidity: Use a dehumidifier in high-humidity climates or during prolonged wet seasons.
For practical tips on moisture control and mold prevention in bathrooms, established home resources provide helpful cleaning and maintenance guidelines: Better Homes & Gardens.
When to call a professional
Contact a licensed professional if you encounter any of the following:
- Active, persistent leaks you cannot isolate or stop.
- Visible mold growth larger than a small patch (roughly 10 square feet).
- Soft, sagging, or rotten flooring near the tub.
- Leaks that involve structural elements (floor joists, sill plates).
- Plumbing issues beyond simple tightening or gasket replacement.
Plumbers, licensed bathroom remodelers, and certified mold remediation companies each have specific expertise. If both plumbing and structural damage exist, coordinate repairs so moisture sources are fixed before structural remediation begins.
DIY vs. professional repair: a quick decision guide
- DIY candidate: Minor caulk/grout repairs, tightening visible fittings, improving ventilation.
- Call a pro: Hidden leaks, large mold infestations, structural wood rot, complex drain or overflow repairs, or when permits and building-code compliance are required.
Checklist: what to document before repairs
Capture these details to help contractors estimate repair scope and to support insurance claims:
- Photos of stains, mold, warped flooring, and the plumbing area.
- Dates and times when moisture was first noticed and any attempts to stop it.
- Names of any tradespeople contacted and a summary of their findings.
- Receipts for temporary fixes (fans, dehumidifiers, materials).
FAQs: quick answers about moisture under bathtub
How serious is moisture under the tub?
It can be serious. Even small leaks can cause significant structural and mold-related problems over months to years. Early detection prevents escalation.
Can I just dry the area and ignore the cause?
No. Drying conceals symptoms but doesn’t stop water intrusion. The source must be identified and repaired to prevent recurring damage.
Is mold removal necessary if I see only a little mold?
Small surface mold on non-porous surfaces can often be cleaned safely using proper cleaners and PPE. However, mold on porous materials or large infestations requires professional remediation.
How long can a leak under a bathtub go unnoticed?
Weeks to years. Hidden leaks behind walls and under tubs often go undetected until odors, visible stains, or structural changes appear.
Will insurance cover moisture damage under a bathtub?
Coverage depends on your policy and whether the damage is sudden (covered) or due to long-term neglect (often excluded). Document the issue and contact your insurer for specifics.
Final steps: plan repairs and protect your home
Moisture under bathtub is a fixable problem when caught early and addressed with the right mix of inspection, temporary containment, and permanent repair. Start with careful observation, use basic diagnostic tools, and don’t hesitate to bring in licensed plumbers or restoration pros for anything beyond minor maintenance.
If you’d like a clear plan for making your bathroom comfortable and resilient, consider exploring design and renovation ideas that prioritize waterproofing and ventilation. Learn more: How to Design A Comfortable Modern Living Space
Resources
General home and maintenance guidance: Better Homes & Gardens — bhg.com.
Need more help?
If you’re unsure what to do next, take photos and notes during your inspection and share them with a licensed plumber or a home improvement professional for a fast assessment and written estimate. Acting sooner limits damage and often lowers repair costs.