Floorboards lifting after water spill is a stressful sight for any homeowner—those raised seams, cupped planks, or buckled panels signal moisture has done more than just sit on the surface. The way you respond in the first 24–72 hours affects whether you can save your floor with a few DIY steps or end up paying for costly repairs. This guide walks you through immediate actions, drying and repair techniques for different floor types, when to call a pro, and how to prevent a repeat.
Why floorboards lift after a water spill
Wood and many manufactured flooring products expand when they absorb moisture. Floorboards can lift, cup (edges higher than the center), crown (center higher than the edges), or completely buckle if the moisture is sufficient and the boards can’t expand uniformly. This happens because:
- Wood absorbs water and swells across the grain.
- Installation gaps or acclimation were insufficient, leaving no room for controlled expansion.
- Subfloor or underlayment trapped moisture, allowing longer exposure than surface cleaning alone.
- Prolonged humidity or hidden leaks (under appliances, plumbing lines, or exterior doors) continue to wet the boards.
Immediate actions: first 24–48 hours
Time is critical. Quick response can reduce damage and the chance of mold growth.
- Stop the source. If the spill came from a broken pipe, shut off the water supply or the valve feeding that fixture.
- Remove standing water. Use towels, a wet/dry vacuum, or a mop to extract as much water as possible immediately.
- Protect unaffected areas. Create a dry perimeter with thick towels or rugs and move furniture off wet areas to prevent staining and additional pressure.
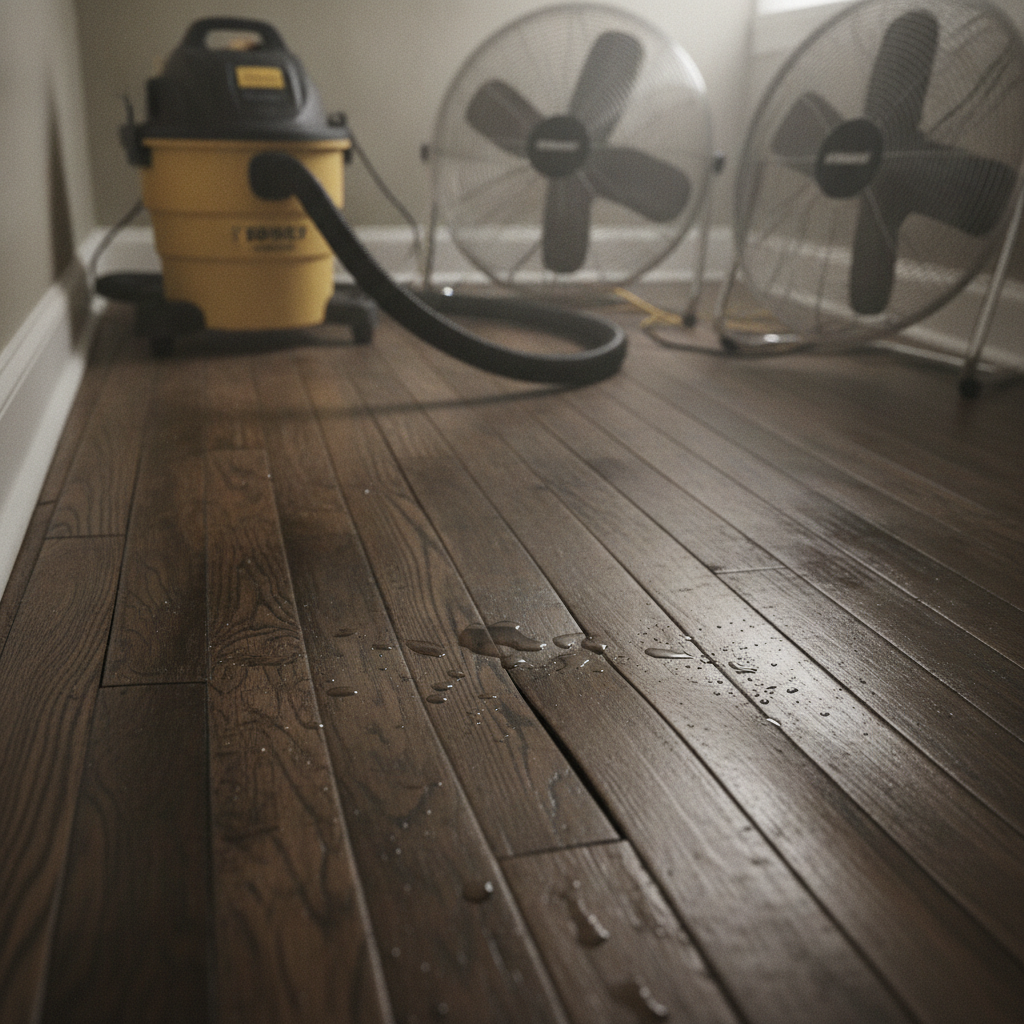
- Increase airflow. Open windows and doors and turn on fans. If you have a dehumidifier, place it in the affected room and set to a dry setting. This reduces moisture in the air and helps floorboards release water.
- Remove heat sources that could trap moisture. Avoid using high heat directly on wet wood (like hairdryers) that can cause uneven drying and further damage.
How long does it take for floorboards to dry?
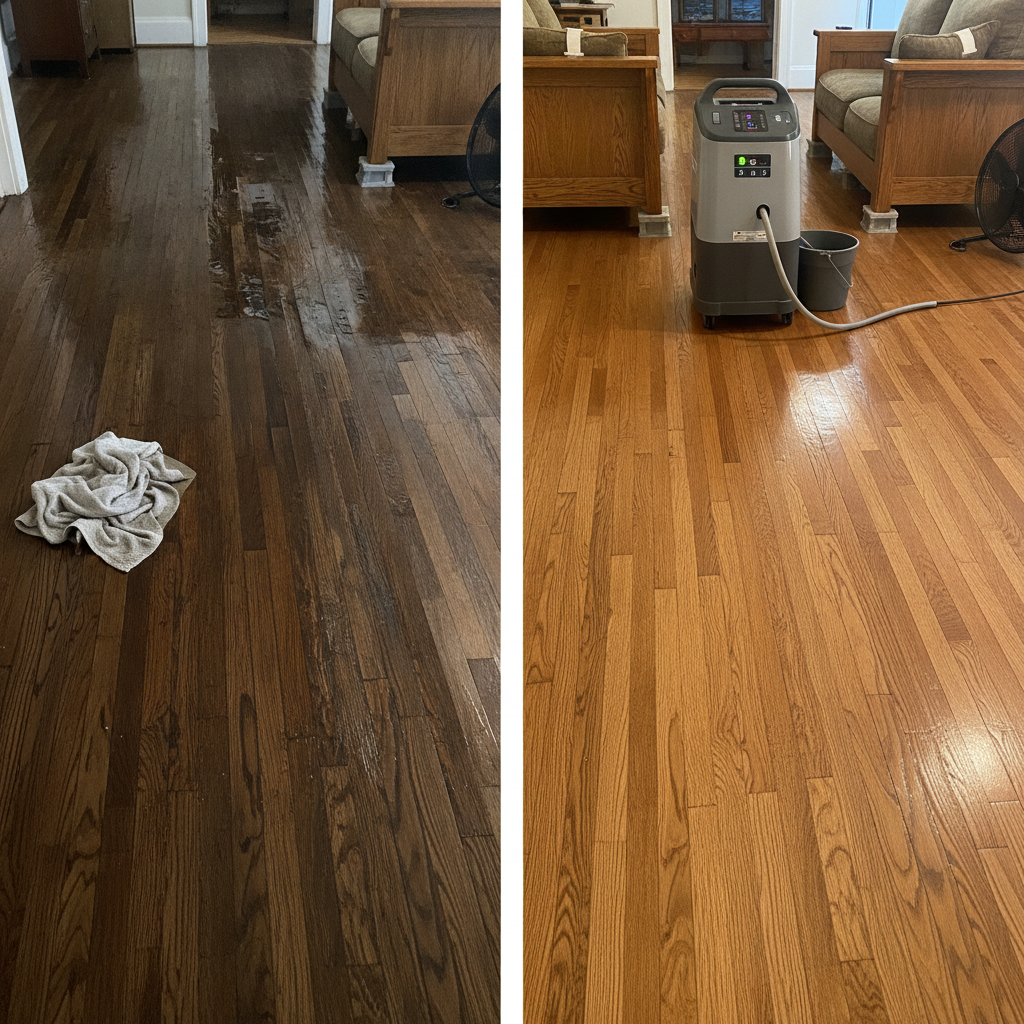
Drying time depends on floor type, depth of water exposure, indoor humidity, and ventilation. Superficial spills on sealed surfaces may dry in 1–3 days with fans and dehumidifiers. More serious absorption into wood or subfloor can take one to three weeks or longer. Measure moisture content with a moisture meter to confirm when levels are back to safe ranges (typically 6–9% for kiln-dried hardwood in many climates, though acceptable ranges vary).
Assessing the damage: signs to watch for
Careful inspection helps decide repair vs. replacement.
- Surface discoloration or staining that doesn’t wipe off — possible finish or tannin bleed.
- Lifting edges, visible gaps, or raised joints — signs of swelling or expansion.
- Cupping (edges higher than center) — often from moisture in the subfloor or from uneven drying.
- Crowning (center higher than edges) — usually caused by high humidity on the surface when wood dries from below while the top remains wet.
- Soft or spongy spots — possible rot or subfloor damage; often requires removal to inspect.
- Mold or mildew odor — indicates prolonged moisture and potential mold growth under or between boards.
Floor type-specific guidance
Solid hardwood
Solid hardwood is most vulnerable to cupping and buckling because it responds directly to moisture across the board thickness.
- Short-term spill with quick drying: often boards will flatten back out as moisture evaporates.
- Persistent cupping: may require sanding and refinish if the boards remain structurally sound.
- Severe buckling or rot: affected boards will need removal and replacement. Check the subfloor for damage.
Engineered hardwood
Engineered wood is more dimensionally stable due to its cross-layer construction, so it resists large-scale expansion. However, the top veneer can delaminate or lift if moisture penetrates the tongue-and-groove seams or the adhesive bond fails.
- Quick drying may save the floor; use fans and dehumidifiers.
- Delamination or visible lifting often requires board replacement for affected areas.
Laminate flooring
Laminate has a core that swells and can’t be sanded or refinished. If the core swells, replacement is the typical fix.
- Small, local spills can sometimes be cut out and replaced with matching planks.
- If many panels swell, consider full replacement and address moisture source.
Luxury vinyl plank (LVP) and vinyl sheet
Vinyl tends to resist water better than wood and laminate. However, prolonged pooling can still cause adhesive breakdown or mold growth beneath.
- Surface drying and thorough subfloor inspection are usually adequate.
- Replacement may be needed if adhesive fails or subfloor was damaged.
Drying techniques and tools
Use a combination of methods for best results.
- High-capacity fans: direct airflow along the surface and into cracks. Air movers are more effective than household fans.
- Dehumidifiers: pull moisture from the air, speeding drying and preventing reabsorption.
- Wet/dry vacuums: remove standing water quickly.
- Moisture meters: a pin-type or pinless meter checks wood moisture content to guide next steps.
- Desiccant dehumidification: for severe jobs, professionals sometimes use desiccant systems to drop humidity quickly.
Repair options: DIY vs. professional
Small, localized damage is often within reach for a confident DIYer. However, structural issues, mold, or large-area lifting are best left to professionals.
DIY repairs
- Dry the area thoroughly with fans and dehumidifiers.
- If boards only slightly lifted and are solid, let them dry; they may settle back. Weighing them down with flat boards and weights can help them lie flat again as they dry.
- Sanded cupped boards after moisture levels normalize, then refinish to restore appearance.
- For small damaged sections, remove and replace individual boards with matching material.
When to hire a pro
- Visible subfloor damage, rot, or soft spots.
- Widespread buckling or cupping affecting a large area.
- Suspected mold growth under floorboards or in adjoining walls.
- Historic or expensive floors where improper repair can reduce value.
Step-by-step: removing and replacing a few boards
If you decide to replace damaged boards yourself, follow these general steps. (Techniques vary by flooring type and manufacturer—consult product guides.)
- Safety first: protective eyewear, gloves, and dust mask.
- Remove baseboards or trim to give working room.
- Cut out the damaged boards carefully with a circular saw set to the plank depth, or lift boards using a pry bar at seams where practical.
- Inspect the subfloor and underlayment; repair any water damage or rot before installing new planks.
- Install replacement boards, ensuring a tight fit and correct adhesive or staple/nail pattern per flooring type.
- Sand and refinish if using solid hardwood to match the surrounding floor.
Preventing future incidents
Prevention is more cost-effective than repair. Protect your floors with these habits and upgrades:
- Use area rugs and mats near sinks, dishwashers, and entryways to block splashes and moisture tracking.
- Install water detection alarms near appliances, behind toilets, or at basement drains to catch leaks early.
- Maintain caulking around tubs, showers, and utility sinks—inspect annually.
- Allow proper acclimation for hardwood during installation—follow manufacturer guidelines for humidity and temperature.
- Consider moisture barriers or water-resistant flooring in high-risk rooms like kitchens and bathrooms.
Costs: what to expect
Costs vary widely by floor type, extent of damage, and whether you hire professionals. Typical ranges:
- Minor drying and sanding/refinish: $200–$1,000 depending on area and finish.
- Replacing a few boards: $150–$500 for materials and DIY labor; $500–$1,500 if a pro is hired.
- Large-area replacement and subfloor repair: $1,500–$5,000+ based on materials and labor.
Always get multiple quotes and check references for contractors. Photos and moisture readings help with accurate estimates.
Mold risk: when to worry
Visible mold or musty smells require immediate attention. Mold can grow under flooring within 24–48 hours if moisture persists and can spread to walls and insulation. If you detect mold or the spill involved contaminated water (sewer backup, floodwater), consult a remediation specialist before reinstalling flooring. For general mold guidance and safety considerations, reputable sources like Better Homes & Gardens provide helpful articles on identifying and dealing with water-damaged flooring: Better Homes & Gardens on repairing water-damaged floors.
Insurance and documentation
Document everything: photos of the spill, lifted floorboards, dates, and the steps you took to dry and repair. This can help with homeowner’s insurance claims if the damage falls under your policy. Note that gradual damage caused by long-term neglect is often excluded, while sudden, accidental spills or burst pipes are more likely to be covered. Contact your insurer promptly and provide documentation.
Tools and materials checklist
- Wet/dry vacuum
- High-capacity fans or air movers
- Dehumidifier (rental if needed)
- Moisture meter (pin or pinless)
- Replacement planks or matching flooring materials
- Safety gear: gloves, mask, goggles
- Basic carpentry tools: pry bar, circular saw or oscillating multi-tool, hammer, nails or flooring staples, wood glue or approved adhesive
When lifting will correct itself—and when it won’t
Lifting caused by a short, surface-level spill often reverts as boards dry—especially in solid hardwood with adequate acclimation space. However, if the wood was saturated, if the subfloor was wet, or if the spill persisted for hours, the risk of permanent deformation increases. Use a moisture meter to confirm stable readings before sanding or refinishing, and give the floor several days of consistent drying conditions before concluding the outcome.
Professional services to consider
- Floor drying and water damage restoration specialists
- Flooring contractors for replacement and refinishing
- Mold remediation experts for contamination concerns
- Plumbers to fix any ongoing leak sources
FAQ
Q: My floorboards are cupping after a small spill—will they flatten back out?
A: If the spill was contained and you acted quickly (extracted standing water, used fans/dehumidifiers), there’s a good chance cupped boards will return to normal as they dry. Monitor moisture content and avoid heavy sanding until readings stabilize to prevent over-sanding.
Q: Should I lift the boards to dry underneath?
A: Not immediately. Removing boards too soon can introduce additional risk and slow drying if it exposes wet subfloor. Start with surface drying and moisture monitoring. If moisture levels remain high after a few days, lifting select boards to dry and inspect the subfloor may be necessary—preferably performed by a professional.
Q: Can I refinish a floor that was water-damaged?
A: Yes, if the boards are structurally sound and moisture levels have normalized. Refinishing hides stains and restores the surface, but severely distorted or delaminated boards must be replaced first.
Q: How do I know if the subfloor is damaged?
A: Signs include sagging, spongy feeling underfoot, visible rot, or discoloration after removing boards. A pro can lift a few test planks to inspect and assess the extent of damage.
Q: Are engineered floors better for areas prone to spills?
A: Engineered flooring is more dimensionally stable than solid hardwood and tolerates moisture fluctuations better. For wet-prone areas, luxury vinyl, tile, or specially treated water-resistant flooring are the safest choices.
Final checklist: what to do now
- Stop the water source and remove standing water immediately.
- Increase airflow and use dehumidifiers for at least 48–72 hours.
- Document the damage and your mitigation steps with photos and moisture readings.
- Call a pro if you see mold, extensive buckling, or subfloor damage.
- After drying, decide between refinishing, replacing boards, or full replacement based on moisture readings and the floor’s condition.
If you’re dealing with floorboards lifting after water spill and want more design-focused ideas for replacing or updating your floors after repair, consider exploring resources on creating comfortable, modern living areas. For a helpful guide on designing a comfortable modern living space that pairs well with many flooring options, check How to Design A Comfortable Modern Living Space.
Note: For further practical guidance on repairing water-damaged flooring and best practices for restoration, see the detailed resource from Better Homes & Gardens: https://www.bhg.com/home-improvement/flooring/repair/how-to-repair-water-damaged-hardwood-floors/


