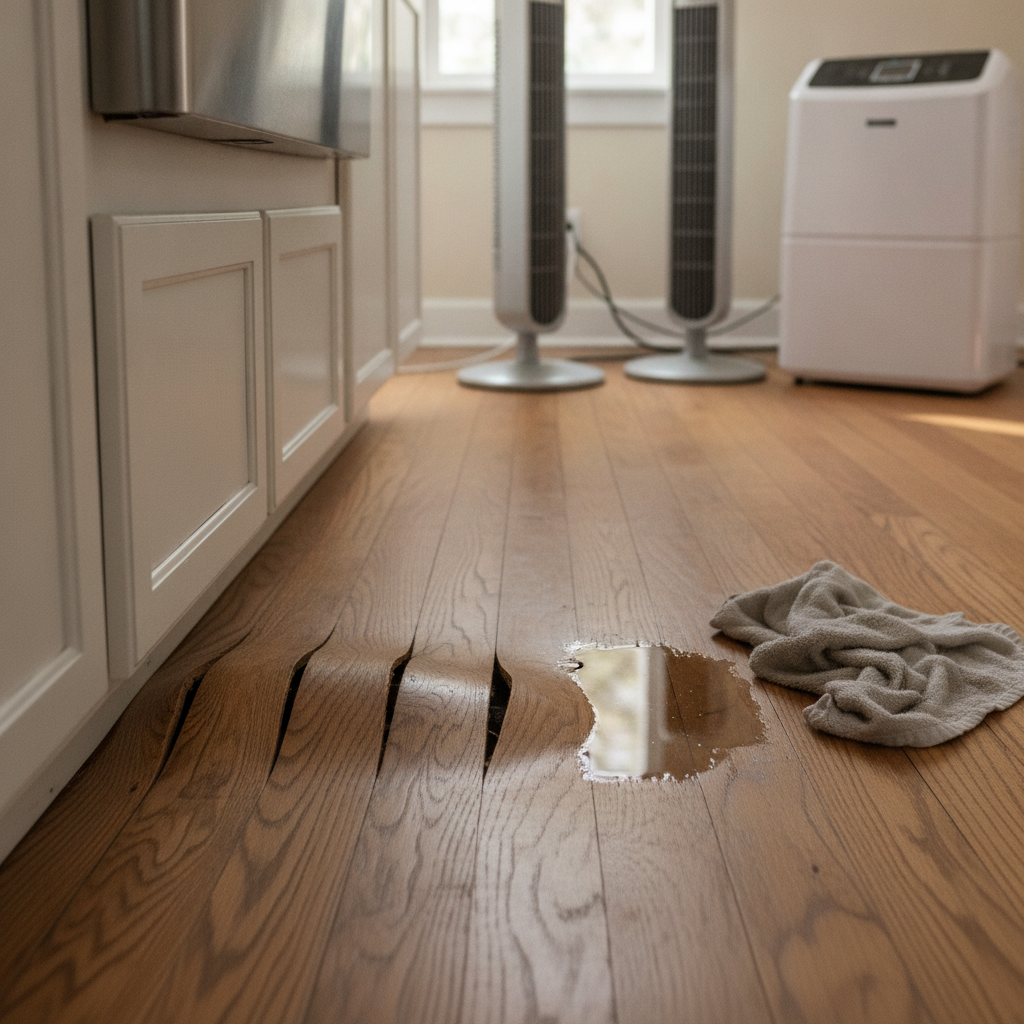
Seeing floorboards lifting after water spill can be alarming—those raised seams, cupped boards, or buckles signal that moisture has invaded the wood and swelling pressure is forcing boards out of place. Acting quickly can reduce long-term damage, stop mold, and often save you from a full floor replacement. This guide walks you through immediate steps, drying techniques, repair options, prevention, and when to call a professional.
Why floorboards lift after a water spill
Wood is hygroscopic: it naturally absorbs and releases moisture to reach equilibrium with the surrounding air. When a sudden water spill saturates boards, the wood fibers swell. In a confined installation (like tongue-and-groove floors nailed or glued down), this swelling has nowhere to go—so the board surface often lifts, buckles, or cups.
- Surface water soaks into boards and subfloor joints.
- Expansion is uneven—edges often swell more than centers—causing cupping.
- Prolonged moisture weakens adhesive or fasteners, leading to separation and lifting.
- Wood that sits wet for days is at risk of mold growth and permanent warping.
Immediate steps to take after a spill
How you respond in the first 24–48 hours makes the biggest difference. Follow these prioritized actions:
- Stop the source. If a pipe or appliance caused the spill, turn off the water or power to the appliance.
- Remove standing water right away using towels, a wet/dry vacuum, or a mop.
- Move furniture and rugs off the affected area so the floor can dry and you can inspect damage.
- Open windows and doors to improve air circulation, and run ceiling or box fans to speed surface drying.
- Use dehumidifiers in the room to reduce ambient humidity and pull moisture from the subfloor.
Drying and moisture removal: what works
Drying must reach both the floorboards and the subfloor. Surface drying alone can leave trapped moisture that leads to cupping or mold.
Tools and techniques
- Wet/dry vacuum: Best for immediate water extraction from joints and seams.
- Fans: High-velocity fans speed evaporation across the surface.
- Dehumidifiers: Critical for lowering ambient humidity and pulling moisture from deeper layers.
- Air movers + heaters: For faster drying in colder climates, controlled heating can help—but avoid extreme heat that could split wood.
- Remove boards if necessary: In severe cases, lifting boards to dry the subfloor and allow airflow may be required.
Note: Drying can take between 48 hours and several weeks depending on spill volume, wood type, and ventilation. Monitor moisture with a moisture meter when available; flooring is typically considered dry when wood moisture content matches ambient levels (often 6–9% for hardwoods, but this varies by climate).
Assessing the damage: minor vs. major
After drying begins, evaluate how much the boards have deformed.
- Minor cupping or slight separation: Often improves as the floor dries; small gaps may disappear.
- Surface discoloration or finish bubbling: Refinish may repair appearance if structural integrity is intact.
- Buckling (boards lifting high) or loose boards: More serious—may require repair or section replacement.
- Persistent moisture or mold: Professional remediation might be needed if mold or structural rot is present.
Repair options for lifting floorboards
Choose a repair method based on the damage level and your comfort with DIY repairs.
1. Small gaps and minor lifting
- Keep drying the floor fully; sometimes boards settle back once dry and humidity stabilizes.
- Use a soft mallet and wood block to gently tap boards back into place once dry—this works for boards lifted slightly along seams.
- Fill remaining small gaps with color-matched wood filler or grain filler and sand lightly before refinishing.
2. Cupped boards (edges higher than center)
- Often correct as the moisture equalizes. Accelerate by increasing airflow and using dehumidifiers.
- If cupping persists after proper drying, boards may need sanding and refinishing or replacement if the crown is permanent.
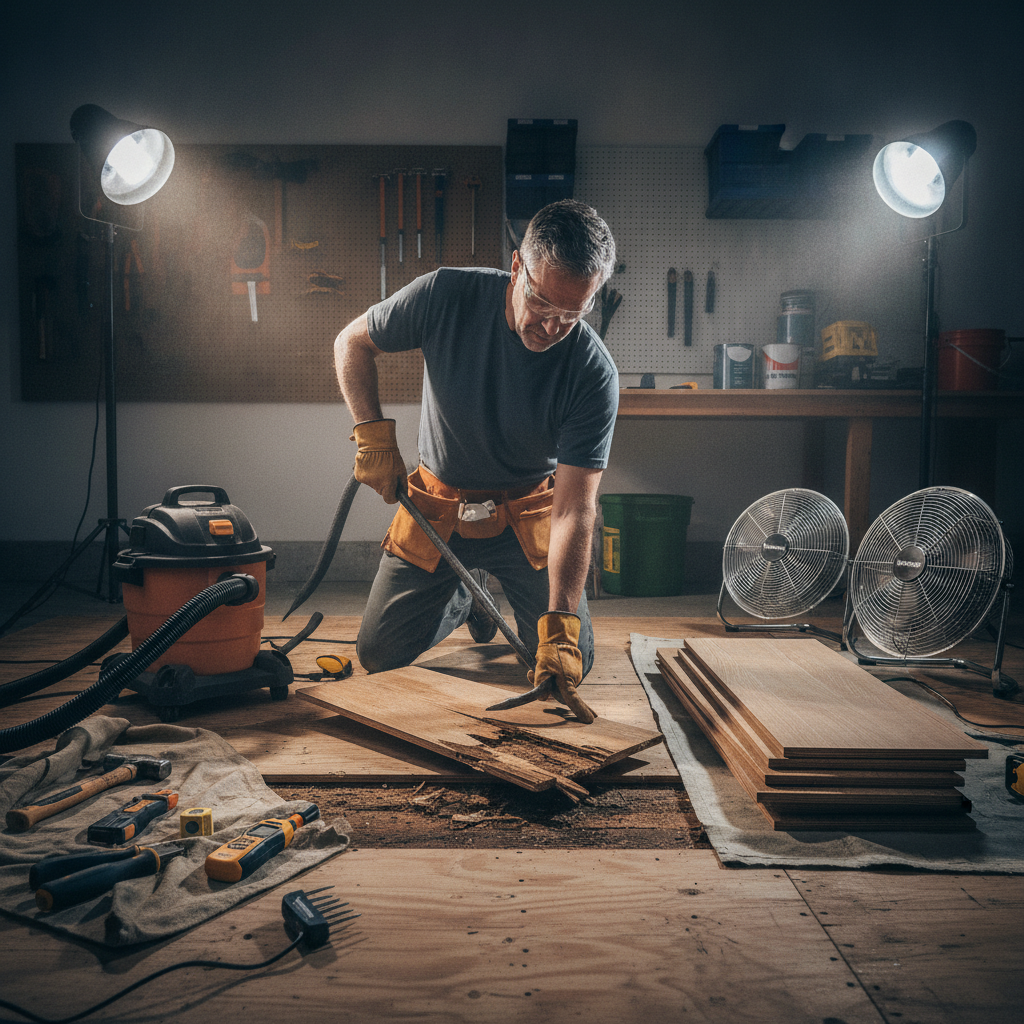
3. Buckled or severely lifted boards
- These typically need removal and reinstallation. Carefully remove the damaged boards and inspect the subfloor for rot or loose fasteners.
- Replace with new boards cut to size, acclimated to your home’s humidity before installation to prevent rebound buckling.
- If the installation is nail-down or glue-down, repairs may require professional tools and experience.
4. Engineered wood and laminate
- Floating floors (laminate or some engineered wood) are particularly sensitive to water at seams; they can swell and come apart.
- Replace affected planks; ensure underlayment and subfloor are dry before reinstalling.
When to call a professional
Consider hiring a pro if you notice any of the following:
- Widespread buckling across large areas.
- Persistent elevated moisture readings after 72 hours of drying efforts.
- Black mold, strong musty odors, or visible rot in the subfloor.
- Glue-down floors where adhesive failure is suspected or where removal risks damaging the subfloor.
- If you’re unsure about structural damage or insurance claims.
Mold risk and health considerations
Lingering moisture can lead to mold growth within 24–48 hours in warm, dark conditions. Mold spores can cause respiratory irritation, allergy symptoms, or worse for people with compromised immune systems.
- Wear N95 masks and gloves if you see mold; avoid disturbing moldy materials without proper protection.
- Small mold patches on the surface can sometimes be cleaned with a solution recommended for wood surfaces, but larger infestations require professional remediation.
Costs and typical timelines
Repair costs vary widely depending on floor type, area affected, and whether professional services are required. Rough estimates:
- Minor DIY fixes and refinishing: $100–$1,000 depending on materials and finish.
- Partial board replacement by a pro: $300–$1,500 for labor and materials for a small room.
- Full floor replacement: $1,500–$10,000+ depending on flooring choice (laminate vs. solid hardwood) and room size.
Typical timelines:
- Initial extraction + surface drying: 1–3 days.
- Complete drying of subfloor: a few days to several weeks.
- Repairs and refinishing: 1 day for small fixes to 1–2 weeks for major replacement and finishing.
Preventing future lifting and water damage
Good prevention reduces repair costs and stress. Adopt these habits and upgrades:
- Use waterproof mats near sinks, dishwashers, and entryways. But don’t keep mats pressed against the floor for long periods—moisture can collect beneath them.
- Fix plumbing leaks and appliance malfunctions promptly. Check hoses on dishwashers, refrigerators, and washing machines annually.
- Maintain consistent indoor humidity—use humidifiers in winter and dehumidifiers in humid seasons to keep wood at equilibrium with the environment.
- Apply a durable finish and reseal vulnerable areas like kitchen or bathroom thresholds.
- Consider water-resistant flooring in high-risk areas: tile, luxury vinyl plank (LVP), or waterproof engineered options.
Insurance: will homeowner’s insurance cover it?
Coverage depends on the cause. Sudden accidental water damage (like a burst pipe) is often covered, but gradual damage from long-term leaks or poor maintenance usually is not. Document damage with photos, save receipts for mitigation (drying equipment rental, professional drying), and contact your insurer promptly to start a claim.
Tip: Keep a record of appliance maintenance and any reports of leaks to support your claim if needed.
Tools and materials list for DIY repair
- Wet/dry vacuum
- High-velocity fans and/or air movers
- Commercial dehumidifier
- Moisture meter (for wood and subfloor)
- Pry bar, hammer, and crowbar for plank removal
- Replacement flooring planks and matching finish
- Wood filler, sandpaper, stain, and polyurethane
- Protective equipment: gloves, goggles, N95 mask
Natural fixes and what to avoid
Avoid aggressive heating (like high heat from torches or hair dryers set on very hot) that can crack or split the wood. Don’t replace boards before the subfloor is dry—trapping moisture leads to repeat problems.
Natural, low-impact drying methods—fans, dehumidifiers, and time—are safer. For small cupping, controlled sanding after thorough drying and finishing often restores the floor’s appearance.
Further reading and reliable resources
For practical tips on drying and preventing water damage to floors and fabrics, consult reputable home-living sources. Good Housekeeping has useful guides and product recommendations for home water damage cleanup and prevention; see their advice here: Good Housekeeping: How to handle water damage.
Frequently asked questions (FAQ)
How long will it take for lifted floorboards to flatten on their own?
It depends. With proper drying and climate control, minor lifting can settle within days to a couple of weeks. Severe buckling or boards that have lost structural integrity will not return to flat and need repair.
Can I continue using the room while drying the floor?
You can, but minimize traffic to avoid further damage. Remove furniture from wet areas and keep fans and dehumidifiers running to speed drying.
Is it safe to sand and refinish a water-stained floor right away?
No. Sanding and refinishing should only be done when wood is completely dry—sanding while wood is damp can produce poor results and lead to future problems.
Will refinishing remove stains from water spills?
Surface-level stains and finish damage can often be fixed by sanding and refinishing. Deep discoloration or areas with long-term water exposure may require board replacement or special staining techniques.
When is replacement the only option?
Replacement is necessary when boards are severely warped, buckled, rotten, or there’s mold and structural damage to the subfloor. Also replace when matching repairs would be too noticeable or impractical.
Final checklist after a water spill
- Stop the source and remove standing water immediately.
- Increase airflow and run dehumidifiers until moisture readings normalize.
- Inspect subfloor and boards for rot or mold; document damage for insurance.
- Decide on DIY repairs versus professional help based on extent of buckling and moisture content.
- Prevent future incidents with maintenance, waterproofing measures, and humidity control.
Dealing with floorboards lifting after water spill is stressful, but with fast action and the right drying strategy you can often avoid major replacements. When in doubt, document the damage, prioritize drying, and consult a flooring professional to preserve your home’s value and safety.
If you’d like more ideas on creating resilient, comfortable interiors and choosing the right flooring for wetter spaces, explore this guide: How to Design A Comfortable Modern Living Space


