Few things are as instantly frustrating as discovering a kitchen faucet leaking at the base. That persistent drip, drip, drip isn’t just annoying; it can lead to higher water bills, potential water damage to your countertops or cabinets, and even mold growth if left unchecked. While the thought of tackling a plumbing issue might seem daunting, many common causes of a leaky faucet base are surprisingly simple for a homeowner to diagnose and fix. This guide will walk you through the troubleshooting steps, essential tools, and detailed repair instructions to help you stop that unwelcome drip and restore peace and dryness to your kitchen.
Why Is Your Kitchen Faucet Leaking at the Base? Unraveling the Mystery
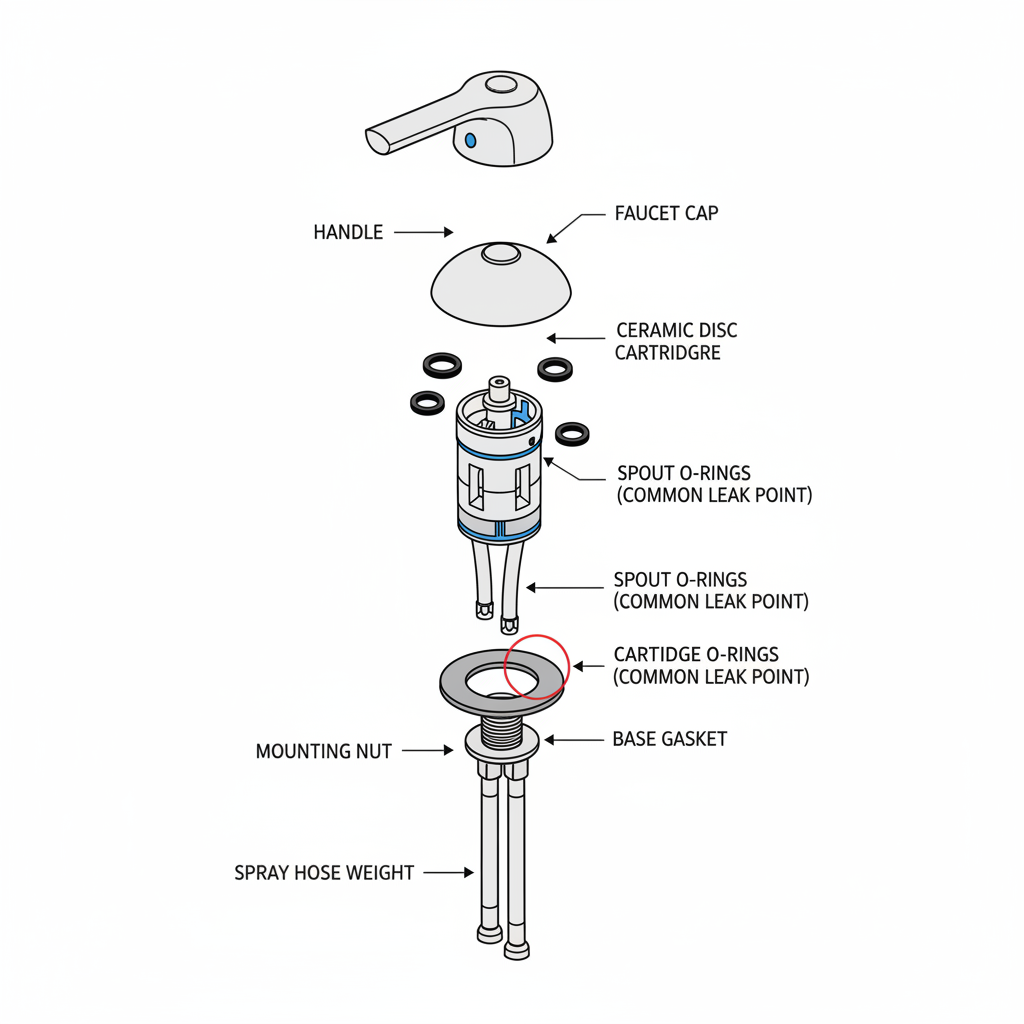
Before you can fix the leak, you need to understand its root cause. A leak at the base of your kitchen faucet typically indicates an issue with components located directly beneath the handle or within the faucet body itself, where it meets the sink deck. Here are the most common culprits:

Loose Mounting Nuts or Screws
Over time, the nuts or screws that secure your faucet to the sink or countertop can loosen due to daily use and vibrations. This creates a small gap between the faucet body and the sink surface, allowing water to seep out from underneath when the faucet is in use. This is often the easiest fix.
Worn O-Rings or Gaskets
Inside most faucets, especially single-handle models, there are rubber O-rings or gaskets that create a watertight seal between moving parts or between the faucet body and other components like the spout or cartridge. These rubber seals can harden, crack, or wear out over time, losing their ability to prevent water from escaping. When these seals are compromised at the base, water finds its way out.
Deteriorated Seals
Beyond O-rings, many faucets use various other types of seals, such as those within the faucet cartridge (especially in disc or ceramic cartridge faucets) or beneath the spout. If these seals degrade, water can travel down through the faucet body and emerge at the base.
Corroded Faucet Body or Components
Mineral buildup from hard water can lead to corrosion within the faucet’s internal components. This corrosion can eat away at metal parts, creating tiny pinholes or compromising the integrity of connections, allowing water to escape. While less common for new faucets, older faucets are more susceptible.
Improper Installation
If your faucet was recently installed and a leak appeared shortly after, it’s possible that a component was not tightened correctly, or a seal was improperly seated. This could include issues with the mounting hardware or the internal assembly.
Cracked Faucet Base
While rare, extreme pressure or accidental impact can cause a hairline crack in the metal or plastic base of the faucet itself. If this happens, water will inevitably leak through the crack. This usually necessitates a full faucet replacement.
Before You Begin: Safety First and Essential Tools
Before you grab your wrench and dive under the sink, it’s crucial to take a few preparatory steps to ensure your safety and streamline the repair process.
Turning Off the Water Supply
This is the most critical first step. You absolutely must shut off the water supply to your kitchen faucet to prevent a flood. Look under your sink for two shut-off valves, one for hot water and one for cold water. Turn both handles clockwise until they are tightly closed. After closing the valves, turn on your kitchen faucet to drain any residual water from the lines and confirm that the water supply has indeed been stopped.
Gathering Your Toolkit
Having the right tools on hand will make the job much smoother. Here’s a list of what you might need:
- Adjustable Wrench or Basin Wrench: Essential for tightening nuts under the sink. A basin wrench is particularly useful for reaching tight spaces.
- Screwdrivers: Phillips head and flathead, for removing handles or cover caps.
- Hex Keys (Allen Wrenches): Many modern faucets use small hex screws to secure handles or other components.
- Pliers: Standard or needle-nose pliers for gripping small parts.
- Flashlight or Headlamp: It’s dark under the sink!
- Bucket and Rags: To catch any residual water and clean up spills.
- Plumber’s Grease (Silicone-based): For lubricating new O-rings and seals.
- Replacement O-Rings and Gaskets: It’s a good idea to have a generic assortment or, ideally, specific replacement parts for your faucet model.
- Utility Knife or Small Flathead Screwdriver: For carefully prying off decorative caps.
- Wire Brush or Old Toothbrush: For cleaning mineral deposits.
Step-by-Step Guide to Fixing a Kitchen Faucet Leaking at the Base
With your water off and tools ready, let’s tackle that leak. Follow these steps, starting with the simplest solutions first.
Step 1: Isolate the Leak Source
Before you start disassembling, try to pinpoint exactly where the water is coming from.
With the water turned back on (briefly and carefully, with a bucket ready), observe the faucet. Does the leak happen only when the faucet is turned on? Does it drip constantly? Does it get worse when you swivel the spout? This observation can give you clues. A leak at the very base, where the faucet meets the sink, often points to loose mounting or a seal issue below the sink deck.
Step 2: Tightening Loose Connections
This is often the easiest and most common fix for a leak at the base.
- Access Under the Sink: Clear out anything stored under your sink to give yourself ample room to work.
- Locate Mounting Nuts: Look up at the underside of your sink where the faucet assembly passes through. You’ll typically see one or more large nuts or screws that hold the faucet firmly in place against the sink deck.
- Tighten: Use your adjustable wrench or basin wrench to gently but firmly tighten these nuts clockwise. Be careful not to overtighten, which could crack the sink or damage the faucet base.
- Test: Turn the water supply back on and check for leaks. If the leak stops, congratulations, you’ve solved the problem! If not, proceed to the next step.
Step 3: Replacing Worn O-Rings and Gaskets
If tightening didn’t work, worn internal seals are the next most likely culprit. This usually involves disassembling the faucet from the top. The exact steps vary slightly depending on your faucet type (e.g., single-handle, two-handle, pull-down), but the general principle is the same.
General Steps for Single-Handle Faucets:
- Remove the Handle:
- Look for a decorative cap (often red/blue or a logo) on the front or side of the handle. Carefully pry it off with a utility knife or small flathead screwdriver.
- Beneath the cap, you’ll find a screw (often Phillips or hex). Unscrew it and lift the handle off.
- Access the Cartridge/Ball Valve:
- Once the handle is off, you’ll see a dome-shaped cap or collar. Unscrew this counter-clockwise (you might need pliers).
- Beneath this, you’ll find either a large retaining nut, clips, or another set of screws holding the cartridge (or ball valve assembly) in place. Remove these fasteners.
- Carefully pull out the cartridge or ball valve assembly. Note its orientation before removal, as it must go back in the same way.
- Locate and Replace O-Rings/Gaskets:
- Examine the base of the cartridge or ball valve for rubber O-rings or flat gaskets. Also check the spout base if it’s a pull-down or swivel spout faucet.
- Carefully remove the old, worn O-rings using a small pick or screwdriver.
- Match them with new O-rings or gaskets from your replacement kit.
- Lightly coat the new O-rings with plumber’s grease. This helps create a better seal and makes reassembly easier.
- Install the new O-rings or gaskets in their correct grooves.
- Reassemble and Test:
- Carefully put the faucet back together in reverse order. Ensure all parts are aligned correctly and tightened securely, but not excessively.
- Turn the water supply back on slowly and check for leaks. Operate the handle and swivel the spout (if applicable) to ensure the leak is gone.
Specific Note for Spout Leaks:
If the leak appears to be coming from around the base of a swivel spout (rather than the entire faucet base), the O-rings specifically sealing the spout to the faucet body are likely the problem. You’ll need to remove the handle and then carefully lift the spout straight up to access these O-rings. Replace them as described above.
Step 4: Addressing Seal Issues
In some faucets, particularly disc or ceramic disc models, the seals are internal to the cartridge. If replacing external O-rings doesn’t work, you might need to replace the entire faucet cartridge.
- Identify Cartridge Type: Take out the old cartridge and either consult your faucet manual or take the old cartridge to a hardware store to find an exact match.
- Install New Cartridge: Ensure the new cartridge is inserted in the correct orientation. Some have specific markings or notches for alignment.
- Reassemble: Put the faucet back together, ensuring all fasteners are secure.
- Test: Turn on the water and check for leaks.
Step 5: Dealing with a Cracked Faucet Base
If, after careful inspection, you find a crack in the faucet body or base, repair is generally not feasible or recommended. Small cracks can be temporary patched with epoxy, but they usually fail quickly under water pressure. In this scenario, the most reliable and long-term solution is to replace the entire faucet. While more involved, it’s often more cost-effective than repeatedly attempting to patch a failing faucet.
Step 6: Checking for Corrosion and Sediment Buildup
While disassembling your faucet, take the opportunity to inspect for mineral buildup and corrosion.
- Clean Components: Use a wire brush or old toothbrush to gently scrub away any lime or calcium deposits on metal parts. A vinegar solution can help dissolve stubborn buildup.
- Inspect for Damage: Look for any signs of pitting, rust, or deterioration that could indicate underlying damage. If components are severely corroded, they may need replacement.
- Clean Water Supply Lines: While the water is off, you might consider disconnecting the flexible supply lines from the faucet (from under the sink) and briefly flushing them into a bucket to clear any sediment that could clog internal faucet components later.
When to Call a Professional Plumber
While many kitchen faucet leaks at the base can be a DIY project, there are times when calling a professional plumber is the wisest course of action. Knowing when to escalate can save you time, money, and potential headaches.
Complex Issues
If you’ve gone through all the troubleshooting steps and still can’t identify or fix the leak, or if the problem seems more complex than a simple O-ring replacement, it’s best to call in an expert. This includes issues like:
- Leaks originating deep within the wall.
- Pipes that are corroded or burst.
- Faucets that require specialized tools or knowledge to disassemble.
Lack of Confidence or Time
If you’re uncomfortable working with plumbing, lack the necessary tools, or simply don’t have the time to dedicate to a repair, a professional can handle the job quickly and efficiently. Your time is valuable, and sometimes peace of mind is worth the cost.
Persistent Leaks
If you’ve attempted a repair, and the leak reappears shortly after, it indicates a deeper issue or an incorrect repair. A plumber can provide a definitive diagnosis and solution.
Warranty Considerations
Some newer faucets come with warranties that might be voided if you attempt certain repairs yourself. Check your faucet’s warranty information before undertaking significant work. In some cases, the manufacturer might even provide free replacement parts. A plumber may also be able to advise you on warranty claims.
For more general home repair advice and insights into various household issues, you can often find valuable resources from trusted sources like Good Housekeeping’s guides to home repairs, which can empower you with broader DIY knowledge.
Preventive Measures to Avoid Future Faucet Leaks
An ounce of prevention is worth a pound of cure, especially when it comes to plumbing. Here are some tips to keep your kitchen faucet leak-free:
Regular Inspection
Occasionally, take a moment to look under your sink for any signs of moisture or drips. Inspect the faucet itself for any visible corrosion or changes in its operation. Early detection can prevent minor issues from becoming major problems.
Gentle Use
Avoid excessive force when turning handles or swiveling spouts. Rough handling can prematurely wear out internal components and seals. Train family members to be gentle with the faucet.
Water Quality
If you have hard water, mineral buildup (limescale) can be a significant contributor to faucet wear and leaks. Consider installing a whole-house water softener or a point-of-use filter for your kitchen sink to reduce mineral deposits. Regularly clean the aerator to prevent buildup there, too, as it can sometimes affect pressure and internal component stress.
Proper Installation
If you’re installing a new faucet, ensure it’s done correctly according to the manufacturer’s instructions. Pay close attention to tightening mounting nuts and seating all seals and gaskets properly. If in doubt, consider hiring a professional for installation.
Frequently Asked Questions About Kitchen Faucet Leaks
Q1: Can a leaky faucet increase my water bill?
A: Absolutely! Even a slow drip can waste a significant amount of water over time. A faucet dripping just 10 times per minute can waste over 500 gallons of water per year. Faster drips or streams can waste thousands of gallons, leading to noticeably higher water bills.
Q2: How long does a kitchen faucet typically last?
A: The lifespan of a kitchen faucet varies widely depending on its quality, brand, water conditions, and usage. A high-quality faucet can last 15-20 years or more, while a budget-friendly option might only last 5-10 years before requiring repairs or replacement.
Q3: Is it better to repair or replace a leaking faucet?
A: For minor issues like worn O-rings or loose connections, repair is usually the more cost-effective and environmentally friendly option. However, if your faucet is old, severely corroded, constantly leaking despite repairs, or if replacement parts are unavailable or expensive, replacing the entire faucet might be the better long-term investment. Consider the cost of parts versus a new faucet and the overall age and condition of your current unit.
Q4: What’s the difference between an O-ring and a gasket?
A: Both O-rings and gaskets are types of seals used to prevent fluid leakage between two surfaces. An O-ring is typically a circular, ring-shaped rubber seal designed to sit in a groove and compress to create a seal. Gaskets, on the other hand, are often flat sheets of material (rubber, cork, fiber) cut to shape, used to seal the junction between two stationary parts. In faucets, O-rings are commonly used on moving parts like spouts or cartridges, while flat gaskets might be found at the base where the faucet meets the sink deck.
Q5: How do I know if my faucet needs a new O-ring vs. a new cartridge?
A: If the leak is specifically at the base of a swivel spout, or if it drips from the spout when the faucet is off but otherwise works, worn O-rings on the spout are a likely cause. If your single-handle faucet is leaking from the base or handle, or if it’s difficult to turn off completely, you might be looking at a worn cartridge. A cartridge typically contains multiple seals and moving parts, so a leak from the base where the handle connects often points to cartridge failure. If your faucet has a ceramic disc cartridge, it’s usually the entire cartridge that needs replacing rather than individual O-rings within it.
Conclusion
A kitchen faucet leaking at the base is a common household nuisance, but it doesn’t have to be a plumbing nightmare. By systematically diagnosing the problem, gathering the right tools, and following these step-by-step instructions, you can confidently tackle most leaks yourself. Remember to prioritize safety by turning off the water supply and don’t hesitate to call a professional plumber if the job proves too complex or if the leak persists. With a little effort, you can enjoy a dry, drip-free kitchen once again!

