Creating a captivating focal point in your home is easier than ever, and one of the most innovative trends emerging in interior design is the artificial grass backdrop for home photo walls. Far beyond just a garden material, synthetic turf can be repurposed to craft stunning, maintenance-free green walls that serve as the perfect canvas for your memories. Whether you’re looking to elevate your everyday living space, design a dynamic area for family portraits, or simply add a touch of lush greenery, an artificial grass photo wall offers endless possibilities to infuse charm and personality into any room. This guide will explore imaginative ideas, practical tips, and the undeniable benefits of integrating this versatile element into your home decor, turning a blank wall into a vibrant, photo-ready masterpiece.
Why Choose Artificial Grass for Your Photo Wall?
The appeal of artificial grass extends beyond its aesthetic value; it offers a multitude of practical benefits that make it an ideal choice for a home photo wall. Understanding these advantages can help you appreciate why this innovative material is gaining traction in modern home decor.
Low Maintenance, High Impact
Unlike natural plants, artificial grass requires no watering, trimming, or sunlight. Once installed, it maintains its vibrant green appearance year-round without any effort on your part. This means no wilting leaves, no soil spills, and no pest concerns, allowing you to enjoy a consistently beautiful backdrop with minimal fuss. For those who love the look of greenery but lack a green thumb, artificial turf is a dream come true.
Durability and Longevity
High-quality artificial grass is designed to withstand various conditions, making it incredibly durable. It resists fading from UV exposure (if in a sunny room, though usually not a primary concern indoors), is tough against wear and tear, and retains its texture and color for years. This ensures that your photo wall remains a stunning feature for a long time, providing a reliable and attractive backdrop for countless photographs and daily enjoyment.
Versatility in Design
Artificial grass comes in various pile heights, shades of green, and textures, offering flexibility to match your desired aesthetic. From a tightly trimmed, uniform look to a wilder, more organic feel, you can select the perfect type to complement your home’s existing decor. Furthermore, its neutral green base acts as an excellent canvas, allowing you to easily layer other decorative elements, frames, and lighting without clashing.
Allergy-Friendly
For households with allergy sufferers, natural plants can sometimes be a source of discomfort. Artificial grass eliminates this issue entirely, providing a beautiful green element without introducing pollen or other allergens into your indoor environment. It’s a healthy choice that allows everyone to enjoy the refreshing look of nature indoors.
Cost-Effective in the Long Run
While the initial investment in artificial grass might seem higher than some temporary decor options, its longevity and zero maintenance costs make it a very cost-effective solution over time. You won’t need to replace plants, buy fertilizers, or invest in special lighting, saving you money and time in the long run.
Essential Considerations Before You Begin
Before diving into the exciting world of design, a little planning can go a long way in ensuring your artificial grass backdrop is a success. Here are key factors to consider:
Choosing the Right Location
Consider which wall will best serve as your photo backdrop. A wall in a living room, bedroom, or even a spacious hallway can work. Think about natural lighting, available space, and how the green wall will integrate with the rest of the room’s decor. Is it a high-traffic area, or a more intimate corner?
Selecting the Perfect Artificial Grass
As mentioned, options vary. For an indoor photo wall, look for artificial grass with a softer, less abrasive texture than what you might use outdoors. Consider the pile height – a shorter pile might look neater and more uniform, while a longer pile could offer a richer, more luxurious feel. Sample swatches can be invaluable here to see how different types look in your home’s lighting.
Measuring and Budgeting
Accurately measure the dimensions of the wall or section you plan to cover. This will help you calculate the amount of artificial grass needed and estimate costs. Don’t forget to factor in tools, adhesives, and any additional decorative elements you plan to add. Always add a little extra to your measurements for cutting and trimming.
Installation Method
There are several ways to install artificial grass on a wall: direct adhesion, stapling to a backer board, or creating removable panels. Your choice might depend on whether you want a permanent fixture or something you can easily change or move. Direct adhesion is often suitable for permanent installations, while panels offer flexibility.
Safety and Ventilation
Ensure that any adhesives or sealants used are low-VOC (Volatile Organic Compounds) to maintain good indoor air quality. If installing in a smaller room, ensure adequate ventilation during and immediately after installation. Always follow manufacturer guidelines for all products.
Creative Artificial Grass Backdrop Ideas for Every Style
The true magic of an artificial grass backdrop lies in its ability to be customized. Here are some inspiring ideas to help you design a photo wall that reflects your unique style and enhances your home’s aesthetic.
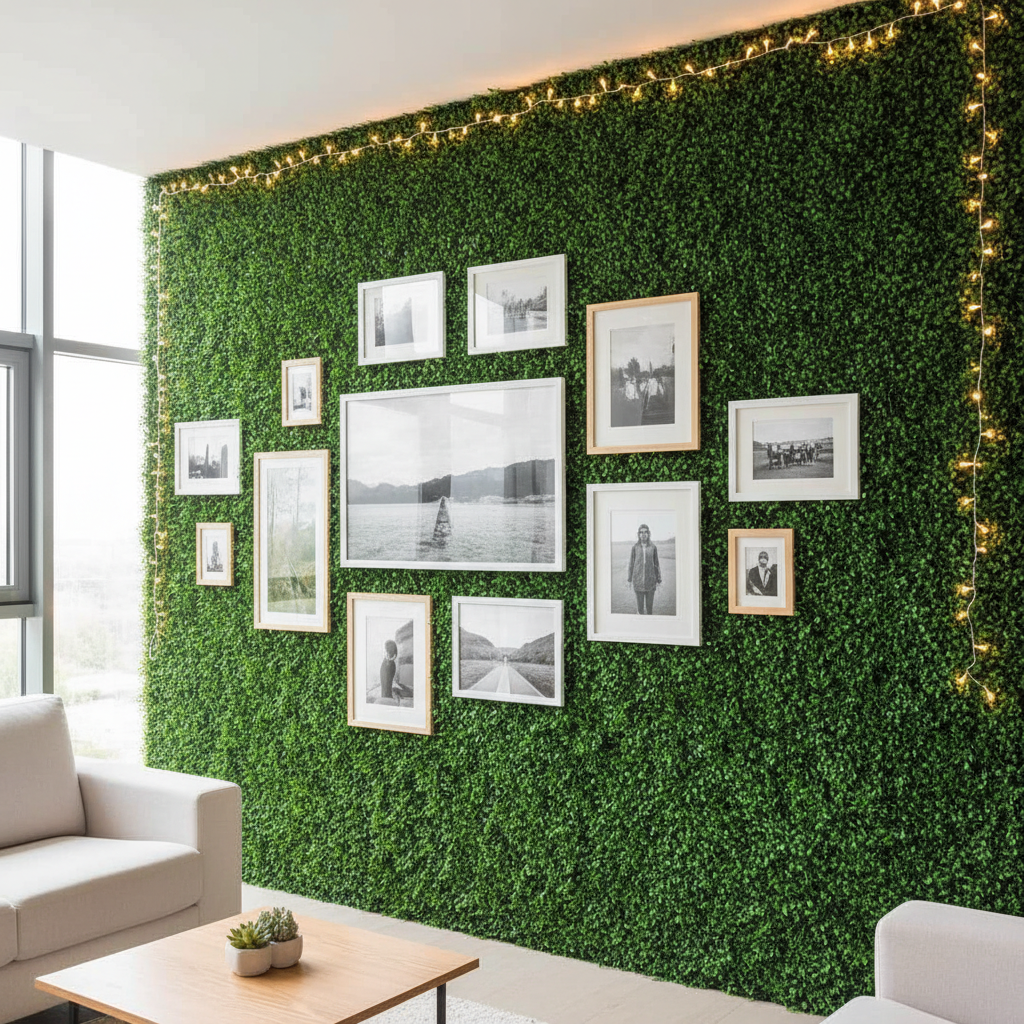
1. Minimalist Greenery
Sometimes less is more. For a sleek, contemporary look, let the vibrant green of the artificial grass speak for itself. Install a clean, uniform panel of turf and accessorize sparingly. Think about a few simple, elegantly framed photos, perhaps in white, black, or natural wood frames, arranged symmetrically. A single, well-placed minimalist wall clock or a simple geometric metal sculpture can add interest without overwhelming the natural beauty of the green wall. This style works wonderfully in modern apartments or homes that favor clean lines and uncluttered spaces, providing a calming, serene focal point.
2. Floral Fantasy
Transform your green wall into an enchanting garden. This is perfect for romantic settings, children’s rooms, or anyone who loves the vibrancy of flowers. Attach high-quality artificial flowers, either individually or in small clusters, directly to the grass. You can opt for a specific color palette – pastels for a whimsical feel, or bold primary colors for a dramatic statement. Mix in different types of foliage, such as faux ferns or eucalyptus leaves, for added texture. Consider creating a cascading floral effect from the top corners or a dense floral “wreath” surrounding a central photo. This idea is also excellent for creating a temporary photo booth area for celebrations.
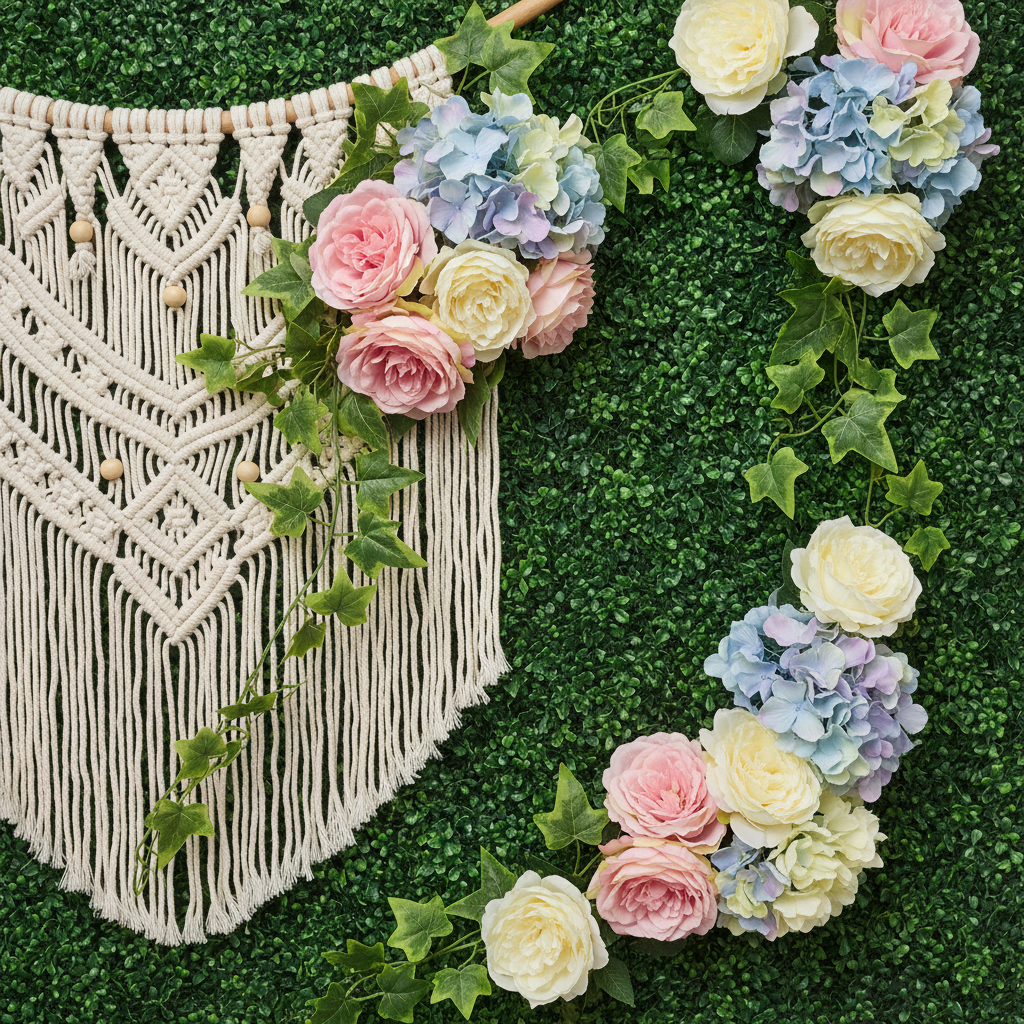
3. Boho Chic Oasis
Embrace a relaxed, artistic vibe with a bohemian-inspired artificial grass backdrop. Combine the greenery with natural textures and earthy tones. Hang macrame wall art, dreamcatchers, or decorative woven baskets directly onto the grass. Add elements like dried pampas grass, string lights, and small wooden shelves displaying eclectic artifacts or potted succulents. Distressed wood frames for your photos will complement this aesthetic perfectly. A plush rug and floor cushions placed in front of this wall can complete the cozy, free-spirited atmosphere, making it an ideal spot for lounging and candid photos.
4. Whimsical Wonderland
Perfect for nurseries, playrooms, or those who adore a touch of magic, a whimsical wonderland backdrop can be truly enchanting. Incorporate fairy lights (battery-operated ones are safest and easiest to install on turf) that twinkle against the green. Add oversized, colorful paper flowers, shimmering butterflies, or cutouts of woodland creatures. Large, whimsical letters spelling out a child’s name or a sweet phrase can also be a delightful addition. The artificial grass provides a soft, inviting base that allows these playful elements to pop, creating a dreamlike setting for photos and imaginative play.
5. Sports & Game Day Theme
For the sports enthusiast, an artificial grass photo wall is a natural fit. Mimic a mini sports field by adding white lines with paint or tape, resembling a football or soccer pitch. Attach miniature sports equipment like a small baseball bat, a decorative basketball, or a tiny goal net. You can display framed jerseys, signed memorabilia, or action shots of family members playing their favorite sports. This theme is fantastic for a game room, a teen’s bedroom, or a dedicated “man cave” where passion for sports is celebrated, making it a dynamic spot for game day selfies.
6. Seasonal & Holiday Transformations
One of the most exciting aspects of an artificial grass backdrop is its adaptability. It serves as an evergreen base that can be easily transformed for different seasons and holidays.
- Spring: Adorn with pastel artificial flowers, cute bunny cutouts, and delicate bird ornaments.
- Summer: Bright, bold sunflowers, miniature beach balls, or even a small, decorative surfboard.
- Autumn: Faux autumn leaves in reds, oranges, and golds, small pumpkins, or rustic wooden signs.
- Winter/Holidays: String up warm white fairy lights, hang sparkly ornaments, artificial snowflakes, or a festive garland.
This adaptability ensures your photo wall remains fresh and relevant throughout the year, providing a unique background for holiday cards and seasonal snapshots.
7. Urban Jungle Vibe
Bring the outdoors in with a sophisticated urban jungle theme. Combine different types of faux foliage – varying shades and textures of green – to create depth and a layered look on your artificial grass. Think about adding elements like large monstera leaves, hanging ivy, and a few industrial-style shelves holding small concrete planters or minimalist ceramic vases. Metallic accents (gold, copper, or black) can add a modern touch. This look is perfect for loft apartments or homes seeking a contemporary, nature-inspired feel, offering a serene escape within a bustling city environment. For more design inspiration on bringing natural elements indoors, consider exploring resources from experts in interior design, such as those found on Architectural Digest.
8. Kids’ Playful Paradise
Create a fun, interactive photo wall for children. Beyond whimsical elements, consider adding small, sturdy hooks where kids can hang their drawings, lightweight toys, or dress-up accessories. Attach soft, colorful fabric letters or numbers. You could even incorporate a small, child-safe mirror at their height, framed by the grass, for silly reflections. This transforms the photo wall into a dynamic space for play and creativity, capturing not just static images, but also moments of joy and imagination.
DIY Installation Guide: Step-by-Step
Installing an artificial grass backdrop can be a rewarding DIY project. Here’s a basic guide to get you started:
Step 1: Gather Your Materials and Tools
- Artificial grass roll or tiles
- Measuring tape
- Utility knife or strong scissors
- Adhesive (e.g., strong construction adhesive suitable for wall mounting and turf) or heavy-duty staple gun (if using a backer board)
- Caulking gun (if using adhesive tubes)
- Level
- Straight edge or ruler
- Optional: Plywood or MDF board (if creating removable panels or a smoother base)
- Optional: Primer for the wall (if using adhesive directly on a porous surface)
- Safety gloves and eye protection
Step 2: Prepare the Wall Surface
Ensure the wall is clean, dry, and smooth. Fill any holes or cracks, and sand down rough patches. If painting, allow adequate drying time. For direct adhesion, priming the wall can help the adhesive bond better, especially on painted or porous surfaces.
Step 3: Measure and Cut the Grass
Measure the dimensions of your wall or the area you want to cover. Unroll your artificial grass and carefully cut it to size using a utility knife and a straight edge. Take your time to make straight cuts. If you’re covering a large area, you might need multiple pieces. Pay attention to the “grain” or direction of the grass blades; for a seamless look, all pieces should be oriented in the same direction.
Step 4: Choose Your Installation Method
Option A: Direct Adhesion (Permanent)
- Apply a strong adhesive directly to the back of the artificial grass or the wall in horizontal strips or a zigzag pattern.
- Carefully press the grass onto the wall, starting from one corner and working your way across.
- Use a roller or a clean hand to firmly press the grass, ensuring good contact and removing any air bubbles.
- If using multiple pieces, align them carefully, ensuring the seams are as inconspicuous as possible. You can use turf tape and adhesive for seams if desired.
- Allow the adhesive to cure completely according to the manufacturer’s instructions, typically 24-48 hours, before adding any decorations.
Option B: Backer Board / Panels (More Versatile)
- Cut plywood or MDF boards to the desired size of your panels.
- Attach the artificial grass to the boards using a strong adhesive or a heavy-duty staple gun on the back edges. Ensure the grass is taut and smooth.
- Once the grass is securely attached to the boards, mount these panels onto your wall using appropriate hardware (e.g., French cleat hangers, screws into studs, or heavy-duty picture hangers).
- This method allows for easier removal or relocation of the grass wall in the future.
Step 5: Finishing Touches
Once the grass is securely in place, step back and inspect your work. Trim any excess grass around the edges with your utility knife for a neat finish. Gently brush up the pile to make it look fuller. Now you’re ready to start decorating!
Maintaining Your Artificial Grass Photo Wall
While artificial grass is low maintenance, a few simple steps can keep your photo wall looking pristine for years to come:
- Regular Dusting: Use a soft brush, a dry cloth, or a handheld vacuum with a brush attachment to gently remove dust and cobwebs from the grass blades.
- Spot Cleaning: For any accidental spills or marks, use a damp cloth with mild soap and water. Avoid harsh chemicals that could damage the fibers or backing. Gently blot the area rather than rubbing vigorously.
- Avoid Heavy Objects: While durable, try to avoid hanging excessively heavy objects that could pull down the grass or adhesive over time. Distribute weight evenly if hanging multiple frames.
- UV Protection (Optional): If your wall receives significant direct sunlight, consider using an indoor UV protectant spray specifically designed for artificial plants, though most modern indoor turf is UV stabilized.
- Fluffing: Over time, gravity might flatten the blades slightly. Gently brush the grass against the grain with a stiff-bristled brush (like a broom) to help the blades stand upright again.
Tips for Maximizing Your Photo Wall’s Potential
To truly make your artificial grass backdrop shine as a home photo wall, consider these additional tips:
- Vary Frame Sizes and Shapes: Don’t stick to just one size of photo frame. Mix square, rectangular, and even circular frames for a dynamic and engaging display.
- Incorporate Different Media: Beyond framed photos, think about hanging small canvases, metal prints, or even clipboards with rotating art pieces or notes.
- Add Dimensionality: Use lightweight shelves, floating ledges, or shadow boxes to add depth. These can hold small decorative objects, plants, or even small sculptures.
- Strategic Lighting: Good lighting is crucial for both aesthetics and photography. Consider adjustable track lighting, wall sconces, or even clip-on spotlights to illuminate your photos and the grass texture. Fairy lights or LED strips integrated into the design can also create a magical ambiance.
- Personal Touches: This is your wall! Include elements that tell your story: travel souvenirs, children’s artwork, quotes that inspire you, or mementos from special events.
- Seasonal Refresh: Don’t be afraid to change up the decor elements on your wall with the seasons or for special occasions. It keeps the wall fresh and exciting.
Frequently Asked Questions About Artificial Grass Photo Walls
Q1: Is artificial grass safe for indoor use?
A: Yes, most modern artificial grass products are safe for indoor use. Look for products that are non-toxic, lead-free, and ideally, low-VOC if you are using adhesives. Ensure good ventilation during installation if using adhesives or paints.
Q2: How do I attach photos and decorations to the artificial grass?
A: For lightweight items like photos, you can use strong double-sided tape, hot glue (test on a hidden spot first), small clips, or even fine fishing line to tie items to the grass fibers. For heavier items like frames or shelves, you’ll need to secure them directly to the wall *through* the grass, using appropriate anchors and screws, or install them on a backer board before mounting.
Q3: Can I install artificial grass on a textured wall?
A: While possible, a smoother surface will generally yield a better, more even finish. If your wall is heavily textured, consider installing a thin layer of plywood or MDF board first to create a smooth base, and then attach the artificial grass to that board.
Q4: How do I clean dust from the grass blades?
A: A light dusting with a soft cloth, a soft-bristled brush, or a handheld vacuum cleaner with a brush attachment is usually sufficient to remove dust and maintain the clean appearance of the grass.
Q5: Will the artificial grass fade over time indoors?
A: High-quality artificial grass is typically UV stabilized to resist fading, even if exposed to sunlight. Indoors, fading is generally much less of an issue than outdoors, but choosing a quality product will offer the best longevity.
Q6: Can I use real plants alongside the artificial grass backdrop?
A: Absolutely! Mixing real plants (potted plants on shelves, hanging planters) with your artificial grass backdrop can enhance the “urban jungle” or “floral fantasy” themes, adding another layer of authenticity and texture.
An artificial grass backdrop for your home photo wall is more than just a decor trend; it’s a creative statement that brings the serenity of nature indoors with unparalleled ease. From minimalist statements to vibrant, whimsical scenes, the possibilities for personalization are boundless. By carefully planning your design, following simple installation steps, and maintaining your greenery, you can create a stunning, unique, and ever-evolving focal point that celebrates your memories and beautifies your living space for years to come. Embrace this innovative idea and watch your home transform into a vibrant oasis, ready for its close-up.

