There are few things more alarming for a homeowner than discovering a water stain spreading across their ceiling or wall after a heavy rain, especially when it originates from an area near the fireplace. If you’re experiencing a chimney leaking during storms, it’s not just an inconvenience; it’s a clear signal that your home’s protective envelope has been compromised. Water intrusion from a leaky chimney can lead to significant structural damage, mold growth, and even pose a fire hazard if not addressed promptly. Understanding the root causes of these leaks, knowing how to identify them, and taking proactive steps for repair and prevention are crucial for maintaining the integrity and safety of your home.
A chimney, while often overlooked, is a complex structure exposed to the harshest elements. From scorching summer sun to freezing winter winds and torrential downpours, it takes a constant beating. Over time, these environmental stresses can wear down its components, creating vulnerabilities that allow water to seep in during heavy storms. This guide will walk you through the common culprits behind a leaky chimney, the dangers it presents, how to pinpoint the source of the problem, and practical solutions for both immediate repair and long-term prevention.
Why is My Chimney Leaking During Storms? Common Causes Unveiled
When rain finds its way into your chimney system, it’s usually due to a failure in one or more of its protective layers. Identifying the specific point of failure is key to effective repair. Here are the most common reasons why your chimney might be leaking when the weather turns foul:
1. Damaged Chimney Cap or Crown
The very top of your chimney houses two critical components designed to keep water out:
- Chimney Cap: This is a cover, typically made of metal, that sits over the flue opening. Its primary job is to prevent rain, snow, animals, and debris from entering the chimney flue. If the cap is missing, rusted, bent, or has holes, water can easily funnel directly down the flue and into your home.
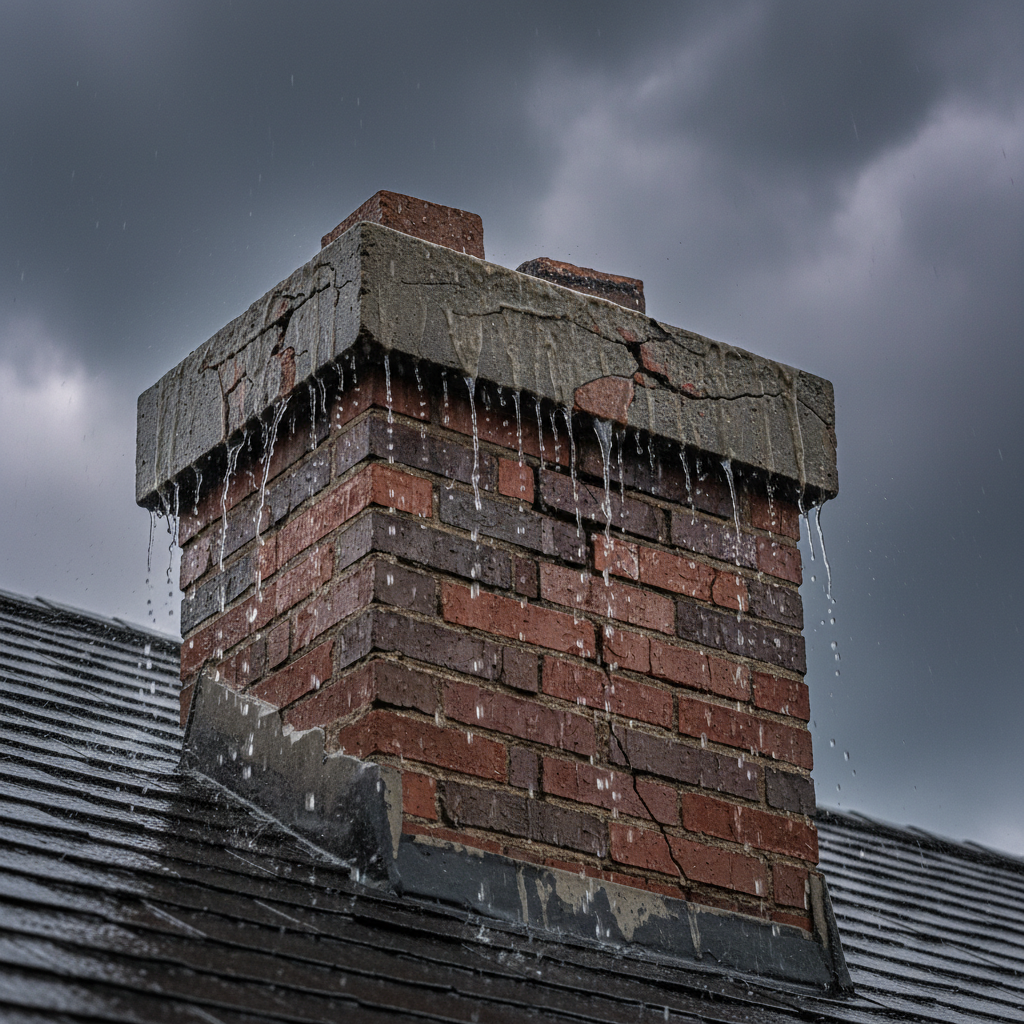
- Chimney Crown: The crown is the concrete slab that caps the entire masonry chimney structure, sloping away from the flue to shed water. Cracks in the chimney crown, often caused by freezing and thawing cycles, are a very common source of leaks. These cracks allow water to penetrate the masonry below, eventually making its way into the house. A poorly constructed crown that doesn’t extend beyond the chimney walls also allows water to run directly down the sides, saturating the bricks.
2. Cracked Mortar Joints
The mortar that binds the bricks of your chimney together is constantly exposed to weather. Over time, mortar can deteriorate, crack, and crumble due to thermal expansion and contraction, acidic rain, and general wear and tear. When mortar joints develop cracks or wash out, they become porous pathways for water. During a heavy storm, rain can saturate the bricks and mortar, and then follow these fissures inward, eventually reaching the interior of your home.
3. Faulty Flashing
Flashing is perhaps the most critical component for preventing leaks where the chimney meets the roof. It’s a system of metal sheets (typically aluminum, copper, or steel) that creates a watertight seal between the chimney and the roofing material. Flashing is installed in overlapping layers, directing water down the roof and away from the chimney base.
- Common Flashing Issues:
- Improper Installation: If the flashing wasn’t installed correctly initially, it might not provide a proper seal.
- Corrosion or Damage: Over time, flashing can rust, tear, or become dislodged due to high winds, ice dams, or settling.
- Sealant Failure: The caulk or sealant used to seal flashing edges can dry out, crack, and pull away, creating gaps for water entry.
- Missing Counter-Flashing: Counter-flashing is mortared into the chimney’s masonry joints and overlaps the step flashing on the roof, completing the seal. If it’s missing or compromised, water can easily get behind the primary flashing.
4. Porous Bricks or Masonry
While bricks might seem impervious to water, they are actually porous. New bricks have a certain level of water resistance, but over decades, constant exposure to rain, snow, and freeze-thaw cycles can cause them to become more absorbent. When bricks become saturated, especially during prolonged downpours, water can soak through the masonry and eventually penetrate the interior wall. This is particularly common in older chimneys or those that have not been adequately maintained.
5. Clogged Chimney Flue
While less common for direct leaks, a severely clogged chimney flue can contribute to moisture problems. If the flue is blocked by creosote, debris, or a defunct animal nest, it can impede proper ventilation. This might lead to condensation buildup within the flue, which, if excessive, could mimic a leak. More significantly, persistent blockages can also lead to more serious fire hazards.
6. Condensation Issues (Often Mistaken for Leaks)
Sometimes, what appears to be a leak is actually condensation. Modern high-efficiency furnaces and water heaters often vent through older, oversized chimney flues. The cooler temperatures in these large flues can cause the hot, moist exhaust gases to condense rapidly, forming significant amounts of water. This condensation, often acidic, can run down the flue, saturate the masonry, and appear as a leak. This issue requires a chimney liner specifically sized for the appliance to prevent further damage.
The Dangers of a Leaky Chimney: Why Act Fast
Ignoring a leaky chimney is akin to ignoring a slow drip from a faucet – it seems minor initially, but the long-term consequences can be severe and costly. Prompt action is not just about convenience; it’s about protecting your home and family.
1. Structural Damage
Water is relentlessly destructive. When it repeatedly enters the chimney structure, it can weaken mortar joints, erode bricks, and cause the masonry to spall (flaking or crumbling of the brick face). This compromises the structural integrity of the entire chimney, potentially leading to costly repairs, or in extreme cases, a partial or complete collapse. Internally, water can rot wooden beams, ceiling joists, and drywall adjacent to the chimney.
2. Mold and Mildew Growth
Moisture and darkness create the perfect breeding ground for mold and mildew. A persistent leak will inevitably lead to mold growth on ceilings, walls, and within insulation. Mold not only causes unsightly stains and a musty odor but also poses significant health risks, especially for individuals with allergies, asthma, or compromised immune systems. Remediation can be an expensive and disruptive process.
3. Fire Hazard
Perhaps the most alarming danger associated with a leaky chimney is the increased risk of fire. Water entering the chimney can saturate creosote deposits within the flue. This dampness, combined with heat, can create a highly flammable, tar-like substance that is extremely difficult to remove. Additionally, water can damage the flue liner, which is critical for containing heat and preventing it from transferring to combustible materials in your home. A compromised flue liner dramatically increases the risk of a house fire.
4. Reduced Lifespan of Chimney and Appliances
Constant exposure to moisture accelerates the deterioration of all chimney components, from the cap and crown to the bricks and mortar, significantly shortening the chimney’s overall lifespan. If condensation is the culprit, the acidic nature of the condensate can rapidly corrode metal liners and connectors of your heating appliances, leading to premature failure and costly replacements.
How to Identify the Source of a Chimney Leak
Pinpointing the exact source of a chimney leak can be challenging, as water can travel a considerable distance before becoming visible. However, a systematic approach can help narrow down the possibilities:
1. Look for Obvious Interior Signs
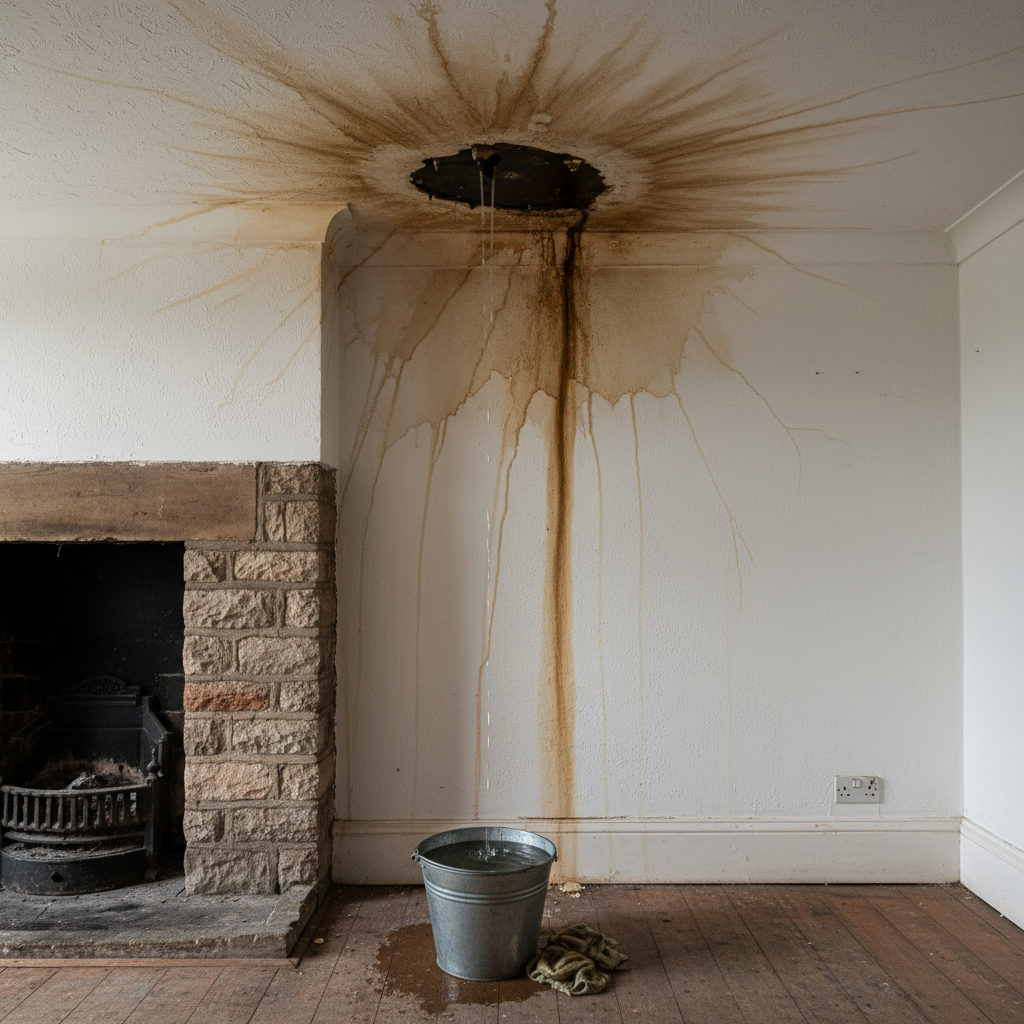
- Water Stains: The most common sign is water stains on ceilings or walls near the fireplace, especially after heavy rains. The stain might be yellow, brown, or rust-colored.
- Dampness/Peeling Paint: Feel for dampness on walls, or observe peeling paint or bubbling wallpaper around the chimney breast.
- Musty Odors: A persistent musty smell, particularly in the fireplace or nearby rooms, often indicates mold or mildew caused by water intrusion.
- Drips in Firebox: Actual drips or puddles in the firebox are a clear sign of a significant leak, often from a damaged cap or flue.
2. Conduct a Visual Inspection from the Ground
From a safe distance, use binoculars to inspect the exterior of your chimney:
- Chimney Cap/Crown: Look for missing caps, rust, bent metal, or visible cracks in the concrete crown.
- Mortar Joints: Scan for crumbling mortar, missing chunks, or deep cracks between bricks.
- Bricks: Check for spalling (flaking/chipping) bricks, discoloration, or areas that appear perpetually damp.
- Flashing: Observe the flashing where the chimney meets the roof. Is it pulling away, bent, rusted, or covered in deteriorated caulk?
3. Ladder or Roof Inspection (Exercise Extreme Caution!)
If you’re comfortable and have the proper safety equipment, a closer inspection from a ladder or the roof can provide more detail. However, if you’re unsure or uncomfortable, always hire a professional. Safety should be your top priority. From the roof, you can get a better view of the chimney crown, the condition of the mortar joints, and the integrity of the flashing. Look for any gaps, lifted edges, or visible damage.
4. Professional Chimney Inspection
When in doubt, or if you cannot safely identify the source yourself, call a certified chimney sweep or masonry expert. They have specialized tools, training, and experience to conduct a thorough inspection, often involving climbing onto the roof and using cameras to inspect the flue liner. A professional can accurately diagnose the problem and recommend the most effective solutions.
DIY vs. Professional Repair: When to Call an Expert
Once the source of the leak is identified, the next step is repair. While some minor issues might be within the realm of a confident DIYer, many chimney repairs are complex, dangerous, and best left to professionals.
DIY Tasks (Proceed with Caution):
- Cleaning Gutters: Ensure nearby gutters are clean and draining properly, as overflowing gutters can direct water onto the chimney.
- Minor Sealant Repair: If you find a very small, isolated crack in existing sealant around flashing (and the flashing itself is sound), you might be able to re-seal it with exterior-grade caulk. This is a temporary fix, however.
- Basic Chimney Cap Replacement: If your chimney cap is simply missing and the flue size is standard, you might be able to purchase and install a new one. Ensure it’s properly secured.
When to Call a Professional (Highly Recommended):
- Roof Access: Any work requiring you to get on the roof, especially a steep or high roof, should ideally be done by professionals who have the right safety gear and experience.
- Damaged Chimney Crown: Repairing or rebuilding a chimney crown requires specific masonry skills and materials.
- Flashing Issues: Flashing repair or replacement is intricate work that must be done precisely to prevent future leaks. Improperly installed flashing is a leading cause of chimney leaks.
- Cracked Mortar/Porous Bricks: Repointing (replacing old mortar) or waterproofing bricks requires specialized knowledge and tools.
- Flue Liner Damage or Condensation Issues: These repairs are complex and demand expert assessment and specialized solutions, such as installing a new, appropriately sized flue liner.
- Any Structural Damage: If bricks are crumbling, the chimney is leaning, or there are significant cracks in the masonry, a professional is essential.
Remember, chimney sweeps and masonry contractors are trained to identify and repair these issues safely and effectively. Their expertise can save you from costly future damage and ensure your chimney operates safely. For general home maintenance tips that can help you identify issues around your home, including those related to your chimney, Good Housekeeping offers a useful home maintenance checklist that covers various seasonal tasks.
Preventing Future Chimney Leaks
Prevention is always better than cure, especially when it comes to water damage. Proactive maintenance can save you significant time, money, and stress in the long run.
1. Regular Maintenance and Inspections
The single most effective way to prevent chimney leaks is to schedule annual professional chimney inspections. A certified chimney sweep will examine all accessible parts of your chimney, including the cap, crown, flashing, masonry, and flue liner, to identify potential problems before they escalate into leaks. They can spot minor cracks, deteriorating mortar, or compromised flashing early on, allowing for timely repairs.
2. Upgrade or Repair Chimney Components
- Install or Replace a Chimney Cap: Ensure your chimney has a properly fitting cap that covers all flues. Stainless steel or copper caps are durable and long-lasting.
- Repair or Rebuild the Chimney Crown: If your crown is cracked, have it repaired or rebuilt with a proper overhang and drip edge to shed water effectively. Concrete crowns are more durable than mortar wash crowns.
- Check and Maintain Flashing: Regularly inspect flashing for signs of wear, rust, or sealant failure. Have any compromised flashing repaired or replaced by a roofing professional or chimney technician.
- Repoint Deteriorated Mortar: If mortar joints are crumbling, have a mason repoint them. This involves removing the old, damaged mortar and replacing it with fresh, durable mortar.
3. Apply Water Repellent Treatment
Once your masonry is sound and dry, consider having a professional apply a specialized water repellent to the exterior bricks. Unlike sealants that trap moisture, these siloxane-based repellents allow the brick to breathe while significantly reducing its porosity and preventing water absorption. This is especially beneficial for older, more porous chimneys and can add years to their life by protecting against freeze-thaw damage.
4. Ensure Proper Ventilation and Liner Sizing
If condensation is the culprit, consult with a professional to ensure your chimney flue is correctly sized for your heating appliances. Often, this means installing a new, insulated stainless steel liner to maintain higher flue gas temperatures and prevent condensation.
What to Do Immediately If You Discover a Leak
Finding your chimney leaking during a storm can be alarming. Here’s what you should do:
- Contain the Water: Place buckets or towels to catch dripping water to minimize damage to floors and furniture.
- Identify the General Location: Try to determine where the water is entering (e.g., ceiling, firebox, wall). This information will be helpful for the repair professional.
- Turn Off Fireplace Use: If you use your fireplace, stop immediately. Water inside the chimney can mix with creosote, potentially creating a dangerous situation.
- Contact a Professional: As soon as the storm passes, or even during if it’s severe and safe to do so, call a certified chimney sweep or masonry contractor. Explain the situation and schedule an inspection.
- Document the Damage: Take photos or videos of the water stains and any visible damage. This documentation can be useful for insurance purposes.
- Ventilate: Once safe to do so, try to air out the affected area to help prevent mold growth.
Frequently Asked Questions About Chimney Leaks
Q1: Can a leaky chimney cause a fire?
A1: Yes, absolutely. A leaky chimney can significantly increase the risk of a house fire. Water can damage the flue liner, which is designed to contain heat and prevent it from transferring to combustible materials in your home. Furthermore, water mixing with creosote deposits can create an even more flammable and dangerous substance within the flue. Any sign of a leak should prompt immediate professional inspection and repair.
Q2: How much does it cost to fix a leaky chimney?
A2: The cost to fix a leaky chimney varies widely depending on the cause and extent of the damage. Minor repairs like replacing a chimney cap might be a few hundred dollars. More complex issues such as flashing replacement, chimney crown repair, repointing, or installing a new flue liner can range from several hundred to several thousand dollars. Structural repairs or rebuilding a portion of the chimney can be even more substantial. It’s always best to get a professional estimate after a thorough inspection.
Q3: Is a chimney leak covered by homeowner’s insurance?
A3: This depends on your specific policy and the cause of the leak. Generally, sudden and accidental water damage (like from a storm) may be covered. However, damage resulting from a lack of maintenance or gradual deterioration (like old, crumbling mortar) is often not covered. It’s crucial to review your homeowner’s insurance policy and contact your provider as soon as you discover the leak to understand your coverage options.
Q4: How often should I have my chimney inspected?
A4: The Chimney Safety Institute of America (CSIA) recommends that chimneys be inspected at least once a year, regardless of how often you use your fireplace or heating appliance. This annual inspection helps identify any potential issues, including those that could lead to leaks, blockages, or other safety hazards, allowing for proactive maintenance and repair.
Q5: What’s the difference between a chimney cap and a chimney crown?
A5: The chimney cap is the cover that sits on top of the flue opening(s) to prevent rain, animals, and debris from entering the flue. The chimney crown, on the other hand, is the concrete slab that covers the entire top of the masonry chimney structure, sloped to shed water away from the flue and down the outside of the chimney walls.
Conclusion
A chimney leaking during storms is a problem that demands immediate attention. From compromised chimney caps and crowns to faulty flashing and deteriorating mortar, there are several culprits that can allow water to breach your home’s defenses. Ignoring these leaks can lead to a cascade of expensive and dangerous problems, including structural damage, pervasive mold growth, and a heightened risk of fire.
By understanding the potential causes, knowing how to spot the signs of a leak, and enlisting the expertise of certified professionals for inspection and repair, you can protect your chimney and, by extension, your entire home. Regular maintenance and proactive measures like proper capping, crown repair, and water repellent treatments are your best defense against the relentless forces of nature. Don’t let a small drip turn into a major disaster; act swiftly to secure the safety and longevity of your cherished home.


