From Trash to Treasure: Crafting Your Dream Accent Wall with Recycled Materials
Hey there, fellow home improvement enthusiast! Have you ever looked at a blank wall in your home and thought, “This space needs a story”? Accent walls are fantastic for that – they add character, depth, and a focal point to any room. But what if I told you that you could create an absolutely stuing accent wall, not just with paint, but by turning everyday discards into dazzling decor? That’s right, we’re talking about accent walls made from recycled materials!
Beyond being incredibly unique and a fantastic conversation starter, an eco-friendly accent wall is a brilliant way to express your creativity, reduce waste, and often, save a significant amount of money. I’ve seen firsthand (and even tried a few myself!) how a wall made from forgotten items can completely transform a room. It’s about seeing the potential in what others might call junk and giving it a second, glorious life. Ready to dive into the wonderful world of sustainable decor? Let’s get started!
Plaing Your Eco-Friendly Masterpiece
Before you start hoarding every empty cereal box you find, a little plaing goes a long way. Trust me, a well-thought-out project is a happy project! The first step is to choose your wall. Think about which wall could benefit most from a bold statement. Is it behind your bed, in your dining room, or perhaps a long hallway that feels a bit bland?
Once you’ve picked your canvas, it’s time for inspiration. Head to Pinterest, Instagram, or even just take a walk around your neighborhood with fresh eyes. What kind of texture, color, and vibe are you going for? Rustic? Modern? Whimsical? The type of recycled material you choose will heavily influence this. Don’t forget to measure your wall accurately – this will help you estimate the amount of material you’ll need.
Safety is also paramount. When working with tools, cutting materials, or using adhesives, always prioritize safety. Wear gloves, eye protection, and work in a well-ventilated area. And always make sure the wall you’re working on is clean, dry, and structurally sound enough to hold your creation.
Material Spotlight: The Rustic Charm of Wood Pallets & Scraps
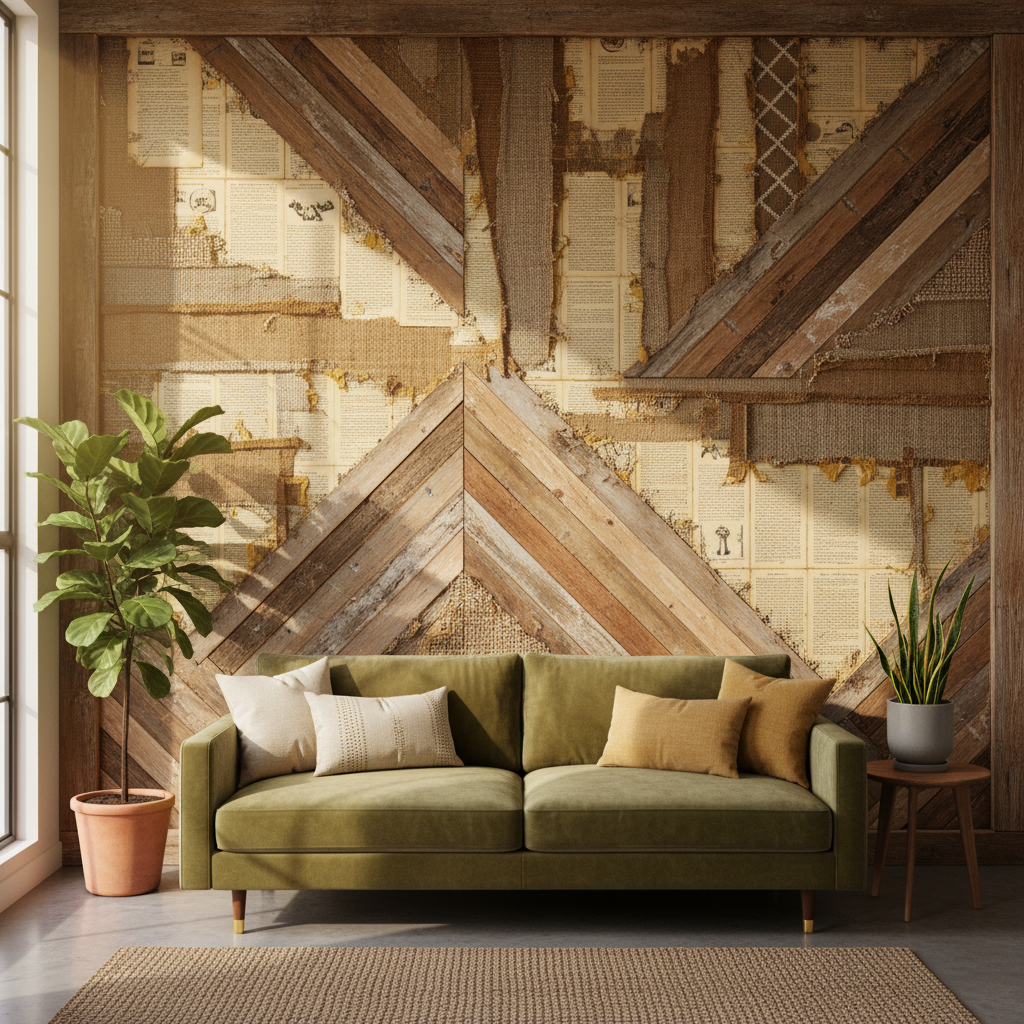
Ah, the humble wood pallet! This is probably one of the most popular and versatile recycled materials for DIY projects, and for good reason. Pallets offer a beautiful, raw, and rustic aesthetic that can bring a lot of warmth and character to a space. I’ve seen some incredible transformations, from entire walls covered in sanded and stained pallet wood to intricate geometric patterns made from smaller scraps.
How to use them:
- Sourcing: Look for free pallets at local businesses (ask first!), construction sites, or even online marketplaces. Always inspect them for damage, pests, or chemical treatments (look for “HT” for heat-treated, avoid “MB” for methyl bromide).
- Preparation: This is crucial. Disassemble the pallets carefully using a pry bar or saw. Sand the wood thoroughly to remove splinters and smooth the surface. You can then stain, paint, or simply seal the wood to preserve its natural beauty.
- Installation: You can attach the planks directly to your wall using screws or nails, ensuring they go into studs for stability. Experiment with different orientations – horizontal, vertical, or even diagonal – to create various effects. Some people even cut them into geometric shapes for a more modern look.
Material Spotlight: The Literary Elegance of Old Books & Magazines
Got a stack of old paperbacks you’re never going to read again, or magazines past their prime? Don’t toss them! They can create an incredibly sophisticated and textured accent wall that speaks volumes (pun intended!). I once saw a cafe that had a wall made entirely of old book pages, and it was simply breathtaking – it added such a cozy, intellectual vibe.
How to use them:
- Sourcing: Raid your bookshelves, visit thrift stores, or check out library discard piles. Look for books with interesting covers, aged pages, or even just a consistent size.
- Preparation: You can use entire book covers for a colorful, collage-like effect, or carefully tear out pages for a more uniform, layered look. For magazines, consider cutting out interesting images or text, or using whole pages for color blocks.
- Installation: A strong spray adhesive or craft glue works well for attaching paper to a wall. For book pages, you can overlap them slightly, create a herringbone pattern, or even roll them into tubes for a 3D effect. For book covers, arrange them in a grid or a more organic pattern. You might want to seal the finished wall with a matte or gloss varnish to protect it and give it a polished look.
Material Spotlight: The Textile Artistry of Fabric Scraps & Old Clothes
Who knew your old jeans or fabric remnants could become a work of art? Using fabric scraps and old clothes brings an incredible amount of texture, color, and softness to a wall. Think about creating a quilted effect, a woven pattern, or even fringed layers. It’s a wonderful way to use up those bits and bobs from sewing projects or beloved, worn-out garments.
How to use them:
- Sourcing: Your own closet, fabric store remnants bins, thrift stores, or even old bedsheets and curtains. Consider different textures like denim, cotton, linen, or even silk for variety.
- Preparation: Wash and iron all fabrics. Cut them into desired shapes – squares, rectangles, strips, or even abstract forms.
- Installation: There are several ways to attach fabric. You can use fabric glue, a staple gun (if your wall allows), or even create removable fabric panels. For a truly unique look, consider creating a large fabric “quilt” that you then hang on the wall, or stretching fabric over frames to create individual wall art pieces that together form an accent.
Material Spotlight: The Playful Mosaic of Bottle Caps & Cans
This option is for the truly adventurous and patient DIYer, but the results can be absolutely stuing and incredibly unique. Imagine a wall shimmering with a mosaic of bottle caps or reflecting light from flattened aluminum cans. It’s certainly a conversation starter!
How to use them:
- Sourcing: Start collecting! Ask friends, family, and local bars/restaurants to save their bottle caps. For cans, aluminum soda or beer cans work best as they are easy to cut and flatten.
- Preparation: Clean all bottle caps thoroughly. For cans, carefully cut off the top and bottom, then slice down the side to create a flat sheet. Be extremely careful with sharp edges! You can then flatten these sheets completely. You might even want to paint the bottle caps or cans for a specific color scheme.
- Installation: This is where patience comes in. Strong adhesive like construction adhesive or epoxy glue will be necessary. For bottle caps, you can arrange them face up, face down, or on their sides to create different textures and patterns. For flattened cans, you can overlap them like shingles, cut them into geometric shapes, or even create intricate patterns.
General Tips for a Successful Recycled Accent Wall
- Start Small: If you’re new to DIY or working with recycled materials, consider starting with a smaller section of a wall or a framed piece of art before tackling an entire wall.
- Gather Your Tools: Depending on your material, you might need a measuring tape, level, saw, utility knife, scissors, sander, pry bar, staple gun, various glues (wood glue, spray adhesive, construction adhesive), and safety gear.
- Adhesion is Key: Choose the right adhesive for your material and wall type. Test a small area first to ensure it holds well and doesn’t damage your wall.
- Layer and Texture: Don’t be afraid to experiment! Layering different materials or using the same material in varying ways can add incredible depth.
- Seal It Up: For many materials, especially paper or untreated wood, a protective sealant (like a clear varnish or polyurethane) will help with durability and easy cleaning.
- Embrace Imperfection: Recycled materials often come with their own unique quirks and imperfections. Embrace these! They add to the character and story of your wall.
Why Go Recycled? The Bigger Picture
Beyond the sheer satisfaction of creating something beautiful with your own hands, there are some pretty compelling reasons to choose recycled materials for your accent wall. You’re giving items a second life, diverting waste from landfills, and often saving a good chunk of change on materials. Plus, you’re creating a truly unique piece of art that no one else in the world will have. It’s a statement about your style, your values, and your commitment to a more sustainable way of living.
Ready to Create?
So, there you have it! Creating an accent wall from recycled materials is an incredibly rewarding project. It’s an opportunity to let your imagination run wild, to transform discarded items into stuing features, and to add a truly personal and eco-conscious touch to your home. Don’t be afraid to experiment, to get a little messy, and to enjoy the process. Every scrap, every piece of reclaimed wood, every old book page has the potential to become part of something magnificent. I can’t wait to see what amazing accent walls you’ll create!
