Why Does My Shed Roof Leak After Snow? Common Culprits
The beauty of a snow-covered landscape can quickly turn into a headache when that snow begins to melt and finds its way inside your shed. Understanding the specific reasons why a shed roof might leak after snow is the first step towards a lasting solution. Here are the most common culprits:
Snow Load and Ice Dams
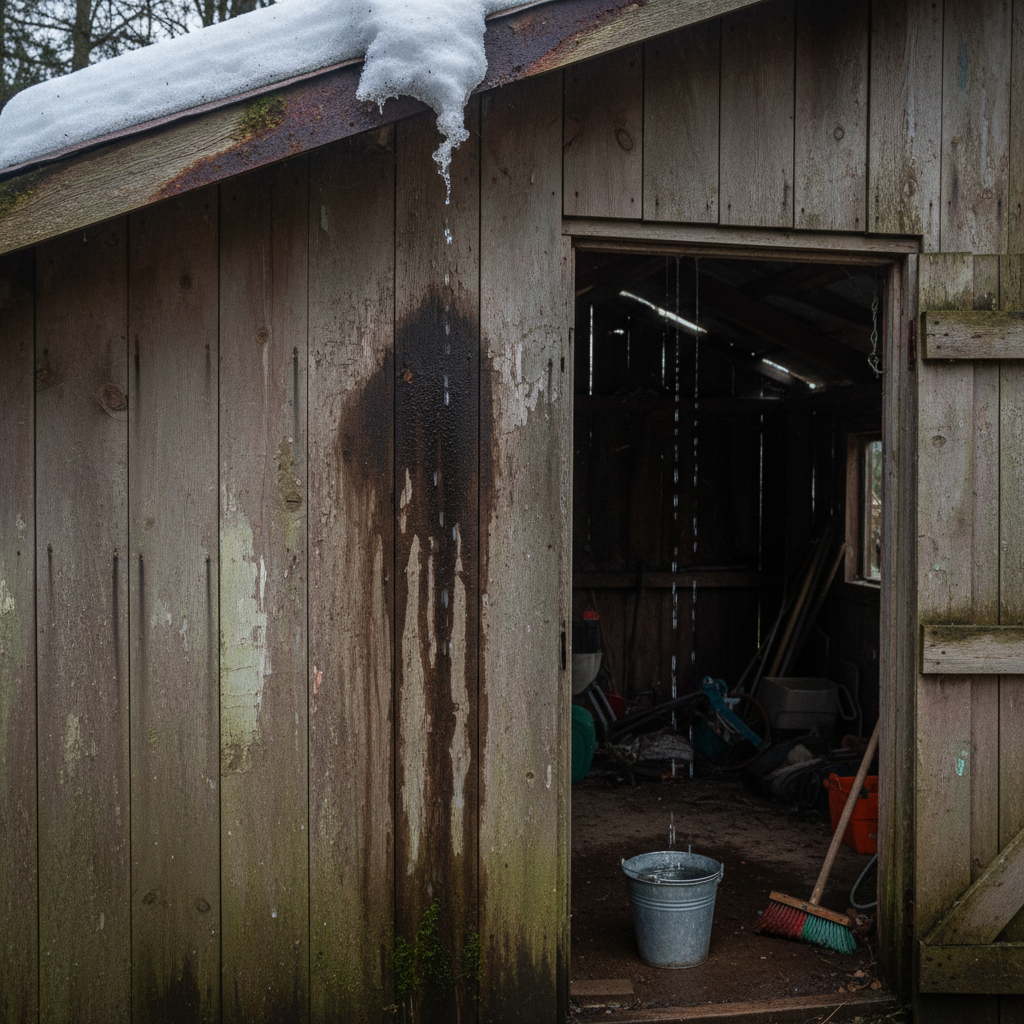
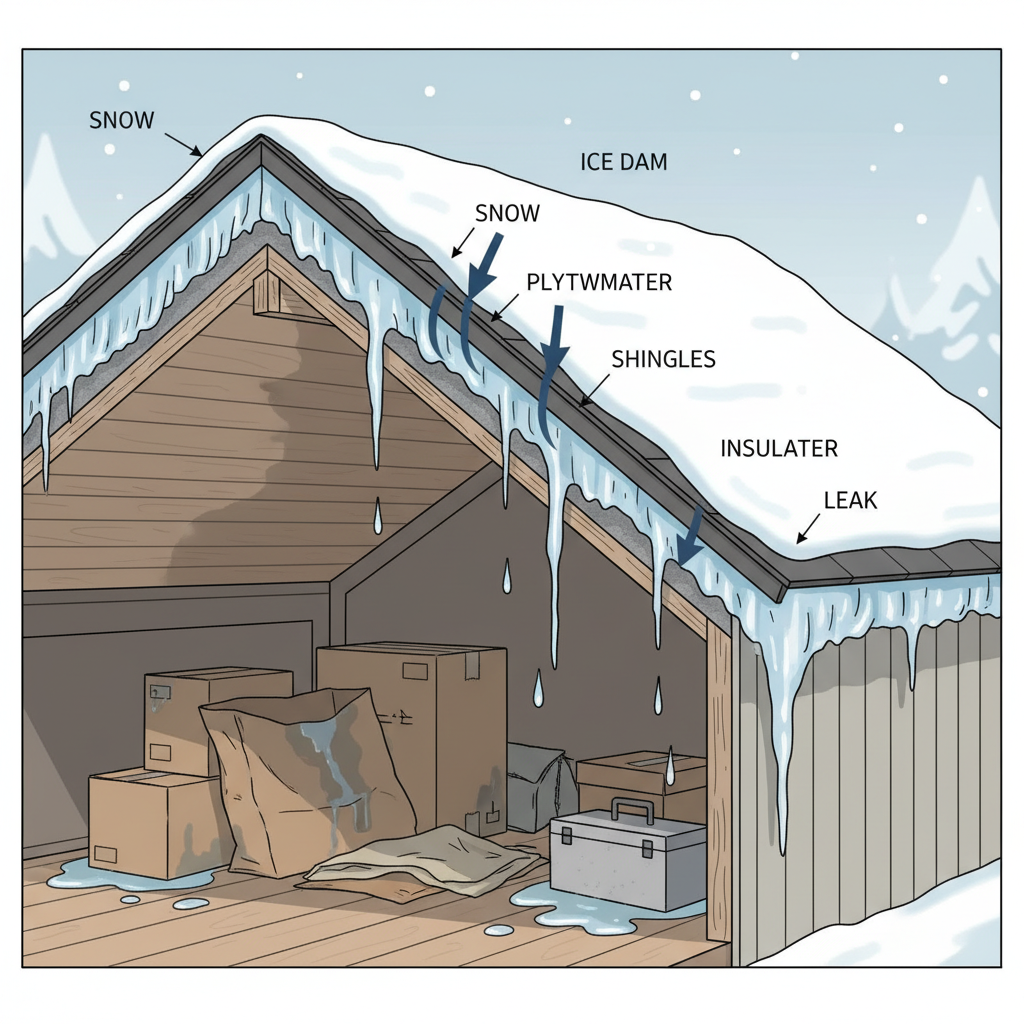
Heavy snow accumulation exerts significant weight on your shed roof. While sheds are designed to withstand a certain load, excessive or prolonged snow can stress the roofing materials, potentially causing minor structural shifts that open up vulnerabilities. Even more problematic are ice dams. These occur when heat from inside the shed (or even ambient warmth from the sun) melts snow on the upper parts of the roof. This meltwater then flows down to the colder eaves, where it refreezes, forming a barrier of ice. Subsequent meltwater, unable to drain over this ice dam, backs up under shingles, through gaps, and eventually into your shed. This process is one of the leading causes of a shed roof leaking after snow.
Temperature Fluctuations and Freeze-Thaw Cycles
Winter isn’t static; it’s a dynamic season marked by fluctuating temperatures. A day of thawing, followed by a night of freezing, creates a relentless cycle that can be incredibly damaging to roofing materials. Water seeps into tiny cracks and crevices during warmer periods, only to expand when it freezes solid overnight. This expansion widens existing cracks and creates new ones, slowly compromising the integrity of shingles, flashing, and seals. Over time, these minute damages accumulate, making the roof susceptible to leaks when snow melts.
Aging or Damaged Roofing Materials
No roofing material lasts forever. Over years of exposure to sun, rain, wind, and snow, materials like asphalt shingles, metal panels, or wooden shakes will degrade. Shingles can crack, curl, blister, or lose their granular surface. Metal roofs can develop rust spots or loose seams. Felt underlayment can become brittle and tear. Any of these conditions create easy entry points for water once the snow begins to melt. A shed with an older roof is inherently more vulnerable to leaks after a snowfall.
Poor Drainage and Gutter Issues
Effective drainage is critical for preventing water accumulation. If your shed’s gutters are clogged with leaves, debris, or ice, meltwater from the snow has nowhere to go. It pools along the eaves and fascia, eventually finding its way underneath the roofing materials and into the shed. Similarly, if your shed lacks gutters or if the roof slope is insufficient, water can sit on the roof longer, increasing the chances of it seeping through any weaknesses.
Improper Installation or Flashing
Even a brand-new roof can leak if it wasn’t installed correctly. Common installation errors include improperly nailed shingles, insufficient overlap, or inadequate sealing. Flashing, the metal strips installed around penetrations like vents, chimneys (less common on sheds but possible), and along valleys or wall junctions, is particularly critical. If flashing is bent, rusted, or installed incorrectly, it can create direct pathways for water to enter the shed once snowmelt occurs. These often become apparent only under the stress of melting snow.
Ventilation Problems
While often overlooked for sheds, proper attic or roof cavity ventilation is important, especially in colder climates. Good ventilation helps to maintain a consistent temperature across the entire roof surface. Without it, heat from the shed interior can warm the roof deck unevenly, leading to the differential melting and refreezing that creates ice dams. Poor ventilation also contributes to moisture buildup, which can accelerate the deterioration of the roof structure and materials from the inside out.
Immediate Steps: What to Do When You Discover a Leak
Finding a leak can be alarming, but taking immediate, calm action can minimize damage and provide clues for repair.
Contain the Water
Your first priority is to stop the water from spreading and damaging more of your stored items or the shed’s interior. Place buckets, tarps, or old towels directly under the leak. If the water is spreading across the floor, create a makeshift barrier or channel it towards a drain or the door opening.
Identify the Leak’s Location
While the leak might appear in one spot, the actual source on the roof could be several feet away. Try to determine the general area where the water is coming in. Look for dripping sounds, water stains, or visible streams. This initial assessment will be crucial for guiding your exterior inspection.
Assess the Damage
After containing the immediate leak, take a moment to assess the extent of the water damage inside the shed. Are items soaked? Is the floor warped? Are there signs of mold or mildew already? Documenting the damage with photos can be helpful for potential insurance claims (though shed-specific insurance varies) or for tracking repairs.
Safety First
Before attempting any inspection or repair, prioritize safety. If the leak is near electrical outlets or wiring, turn off the power to the shed if possible. Avoid walking on a slippery or unstable roof, especially if there’s still snow or ice. If you’re uncomfortable or unsure, it’s always best to wait for safer conditions or call a professional.
Diagnosing the Source: Pinpointing the Problem Area
Once the immediate crisis is contained, it’s time to play detective and find the exact source of the leak. This often requires both an interior and exterior inspection.
Inspect the Exterior: Roof Surface and Edges
Once it’s safe and the weather permits, carefully inspect your shed roof from the outside. Look for:
- Missing, Cracked, or Curled Shingles: These are obvious weak points.
- Loose or Damaged Flashing: Check around vents, edges, and any other penetrations.
- Sagging or Soft Spots: These indicate structural weakness or water accumulation.
- Clogged Gutters and Downspouts: Ensure they are clear of debris.
- Evidence of Ice Dams: Look for thick ridges of ice along the eaves.
- Damaged Fascia Boards: Rotting wood here can indicate water overflow from gutters.
- Cracks or Gaps: Especially around the edges where the roof meets the walls.
Examine the Interior: Attic or Underside of Roof
If your shed has an accessible attic or rafters, get inside with a flashlight. Look for:
- Water Stains: These often trace a path from the leak source.
- Mold or Mildew: Indicates a long-standing moisture problem.
- Damp or Rotted Wood: Especially on rafters, sheathing, or insulation.
- Penetrations: Areas where nails, screws, or vents go through the roof are common leak points.
Look for Water Trails and Stains
Water often doesn’t drip straight down. It can travel along rafters, beams, or the underside of the roof sheathing before finding an exit point. Trace water stains and dampness upwards to help pinpoint the origin. The actual leak might be uphill from where the water is appearing inside the shed.
Consider Professional Help
If you’re unable to find the source, or if the roof is too steep, high, or damaged to inspect safely, don’t hesitate to call a professional roofing contractor. They have the experience and equipment to diagnose difficult leaks.
Effective Solutions: Repairing a Leaky Shed Roof
Once you’ve identified the problem, it’s time for the fix. The repair method will depend entirely on the nature and severity of the leak.
Addressing Ice Dams
If ice dams are the cause, careful removal is essential. Avoid using harsh tools that could damage the roof. Consider products like roof rakes (used from the ground) to safely remove snow from the eaves, or calcium chloride ice melt products specifically designed for roofs (use sparingly and according to instructions to avoid damage). The long-term solution involves improving ventilation and insulation to prevent their formation in the first place.
Repairing Shingles and Roofing Felt
- Replacing Damaged Shingles: Carefully lift the shingle above the damaged one, remove the old shingle’s nails, slide out the old shingle, and slide in a new one. Secure it with roofing nails and seal the edges with roofing cement.
- Repairing Small Cracks: For minor cracks or missing granules, a high-quality roofing cement or sealant can be applied directly.
- Addressing Exposed Nails: If nails have popped up, gently hammer them back down and cover the head with roofing cement.
Fixing Flashing Issues
Damaged or loose flashing needs immediate attention. Small gaps can be sealed with roofing cement or silicone caulk. For severely bent, rusted, or missing flashing, it may need to be replaced entirely. This can be a more complex task, potentially requiring the removal of surrounding shingles.
Sealing Small Cracks and Holes
For tiny holes, pinholes, or minor cracks in the roof surface (especially common on older metal or flat roofs), a high-quality roofing sealant or elastomeric coating can provide a temporary or even long-term fix, depending on the material and crack size. Always ensure the surface is clean and dry before application.
Replacing Damaged Sections
If a specific area of the roof deck (the plywood or OSB beneath the roofing material) is rotted or soft, the roofing material above it will need to be removed, the damaged deck replaced, and new roofing applied. This is a more involved repair but essential for structural integrity.
Improving Drainage with Gutters
If your shed lacks gutters or if they are perpetually clogged, installing or maintaining a gutter system is a wise investment. Ensure gutters are properly sloped towards downspouts and kept free of debris. Gutter guards can help prevent clogs.
Considering a Full Roof Replacement
If your shed roof is old, extensively damaged, or experiencing multiple widespread leaks, a full roof replacement might be the most cost-effective and durable solution in the long run. While a larger undertaking, it ensures complete protection and extends the life of your shed significantly. For more on general roof maintenance and repairs, reputable sources like Good Housekeeping offer valuable insights.
Preventative Measures: Keeping Your Shed Dry Year-Round
The best way to deal with a shed roof leaking after snow is to prevent it from happening in the first place. Proactive maintenance is key to a dry, healthy shed.
Regular Roof Inspections and Maintenance
Make it a habit to inspect your shed roof at least twice a year—once in the spring to assess winter damage and once in the fall to prepare for winter. Look for loose shingles, cracked sealant, rusted flashing, or any signs of wear and tear. Address small issues before they become major leaks.
Ensure Proper Ventilation
Adequate ventilation helps equalize temperatures on both sides of the roof deck, preventing premature aging of materials and, crucially, the formation of ice dams. If your shed lacks vents, consider installing gable vents, ridge vents, or soffit vents to allow for airflow. Consult with a professional if you’re unsure about the best ventilation strategy for your shed.
Clear Debris and Maintain Gutters
Regularly clean your gutters and downspouts, especially before winter. Remove leaves, twigs, and other debris that can lead to clogs and ice dams. If your shed doesn’t have gutters, consider installing them to direct meltwater away from the foundation and roofline.
Consider a Durable Roofing Material
When it’s time for a roof replacement, invest in high-quality, durable materials suitable for your climate. Options like architectural shingles, metal roofing, or even rubber membrane (for low-slope roofs) can offer superior protection against snow, ice, and harsh weather conditions.
Trim Overhanging Branches
Branches overhanging your shed can drop leaves and debris into gutters, scrape against the roof, and even pose a risk of falling during heavy snow or ice storms, causing significant damage. Trim them back to prevent these issues.
Apply Protective Coatings
For certain roofing types, especially flat or low-slope roofs, applying an elastomeric roof coating can add an extra layer of waterproofing and protection. These coatings can seal minor cracks and extend the life of the roof, providing an additional barrier against snowmelt.
The Long-Term Impact of Neglecting Shed Roof Leaks
Ignoring a leaky shed roof, especially one that appears after snowmelt, can lead to a cascade of problems that far outweigh the initial inconvenience of a small drip.
Structural Damage and Wood Rot
Persistent moisture exposure causes wood components of your shed—rafters, joists, sheathing, and even wall studs—to rot. This compromises the structural integrity of the entire building, making it unstable and potentially unsafe. Once rot sets in, repairs become significantly more complex and expensive.
Mold and Mildew Growth
Damp, dark environments are ideal breeding grounds for mold and mildew. These fungi not only produce an unpleasant musty odor but can also damage stored items, cause respiratory issues, and further degrade wooden structures. Removing extensive mold can be a difficult and costly process.
Damage to Stored Items
The primary purpose of a shed is to protect your belongings. A leak directly defeats this purpose. Tools can rust, gardening supplies can spoil, fabrics can grow mold, and any electrical equipment can be permanently damaged. The value of items lost or ruined can quickly exceed the cost of roof repair.
Pest Infestations
Moisture and rotting wood attract various pests, including termites, carpenter ants, rodents, and other insects. These creatures can further damage the shed’s structure and even find their way into your home if the shed is in close proximity.
Decreased Property Value
A poorly maintained shed, particularly one with a leaky roof, detracts from your property’s overall appeal and value. Potential buyers will view it as a liability, and it may require costly repairs before a sale can be finalized.
FAQs About Shed Roof Leaks After Snow
Q: Can a shed roof leak even if the snow hasn’t fully melted?
A: Yes, absolutely. This is often due to ice dams. Heat from the shed warms the roof deck, melting the snow directly above it. This meltwater then flows down, hits colder eaves, and refreezes, creating an ice dam. The subsequent meltwater gets trapped behind this dam and backs up under shingles, leading to leaks even while snow is still present on other parts of the roof.
Q: How often should I inspect my shed roof?
A: It’s recommended to inspect your shed roof at least twice a year: once in the spring to check for winter damage, and again in the fall to prepare for the upcoming winter. More frequent checks after severe weather events are also a good idea.
Q: Is it safe to repair a shed roof in winter?
A: Repairing a shed roof in winter can be hazardous due to slippery conditions from ice or snow, and cold temperatures can make some roofing materials brittle or sealants less effective. Small, urgent repairs might be possible, but it’s generally safer and more effective to wait for milder, dry weather conditions for significant repairs or replacements. Always prioritize safety.
Q: What’s the best roofing material to prevent snow-related leaks?
A: Durable materials like metal roofing (especially standing seam), architectural shingles, or certain rubber membranes (for low-slope roofs) are excellent for preventing snow-related leaks. Metal roofs shed snow and ice efficiently, while quality shingles, properly installed with good underlayment, offer robust protection. The key is proper installation and adequate pitch.
Q: When should I call a professional for a shed roof leak?
A: You should call a professional if you can’t identify the source of the leak, if the repairs seem beyond your skill level, if the roof is too high or steep to access safely, or if there’s extensive damage or structural compromise. Professionals have the tools, expertise, and safety equipment to diagnose and fix complex roofing issues efficiently.
Conclusion: Protecting Your Outdoor Investment
A shed is more than just a storage unit; it’s an extension of your home, protecting valuable tools, equipment, and personal belongings. When your shed roof starts leaking after snow, it’s a clear call to action. By understanding the common causes, taking prompt diagnostic steps, implementing effective repairs, and adopting a routine of preventative maintenance, you can ensure your shed remains a dry, secure, and valuable asset for years to come. Don’t let the melting snow turn your outdoor sanctuary into a soggy mess—take control and protect your investment.


