Discovering your kitchen sink air gap leaking can be an alarming and messy experience, often signaling an underlying issue with your dishwasher’s drainage system. While it might seem like a minor drip at first, ignoring a leaking air gap can lead to water damage, mold growth, and more significant plumbing problems down the line. This often-overlooked plumbing component plays a crucial role in preventing contaminated water from flowing back into your clean water supply. Understanding why your air gap might be leaking, how to accurately diagnose the problem, and the steps you can take to fix it is essential for any homeowner. In this comprehensive guide, we’ll walk you through everything you need to know to troubleshoot and resolve a leaking kitchen sink air gap, ensuring your kitchen remains clean, safe, and fully functional.
What is a Kitchen Sink Air Gap and Why is It Important?
Before diving into troubleshooting leaks, it’s vital to understand what an air gap is and its fundamental role in your kitchen’s plumbing system. A kitchen sink air gap is a small, typically cylindrical fitting located on your kitchen sink or countertop, usually near the faucet. It’s easily recognizable by its two distinct openings, often capped by a decorative cover.
The Purpose of an Air Gap: Backflow Prevention
The primary function of a dishwasher air gap is to prevent a plumbing phenomenon known as “backflow.” Backflow occurs when wastewater, which can be contaminated with food particles, soap, and bacteria, flows backward from your dishwasher drain hose into your home’s potable (drinking) water supply. This can happen if there’s a sudden drop in water pressure in your plumbing system or a blockage in the drain line.
An air gap creates an actual physical separation, a literal “air gap,” between the end of your dishwasher’s drain hose and the drainage system (usually your garbage disposal or main sink drain). This physical break ensures that even if there’s a vacuum or back pressure in the drain, the dirty water cannot be siphoned back into the dishwasher or, more critically, into your clean water lines. It’s a critical safety device mandated by plumbing codes in many areas to protect public health.
How an Air Gap Works
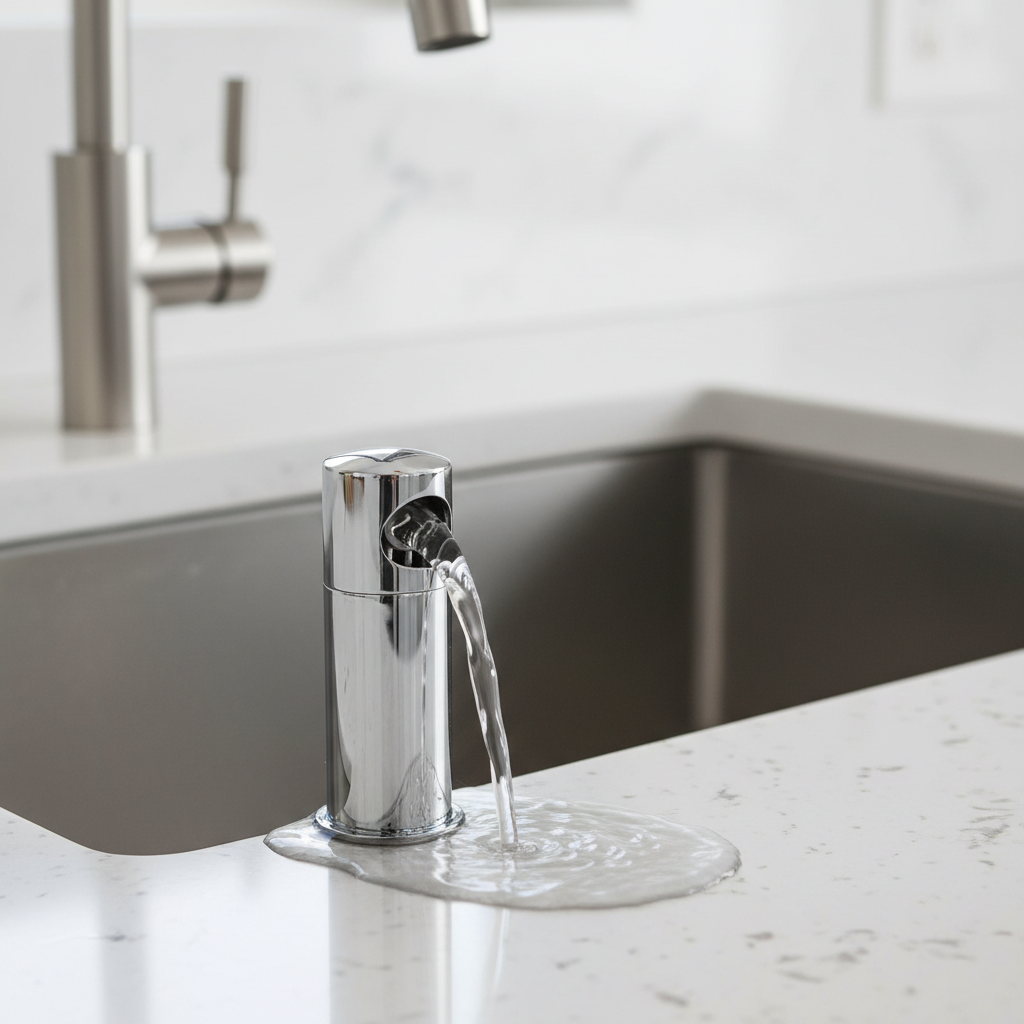
Water from your dishwasher’s drain pump is directed to the top inlet of the air gap. Inside the air gap unit, the water flows over a small barrier and then exits through the bottom outlet, continuing its journey to the garbage disposal or sink drain. If the drain line from the air gap to the disposal becomes clogged, the water has nowhere to go. Instead of backing up into the dishwasher, the air gap is designed to allow this excess water to overflow from its vent openings, making the leak visible. This overflow is a deliberate safety feature, alerting you to a blockage before it causes more significant issues or contaminates your water supply.
Understanding Why Your Kitchen Sink Air Gap is Leaking
A leaking air gap is almost always a symptom of a blockage somewhere in the dishwasher’s drain path, rather than a fault with the air gap itself. Pinpointing the exact cause is the first step toward a successful repair. Here are the most common reasons your kitchen sink air gap might be leaking:
1. Clogged Dishwasher Drain Hose (from Air Gap to Disposal/Drain)
This is by far the most frequent culprit. The hose connecting the air gap to your garbage disposal or a dedicated drain stub can become clogged with food particles, grease, detergent residue, or mineral deposits. When this hose is blocked, the water draining from your dishwasher has no clear path to the drain. The air gap, doing its job, will then divert the overflowing water out through its vent holes, causing the visible leak on your sink deck.
2. Clogged Air Gap Unit Itself
While less common than a drain hose clog, the internal components of the air gap unit can also accumulate debris. Small food particles, pieces of labels, or mineral buildup can partially or completely obstruct the flow of water within the air gap, leading to an overflow.
3. Clogged Garbage Disposal
If your dishwasher drains into your garbage disposal, a clog in the disposal unit itself or the main drain line connected to it will prevent proper drainage. When the disposal is jammed or the drain is blocked, water backs up, affecting the dishwasher’s ability to drain, and subsequently causing the air gap to leak. Running the disposal without water is a common mistake that can lead to clogs.
4. Blocked Sink Drain
If your main sink drain is slow or completely clogged, it can impede the flow of water from the garbage disposal, which in turn backs up the entire system, including the dishwasher drain path and the air gap.
5. Improper Installation or Loose Connections
Though not a clog, improper installation can sometimes lead to leaks. If the hoses connected to the air gap are not securely fastened with clamps, or if the air gap unit itself is not seated correctly on the sink or countertop, water can escape. This is less common for a sudden leak, but can be a factor if the leak appeared shortly after installation or maintenance.
6. Damaged Air Gap Unit
In rare instances, the air gap unit itself might be cracked or damaged, especially if it’s made of plastic and has been subjected to impact or extreme temperatures. A crack would allow water to escape directly from the unit, regardless of clogs.
7. Dishwasher Pump Issues or Excessive Water Pressure
While an air gap leak is typically due to a downstream blockage, an excessively powerful dishwasher drain pump or unusually high water pressure could theoretically overwhelm a partially restricted air gap or drain hose, contributing to an overflow.
Diagnosing the Leak: A Step-by-Step Guide
Accurately identifying the source of the blockage is crucial for an effective repair. Follow these steps to diagnose why your kitchen sink air gap is leaking:
Step 1: Observe the Leak
- When does it leak? Does it leak only when the dishwasher is running its drain cycle? Does it leak every time the dishwasher drains, or only sometimes?
- How much water leaks? Is it a trickle or a significant flow?
- Where exactly is the water coming from on the air gap? Is it from the top cap, around the base, or from the small vents?
Most commonly, the leak occurs during the dishwasher’s drain cycle and spills from the vents or under the cap, indicating a blockage downstream.
Step 2: Test Your Garbage Disposal
If your dishwasher drains into your garbage disposal, this is often the easiest place to start.
- Turn on your cold water faucet to a steady stream.
- Turn on the garbage disposal. Listen for any unusual noises or signs of struggle.
- If the disposal hums but doesn’t grind, it might be jammed. Use an Allen wrench (usually supplied with the disposal) in the reset hole on the bottom to clear it, then press the reset button.
- If the disposal seems to work but the water drains slowly, or if water backs up into the sink, the problem might be a clog further down the main drain line, or the disposal itself is failing.
Step 3: Run the Dishwasher (Carefully)
Start a short wash cycle on your dishwasher and pay close attention to the air gap when the dishwasher goes into its drain cycle. This will confirm if the leak is directly tied to the dishwasher’s operation.
Step 4: Inspect the Air Gap Unit
With the dishwasher draining (and leaking), carefully observe the air gap.
- Remove the decorative cap by twisting or pulling it straight up.
- Underneath, you’ll usually find another cover. Remove this as well.
- Look for any visible debris inside the air gap unit, such as food particles, grease, or mineral buildup. This can sometimes be the direct cause of the leak.
Step 5: Check the Dishwasher Drain Hose (from Air Gap to Disposal/Drain)
This hose is often the primary suspect.
- Locate the dishwasher drain hose connecting the air gap to the garbage disposal or the main sink drain. This hose is typically corrugated plastic.
- Feel along the hose for any hard spots or bulges that might indicate a blockage.
- If possible, carefully disconnect the hose from the garbage disposal inlet (or drain stub). Have a bucket ready, as some water will likely spill out.
- Inspect the opening on the disposal for any debris. Ensure the knockout plug in the disposal was removed during installation if this is a new setup.
- If you disconnect the hose, try to flush water through it from the air gap end. If water flows freely, the clog is likely in the disposal or further down the drain. If water doesn’t flow, the hose itself is clogged.
DIY Solutions for a Leaking Kitchen Sink Air Gap
Once you’ve identified the likely cause, many air gap leaks can be fixed with basic tools and a bit of DIY effort. Always prioritize safety before starting any plumbing work.
Safety First!
- Turn off the power to your garbage disposal and dishwasher at the breaker box before performing any work inside the disposal or disconnecting hoses.
- Wear gloves and eye protection to protect yourself from dirty water and potential chemical exposure.
- Have towels and a bucket ready to catch any spills.
Solution 1: Clear the Dishwasher Drain Hose (Air Gap to Disposal/Drain)
This is the most common fix.
- Access the Hose: The hose usually connects to a dedicated inlet on the side of your garbage disposal or a separate branch on the sink drain pipe. You might need to reach under the sink.
- Disconnect the Hose: Loosen the clamp holding the hose to the disposal/drain. Twist and pull the hose off. Be prepared for some residual water to come out.
- Clear the Clog:
- Inspect the Connection Point: Look into the disposal inlet for any hardened food debris or obstructions. Use a screwdriver or a small brush to clear it out.
- Clean the Hose: Take the disconnected hose to a utility sink or outside. Use a stiff wire brush, a pipe cleaner, or even a straightened coat hanger to push through the hose and dislodge any buildup. You can also flush it thoroughly with hot water. Ensure water flows freely through it.
- Reattach the Hose: Securely reattach the clean hose to the disposal/drain inlet and tighten the clamp. Ensure there are no kinks in the hose.
- Test: Turn the power back on and run a short dishwasher cycle to check for leaks.
Solution 2: Clean the Air Gap Unit Itself
If the hose is clear, the air gap unit might be the issue.
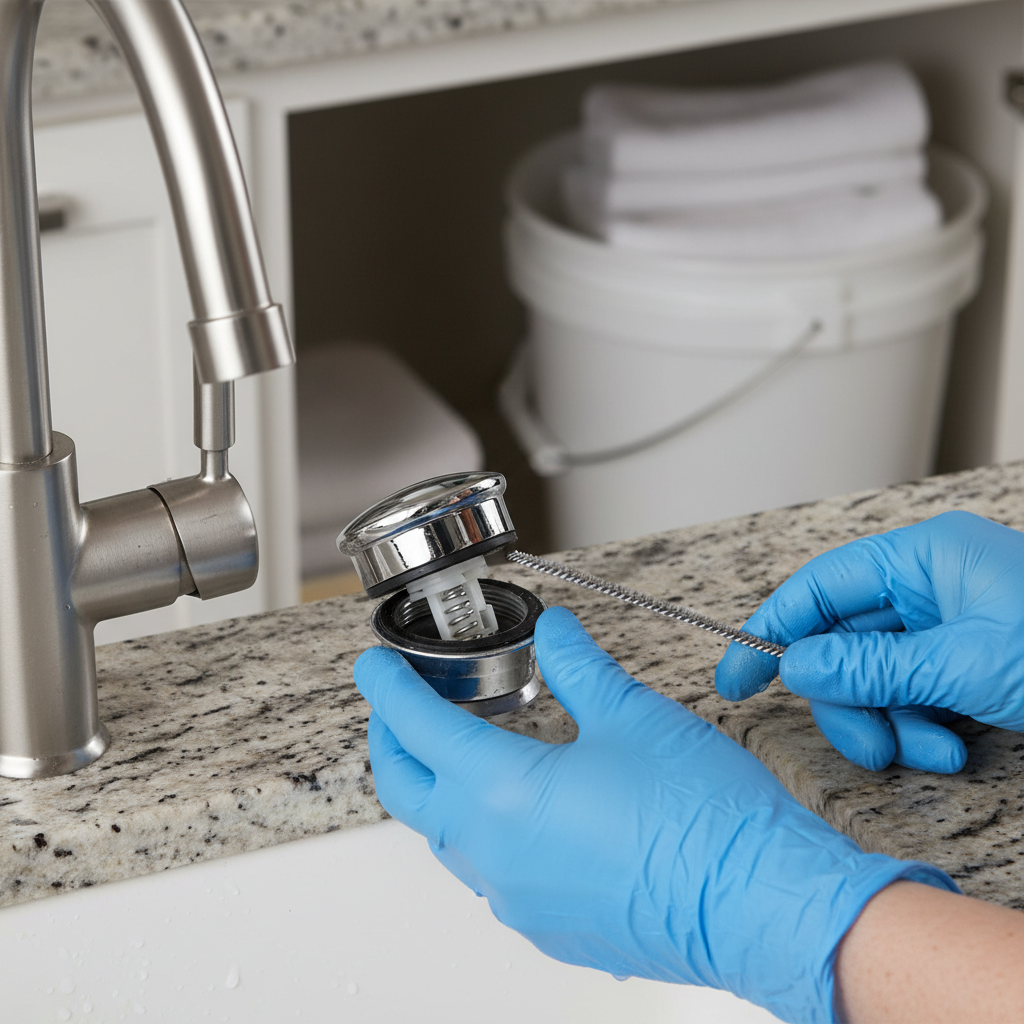
- Remove the Covers: Twist or pull off the decorative cap, then remove the inner cover.
- Inspect and Clean: Look for any visible debris, food particles, or mineral buildup inside the unit. Use a small brush (like a toothbrush or bottle brush) or a thin wire to gently clear out any obstructions from the internal passages.
- Flush (Optional): While the covers are off, you can carefully pour a small amount of hot water down the air gap to help flush out loose debris.
- Reassemble and Test: Replace the inner cover and decorative cap. Turn the power back on and run the dishwasher to test.
Solution 3: Clear the Garbage Disposal and Main Sink Drain
If the above steps don’t resolve the issue, the clog might be deeper.
- Clear the Disposal: If your disposal is humming but not grinding, it’s likely jammed. Use the Allen wrench provided with the disposal to free the motor from the bottom, then press the red reset button. Run cold water and the disposal to ensure it’s clear.
- Baking Soda and Vinegar: For minor clogs in the main drain, pour 1/2 cup of baking soda down the drain, followed by 1/2 cup of white vinegar. Let it sit for 20-30 minutes, then flush with hot water. This creates a fizzing action that can help break down grease and grime.
- Plunger: Ensure your other sink drain opening (if you have a double sink) is sealed tightly with a stopper. Fill the sink with a few inches of water, then vigorously plunge the drain opening for 20-30 seconds.
- Drain Snake (Auger): For stubborn clogs, a drain snake can be inserted into the main sink drain (after removing the P-trap if necessary) to physically break up or retrieve the blockage. If you’re uncomfortable with this, it’s a good time to call a professional.
For more general kitchen drain maintenance tips that can help prevent these clogs, you might find resources like those from Good Housekeeping on cleaning kitchen drains helpful.
Solution 4: Check for Loose Connections or Damage
If all clogs are cleared and the leak persists, inspect the connections at the air gap unit more closely.
- Ensure the hoses are tightly secured with their clamps.
- Check the air gap unit itself for any visible cracks or damage. If the unit is cracked, it will need to be replaced.
Solution 5: Replace the Air Gap Unit (If Damaged)
If your air gap unit is physically damaged, replacement is the only option. This is a relatively straightforward process:
- Purchase a New Unit: Ensure the new unit matches the size of the hole in your sink/countertop.
- Disconnect Hoses: Loosen the clamps and disconnect both hoses from the old air gap unit (one from the dishwasher, one to the disposal/drain).
- Remove Old Unit: Unscrew the mounting nut from underneath the sink that holds the air gap in place. Pull the old unit up and out.
- Install New Unit: Insert the new air gap unit into the hole. From underneath, thread on the rubber washer and mounting nut, tightening it securely by hand, then with a wrench, but don’t overtighten.
- Reconnect Hoses: Attach the dishwasher drain hose to the smaller inlet and the hose leading to the disposal/drain to the larger outlet. Secure both with clamps.
- Test: Turn the water and power back on, and run your dishwasher to check for any leaks.
When to Call a Professional Plumber
While many air gap leaks can be resolved with DIY methods, there are instances where calling a professional plumber is the best course of action:
- Persistent Leaks: If you’ve tried all the troubleshooting steps and the air gap continues to leak, there might be a more complex underlying issue that requires expert diagnosis.
- Main Drain Clogs: If the problem seems to stem from a deep clog in your main kitchen drain or further down your home’s plumbing system, a professional has the specialized tools (like industrial drain snakes or hydro-jetting equipment) to clear it effectively.
- Uncertainty: If you’re uncomfortable working with plumbing or unsure about the cause of the leak, a professional can provide peace of mind and prevent accidental damage.
- Dishwasher Malfunction: If you suspect the dishwasher’s drain pump itself is failing, or if there are other issues with the dishwasher’s drainage cycle that aren’t related to clogs, a plumber or appliance technician should be consulted.
- Water Damage: If the leak has already caused significant water damage to your cabinets or flooring, a plumber can address the leak, and you may need a restoration specialist for the water damage.
Preventative Maintenance to Avoid Future Leaks
Proactive care can significantly reduce the chances of your kitchen sink air gap leaking again:
- Scrape Plates Thoroughly: Before loading dishes into the dishwasher, scrape off all large food particles into the trash or compost. This reduces the amount of debris entering the drain system.
- Use Your Garbage Disposal Regularly: If your dishwasher drains into the disposal, run the disposal with cold water for 15-30 seconds before and after using the dishwasher. This ensures the disposal is clear and ready to accept the dishwasher’s discharge.
- Avoid Grease Down the Drain: Never pour grease, oil, or fat down your kitchen sink or into the garbage disposal. These substances solidify and are a primary cause of stubborn clogs.
- Clean Your Dishwasher: Regularly clean your dishwasher to prevent food particles and grime from accumulating and potentially entering the drain hose. This includes cleaning the filter, spraying arms, and the interior.
- Occasional Air Gap Flush: Periodically remove the air gap cap and pour a small amount of hot water down it to flush out any potential buildup before it becomes a problem.
- Consider a Drain Protector: If you have a double sink, consider using a drain protector in the non-disposal side to catch food scraps and prevent them from going down the main drain.
- Check Hoses Annually: Briefly inspect the dishwasher drain hose and connections under the sink once a year for any signs of wear, kinks, or looseness.
Frequently Asked Questions (FAQs)
Is an air gap necessary for my dishwasher?
In many regions, yes, an air gap is required by local plumbing codes to prevent backflow and protect your potable water supply from contamination. While some installations use a “high loop” in the dishwasher drain hose as an alternative, many codes still mandate a dedicated air gap for maximum protection.
Can I bypass the air gap?
Bypassing or removing an air gap is not recommended and is often illegal according to plumbing codes. It compromises the safety of your home’s water supply by removing a critical backflow prevention device. If your air gap is leaking, it indicates a problem that needs to be fixed, not bypassed.
How often should I clean my air gap?
There’s no strict schedule, but it’s a good idea to visually inspect it every few months. If you notice your sink draining slowly, your dishwasher isn’t draining well, or you’re experiencing a leak, that’s definitely the time to clean it. Proactive cleaning (perhaps once a year) can prevent issues.
What’s the difference between an air gap and a high loop?
Both serve to prevent backflow, but an air gap provides a physical break in the drain line, making it highly effective. A high loop involves routing the dishwasher drain hose in a high arc under the sink (above the drain inlet) to create a hydraulic barrier against backflow. While a high loop is accepted in some codes, an air gap offers superior protection.
Will a leaking air gap cause water damage?
Yes, if left unaddressed, a leaking air gap can cause significant water damage to your countertop, sink cabinet, and even your kitchen floor. Constant moisture can lead to wood rot, mold growth, and unpleasant odors, which are much more expensive to repair than a simple clog.
Conclusion
A leaking kitchen sink air gap, while inconvenient, is often a clear signal that your dishwasher’s drainage system needs attention. By understanding the purpose of this vital plumbing component and systematically diagnosing the cause of the leak, you can usually resolve the issue yourself with basic tools. Whether it’s clearing a clogged drain hose, cleaning the air gap unit, or addressing a jammed garbage disposal, taking proactive steps can restore your kitchen’s functionality and prevent more serious problems. Remember, if you’re ever in doubt or facing a persistent issue, don’t hesitate to consult a professional plumber to ensure your home’s plumbing remains safe and efficient.


