Hey there, fellow home improvers! Have you ever looked at your sad, neglected patio and wished it was a beautiful, inviting outdoor oasis? I certainly have. For years, my concrete slab of a patio was nothing more than a dumping ground for old planters, forgotten tools, and a relentless assault of weeds. I dreamed of a space where I could sip my morning coffee, read a book, or entertain friends, but every time I looked at furniture prices or professional landscaping costs, my dreams quickly deflated. My budget was, let’s just say, “modest.”
Then, one suy afternoon, armed with a strong cup of coffee and a surge of determination, I decided enough was enough. I wasn’t going to let a tight budget stand between me and my dream patio. I was going to DIY it, using the most affordable materials I could find. And guess what? It was one of the most rewarding projects I’ve ever tackled! If you’re in the same boat, feeling overwhelmed by costs but yearning for an outdoor retreat, stick around. I’m going to walk you through my personal journey, sharing all the tips, tricks, and budget-friendly choices I made to transform my drab patio into a fabulous outdoor haven, proving that you don’t need a fortune to create something beautiful.
The Vision & The Vitals: Budgeting & Plaing
Before I even thought about paint colors or potting soil, I sat down and did some serious plaing. This step is crucial, trust me! I started by:
- Dreaming Big (and Realistically): I scoured Pinterest and home decor blogs for inspiration. I created a mood board of styles I loved – cozy, bohemian, modern, rustic. The key was to extract elements I liked and then figure out how to achieve them on a shoestring budget.
- Setting a Budget: This was the most important part. I allocated a specific amount that I absolutely couldn’t exceed. This forced me to be creative and resourceful with every purchase. Write it down, stick to it!
- Listing Needs & Wants: What did I absolutely need (seating, some form of flooring)? What would be nice to have (lighting, plants, privacy screen)? Prioritizing helped me decide where to spend the most and where to cut corners.
- Measuring & Sketching: I grabbed a tape measure and sketched out my patio, noting dimensions and existing features. This helped me visualize layouts and estimate material quantities.
My budget forced me to think outside the box. Instead of expensive pavers, I considered paint. Instead of brand-new furniture, I thought about upcycling. This initial plaing phase, even though it wasn’t “glamorous,” saved me time, money, and headaches down the road.
Clearing the Canvas: Preparation is Key
Trust me when I say, you don’t want to skip this step. Transforming your patio is like painting a masterpiece; you need a clean canvas. My patio was a mess, full of dirt, old stains, and stubborn weeds clinging to every crack. Here’s what I did:
- Declutter: Everything had to go. Old furniture, dead plants, broken pots – all cleared out. This gave me a fresh perspective on the space.
- Weed Warfare: I spent a good hour pulling every single weed I could find. For stubborn ones in cracks, a weed torch or even boiling water can be effective, but manual labor and a good pair of gloves worked for me.
- Pressure Washing: Oh, the satisfaction! If you don’t own a pressure washer, consider renting one for a day or borrowing from a friend. The difference it makes on concrete, brick, or even siding is astonishing. It removed years of grime, moss, and discoloration, instantly brightening the space.
- Minor Repairs: I had a few small cracks in my concrete. I used an inexpensive concrete repair caulk to fill them in. It’s not about making it perfect, but preventing further deterioration and providing a smoother surface for whatever comes next.
Having a clean, clear, and prepped space made the subsequent steps so much easier and ensured a better, longer-lasting result.
Ground Rules: Budget-Friendly Flooring Solutions
This is often the biggest expense, and where I knew I had to get creative. Laying new pavers or decking can be incredibly costly. My solution? Stenciled concrete! Here’s how I tackled it and some other ideas:
My Choice: Stenciled Concrete
My existing concrete slab was structurally sound but ugly. I decided to give it a faux tile look with paint and a stencil. Here’s what I used:
- Concrete Cleaner/Etcher: To ensure proper paint adhesion after pressure washing.
- Outdoor Concrete Paint/Stain: I chose a light base color and a darker color for the stencil. Opt for a durable, non-slip formula.
- Large Stencil: I found a Moroccan tile pattern online for a reasonable price.
- Painter’s Tape, Rollers, Brushes: Standard painting supplies.
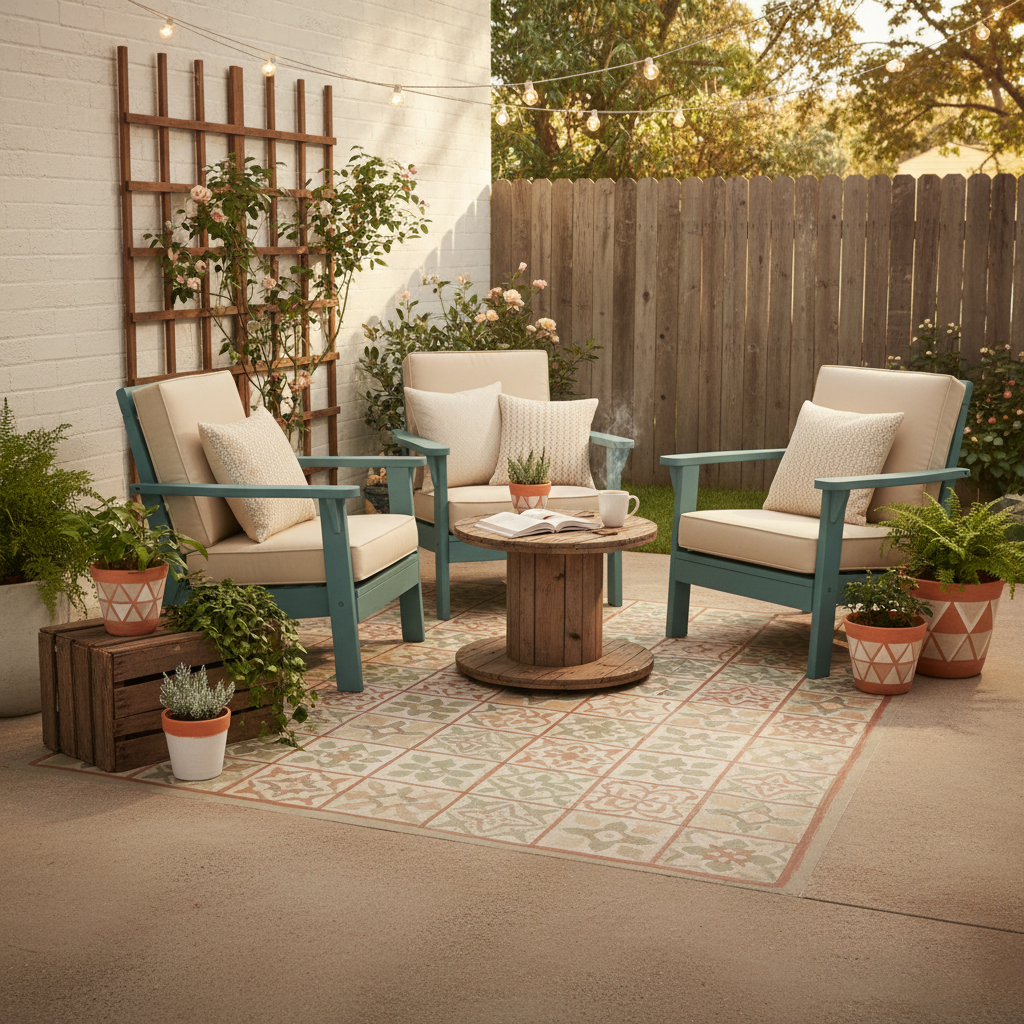
After cleaning and etching, I rolled on two coats of my base color. Once completely dry, I carefully taped down my stencil and applied the contrasting color with a small foam roller. It was a slow process, moving the stencil section by section, but the transformation was incredible! It looked like expensive tiles, and everyone who saw it was amazed it was just paint.
Other Affordable Flooring Ideas:
- Gravel/Pea Gravel: If you don’t have existing concrete, or if yours is beyond repair, a gravel patio is charming and affordable. Define your area with landscape edging, lay down a weed barrier fabric, and then spread your chosen gravel.
- Wood Chips/Mulch: For a softer, more natural look, especially if you want to blend into a garden. Again, use a weed barrier.
- Outdoor Rugs: An instant, no-fuss solution! A large outdoor rug can cover imperfections, add color, and define a space. You can often find great deals online or at discount stores.
- DIY Pallet Deck: If you’re handy and can source free or cheap pallets, you can create a raised deck. Just ensure they are heat-treated (HT) and not chemically treated (MB). Sand them down and apply an outdoor sealant.
Seating & Style: Upcycling & Thrifting Wonders
New outdoor furniture can quickly eat up your budget. My strategy was simple: repurpose, upcycle, and thrift! This is where you can inject a lot of personality without spending a lot of cash.
- Thrift Store Treasures: I found two solid wood chairs at a local thrift store for a steal. They were ugly brown, but a good sanding and two coats of outdoor-friendly spray paint (I chose a lovely teal) completely transformed them. They now look brand new!
- DIY Bench: I used a couple of cinder blocks and some sturdy wooden planks to create a simple, modern bench. I added outdoor cushions bought during an end-of-season sale.
- Repurposed Side Tables: An old wooden spool (from a local hardware store, often given away for free!) became a quirky coffee table after a good clean and a coat of sealant. An old metal bucket, painted vibrant yellow, served as a small accent table.
- Cushions & Pillows: These instantly add comfort and color. Look for outdoor-rated fabrics that can withstand the elements. I found some great deals online and at discount home stores. If you’re crafty, you can even sew your own covers from affordable outdoor fabric.
Don’t be afraid to mix and match. A uniform, store-bought set can look generic. Eclectic, upcycled pieces tell a story and add character.
Let There Be Light (and Ambiance!)
Lighting can transform a space from functional to magical, especially as the sun sets. And it doesn’t have to cost a fortune!
- Solar String Lights: My absolute favorite budget hack! I bought several strands of solar-powered fairy lights and strung them across my patio. They charge during the day and automatically light up at night, creating an enchanting glow without adding to my electricity bill.
- Solar Lanterns: These are fantastic for placing on tables or hanging from hooks. They come in various styles and provide a soft, ambient light.
- DIY Candle Holders: Repurpose mason jars or old wine bottles into beautiful candle holders. You can add sand or small pebbles to the bottom for stability. Citronella candles are great for keeping bugs away too!
- Outdoor Curtains: For a touch of softness and privacy, consider hanging sheer outdoor curtains. I used inexpensive shower curtains from a discount store, which are naturally water-resistant, and hung them from a simple tension rod between two posts.
Layering different types of light creates depth and warmth, making your patio feel truly inviting after dark.
Green Thumbs on a Budget: Plants & Planters
No outdoor oasis is complete without a touch of nature. Plants bring life, color, and freshness to any space.
- Affordable Plants: Instead of buying large, expensive plants, opt for smaller ones that will grow. Check local nurseries for sales, look for end-of-season clearances, or even ask friends for cuttings or divisions from their own gardens. Herbs like basil, mint, and rosemary are not only beautiful but also practical for cooking.
- DIY Planters: Terracotta pots are classic and inexpensive. You can paint them with outdoor paint to match your decor. Repurpose old buckets, tin cans (drill drainage holes!), or even tires (painted brightly!) into unique planters. I even used an old wooden crate for a cluster of smaller plants.
- Vertical Gardens: If space is limited, consider a vertical garden. You can create one using an old pallet, hanging shoe organizers, or a series of small pots attached to a wall. This adds a lush feel without taking up valuable floor space.
Don’t underestimate the power of a few well-placed plants to elevate the entire look and feel of your patio.
The Grand Reveal & Enjoying Your New Oasis
After all the hard work – the plaing, the cleaning, the painting, the planting – it was finally time to step back and admire my creation. The feeling of accomplishment was incredible! My sad concrete slab was gone, replaced by a vibrant, cozy, and utterly charming outdoor living space.
My favorite thing to do now is enjoy my morning coffee out there, listen to the birds, and feel the gentle breeze. In the evenings, with the string lights twinkling, it’s the perfect spot for a quiet read or for hosting a casual get-together with friends. It’s a space that truly reflects my personality and hard work, and the best part is, I didn’t have to break the bank to create it.
Maintaining it is relatively simple: a quick sweep, wiping down surfaces, and tending to the plants. Because everything was chosen for durability and affordability, I don’t worry too much about wear and tear.
Conclusion
So, there you have it – my journey from patio despair to outdoor bliss, all achieved with a modest budget and a lot of DIY spirit. It just goes to show that you don’t need to spend a fortune to create a beautiful and functional outdoor space that you’ll love. It takes a bit of plaing, some elbow grease, and a willingness to think creatively about materials and upcycling.
My advice? Don’t be intimidated. Start small, tackle one project at a time, and most importantly, have fun with it! Your patio can become an extension of your home, a place for relaxation, entertainment, and making memories. Go ahead, get your hands dirty, and transform your outdoor space into the oasis you’ve always dreamed of. You might just surprise yourself with what you can achieve!
