The Silent Danger: Why a Loose Deck Railing is More Than Just an Annoyance
A deck railing serves a vital purpose: to prevent falls. It acts as a protective barrier, keeping people, especially children and pets, from tumbling off the edge of an elevated surface. When a deck railing becomes loose, its ability to perform this function is severely compromised. Imagine leaning against a railing that suddenly gives way – the consequences could range from minor injuries to severe trauma, or even fatalities. This makes addressing a loose deck railing not just a home maintenance task, but a critical safety imperative for every homeowner.
- Risk of Falls: The most obvious danger. A railing that can’t support weight is an accident waiting to happen.
- Legal Liability: As a homeowner, you have a responsibility to maintain a safe environment. An injury due to a neglected loose railing could lead to legal action.
- Decreased Property Value: A visibly unsafe or deteriorating deck can deter potential buyers and reduce your home’s market value.
- Further Structural Damage: A loose railing can indicate deeper issues within the deck structure, such as rotting posts or joists, which could lead to more extensive and costly repairs down the line.
Common Culprits: What Makes a Deck Railing Become Loose?
Understanding the root cause of a loose railing is the first step toward an effective repair. Several factors, alone or in combination, can contribute to a railing losing its stability.
Wood Rot and Deterioration
Wood is susceptible to moisture, and over time, exposure to rain, snow, and humidity can lead to rot. This is particularly common where railing posts meet the deck surface or where wood components are consistently wet. Rot weakens the wood fibers, causing fasteners to lose their grip and the entire structure to become unstable. Areas where water can pool, such as flat surfaces or poorly sealed joints, are prime targets for rot.
Loose or Corroded Fasteners
The screws, bolts, and nails holding your railing together are constantly subjected to stress from temperature changes, foot traffic, and lateral pressure. Over time, these fasteners can loosen, back out, or corrode. Nails, in particular, are prone to losing their grip as wood expands and contracts. Non-galvanized or non-stainless steel fasteners can rust, weakening their structural integrity and eventually failing.
Improper Installation
Not all decks are built to the same standard. If your deck railing was not installed correctly from the outset, it might never have been truly secure. Common installation errors include:
- Using fasteners that are too short or too thin.
- Failing to adequately block or reinforce railing posts.
- Not following local building codes for post attachment, height, and spacing.
- Using nails instead of screws or bolts for critical connections.
Weather Exposure and Environmental Factors
The elements are a deck’s worst enemy. Constant exposure to UV rays, rain, snow, and extreme temperature fluctuations takes a toll. UV radiation breaks down wood fibers and finishes. Rain and snow introduce moisture, leading to rot and corrosion. Freeze-thaw cycles can expand and contract wood, loosening fasteners and causing cracks.
Age and Wear
Even the best-built decks have a lifespan. Years of use, countless footsteps, and continuous exposure to the elements will eventually lead to wear and tear. Fasteners become fatigued, wood components weaken, and the overall structure loses its original rigidity.
Impact Damage
Accidental impacts, whether from moving furniture, playful children, or even strong winds blowing debris, can directly damage railing components or connections, leading to sudden looseness.
Comprehensive Inspection: How to Identify a Loose Deck Railing (and Its Cause)
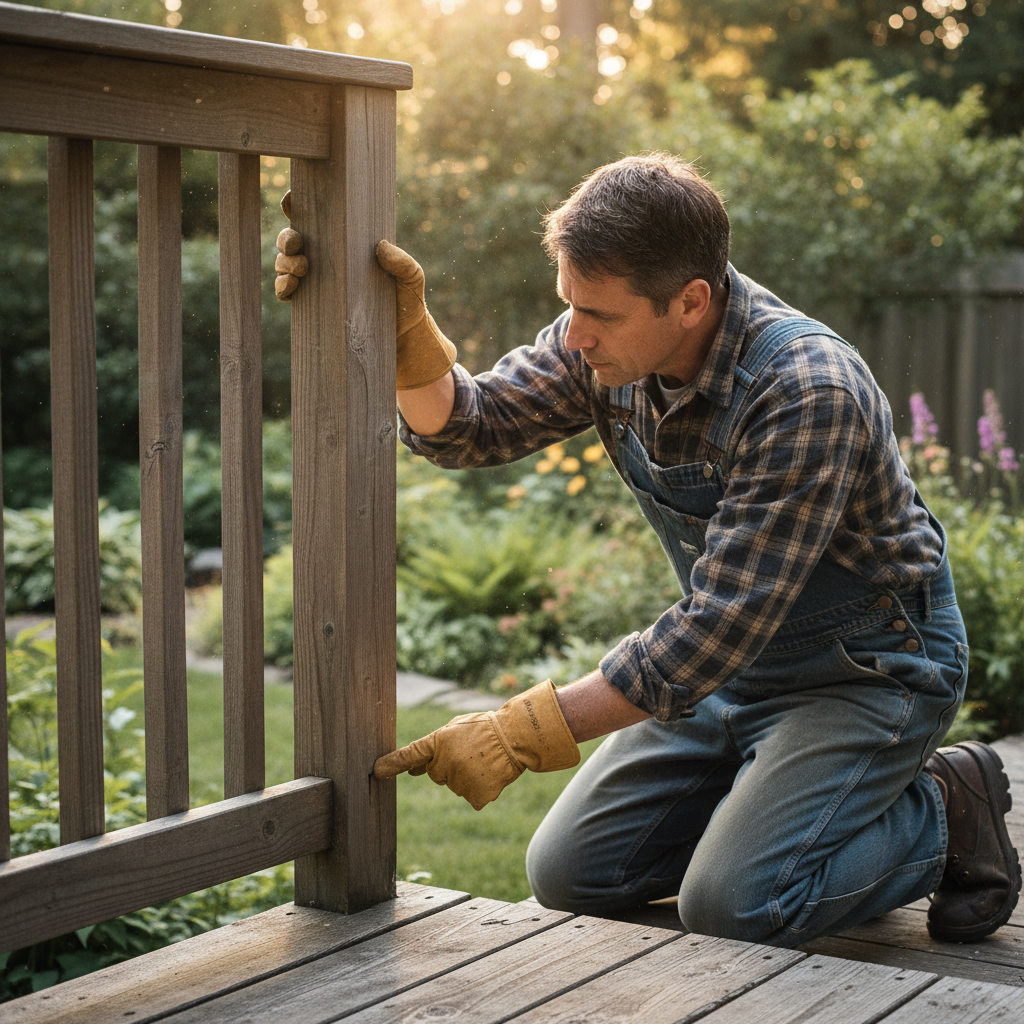
Before you can fix a loose deck railing, you need to thoroughly inspect it to understand the extent of the damage and its underlying cause. A systematic approach will help you identify all problem areas.
1. Visual Check
Start with a thorough visual inspection of your entire deck railing system. Look for:
- Gaps: Are there noticeable gaps between posts and the deck frame, or between balusters and handrails?
- Cracks: Check for cracks in wood posts, balusters, or handrails, especially near fastener points.
- Rust or Corrosion: Examine all metal fasteners for signs of rust or corrosion. This is a clear indicator of weakened connections.
- Discoloration or Soft Spots: Darkening, staining, or a spongy feel in wood components indicates potential wood rot. Probe suspicious areas with a screwdriver to test for softness.
- Missing Fasteners: Look for screws or bolts that have backed out completely or are missing.
2. The “Shake Test”
This is your most reliable method for identifying looseness. Grab each railing post firmly at shoulder height and try to shake it. Push it forward and backward, and side to side. Do the same for sections of the handrail and individual balusters. Note any movement, wobble, or creaking sounds. A properly secured railing should feel solid with minimal to no give.
3. Examine Post-to-Deck Connections
Railing posts are the backbone of your system. Most issues with a loose deck railing originate here. Get down on your hands and knees and look at how each post is attached to the deck frame. Are there bolts that have loosened? Is the wood around the fasteners split or rotted? Many codes require posts to be through-bolted to the rim joist or blocking, not just surface-mounted. If you see only a few screws driven into the deck surface, that’s a red flag for improper installation.
4. Inspect Balusters and Handrails
After checking the posts, move on to the balusters (vertical pickets) and the handrail. Ensure all balusters are firmly attached at both the top and bottom. Check the handrail for any sag, cracks, or loose connections where it meets the posts or other railing sections.
5. Check Ledger Board and Overall Deck Structure
While primarily focused on railings, it’s wise to give a quick once-over to the rest of the deck. If your railing posts are connected to the main deck structure, ensure that the ledger board (the board attaching the deck to your house) and joists are sound. Issues here could affect the railing’s stability indirectly.
DIY Fixes for a Loose Deck Railing: Step-by-Step Guide
Once you’ve identified the source of the looseness, you can often tackle the repairs yourself. Always prioritize safety, wear appropriate protective gear, and ensure you have the right tools for the job.
Tightening Loose Fasteners
This is often the easiest fix for a slightly wobbly railing.
- For Screws: Use a drill or screwdriver to tighten any visible screws. If a screw spins endlessly without tightening, it has stripped the wood. You’ll need to remove it and either replace it with a longer, wider screw of the same type or fill the hole with wood filler and redrill.
- For Bolts: Use a wrench or socket to tighten any loose nuts on through-bolts. If the bolt itself is spinning, you may need a second person to hold the bolt head while you tighten the nut.
- For Nails: Nails are less secure than screws or bolts for deck railings. If nails are the only fasteners, consider carefully prying them out and replacing them with appropriate outdoor-rated screws or bolts.
- Adding Washers: For bolts, adding a washer under the nut can provide a larger surface area, preventing the nut from digging into the wood and helping it stay tight.
- Using Structural Screws: If existing screws are too short or small, replace them with specialized structural screws designed for outdoor use. These are typically thicker, longer, and have a higher shear strength.
Addressing Wood Rot
The approach to wood rot depends on its severity.
- Minor Rot (Surface Level): If the rot is superficial and the wood still feels solid, you can scrape away the rotted material, treat the area with a wood hardener (which soaks in and strengthens the remaining fibers), and then fill any holes or voids with an exterior-grade wood filler. Once dry, sand and paint or stain to match.
- Moderate Rot (Affecting Fasteners): If rot has compromised the wood around fasteners, making them loose, you might need to reinforce the area. Consider adding a metal mending plate or L-bracket on an inconspicuous side of the post, screwed into solid wood. For larger areas, you may need to cut out the rotted section and replace it with a new piece of pressure-treated lumber, securing it with construction adhesive and screws.
- Severe Rot (Structural Compromise): If a post or a significant section of a structural component is severely rotted and spongy throughout, it must be replaced. Attempting to repair severely rotted wood is a temporary fix at best and compromises safety. This is where professional help might be warranted.
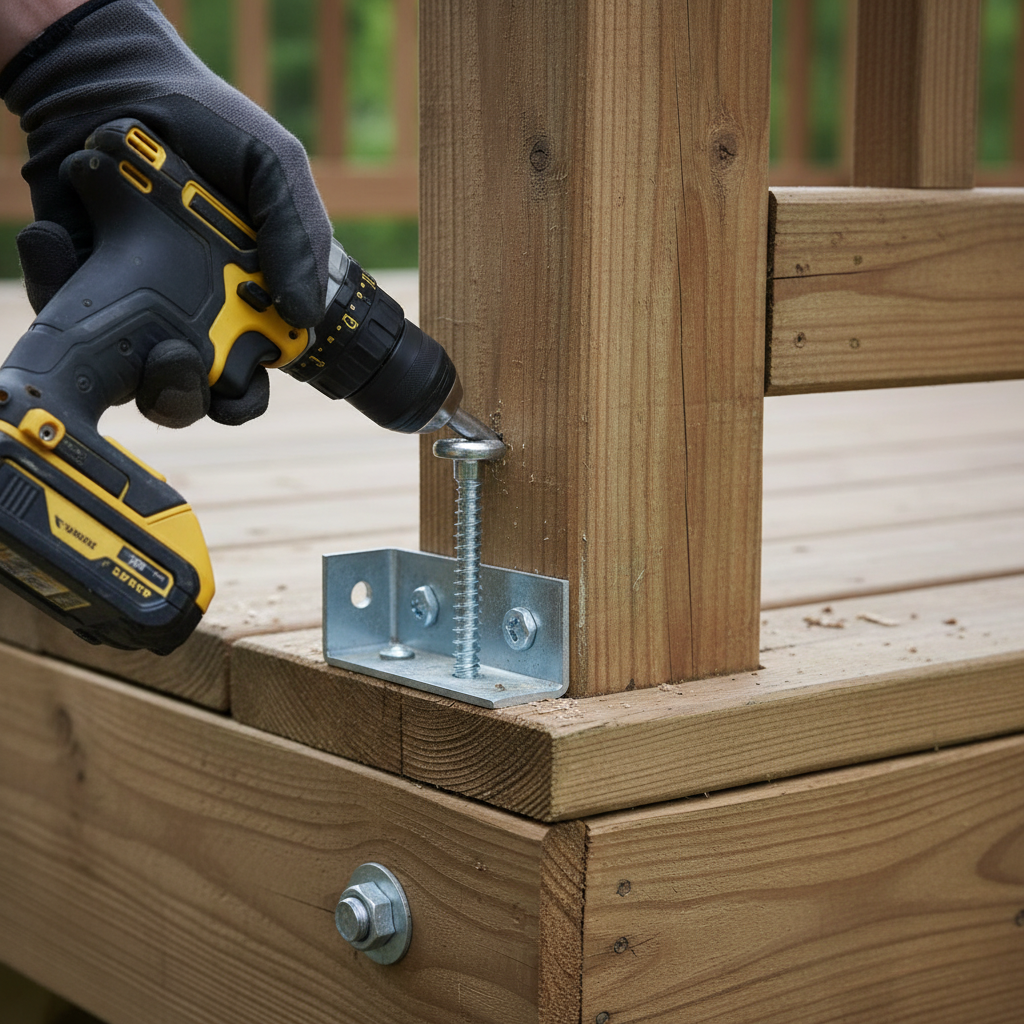
Securing Wobbly Posts
This is often the most critical repair, as posts provide the main stability for the entire railing.
- Through-Bolting to Rim Joist: The gold standard for post attachment. If your posts are only surface-mounted or toe-nailed, you’ll likely need to add through-bolts.
- Temporarily brace the post to hold it plumb and tight against the deck frame.
- Drill two holes (at least 1/2-inch diameter) completely through the post and the rim joist or blocking, ensuring they are staggered vertically (e.g., one higher, one lower).
- Insert hot-dipped galvanized or stainless steel carriage bolts or lag bolts. Use large washers under both the bolt head and the nut.
- Tighten the nuts securely with a wrench. Do not overtighten, which can crush the wood.
- Adding Blocking: If your posts are mounted to the deck surface away from a solid rim joist, you’ll need to add blocking between the joists beneath the post.
- Cut pressure-treated lumber blocks to fit snugly between the joists.
- Secure the blocks firmly to the joists with structural screws or joist hangers.
- Then, through-bolt the railing post to these newly installed blocks.
- Metal Post Anchors/Connectors: Various specialized metal brackets and connectors are available to reinforce post-to-deck connections. These can be particularly useful if you can’t access the inside of the rim joist for through-bolting. Ensure they are rated for outdoor use and follow manufacturer instructions.
Repairing Balusters and Handrails
- Re-attaching Loose Balusters: If balusters are wobbly, remove any old nails. Apply exterior-grade construction adhesive to the ends and re-secure them using two exterior-grade screws (e.g., trim head screws) at each connection point. Make sure they are evenly spaced and plumb.
- Securing Handrails: Check the connections where the handrail meets the posts. Use appropriate screws or bolts to tighten these connections. If the wood is stripped, you may need to move the connection slightly or use a larger diameter screw.
- Replacing Damaged Sections: If a baluster or a section of the handrail is cracked, split, or heavily rotted, it’s best to replace the entire piece. Cut new wood to size, ensuring it matches the existing profile, and install it using appropriate fasteners and adhesives.
When to Call a Professional: Knowing Your Limits
While many railing issues are DIY-friendly, some situations warrant the expertise of a professional deck builder or carpenter. Don’t hesitate to call for help if:
- Extensive Structural Damage: If the loose railing is just one symptom of widespread rot in the deck’s main joists, beams, or ledger board, a professional assessment is crucial.
- Uncertainty About Building Codes: Deck construction is heavily regulated by local building codes, especially concerning railings. If you’re unsure about compliance, a professional can ensure your repairs meet safety standards.
- Lack of Proper Tools or Experience: If you don’t have the necessary tools (e.g., impact driver, large drill bits, specialized clamps) or feel uncomfortable with the complexity of the repair, hiring an expert is safer.
- Major Rebuilds: If multiple posts are rotten or the entire railing system needs an overhaul, a professional can handle the scope of the project efficiently and correctly.
Prevention is Key: Keeping Your Deck Railing Secure for Years
The best way to deal with a loose deck railing is to prevent it from happening in the first place. Regular maintenance and smart building practices can significantly extend the life and safety of your railing.
- Annual Inspections: Make it a habit to inspect your entire deck, including railings, annually. The “shake test” should be part of this routine. Early detection of small issues prevents them from becoming major problems.
- Prompt Repairs: Don’t put off small repairs. A loose screw today can become a rotten post tomorrow.
- Proper Sealing and Staining: Apply a high-quality water repellent sealer or stain to all wood components of your deck every 1-3 years (depending on product and climate). This protects the wood from moisture and UV damage, preventing rot and deterioration.
- Use Appropriate Hardware: When building or repairing, always use fasteners specifically designed for outdoor use and pressure-treated lumber. Hot-dipped galvanized or stainless steel screws and bolts are essential to resist corrosion.
- Ensure Code Compliance: If you’re building a new deck or making significant changes, ensure all railing components meet local building codes for height, baluster spacing, and post attachment.
- Good Drainage: Ensure your deck design and maintenance promote good drainage. Avoid situations where water can pool on railing surfaces or at the base of posts. Keep gutters clean and ensure they drain away from the deck.
- Clean Regularly: Remove debris, leaves, and dirt from your deck surface and around posts. These can trap moisture and accelerate rot.
Deck Railing Building Codes and Safety Standards
While this article provides general guidance, specific requirements for deck railings are dictated by local building codes. These codes are designed to ensure maximum safety. Typically, they cover:
- Railing Height: Often 36 inches for residential decks, but can be 42 inches for commercial or certain elevated decks.
- Baluster Spacing: Usually no more than 4 inches apart (meaning a 4-inch sphere cannot pass through), to prevent children from slipping through.
- Load Requirements: Railings must be able to withstand a certain amount of horizontal force (e.g., 200 pounds applied at any point along the top rail) without failure.
- Post Attachment: Specific methods, like through-bolting, are often mandated for securing posts.
Before undertaking any significant repair or renovation, it’s wise to consult your local building department or refer to resources from reputable organizations for general safety guidelines. For example, you can find valuable information on comprehensive deck safety from sources like Better Homes & Gardens’ Deck Safety Checklist, which offers a great overview of what to look for.
Frequently Asked Questions About Loose Deck Railings
Q: How often should I inspect my deck railing?
A: You should perform a thorough inspection of your entire deck, including the railing, at least once a year, preferably in the spring before heavy use. Also, do a quick visual check before any major gathering or party on the deck.
Q: Can I just nail a loose railing back in place?
A: While you can temporarily nail a loose railing, it’s generally not recommended as a permanent solution. Nails tend to lose their grip over time due to wood expansion/contraction and do not provide the same strength as screws or bolts. It’s always best to replace nails with appropriate outdoor-rated screws or bolts for lasting security.
Q: What type of screws should I use for deck railings?
A: Always use exterior-grade, corrosion-resistant fasteners. Hot-dipped galvanized or stainless steel screws are ideal. For structural connections, use specialized structural screws or lag screws/bolts designed for deck applications. Avoid standard interior screws or electro-galvanized fasteners, as they will rust quickly outdoors.
Q: Is it safe to use a deck with a loose railing?
A: No, it is generally not safe to use a deck with a loose railing, especially if the looseness is significant or affects a critical section. A loose railing is a fall hazard. It’s best to block off the affected area or avoid using the deck until repairs are completed.
Q: How much does it cost to fix a loose deck railing professionally?
A: The cost can vary widely depending on the extent of the damage, the type of railing, labor rates in your area, and whether it’s a minor repair or a major replacement. Simple tightening might be a small service call fee, while replacing multiple rotten posts or entire railing sections could range from a few hundred to over a thousand dollars. Get multiple quotes from licensed professionals for an accurate estimate.
Conclusion
A loose deck railing is a serious concern that demands prompt attention. By understanding the common causes, performing regular inspections, and implementing appropriate repairs and preventative measures, you can ensure your deck remains a safe and enjoyable extension of your home for years to come. Don’t wait for an accident to happen; take action today to secure your deck railing and protect those who use your outdoor living space.


