Understanding Your Air Handler: A Quick Overview
Before diving into the specifics of leaks, let’s briefly review what an air handler does. In most central HVAC systems, the air handler is the indoor unit that contains the blower fan, evaporator coil (for cooling), and sometimes a heating element. Its primary functions include drawing in return air from your home, filtering it, conditioning it (cooling or heating), and then distributing it back through the ductwork. During the cooling process, the evaporator coil gets very cold, causing moisture (humidity) from the air to condense on its surface, much like a cold glass of water “sweats” on a hot day. This condensate water is designed to drain safely away. When this drainage system fails, you get an air handler leaking water.
Why Is Your Air Handler Leaking Water? Common Causes
A leak from your air handler can stem from several issues, ranging from simple maintenance oversights to more complex mechanical failures. Identifying the specific cause is the first step towards an effective solution.
Clogged Condensate Drain Line
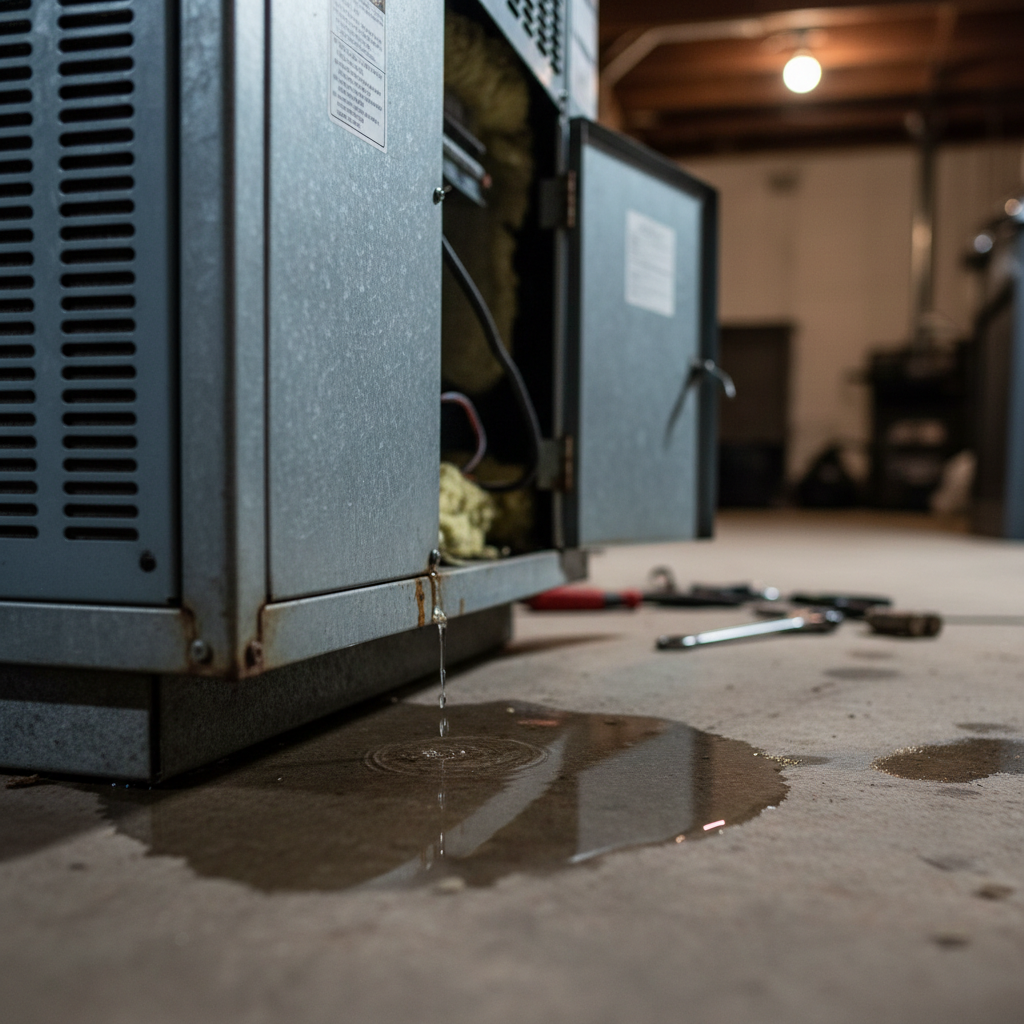
This is arguably the most frequent culprit behind an air handler leaking water. Over time, algae, mold, dirt, and sludge can accumulate inside the condensate drain line, forming a blockage. When the line is clogged, the water collected by the condensate pan has nowhere to go and eventually overflows, spilling out of the air handler unit.
Full or Damaged Condensate Pan
The condensate pan, located beneath the evaporator coil, is designed to collect the water dripping from the coil. If the drain line is completely blocked, the pan will fill up and overflow. Alternatively, the pan itself might be rusted, cracked, or improperly sloped, preventing proper drainage and leading to leaks.
Frozen Evaporator Coil
If your evaporator coil freezes solid, it indicates a problem with airflow or refrigerant levels. A frozen coil can happen due to a very dirty air filter, low refrigerant, a malfunctioning blower fan, or blocked return vents. When the AC unit cycles off, the ice on the coil melts rapidly, producing a large volume of water that can overwhelm the condensate pan, causing it to overflow.
Dirty Air Filter
A severely dirty air filter restricts airflow across the evaporator coil. This reduced airflow can cause the coil to get too cold and freeze, leading to the same issue as described above: a sudden surge of meltwater that the drain system cannot handle, resulting in an air handler leaking water.
Disconnected Condensate Line
Sometimes, the condensate drain line can become loose or completely disconnected from the condensate pan or the air handler unit itself. This can happen due to vibrations, improper installation, or accidental dislodging, causing water to simply pour out rather than flow into the drain system.
Damaged or Incorrectly Installed Drain Line
Beyond clogs, the drain line itself could be damaged. A crack, a loose connection, or an improper slope in the line can cause water to escape before it reaches its intended destination. If the line doesn’t have a slight downward slope, water won’t flow properly by gravity and can back up.
Problems with the Condensate Pump (if applicable)
If your air handler is located in a basement or an area where gravity drainage isn’t possible, a condensate pump is used to push the water uphill to an external drain. If this pump malfunctions, gets clogged, or loses power, it won’t be able to remove the collected water, leading to an overflow.
Excess Humidity in the Home
While usually a symptom of other issues, extremely high indoor humidity can cause the evaporator coil to produce more condensate than the system is designed to handle, potentially overwhelming the drain system, especially if there are minor clogs or issues.
Cracked Drain Pan
Over time, especially in older units, the plastic or metal condensate pan can crack or corrode. A crack, even a small one, will allow water to seep out, causing leaks even if the drain line is perfectly clear.
How to Diagnose an Air Handler Leaking Water: Step-by-Step Troubleshooting
When you notice your air handler leaking water, it’s crucial to act quickly to minimize damage. Follow these steps to diagnose the problem safely.
Safety First: Turn Off Power
Before touching anything, immediately turn off the power to your HVAC system at both the thermostat and the electrical breaker dedicated to the air handler. Water and electricity are a dangerous combination, and this step is non-negotiable.
Locate the Leak Source
Observe where the water is coming from. Is it a slow drip, a steady stream, or a large puddle? Is it dripping directly from the unit, or from a pipe connected to it? This observation can provide initial clues.
Check the Condensate Drain Line and Pan
- Examine the Drain Line: Look for visible blockages in the clear or white PVC pipe leaving the air handler. Follow it to where it drains. Is it kinked? Is it disconnected?
- Inspect the Condensate Pan: Shine a flashlight into the pan underneath the evaporator coil. Is it full of water? Is there any visible sludge, algae, or debris? Look for cracks or signs of corrosion in the pan itself.
- Check the Condensate Pump: If you have a pump, ensure it’s plugged in and working. You might hear a humming sound when it’s active. Check its reservoir for clogs.
Inspect the Evaporator Coil
Carefully open the access panel to the evaporator coil (usually located above the condensate pan). Look for ice build-up on the coil. If it’s frozen, do not attempt to chip away the ice. This indicates a different set of problems that need addressing after the ice melts.
Examine the Air Filter
Locate your air filter (it’s often in the return ductwork or inside the air handler itself) and check its condition. Is it caked with dirt and dust? A dirty filter is a common cause of reduced airflow and frozen coils.
DIY Fixes for a Leaking Air Handler
Once you’ve identified the cause, some issues can be resolved with a bit of DIY effort. Always ensure the power is off before attempting any repairs.
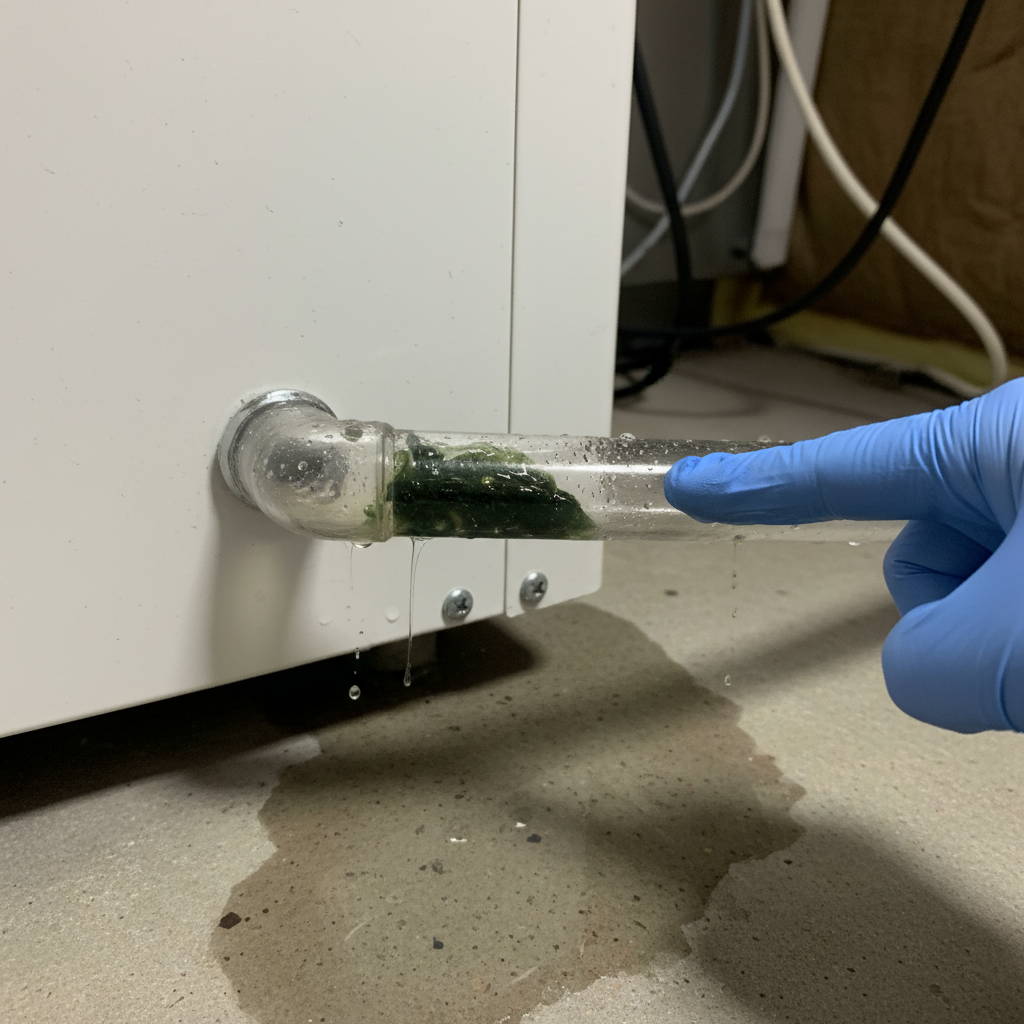
Clearing a Clogged Condensate Drain Line
If the drain line is clogged, you can often clear it yourself:
- Locate the Access Port: Most drain lines have a removable cap or a T-shaped vent near the air handler. Remove it.
- Vacuum the Line: Use a wet/dry shop vac to suction out the clog. Place the vacuum hose tightly over the end of the drain line (where it exits the house) and seal it with duct tape or a rag for maximum suction. Run the vacuum for a few minutes.
- Flush with Vinegar/Bleach: After vacuuming, slowly pour a cup of distilled white vinegar (or a 50/50 bleach and water solution) into the access port. This helps kill algae and bacteria. Let it sit for 30 minutes, then flush with a cup or two of plain water.
- Test: Re-secure the cap, turn the power back on, and run your AC for a while to ensure water is draining properly.
Replacing a Dirty Air Filter
This is one of the easiest and most crucial maintenance tasks. Simply remove the old, dirty filter and insert a new one, ensuring the airflow arrow on the filter points in the direction of the airflow (towards the air handler). Changing filters every 1-3 months, depending on usage and household conditions, is highly recommended.
Draining and Cleaning the Condensate Pan
If the pan is full but not cracked, you can carefully scoop out the standing water or use a wet/dry vac. Once empty, clean it with a solution of warm water and a little soap or vinegar to remove any mold or algae buildup. If there’s a crack, the pan will need to be replaced.
Thawing a Frozen Coil (and addressing the root cause)
If your evaporator coil is frozen:
- Turn Off AC, Keep Fan On: Switch your thermostat from “cool” to “off” but leave the fan setting to “on.” This will help circulate air and melt the ice faster without generating more cold.
- Wait: It can take several hours (or even up to 24 hours) for a heavily frozen coil to completely thaw. Place towels around the unit to catch meltwater.
- Address the Cause: Once thawed, replace your air filter. Check for blocked return air vents in your home. If the problem persists, or if you suspect low refrigerant or a faulty blower, a professional is needed.
When to Call a Professional HVAC Technician
While some issues can be DIY-fixed, knowing when to call a professional is vital. Do not hesitate to contact an HVAC technician if:
-
Persistent Leaks
You’ve tried the DIY fixes, but your air handler is still leaking water.
-
Refrigerant Leaks
If you suspect low refrigerant (often indicated by a frozen coil, warm air, or hissing sounds), this is a job for a certified technician. Refrigerant handling requires specialized tools and licensing.
-
Electrical Issues
Any problems involving wiring, capacitors, or other electrical components should always be handled by a professional for safety reasons.
-
Complex Repairs (Coil replacement, major pump issues)
If the evaporator coil itself is damaged, the condensate pan is cracked beyond repair, or the condensate pump needs replacing, these are typically jobs for experienced technicians.
-
If You’re Unsure
When in doubt, it’s always best to consult a professional. Attempting complex repairs without the proper knowledge or tools can lead to further damage or safety hazards.
Preventing Future Air Handler Leaks: Essential Maintenance Tips
Proactive maintenance is the best defense against your air handler leaking water. Incorporate these tips into your home maintenance routine:
-
Regular Filter Changes
Change your air filter every 1-3 months. This simple act dramatically improves airflow, reduces strain on your system, and prevents coil freezing. Consider setting a reminder on your phone.
-
Annual HVAC Tune-Ups
Schedule a professional HVAC inspection and tune-up every year, ideally before the cooling season. Technicians can spot potential issues like refrigerant leaks, dirty coils, or impending drain line clogs before they become major problems. For a comprehensive guide to HVAC maintenance, Good Housekeeping offers valuable insights on keeping your system in top shape.
-
Keep the Condensate Drain Clear
Periodically pour a cup of distilled white vinegar or a bleach/water solution down the condensate drain line’s access port every few months. This helps prevent algae and mold growth. During your annual tune-up, your technician will also typically flush this line.
-
Monitor Humidity Levels
If your home consistently feels excessively humid, it might be contributing to condensate overflow. Consider using a dehumidifier in particularly damp areas, or consult an HVAC professional about optimizing your system’s humidity removal capabilities.
-
Ensure Proper Insulation
Proper insulation around your ductwork and air handler (especially in unconditioned spaces like attics) can help prevent condensation from forming on the outside of the unit or ducts, which can sometimes be mistaken for an internal leak.
What to Do About Water Damage
If your air handler has been leaking for some time, you might be dealing with water damage to your ceiling, walls, or flooring.
Here’s what to do:
- Stop the Leak: Address the source of the leak immediately.
- Remove Standing Water: Mop up or use a wet/dry vac to remove any standing water.
- Dry the Area Thoroughly: Use fans and dehumidifiers to dry out affected carpets, drywall, and wood. Open windows if the outdoor humidity is low.
- Inspect for Mold: Look for any signs of mold growth, which can appear as black, green, or white fuzzy patches. Mold can start growing within 24-48 hours of a water event.
- Professional Remediation: If the water damage is extensive or if mold is present, it’s best to call a professional water damage restoration or mold remediation service to prevent health issues and structural problems.
FAQs about Air Handler Leaks
Why does my air handler leak water only sometimes?
Intermittent leaks often point to a partially clogged condensate drain line that occasionally gets overwhelmed, or a frozen coil that only leaks when the unit thaws. It could also be related to humidity levels or specific operating cycles.
Is a little water around the air handler normal?
No, any amount of water leaking from your air handler is not normal and indicates a problem within the system. The system is designed to contain and drain all condensate away without visible leaks.
Can a leaking air handler cause mold?
Absolutely. Water provides the perfect breeding ground for mold. If a leak goes unnoticed, especially in dark, damp spaces like attics or closets, mold can quickly grow, leading to poor indoor air quality and potential health problems.
How much does it cost to fix a leaking air handler?
The cost varies widely depending on the cause. A simple clogged drain line might be a DIY fix for the cost of some vinegar, or a service call could be $100-$300. Replacing a cracked condensate pan might be a few hundred dollars. More complex issues like a new evaporator coil or major refrigerant leak repair can run into several hundred or even thousands of dollars. Always get a detailed quote from a reputable technician.
How often should I have my air handler serviced?
It’s generally recommended to have your entire HVAC system, including the air handler, professionally serviced at least once a year, ideally before the start of the cooling season (spring) and heating season (fall) if you have a heat pump.
An air handler leaking water is a problem that demands your attention. While some causes are relatively simple to fix, others require the expertise of a professional HVAC technician. By understanding the common culprits, knowing how to perform basic diagnostics, and committing to regular preventative maintenance, you can protect your home from water damage, ensure your HVAC system operates efficiently, and enjoy a comfortable indoor environment for years to come. Don’t let a small drip turn into a major headache – address leaks promptly and keep your home’s breathing system healthy.


