Water damage around chimney bricks is one of the most common—and most destructive—issues homeowners face when it comes to masonry and roofing. Left unchecked, a small leak can lead to crumbling mortar, brick spalling, interior stains, mold growth, and expensive structural repairs. This article walks you through how to identify the problem, temporary and permanent fixes, preventive maintenance, cost expectations, and when to call in a professional.
Why water damage around chimney bricks matters
Chimneys are exposed to weather constantly. Rain, snow, and freeze-thaw cycles all exploit tiny vulnerabilities in brick, mortar, flashing, or the chimney crown. Because chimneys connect to the interior of your home, water that penetrates masonry can travel into walls and ceilings, cause insulation and framing to rot, and foster mold—posing both structural and health concerns. Prompt diagnosis and repair prevent much larger expenses down the line.
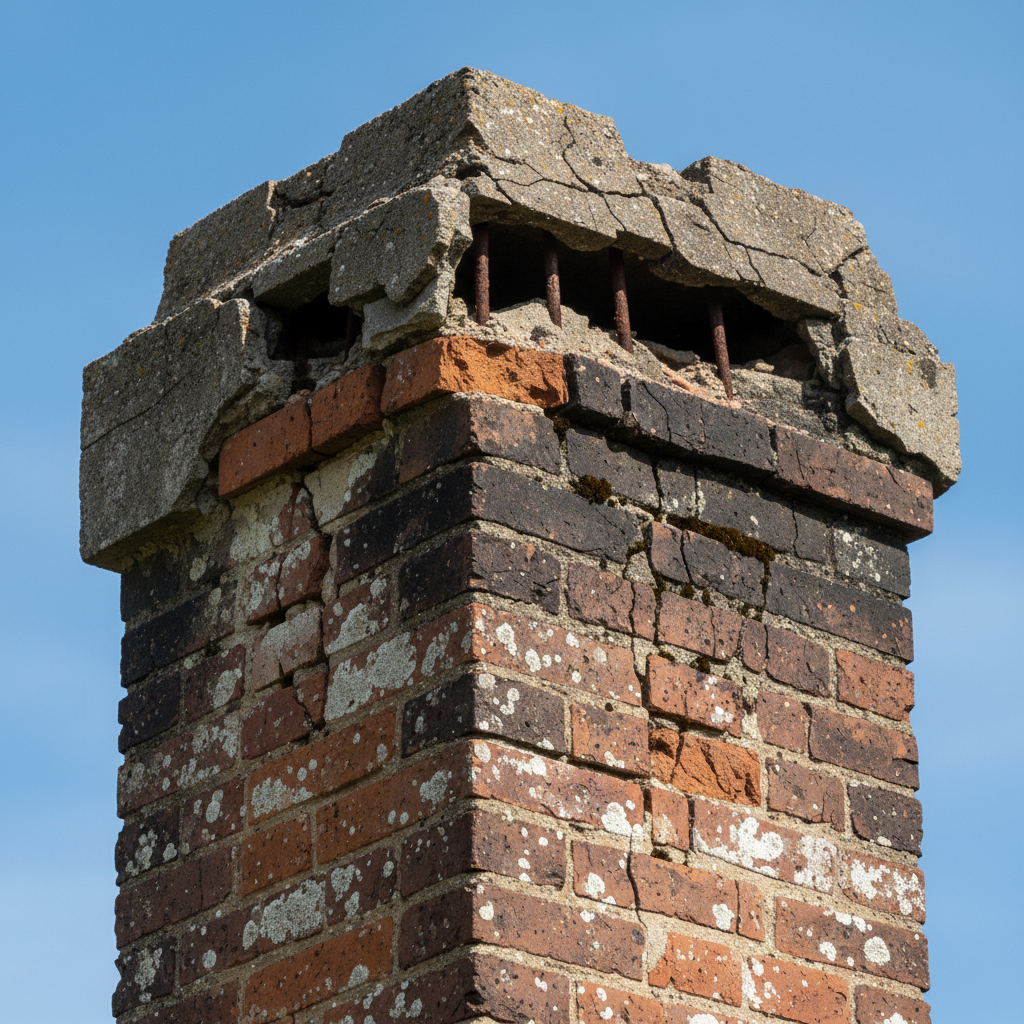
Common signs of water damage around chimney bricks
- White, powdery deposits (efflorescence) on brick faces.
- Cracked, crumbling, or missing mortar joints (deteriorated pointing).
- Spalling bricks—exposed flaky or flaking brick surfaces.
- Water stains on ceilings or walls directly below the chimney.
- Musty smells or visible mold in rooms near the chimney.
- Rust stains on flashing or metal chimney components.
- Frozen water and ice build-up around the chimney in winter.
Top causes of water damage around chimneys
Understanding where water enters helps you target the right repairs.
- Failed flashing: Flashing seals the joint where the chimney meets the roof. If it’s loose, corroded, or improperly installed, water can run into the roof deck.
- Damaged chimney crown: The crown (top concrete layer) directs water away from the chimney. Cracks or missing crown sections allow water to run down inside the masonry.
- No chimney cap: A missing or damaged cap lets rain, snow, and animal intruders get inside the flue.
- Worn mortar (repointing needed): Mortar joints erode over time, leaving gaps for water to penetrate the wall system.
- Porous or deteriorated brick: Bricks can absorb water; repeated freeze-thaw cycles cause bricks to crack or spall.
- Poor roof slope or lack of a cricket: On large chimneys, a water-diverting cricket is often needed; without it, water pools behind the chimney.
- Interior chimney liner issues: If the liner is cracked, water that gets inside the chimney can enter flues and chase into home interiors.
How to inspect your chimney safely
Start with a visual inspection from the ground and move to the roof only if you’re comfortable and properly equipped.
- Look for efflorescence, spalling, cracked or missing mortar, and rust streaks on the chimney face.
- Inspect the chimney crown for cracks, holes, or deteriorated edges.
- Examine flashing where the chimney meets the roof for gaps, rust, or lifted seams.
- Check that a chimney cap is in place and that the mesh or crown is not damaged.
- From inside the attic or top floor, inspect around the chimney for stains, damp insulation, or softened framing.
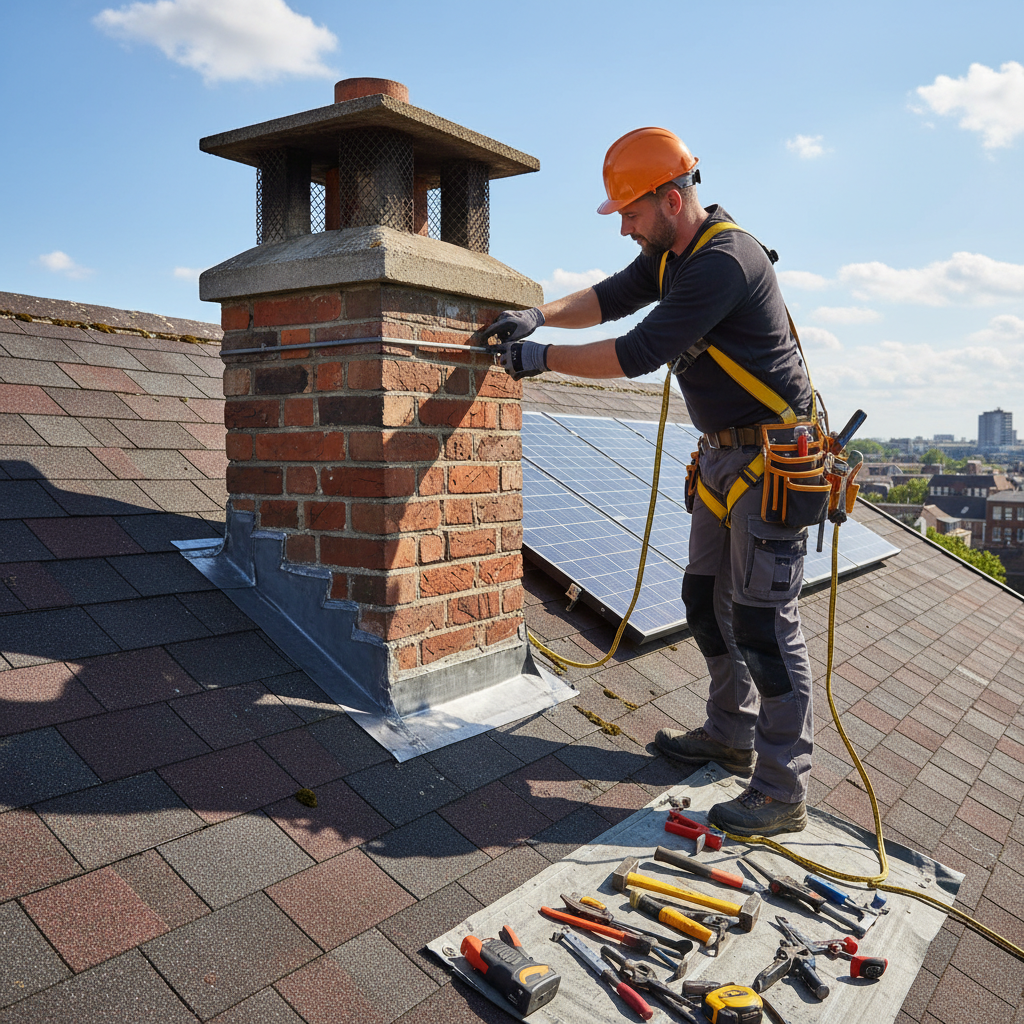
- Always use a sturdy ladder, non-slip shoes, a spotter, and a harness for roof work. If you’re uncomfortable with heights, hire a professional.
Temporary fixes you can do yourself (short-term)
Temporary repairs can stop further damage until a permanent solution is scheduled. These are emergency measures, not long-term remedies.
- Install a temporary cap: If the cap is missing, cover the flue with a fitted tarp or heavy-duty plastic secured with flashing tape to keep rain out.
- Seal small flashing gaps: Use a high-quality roofing sealant (silicone or polyurethane) to seal minor separations between flashing and chimney—but know this is temporary.
- Cover small crown cracks: For hairline crown cracks, a temporary roof cement or appropriate concrete patch can keep water out until a pro repairs it.
- Dry out wet areas: Use fans and dehumidifiers inside the home to reduce mold risk while repairs are arranged.
Permanent repairs and professional solutions
Long-term fixes require the right materials and often a skilled mason or roofing contractor.
Repointing (tuckpointing)
When mortar joints are failing, repointing replaces the old mortar to restore stability and weather resistance. A mason will grind out failed mortar to a proper depth and fill with a compatible mortar mix. It’s important to use mortar with the correct strength and composition—mismatched mortar can damage brick over time.
Replace or repair the chimney crown
A cracked crown should be removed and rebuilt using a reinforced and sloped concrete crown or a cast crown cap, finished with an expansion joint to prevent future cracking.
Flashing replacement
Proper step and counter flashing with copper or stainless steel installed by an experienced roofer is a common cure for roof-to-chimney leaks. Flashing should be integrated with roofing underlayment and sealed properly to last decades.
Install or replace a chimney cap
A good stainless steel cap keeps rain and animals out, and includes a spark arrestor. Caps are relatively inexpensive and often a first-line prevention tool.
Waterproofing (breathable sealers)
After major repairs, apply a silane/siloxane penetrating water repellent that allows moisture vapor to escape but reduces liquid water absorption. Avoid non-breathable coatings that trap moisture and accelerate deterioration.
Chimney relining or rebuilding
If the flue liner is damaged or the upper chimney is extensively deteriorated, relining or partial/full rebuild may be necessary. Relining restores safe drafting for your fireplace and prevents heat and moisture from damaging masonry.
Materials, tools, and estimated costs
Costs vary by location and extent of damage. These are ballpark U.S. ranges to help with planning:
- Minor flashing repair: $150–$600
- Flashing replacement: $300–$1,200
- Chimney crown repair: $300–$1,500
- Repointing (partial): $300–$1,200; full chimney repointing: $1,000–$3,500+
- Chimney cap installation: $100–$500
- Waterproofing treatment: $150–$400
- Chimney rebuild: $2,000–$10,000+ depending on size and scope
Tools and materials used by professionals include grinders, tuckpointing tools, mortar mixes, stainless/copper flashing, concrete mixes for crowns, waterproofing sealers, safety harnesses, and scaffolding.
Preventive maintenance: seasonal checklist
- Annually: Inspect chimney exterior for mortar deterioration, spalling, and crown cracks.
- Before winter: Ensure flashing is intact and the chimney cap is secure to prevent ice and snow infiltration.
- After major storms: Recheck flashing and crown for new damage.
- Every 3–5 years: Consider applying a penetrating water repellent after repairs.
- Every 1–3 years: Have a certified chimney sweep inspect and sweep the flue to remove creosote and check the liner.
Safety and code considerations
Local building codes and insurance policies can influence the type of repair you must do (for example, certain materials for flashing or crown construction). If your chimney repairs involve structural work, chimney relining, or a roof penetration, a licensed contractor who understands local codes should perform the work. For any work requiring roof access, follow fall protection guidelines or hire a pro.
When to hire a professional
Hire a mason or roofing contractor if you notice:
- Large cracks or crumbling masonry.
- Leaking that affects interior ceilings and structural framing.
- Damaged or failing flashing along roof-to-chimney junctions.
- Repeated leaks after attempted repairs.
- Any concern about chimney liner safety (especially if you use the fireplace).
Look for contractors with good local reviews, masonry or roofing trade credentials, and proof of insurance. Ask for references and a written estimate that describes scope, materials, timeline, and warranties.
How chimney water problems affect indoor air quality
Persistent moisture around a chimney often leads to mold growth in attics and interior walls. If you notice musty odors, visible mold, or worsening allergies, address the leak immediately and consider a mold remediation assessment. Drying and repairing the structure, followed by proper ventilation, will restore safer indoor air.
Checklist: Quick troubleshooting flow
- Identify the leak location (inside ceiling, exterior brick, roof-penetration).
- Inspect crown and flashing first—these are frequent culprits.
- Check for missing cap or damaged liner.
- Perform temporary measures to keep water out (cap, seal gaps) if repair is delayed.
- Schedule repointing, crown repair, flashing replacement, or relining as needed.
- After repairs, apply breathable masonry water repellent if recommended by the mason.
Frequently asked questions (FAQs)
How can I tell if the chimney crown is the problem?
Look for horizontal cracks or crumbling concrete at the very top of the chimney. If water travels down the chimney and you see stains or mortar loss along the upper flue areas, the crown is a likely source.
Is applying silicone over brick a good idea to stop leaks?
Use penetrating silane/siloxane repellents that allow vapor permeability—these repel liquid water but let moisture escape. Thick, non-breathable paints or coatings can trap moisture and worsen the problem over time.
Can I repoint my chimney myself?
Small DIY repointing jobs are possible if you have masonry experience, the right tools, and you can match the mortar. However, incorrect mortar selection, poor joint depth, or improper technique can damage brick, so for large jobs hire a qualified mason.
How long should a properly repaired chimney lasting against water?
With correct materials and workmanship—proper flashing, a durable crown, quality mortar, and a cap—repairs can last decades. Ongoing inspections and maintenance keep problems from recurring.
Will waterproofing fix cracking bricks?
No. Waterproofing reduces water absorption but won’t repair structural damage. Repointing, crown repair, or brick replacement will be needed for cracked or spalling bricks.
Final notes
Water damage around chimney bricks is repairable, but timing matters. The sooner you diagnose the source—flashing, crown, mortar, cap, or liner—the easier and less expensive the repair will likely be. Regular seasonal inspections and small preventive investments (a cap, proper flashing, breathable water repellents) save money and protect your home’s structure and indoor air quality.
If you’re researching broader ideas to upgrade or reorganize spaces affected by structural repairs, explore further guidance on creating comfortable interiors and modern living spaces at this resource: How to Design A Comfortable Modern Living Space.
For additional tips on home maintenance and seasonal care, HGTV offers practical articles and resources that are helpful for homeowners tackling chimney and roof concerns: HGTV.
Frequently referenced terminology
- Spalling: Deterioration of brick face due to freeze-thaw cycles.
- Efflorescence: Salt deposits left on masonry as water evaporates.
- Flashing: Metal pieces that seal roof-to-chimney junctions.
- Crown: The sloped concrete cap on top of a chimney.
- Repointing/Tuckpointing: Replacing failing mortar in brick joints.
Resources
When planning repairs, check local building codes and consult licensed contractors. For general home-maintenance inspiration and how-to articles, HGTV is a useful starting place for homeowners.
If you need help prioritizing repairs or want more detailed steps for typical fixes, consider consulting a reputable mason or roofing contractor who can provide an inspection and written plan tailored to your chimney and roof situation.


