There’s nothing quite like a hot, steamy shower to start or end your day, but that invigorating steam can quickly turn into a household headache if your bathroom exhaust fan isn’t pulling enough air. A poorly functioning exhaust fan isn’t just an annoyance; it’s a gateway to excess humidity, lingering odors, and potentially damaging mold and mildew growth. If you’ve noticed your bathroom remaining steamy long after your shower, or a musty smell persisting, it’s a clear sign that your exhaust fan isn’t performing its crucial duty effectively. Understanding why your fan might be underperforming and knowing how to troubleshoot and resolve these issues can save you significant time, money, and protect the integrity of your bathroom. This comprehensive guide will walk you through the common culprits behind a weak exhaust fan and provide actionable steps to restore its full power, ensuring your bathroom remains fresh, dry, and healthy.
Why Your Bathroom Exhaust Fan Isn’t Working Effectively
Before you can fix the problem, it’s essential to understand the potential reasons why your bathroom exhaust fan isn’t pulling enough air. From simple clogs to complex mechanical failures, several factors can impede your fan’s efficiency. Identifying the root cause is the first step toward a lasting solution.
Clogged Fan Grille or Vent
This is by far the most common and easiest problem to fix. Over time, dust, lint, hair, and other airborne particles can accumulate on the fan grille and inside the fan housing. This buildup acts as a physical barrier, restricting the amount of air the fan can draw in and expel. Imagine trying to breathe through a thick, dusty cloth – that’s what your fan is experiencing.
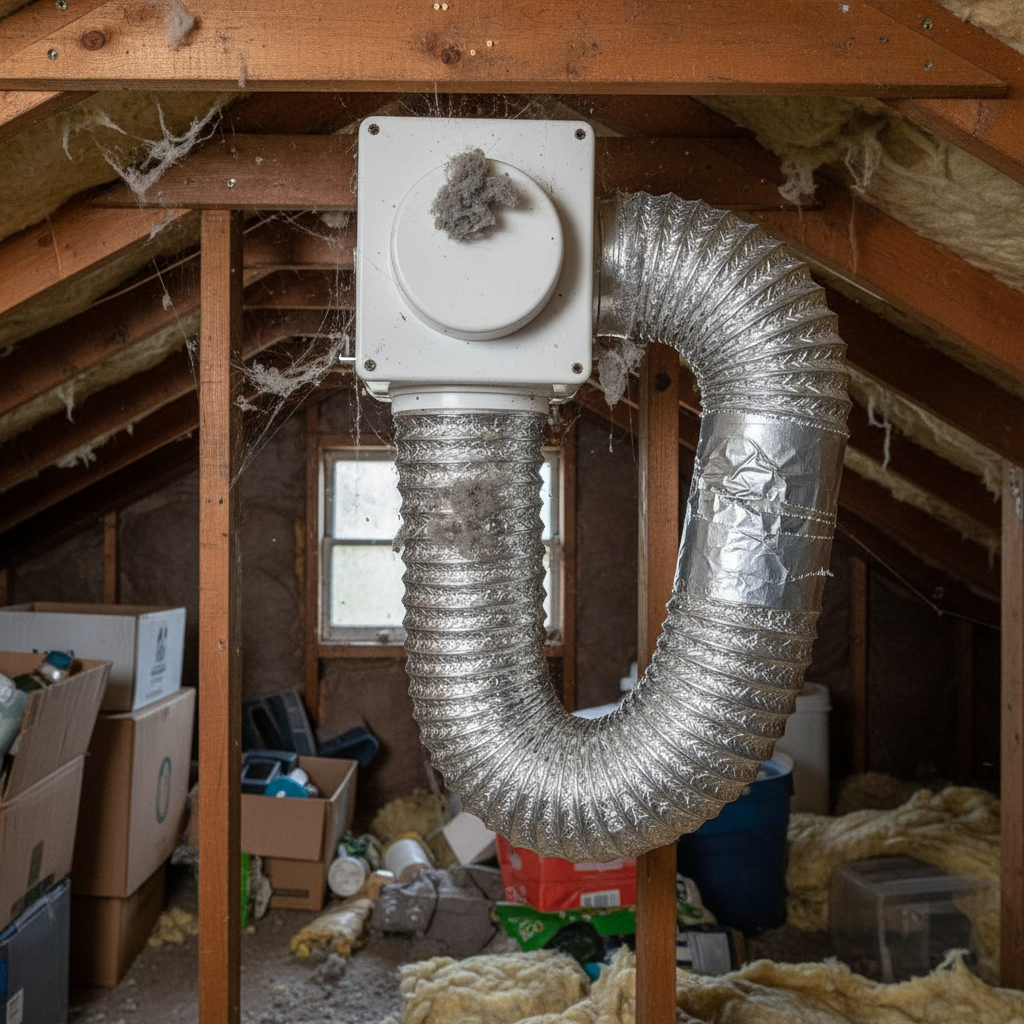
Blocked or Kinked Ductwork
The ductwork is the pathway through which the humid air travels from your bathroom to the outside. If this pathway is obstructed, the fan cannot effectively move air. Common culprits for blockages include:
- Debris accumulation: Dust, lint, and even rodent nests can build up inside the ducts, especially in older or infrequently cleaned systems.
- Kinks or bends: If the ductwork was improperly installed with sharp bends or sags, it can restrict airflow significantly. Flexible ducts are particularly prone to kinking.
- Crushed ducts: Ducts can be accidentally crushed during attic work or if heavy items are placed on them.
Undersized Fan for Your Bathroom
Even a perfectly clean and fully functional fan might not be enough if it’s simply too small for the volume of your bathroom. Exhaust fans are rated by Cubic Feet per Minute (CFM), indicating how much air they can move. If your fan’s CFM rating is lower than what your bathroom requires, it will constantly struggle to clear the air, leading to persistent humidity and odors.
- Standard sizing rule: For bathrooms up to 100 square feet, a general rule is to have at least 1 CFM per square foot. So, a 50 sq ft bathroom needs a 50 CFM fan.
- Larger bathrooms: For bathrooms larger than 100 sq ft, the calculation becomes more complex, often involving multiplying the bathroom’s volume (length x width x height) by an air change rate (e.g., 8 air changes per hour) and dividing by 60 minutes.
- Fixtures: Consider additional CFM for features like jetted tubs (50 CFM), separate shower stalls (50 CFM), and enclosed toilets (50 CFM).
Motor Malfunction or Age
Like any mechanical device, exhaust fan motors wear out over time. Bearings can seize, motor windings can fail, or the motor itself can simply lose power, resulting in a weaker fan. An aging motor might spin, but not with enough force to generate adequate airflow. You might hear the fan running, but the air movement is negligible. Sometimes, a high-pitched whine or grinding sound can indicate a failing motor.
Improper Installation
A significant percentage of exhaust fan problems can be traced back to incorrect installation. This includes:
- Incorrect ducting: Using ducting that is too small in diameter for the fan’s collar, or excessively long duct runs without proper boosts, can severely impede airflow.
- Leaky connections: Poorly sealed connections between the fan, ductwork, and exterior vent can allow air to escape before it reaches the outside, reducing effective airflow.
- Lack of insulation: Uninsulated ductwork running through cold attics can lead to condensation inside the ducts, which can drip back down, or even freeze, causing blockages.
Backdraft Damper Issues
Most exhaust fans and exterior vent caps have a backdraft damper, a small flap designed to prevent outside air from blowing back into the house when the fan is off. If this damper gets stuck in a partially closed position due to dust, rust, or damage, it will restrict the outward flow of air, even when the fan is running at full power.
Leaky Duct Connections
Even if the duct isn’t completely blocked, leaks at the joints where duct sections connect or where the duct connects to the fan housing or the exterior vent can significantly reduce the amount of air actually making it outside. Instead, humid air escapes into your attic or wall cavities, potentially causing hidden moisture problems.
Insufficient Makeup Air
For an exhaust fan to pull air out of a bathroom effectively, new air needs to be able to enter the room. If your bathroom is sealed too tightly (e.g., a tightly weather-stripped door and closed windows), the fan can struggle to create negative pressure, making it harder to move air. This is often an overlooked aspect of fan performance. A small gap under the bathroom door usually provides sufficient makeup air.
Diagnosing the Problem: How to Test Your Fan’s Performance
Once you understand the potential causes, it’s time to put your fan to the test. These simple methods can help you determine if your bathroom exhaust fan is indeed not pulling enough air and give you clues about the severity of the issue.
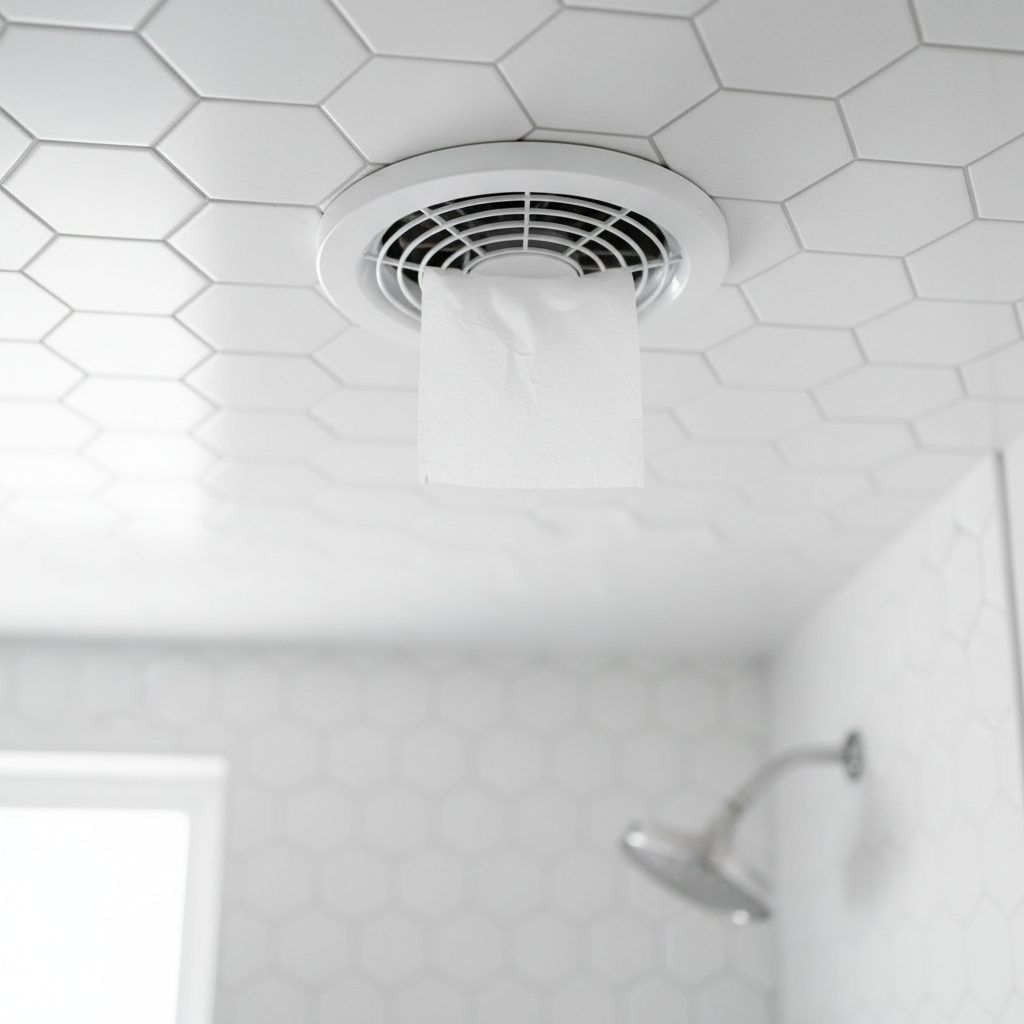
The Tissue Paper Test
This is a classic and highly effective way to gauge your fan’s suction power.
- Turn the fan on.
- Take a single sheet of toilet paper or a lightweight tissue.
- Hold the tissue up to the fan grille.
- If the fan is working properly, it should be able to hold the tissue against the grille by suction alone, even when you release your hand.
- If the tissue falls or can only be held briefly with significant assistance, your fan’s suction is weak.
The Steam Test
This test directly assesses the fan’s ability to clear humidity.
- Run a hot shower with the bathroom door and window closed (as you normally would).
- Turn on the exhaust fan.
- Observe how quickly the steam clears from the mirror and the room.
- If the mirror remains fogged for more than 15-20 minutes after the shower is off, or if the room feels excessively damp, your fan is not adequately removing moisture.
Listening for Changes
Sometimes your ears can tell you a lot.
- Normal hum: A healthy fan should produce a consistent, relatively quiet hum.
- Reduced noise: If your fan seems quieter than usual, it might indicate reduced motor speed or a blockage that’s dampening the sound of airflow.
- Increased noise: Conversely, excessive rattling, grinding, or squealing can point to a failing motor, loose components, or obstructions.
- Air movement: While the fan is running, stand under it and feel for a noticeable draft. You should feel air being pulled upwards.
Step-by-Step Solutions to Improve Airflow
Now that you’ve diagnosed the problem, it’s time to roll up your sleeves and address it. Always remember to turn off the power to the fan at the circuit breaker before performing any maintenance or inspection tasks to prevent electrical shock.
Cleaning the Fan Grille and Housing
This is often the quickest and most impactful fix.
- Turn off power: Locate the circuit breaker for your bathroom and switch it off. Confirm the fan is off by trying to turn it on with the wall switch.
- Remove the grille: Most grilles are held in place by spring clips or small screws. Gently pull down on the grille or unscrew it.
- Clean the grille: Wash the grille in warm, soapy water, rinse, and let it dry completely.
- Clean the fan housing: Using a vacuum cleaner with a brush attachment or a damp cloth (ensure it’s only damp, not wet, and avoid getting water on electrical components), carefully clean the fan blades, motor housing, and the inside of the fan enclosure. Remove all visible dust and lint.
- Reassemble: Once everything is clean and dry, reattach the grille and restore power.
For more detailed instructions on cleaning, you can refer to expert advice like this guide from Good Housekeeping on cleaning your bathroom exhaust fan.
Inspecting and Clearing Ductwork
Accessing ductwork usually requires going into the attic, crawl space, or an access panel.
- Turn off power: Always ensure the fan’s power is off.
- Locate the duct: Trace the ductwork from the fan housing to the exterior vent cap.
- Check for obvious issues: Look for kinks, sags where moisture might collect, or crushed sections. Straighten kinks and support sagging sections with straps.
- Inspect for blockages: If you can safely access parts of the duct, look inside with a flashlight. Use a long brush specifically designed for duct cleaning, or a vacuum cleaner hose, to remove any accumulated debris.
- Exterior vent cap: Check the exterior vent cap for bird nests, insect screens clogged with lint, or a stuck damper. Carefully remove any obstructions.
Checking and Cleaning the Backdraft Damper
This critical component is often overlooked.
- Turn off power: Ensure safety.
- Access the damper: The damper is usually located either directly above the fan blades within the fan housing, or at the exterior vent cap. You might need to remove the fan motor assembly or access the vent from outside.
- Inspect and clean: Gently open and close the flap to ensure it moves freely. Clean off any dust, rust, or debris that might be preventing it from opening fully. Lubricate hinges with a dry lubricant if necessary.
- Repair or replace: If the damper is bent, broken, or heavily corroded, it will need to be repaired or replaced.
Sealing Duct Leaks
If you’ve identified leaks in your ductwork, sealing them can significantly improve airflow.
- Turn off power: Prioritize safety.
- Locate leaks: You might feel air escaping or see signs of moisture around joints.
- Seal with appropriate materials: Use specialized HVAC foil tape (not regular duct tape, which degrades over time) or mastic sealant to seal all joints and connections firmly. Ensure the connections between the fan housing and the duct, and the duct and the exterior vent cap, are airtight.
Addressing Makeup Air Issues
If your bathroom is too airtight, your fan won’t perform optimally.
- Door gap: Ensure there’s at least a 1/2 to 3/4-inch gap under your bathroom door to allow for adequate makeup air. If not, consider trimming the bottom of the door.
- Louvered door: In very tight spaces, a louvered door can be an option to ensure continuous airflow.
- Cracking a window: While not ideal for every scenario, temporarily cracking a window during a shower can help gauge if lack of makeup air is the primary problem.
When to Consider an Upgrade (Fan Sizing, CFM)
If you’ve cleaned everything, checked for blockages, and your fan is still not pulling enough air, it might be undersized or simply at the end of its life.
- Recalculate CFM needs: Re-evaluate your bathroom’s CFM requirements based on its size and fixtures.
- Consider a larger fan: If your current fan’s CFM is too low, upgrading to a higher CFM model is the best solution. Look for models with a low sone rating (noise level) for quiet operation.
- Newer technology: Modern fans often incorporate more efficient motors and better designs, offering improved performance and quieter operation.
- Replacing a motor: Sometimes, just replacing the motor assembly within an existing fan housing is an option, especially if the housing is in good condition and the new motor fits.
Professional Help: When to Call an Expert
While many of these troubleshooting steps are DIY-friendly, there are times when calling a professional is the best course of action.
- Electrical issues: If you suspect a wiring problem or motor malfunction beyond a simple cleaning, an electrician is required.
- Complex ductwork: If your ductwork is difficult to access, runs through multiple stories, or requires significant repair or replacement, an HVAC technician can provide expert service.
- Persistent problems: If you’ve tried all the troubleshooting steps and your fan is still not pulling enough air, a professional can offer a deeper diagnosis.
- New fan installation: For upgrading to a larger or more complex fan, especially if it involves modifying existing ductwork or electrical circuits, professional installation ensures safety and optimal performance.
Preventative Maintenance for Optimal Fan Performance
Once your bathroom exhaust fan is back to peak performance, maintaining it is key to preventing future issues. A little regular care goes a long way in ensuring your bathroom remains a fresh and healthy space.
Regular Cleaning Schedule
The most important preventative measure is regular cleaning.
- Monthly: Quickly wipe down the exterior of the fan grille with a damp cloth to remove surface dust.
- Quarterly to Bi-annually: Depending on bathroom usage and household dust levels, remove the grille and vacuum or wipe down the fan blades and interior housing.
- Annually: Perform a more thorough cleaning, potentially involving washing the grille and inspecting the immediate ductwork entrance and backdraft damper.
Consistent cleaning prevents the heavy buildup that severely restricts airflow.
Annual Duct Check-up
Make it a habit to check your ductwork annually, especially if it runs through an attic or crawl space.
- Visual inspection: Look for kinks, crushes, or disconnects.
- Exterior vent cap: Ensure the exterior vent cap is clear of obstructions like bird nests, insect screens, or heavy lint buildup. This is especially important before winter to prevent blockages from freezing condensation.
- Insulation check: Verify that any insulated ductwork is still properly covered, particularly in unconditioned spaces, to prevent condensation issues.
Mindful Bathroom Habits
Your habits can also contribute to the longevity and effectiveness of your fan.
- Run the fan during and after showers: Always turn on the exhaust fan before you start showering and leave it running for at least 15-20 minutes after you’ve finished. This allows it sufficient time to remove all the moisture.
- Use the fan for odors: Don’t just rely on the fan for steam. Use it to clear strong odors from the bathroom, which also helps cycle air.
- Allow makeup air: Keep the bathroom door slightly ajar or ensure there’s a gap under it to allow fresh air to enter the room while the fan is operating.
- Avoid harsh chemicals near the fan: Sprays and chemicals can accelerate dust buildup and even corrode fan components.
Frequently Asked Questions (FAQs)
How often should I clean my bathroom exhaust fan?
Generally, you should wipe down the grille monthly, remove and clean the grille and accessible fan components every 3-6 months, and perform a more thorough inspection and cleaning (including the backdraft damper) annually. High-usage bathrooms or dusty environments may require more frequent cleaning.
What is CFM and why is it important?
CFM stands for Cubic Feet per Minute, which measures the volume of air an exhaust fan can move. It’s crucial because an undersized fan (low CFM) for your bathroom won’t be able to remove moisture and odors effectively, regardless of how clean it is. Ensure your fan’s CFM matches or exceeds your bathroom’s requirements.
Can a dirty exhaust fan cause a fire?
While less common than with dryer vents, a severely clogged exhaust fan with excessive lint and dust buildup can pose a fire hazard, especially if the motor overheats. Regular cleaning significantly reduces this risk.
How long should I run my bathroom fan after a shower?
It’s recommended to run your bathroom exhaust fan for at least 15-20 minutes after a shower or bath. This allows enough time for the fan to effectively remove all the steam and humidity from the air, preventing condensation and mold growth.
Is it normal for an exhaust fan to make noise?
Yes, all exhaust fans make some noise due to the motor and moving air. Fan noise is measured in “sone” ratings, with lower sone ratings indicating quieter operation. A healthy fan should have a consistent hum. Excessive rattling, grinding, or squealing, however, usually indicates a problem like a failing motor or loose components.
A functional bathroom exhaust fan is more than a convenience; it’s a vital component of a healthy home. By understanding why your bathroom exhaust fan isn’t pulling enough air and following these troubleshooting and maintenance steps, you can ensure your bathroom remains a dry, fresh, and mold-free sanctuary for years to come. Don’t let a weak fan compromise your home’s air quality and structural integrity—take action and enjoy the full benefits of a well-ventilated bathroom.


