There’s nothing quite as frustrating as stepping back to admire a freshly painted room, only to notice unsightly bumps and blisters forming on the surface. If you’ve ever dealt with paint bubbling on interior walls, you know it’s not just an aesthetic issue; it often signals a deeper problem beneath the surface. These raised pockets of paint, known as blisters, can range from tiny pinpricks to large, peeling areas, and they can transform your perfect wall into a bumpy mess in no time. Understanding why this happens is the first step toward effective repair and, more importantly, prevention. This comprehensive guide will delve into the common culprits behind bubbling paint, walk you through the diagnosis process, and provide clear, actionable steps to fix the problem and ensure your future paint jobs stay smooth and beautiful.
What is Paint Bubbling (or Blistering)?
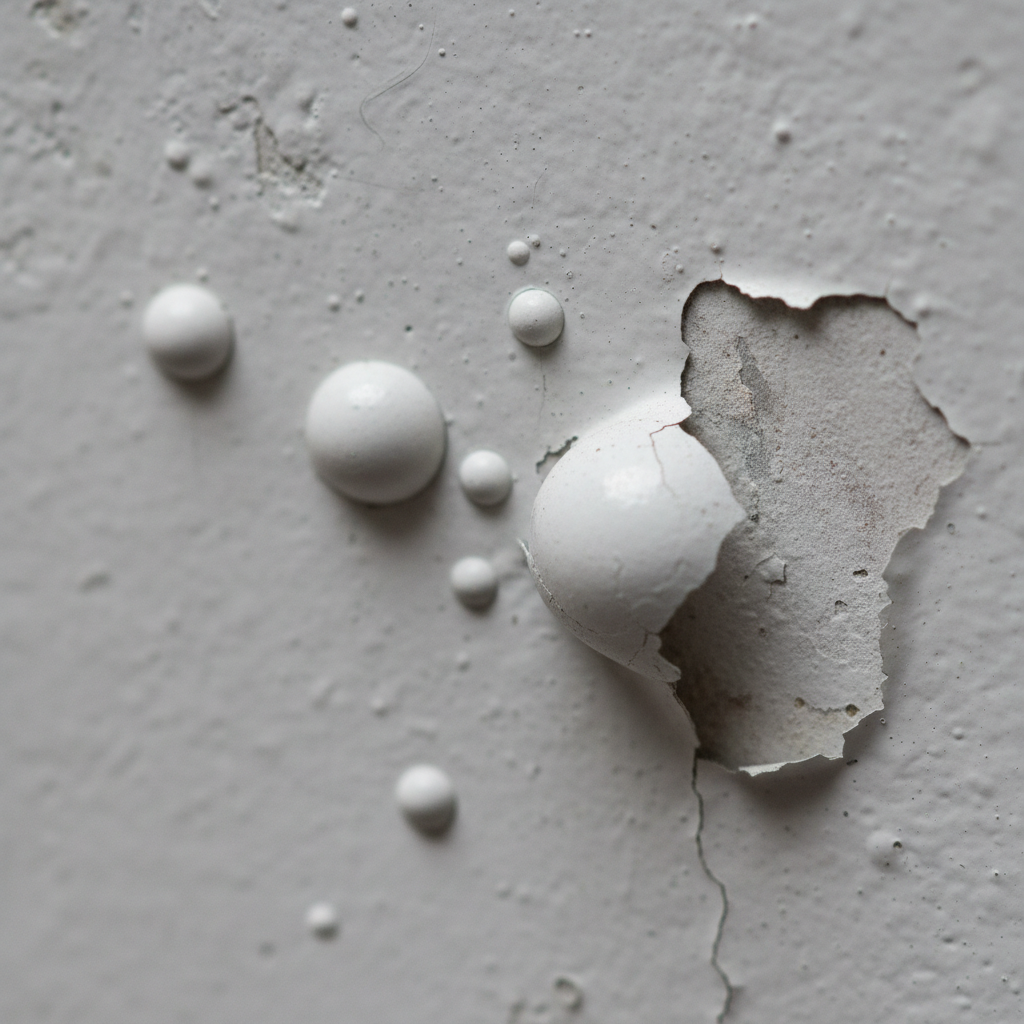
Paint bubbling, also referred to as blistering, occurs when a coat of paint lifts from the surface beneath it, creating small to large pockets of air or moisture. This separation prevents the paint from adhering properly to the wall, resulting in an uneven, raised appearance. The bubbles can be isolated or widespread, and they might appear shortly after painting or develop over time. While often dismissed as a minor annoyance, paint blistering is a clear indication that something went wrong during the painting process or that there’s an underlying issue with the wall itself.
The Root Causes: Why Your Paint is Bubbling on Interior Walls
Identifying the exact cause of your paint bubbles is crucial for a successful repair. Without addressing the root problem, you’ll likely find yourself dealing with the same issue again. Here are the most common reasons why paint blisters on interior walls:
Moisture, the Most Common Culprit
Moisture is arguably the number one enemy of well-adhered paint. When moisture becomes trapped behind the paint film, it tries to escape, pushing the paint away from the substrate and creating bubbles. This can happen in several ways:
- Leaky Plumbing or Roof: Even a small, slow leak from pipes within the wall or a compromised roof can allow moisture to seep into the drywall or plaster, causing paint to bubble.
- High Humidity: Excessive humidity, especially in rooms like bathrooms, kitchens, or basements, can lead to condensation forming on walls. If the paint isn’t formulated to handle high moisture or the room isn’t adequately ventilated, this can result in blistering over time.
- Trapped Moisture in New Construction: In newly constructed or renovated homes, building materials like drywall compound or plaster might not be fully dry before painting. Painting over a damp surface traps this moisture, which later tries to escape, causing bubbles.
- Painting Over a Wet Surface: Applying new paint to a wall that is still damp from cleaning, a spill, or even high ambient humidity can immediately lead to blistering as the paint tries to dry.
Improper Surface Preparation
The foundation of any successful paint job is proper surface preparation. Skipping or rushing these critical steps almost guarantees problems, including bubbling.
- Dirty or Greasy Walls: Dust, dirt, grime, oil, and grease create a barrier between the wall surface and the paint, preventing proper adhesion.
- Unprimed Surfaces: A primer serves as an essential bonding layer, promoting adhesion and ensuring a uniform finish. Painting directly onto bare drywall, patched areas, or glossy surfaces without a suitable primer can lead to poor adhesion and blistering.
- Incompatible Previous Coatings: If new paint is applied over an old finish that is incompatible (e.g., latex over oil-based without proper prep and primer), adhesion can fail.
- Glossy Surfaces Not Roughened: Very smooth, glossy surfaces (like existing semi-gloss paint) don’t provide enough “tooth” for new paint to adhere. They need to be dulled or lightly sanded before priming and painting.
Application Errors
Even with a perfectly prepped wall, mistakes during the actual painting process can cause bubbles.
- Applying Paint Too Thickly: Laying on very thick coats of paint, especially in humid conditions, can cause the top layer to dry and skin over before the underlying layer is fully cured. As solvents or trapped air try to escape from the wet under-layer, they can push up the dried top layer, creating bubbles.
- Painting in Extreme Temperatures: Applying paint in very hot, cold, or excessively humid conditions can affect drying times and paint adhesion. Extreme heat can cause the paint to dry too quickly on the surface, trapping solvents. Extreme cold can prevent proper curing.
- Shaking Rather Than Stirring Paint: While less common with modern paints, vigorously shaking some older formulations could introduce air bubbles into the paint itself, which then transfer to the wall. Stirring is always preferred.
Environmental Factors
Sometimes, the environment outside or within your home can contribute to paint bubbling.
- Rapid Temperature Changes: If a wall heats up quickly after being painted (e.g., direct sunlight hitting an exterior wall after painting, or a sudden change in room temperature), trapped moisture or solvents can expand rapidly and push the paint off.
- Poor Ventilation: Inadequate air circulation, especially during and after painting, can slow down drying and curing, increasing the chances of moisture or solvent entrapment.
Substrate Issues (Less Common but Important)
Problems with the actual wall material can also be a factor.
- Efflorescence: This is a white, powdery substance that can appear on masonry surfaces (like concrete or brick) when salts from within the material are carried to the surface by moisture, then left behind as the water evaporates. Painting over efflorescence can lead to poor adhesion and blistering.
- New Plaster Not Fully Cured: Fresh plaster needs a significant amount of time to fully cure and dry. Painting too soon can trap moisture and cause bubbling.
Diagnosing the Problem: How to Identify the Specific Cause
Observing the characteristics of the bubbles can provide clues about their origin:
- Small, Numerous Bubbles: Often indicates application errors like paint applied too thickly, painting in high heat, or surface contamination (dust, oil). These are usually air or solvent bubbles.
- Large, Soft Bubbles (often containing liquid): A strong indicator of moisture trapped behind the paint. Pressing on them might cause liquid to ooze out, or they may feel soft and squishy. These often appear near ceilings, windows, or plumbing fixtures.
- Bubbles that Peel Away Easily: Suggests poor adhesion due to improper surface preparation (dirty, unprimed, or glossy surface) or an incompatible paint/primer combination.
- Bubbles with a Powdery Substance Behind Them: Could indicate efflorescence, especially on masonry walls.
- Location Matters: Bubbles near the ceiling could indicate a roof leak or attic condensation. Bubbles near the floor or baseboards might point to plumbing leaks or foundation moisture. Bubbles in bathrooms or kitchens usually suggest high humidity or poor ventilation.
Always inspect the affected area thoroughly. Look for signs of leaks, mold, or mildew. Check the moisture content of the wall if you have a moisture meter. This diagnostic step is vital before attempting any repairs.
Fixing Paint Bubbles: A Step-by-Step Guide to Repair
Once you’ve diagnosed the cause, you can proceed with fixing the bubbling paint. Remember, fixing the underlying issue is paramount.
Preparation and Safety First
Before you begin any repair work, ensure your workspace is safe and prepared:
- Protect Your Space: Lay down drop cloths or old sheets to protect floors and furniture.
- Ventilate: Open windows and doors to ensure good air circulation, especially when scraping, sanding, or using paint products.
- Safety Gear: Wear safety glasses, a dust mask (especially when sanding old paint, which might contain lead if your home is older than 1978), and gloves.
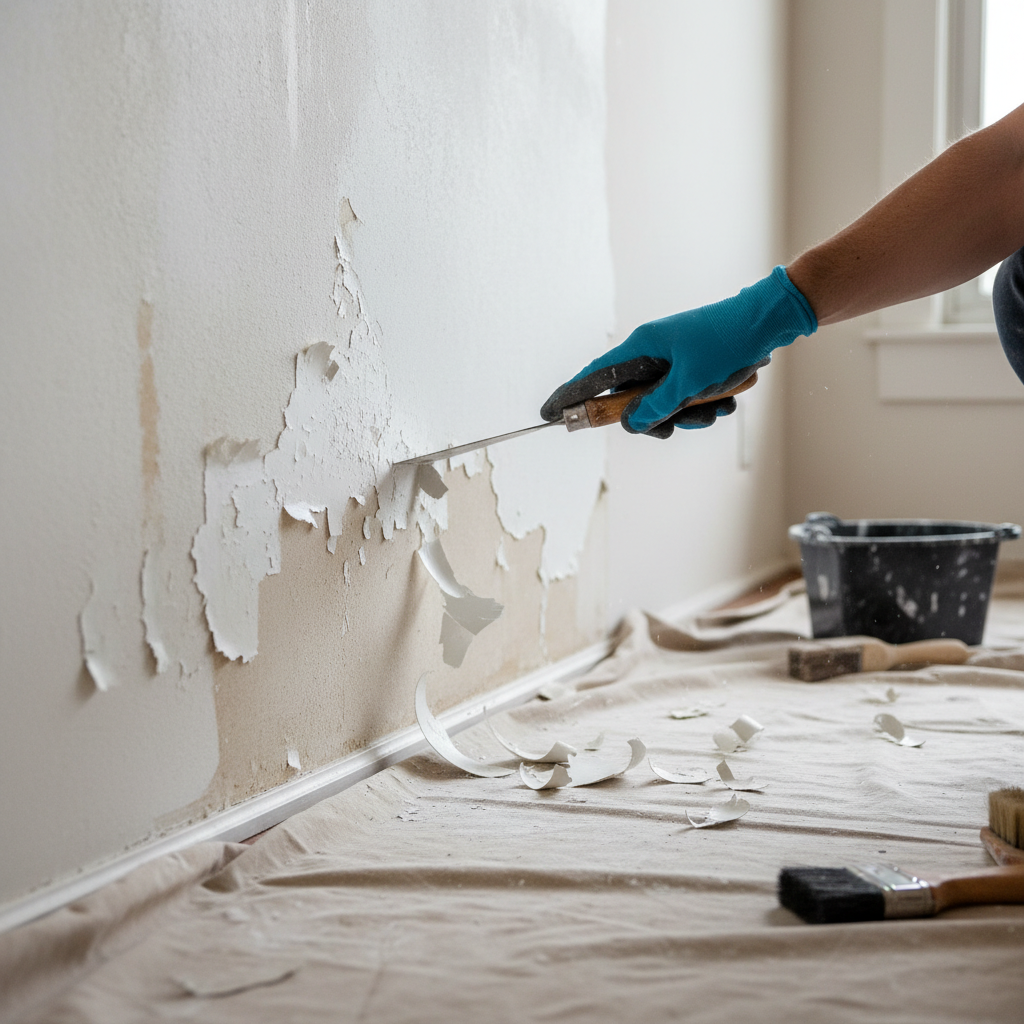
Removing the Damaged Paint
The first step is to remove all affected paint:
- Scrape: Use a paint scraper or putty knife to carefully remove all loose, bubbling, and peeling paint. Extend beyond the visibly damaged area to ensure you get to well-adhered paint.
- Sand: Once the loose paint is removed, lightly sand the edges of the remaining paint to feather them into the bare wall surface. This helps create a smooth transition and prevents noticeable lines when you repaint. Use medium-grit sandpaper (120-150 grit) for this.
- Clean: Thoroughly wipe down the sanded area with a damp cloth to remove all dust and debris. Allow the surface to dry completely.
Addressing the Root Cause (Crucial Step!)
This cannot be stressed enough: do NOT simply repaint without addressing why the bubbles appeared in the first place. Otherwise, they will return.
- Fix Leaks: If moisture is the culprit, identify and repair any plumbing leaks, roof leaks, or foundation issues. Ensure the wall is completely dry before proceeding. You might need to bring in a professional plumber or roofer for this.
- Improve Ventilation: In high-humidity areas, install an exhaust fan, use a dehumidifier, or simply ensure adequate air circulation by opening windows or using fans.
- Clean Thoroughly: If the issue was poor surface prep, ensure the wall is meticulously clean and free of grease, dirt, or mildew. For information on thorough wall cleaning, resources like Good Housekeeping’s guide on cleaning walls before painting offer valuable insights.
- Address Efflorescence: If efflorescence is present, brush it off with a stiff brush, then wash the surface with a solution of trisodium phosphate (TSP) or a specialized masonry cleaner, following product instructions carefully. Ensure the source of moisture causing the efflorescence is also addressed.
Surface Preparation for Repainting
With the old paint removed and the underlying issue resolved, prepare the surface meticulously:
- Patch and Fill: If scraping created divots or if there were existing holes or cracks, use spackle or joint compound to fill them. Allow the compound to dry completely, then sand smooth until it’s flush with the wall.
- Clean Again: Wipe down the patched and sanded areas with a damp cloth to remove any dust. Let it dry fully.
- Prime: Apply a high-quality primer-sealer. If moisture was the issue, choose a moisture-blocking or stain-blocking primer. For previously glossy surfaces, use a bonding primer. For new drywall or patched areas, a good quality acrylic latex primer is usually sufficient. Allow the primer to dry according to the manufacturer’s instructions.
Repainting the Area
Finally, it’s time to repaint the repaired section:
- Matching Paint: Use the exact same paint (brand, color, sheen) that was originally on the wall for the best match. If you don’t have it, consider painting the entire wall or even the whole room for a seamless finish.
- Thin Coats: Apply thin, even coats of paint. Two thin coats are always better than one thick coat, as it promotes proper drying and adhesion.
- Drying Time: Allow adequate drying time between coats as specified by the paint manufacturer. Do not rush this step.
Preventing Future Paint Bubbling: Best Practices for Lasting Results
Prevention is always better than cure. By following best practices, you can significantly reduce the chances of paint bubbling again:
Thorough Surface Preparation is Key
Never underestimate the importance of proper prep work:
- Clean Walls: Always clean your walls thoroughly before painting. Remove all dirt, dust, grease, and mildew using appropriate cleaners. Rinse well and allow to dry completely.
- Sand and Dull: For glossy surfaces, lightly sand to create a dull finish, or use a liquid deglosser. This provides “tooth” for the new paint to grip.
- Patch and Repair: Fill all holes and cracks. Sand smooth and clean away dust.
- Always Prime: Use a high-quality primer suited for your surface and topcoat. It creates a consistent surface for the paint, improves adhesion, and often provides a moisture barrier.
Master Your Painting Technique
Small adjustments in your application can make a big difference:
- Apply Thin Coats: Avoid overloading your brush or roller. Apply paint in thin, even layers.
- Observe Drying Times: Always adhere to the paint manufacturer’s recommended drying times between coats and before exposing the wall to normal conditions.
- Optimal Temperature and Humidity: Paint in moderate temperatures (typically 60-85°F or 15-30°C) and avoid extremely high humidity. Good ventilation during and after painting is crucial for proper drying.
Manage Moisture Levels
Control the environment to protect your paint:
- Fix Leaks Promptly: Address any leaks (plumbing, roof, foundation) immediately.
- Ventilate High-Moisture Areas: Use exhaust fans in bathrooms and kitchens. Consider a dehumidifier in basements or other humid areas.
- Allow New Construction to Dry: If painting new drywall or plaster, ensure it has had ample time to dry and cure completely before priming and painting.
Choose the Right Products
Not all paints and primers are created equal:
- Quality Paint: Invest in good quality paint. Premium paints often have better adhesion properties and are more resistant to moisture.
- Compatible Primers: Ensure your primer is compatible with both your wall surface and your chosen topcoat. For example, some oil-based primers are excellent for blocking stains and moisture, but ensure they can be top-coated with your latex paint if that’s what you’re using.
When to Call a Professional
While many paint bubbling issues can be tackled by a DIY enthusiast, there are situations where calling a professional is the wisest choice:
- Extensive Damage: If a large portion of your wall or multiple walls are bubbling.
- Persistent Issues: If you’ve tried to fix the problem yourself, but the bubbles keep reappearing.
- Suspected Structural Issues: If you suspect the moisture is coming from a major leak in your roof, plumbing, or foundation, or if there are signs of mold and mildew spreading, a professional contractor or plumber should be consulted immediately.
- Lead Paint Concerns: If your home was built before 1978, there’s a possibility of lead-based paint. Disturbing it can release hazardous dust. In such cases, it’s best to consult with a lead-safe certified renovator.
Frequently Asked Questions About Paint Bubbling
Q: Can paint bubbles go away on their own?
A: Unfortunately, no. Once paint has bubbled, the adhesion has failed, and the only way to fix it permanently is to scrape off the damaged paint, address the underlying cause, and repaint the area.
Q: Is bubbling paint dangerous?
A: The paint itself is generally not dangerous. However, the underlying cause of the bubbling, especially prolonged moisture, can lead to more serious issues like mold growth, mildew, or even structural damage, which can pose health risks or compromise your home’s integrity.
Q: How long after painting can bubbles appear?
A: Bubbles caused by application errors (like painting over a dirty surface or too thickly) can appear almost immediately or within a few days of painting. Bubbles caused by moisture issues (like leaks or high humidity) can appear weeks, months, or even years after painting, as the moisture gradually works its way through the wall.
Q: What kind of primer helps prevent bubbles?
A: A high-quality acrylic latex primer is suitable for most surfaces and helps with adhesion. If moisture is a concern, consider an oil-based or shellac-based stain-blocking primer, as these often offer superior moisture resistance and create a strong barrier. For glossy surfaces, a specialized bonding primer is recommended.
Q: Can old paint cause new paint to bubble?
A: Yes, if the old paint is not adhering well to the wall, or if it has a very glossy finish that wasn’t properly prepped, it can prevent the new paint from bonding correctly, leading to bubbling.
Conclusion
Dealing with paint bubbling on interior walls can be a nuisance, but it’s a problem that’s entirely fixable and preventable with the right knowledge and techniques. By understanding the common causes—primarily moisture, inadequate surface preparation, and application errors—you can accurately diagnose the issue. The key to a lasting repair lies in diligently addressing the root cause before embarking on the scraping, patching, priming, and repainting process. By adopting meticulous preparation habits, using appropriate painting techniques, and maintaining proper environmental control within your home, you can ensure your interior walls remain beautifully smooth and blister-free for years to come. Don’t let bubbling paint detract from your home’s beauty; take action and enjoy flawless walls once more!


