Discovering drywall cracking near the ceiling can be an unsettling experience for any homeowner. While some cracks are merely cosmetic blemishes, others can signal more significant structural issues that require immediate attention. Understanding the root cause of these cracks is the first step toward effective repair and ensuring the long-term integrity of your home. This comprehensive guide will delve into the various reasons why drywall cracks appear near ceilings, help you differentiate between minor and major concerns, and provide actionable steps for both DIY fixes and knowing when to call a professional.
Why Do Drywall Cracks Appear Near the Ceiling?
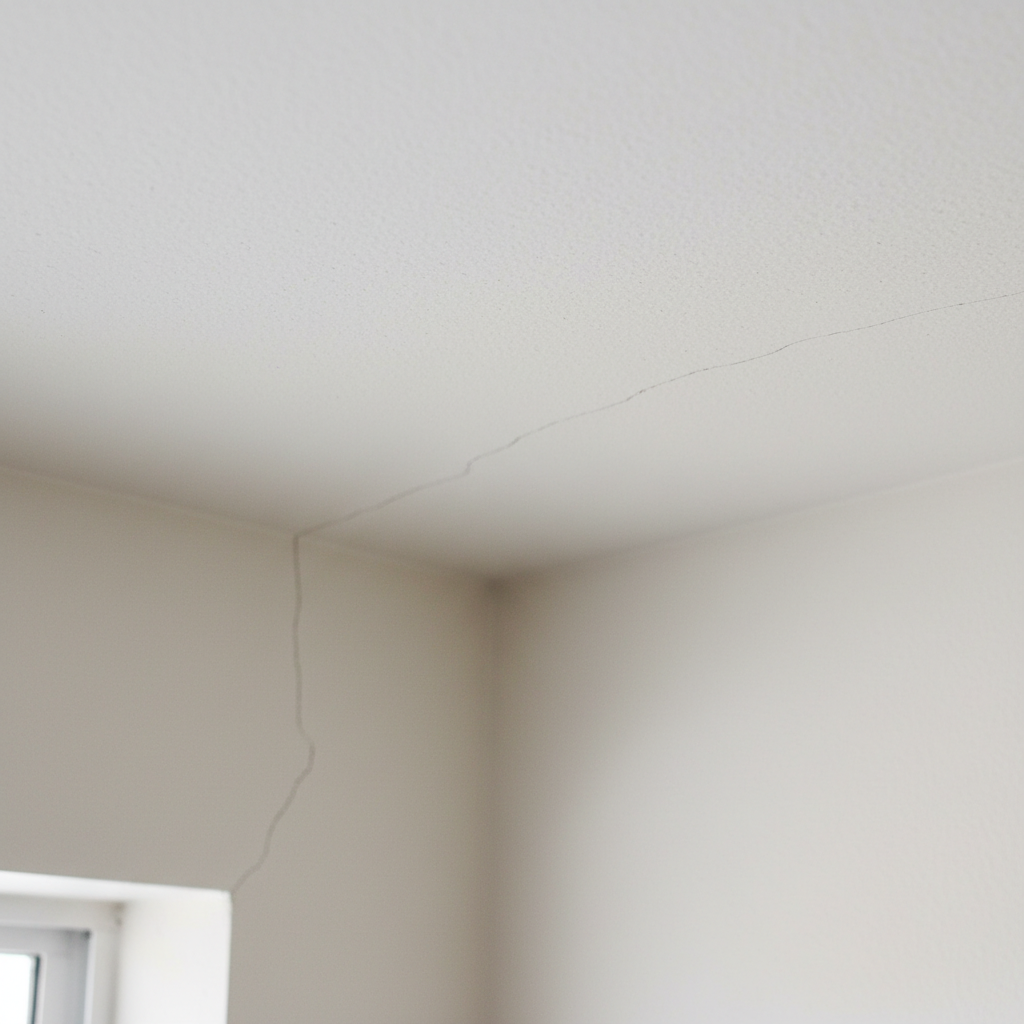
The junction where walls meet the ceiling is a common stress point in many homes. This area is particularly susceptible to movement, expansion, and contraction, making it a prime location for cracks to develop. Unlike cracks in the middle of a wall, those near the ceiling often involve the interplay of different structural elements and environmental factors.
- Stress Points: The ceiling line is where the wall framing meets the ceiling joists or trusses. Any differential movement between these components can place stress on the drywall, leading to cracks.
- Gravitational Pull: The weight of the ceiling drywall itself, combined with any loads from above (like an attic floor or roof), can contribute to sagging and cracking over time, especially if installation was less than ideal.
- Environmental Factors: Fluctuations in temperature and humidity cause building materials to expand and contract, and these movements are often most visible at junctions like the ceiling line.
Common Causes of Drywall Cracks Near the Ceiling
Pinpointing the exact cause of drywall cracks near your ceiling is crucial for effective repair. Here’s a breakdown of the most common culprits:
1. House Settlement
One of the most frequent causes of cracks is the natural settlement of your home. As a house ages, it settles into its foundation, and minor shifts are normal. This can cause slight movements in the framing, leading to small, often hairline cracks, particularly in areas like ceiling corners and wall-to-ceiling joints. Minor settlement cracks are usually not a cause for alarm, but significant, rapidly growing, or recurring cracks might indicate more serious foundation issues.
2. Temperature and Humidity Fluctuations
Wood framing, drywall, and joint compound all react to changes in temperature and humidity. During hot, humid months, materials expand, and in dry, cold conditions, they contract. This constant expansion and contraction can put stress on the drywall seams and cause cracks, especially if the joint compound or tape wasn’t applied correctly during installation. Proper ventilation and humidity control can mitigate this issue.
3. Poor Drywall Installation
The quality of drywall installation plays a significant role in its longevity. Common installation flaws that lead to cracks include:
- Insufficient Fasteners: Not enough screws or nails to secure the drywall sheets properly can allow them to sag or shift.
- Improper Taping and Mudding: If joint tape isn’t embedded correctly in joint compound, or if too little compound is used, the seams can crack as the house settles or materials move.
- Butt Joint Placement: Butt joints (where the untapered edges of drywall sheets meet) are thicker and harder to conceal. If not properly floated out, they are prone to cracking.
- Missing Backing: If drywall sheets don’t have adequate framing behind them at the edges, they lack support and can crack or sag.
4. Foundation Problems
While less common for isolated ceiling cracks, serious foundation issues can manifest as significant drywall cracks. These cracks are often larger, span across multiple walls and ceilings, and are usually accompanied by other tell-tale signs such as:
- Sticking doors and windows
- Uneven or sloping floors
- Cracks in exterior brick or foundation walls
- Large, diagonal cracks originating from door or window frames
If you suspect foundation problems, it’s crucial to consult a structural engineer or foundation specialist immediately.
5. Roof Leaks or Water Damage
Water is a notorious enemy of drywall. A persistent roof leak can saturate drywall, weakening its structural integrity and causing it to sag, stain, and crack. Cracks caused by water damage often appear as:
- Yellowish or brownish stains around the crack.
- Soft or spongy drywall texture when touched.
- Sagging or bowing in the ceiling itself.
- Spiderweb cracks emanating from a central wet spot.
Addressing the water source is paramount before attempting any drywall repair.
6. Structural Issues (Truss Uplift or Framing Problems)
In some homes, particularly those with attic trusses, a phenomenon called “truss uplift” can occur. This happens when the bottom chord of a roof truss (which spans across the ceiling) expands and contracts at a different rate than the top chords due to temperature and moisture differentials between the attic and the living space below. As the bottom chord lifts, it can pull away from interior walls, causing cracks along the wall-to-ceiling joint, often appearing seasonally. Other framing issues, such as undersized joists or damaged studs, can also lead to excessive deflection and subsequent cracking.
7. Excessive Weight in Attic
If your attic is used for heavy storage, or if heavy HVAC units or water heaters are installed directly on ceiling joists not designed to bear such weight, it can cause the ceiling drywall to sag and crack. Attic floors are typically designed for light storage or foot traffic during maintenance, not for heavy loads.
8. Earthquakes or Seismic Activity
Homes in seismically active regions may experience drywall cracks following an earthquake. The intensity of the cracks will depend on the magnitude and proximity of the seismic event. These cracks can range from minor to significant and may require professional assessment.
9. DIY Renovation Stress
Sometimes, new cracks appear after a home renovation, especially if new openings are cut into walls or ceilings, or if heavy objects are installed without adequate support. Vibrations from construction work, even nearby, can also contribute to existing stresses in the drywall.
Types of Drywall Cracks and What They Indicate
Observing the pattern and location of your drywall cracks can provide valuable clues about their underlying cause:
- Hairline Cracks: These are very thin, often barely visible cracks. They are typically cosmetic and usually indicate minor house settlement or normal expansion/contraction. They are often found at ceiling-wall junctions or along taped seams.
- Straight Cracks Along Seams: Cracks that run perfectly straight along a drywall seam often point to poor installation, such as inadequate joint tape adhesion or insufficient joint compound, allowing the seam to separate over time.
- Diagonal Cracks: Cracks that run diagonally, especially near the corners of doors and windows, are often stress cracks. They can indicate significant settlement, foundation issues, or structural movement, as these openings are natural weak points in a wall.
- Spiderweb or Map Cracks: While more common in old plaster, similar patterns can appear in drywall, especially if there’s extensive water damage causing the drywall paper to delaminate, or if there’s significant old paint buildup that is cracking.
- Cracks at the Ceiling/Wall Joint: These are extremely common and can be due to natural settlement, truss uplift, or simply the differential movement between wall and ceiling framing. A recurring crack in this area might suggest ongoing movement.
- Sagging Drywall with Cracks: If the drywall is noticeably bowing or sagging in addition to cracking, it’s a strong indicator of water damage, excessive weight from above, or fastener failure. This needs immediate attention.
Assessing the Severity: When to Worry and When to DIY
Not all cracks are created equal. Knowing when to grab your spackle and when to pick up the phone for a professional is key.
DIY Fixes for Minor Cracks:
- Small Hairline Cracks (less than 1/16 inch wide): These are often cosmetic. Clean the area, apply a thin layer of lightweight joint compound or spackle, sand smooth, and repaint.
- Straight Cracks Along Seams (up to 1/8 inch wide, not recurring): If the crack is stable and not spreading, you can widen it slightly with a utility knife, clean out loose debris, apply a thin coat of setting-type joint compound, embed fiberglass mesh tape, apply more compound, feather it out, sand, and paint.
For detailed instructions on patching drywall cracks, you can refer to reputable sources like Good Housekeeping’s guide on fixing cracked walls, which offers practical advice for homeowners.
When to Call a Professional:
- Recurring Cracks: If you’ve patched a crack, and it reappears shortly after, it indicates ongoing movement or an unresolved underlying issue.
- Large or Spreading Cracks: Any crack wider than 1/8 inch, or one that is actively growing in length or width, warrants professional inspection.
- Cracks Accompanied by Other Signs: If cracks are coupled with sagging ceilings, bowing walls, sticking doors/windows, uneven floors, or visible water stains, it’s time to call a structural engineer, foundation specialist, or a reputable general contractor.
- Multiple Cracks in Various Locations: A proliferation of cracks throughout your home suggests a more widespread problem.
- Suspected Water Damage: If you suspect a roof leak or plumbing issue, address the water source first with a plumber or roofer, then consult a contractor for drywall repair.
- Suspected Foundation or Structural Issues: These are complex problems that require expert assessment and repair to ensure the safety and stability of your home.
DIY Solutions for Minor Drywall Cracks
For those minor, cosmetic cracks, here’s a basic guide to getting them fixed:
- Gather Your Materials: You’ll need joint compound (lightweight all-purpose or setting-type), joint tape (paper or fiberglass mesh, depending on crack size), a 4-6 inch drywall knife, sandpaper (120-150 grit), a sanding sponge, a damp cloth, and paint matching your ceiling.
- Prepare the Area: Clear furniture and lay down drop cloths. Use a putty knife or utility knife to slightly widen the crack and remove any loose drywall or paint chips. Clean the area thoroughly with a damp cloth to ensure good adhesion.
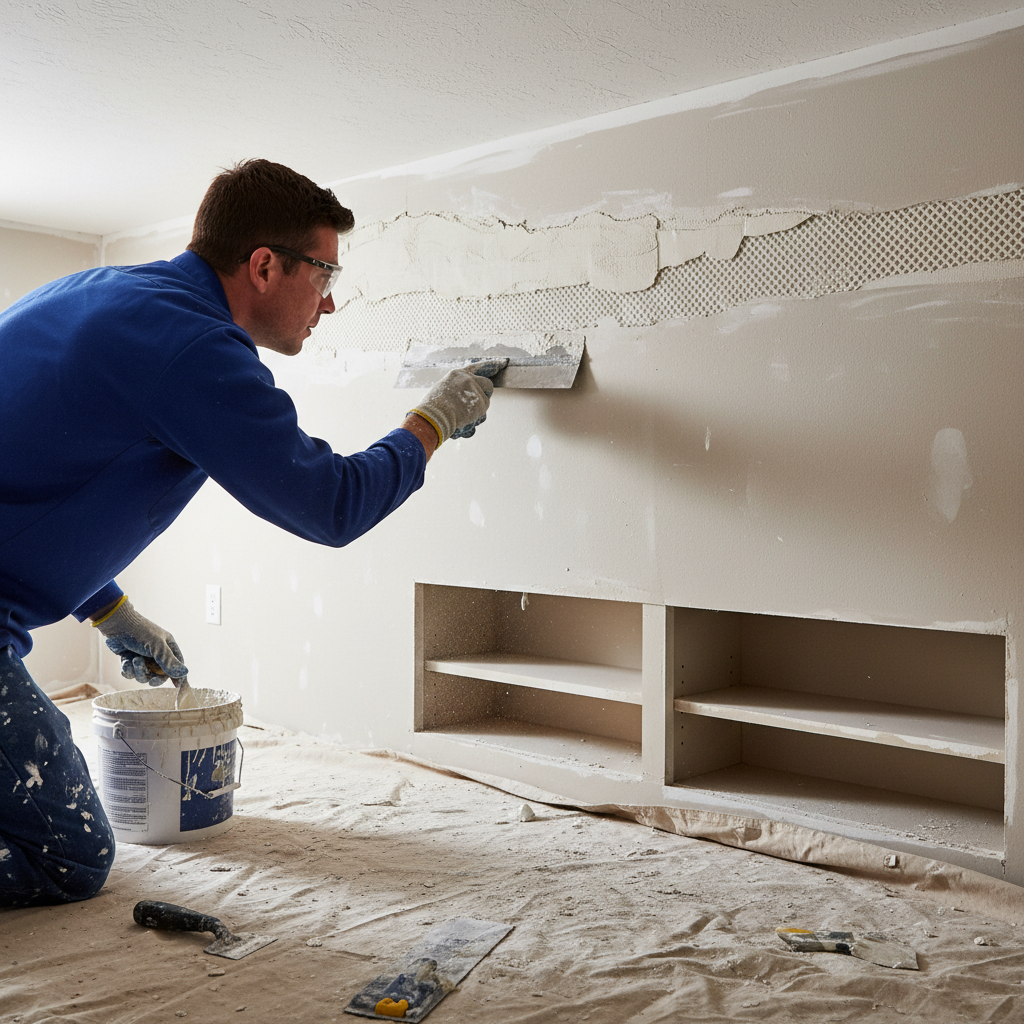
- Apply Mesh Tape (for cracks > 1/16 inch): For slightly larger cracks or those along seams, press self-adhesive fiberglass mesh tape directly over the crack, ensuring it’s centered.
- First Coat of Joint Compound: Apply a thin, even layer of joint compound over the tape (if used) or directly into the crack. Use your drywall knife to feather out the edges smoothly, making sure no excess compound builds up. Allow to dry completely (check product instructions, usually several hours).
- Second Coat (and Third if Needed): Once dry, apply a second, slightly wider, thinner coat of joint compound. Feather out the edges even further to blend it seamlessly with the surrounding ceiling. If necessary, apply a third very thin skim coat after the second has dried.
- Sand Smooth: Once all coats are completely dry, lightly sand the patched area with fine-grit sandpaper or a sanding sponge. Use circular motions to blend the patch into the existing ceiling texture. Wipe away all dust with a damp cloth.
- Prime and Paint: Apply a coat of primer to the patched area to ensure uniform paint absorption. Once the primer is dry, paint the ceiling, feathering out your strokes to blend the new paint with the old. You may need to paint the entire ceiling for the best results, especially if it has aged or has a unique texture.
Preventative Measures
While some cracks are inevitable, you can take steps to minimize their occurrence:
- Maintain Consistent Indoor Humidity: Use humidifiers in dry winters and dehumidifiers in humid summers to keep indoor humidity levels stable, reducing material expansion and contraction.
- Ensure Proper Attic Ventilation: Good attic ventilation helps regulate temperature and moisture, reducing the likelihood of truss uplift and other issues.
- Don’t Overload Your Attic: Be mindful of the weight you place in your attic. If you plan to store heavy items, ensure your ceiling joists are adequately reinforced by a professional.
- Regular Home Maintenance: Periodically inspect your roof for leaks, check gutters, and address any drainage issues around your foundation.
- Professional Drywall Installation: If installing new drywall, hire experienced professionals who follow best practices for taping, mudding, and fastening.
Frequently Asked Questions About Drywall Cracks Near the Ceiling
Are drywall cracks near the ceiling always serious?
No, not always. Many hairline cracks or small cracks along seams are cosmetic and result from normal house settlement or minor expansion/contraction. However, larger, rapidly spreading, recurring, or accompanied by other signs (like sagging or sticking doors) should be investigated by a professional.
Can I just paint over a drywall crack?
While you can paint over a small hairline crack, it’s generally not recommended without proper repair. The crack will likely reappear through the new paint, sometimes within days or weeks, especially if there’s ongoing movement. Proper preparation, including widening the crack, cleaning, taping (if needed), and applying joint compound, is essential for a lasting fix.
How much does it cost to fix drywall cracks?
The cost varies widely depending on the size and number of cracks, the underlying cause, and whether professional intervention is needed. Minor DIY repairs might only cost the price of materials (under $50). Professional repair for cosmetic cracks could range from $100 to $500 per crack or area. If structural or foundation issues are involved, costs can be thousands or even tens of thousands of dollars, as they involve more extensive work.
What kind of caulk should I use for ceiling cracks?
For very small, non-structural cracks at the wall-to-ceiling joint, a high-quality, paintable acrylic latex caulk with silicone can be used. It offers some flexibility to accommodate minor movement. However, for actual cracks within the drywall panel or along seams, joint compound and tape are the correct solutions, as caulk is not designed to permanently bond and fill drywall surfaces.
How do I know if a crack is structural?
Structural cracks are typically larger (wider than 1/8 inch), often diagonal, and may extend through multiple building materials (e.g., from ceiling to wall, or through foundation walls). They are usually accompanied by other signs of structural distress such as sticking doors/windows, uneven floors, bowing walls, or visible shifts in the building’s alignment. When in doubt, it’s always best to consult a structural engineer.
Conclusion
Drywall cracking near the ceiling is a common issue for homeowners, with causes ranging from benign house settlement to more serious structural problems. By carefully observing the type, size, and location of the cracks, and noting any accompanying signs, you can often determine the best course of action. For minor cracks, a DIY repair can restore your ceiling’s aesthetics. However, for larger, recurring, or suspicious cracks, don’t hesitate to seek professional advice. Proactive maintenance and timely intervention will help ensure the longevity and safety of your home.


