Discovering moisture under your bathtub can be a homeowner’s nightmare, signaling hidden problems that could lead to significant damage and costly repairs. This insidious issue, often out of sight and out of mind, can manifest as a persistent musty odor, visible mold growth, or even structural compromise to your home. Addressing moisture under bathtub promptly is crucial, not only to prevent further damage but also to safeguard the health of your household. In this comprehensive guide, we’ll delve into the common causes of this unwelcome dampness, equip you with the knowledge to detect it, and provide actionable steps to fix the problem, ensuring your bathroom remains a sanctuary rather than a source of stress.
The Silent Threat: Why Moisture Under Bathtub is So Problematic
Unlike a visible plumbing leak that immediately demands attention, moisture under a bathtub often goes unnoticed for extended periods. This hidden nature is precisely what makes it so dangerous. Trapped in a dark, often poorly ventilated space, water creates an ideal breeding ground for mold, mildew, and bacteria. Over time, this damp environment can begin to rot wooden subflooring and joists, disintegrate drywall, and corrode plumbing fixtures. The consequences extend beyond mere aesthetics, impacting indoor air quality, structural integrity, and ultimately, your wallet.
Common Culprits: Identifying the Sources of Bathtub Moisture
Understanding where the water is coming from is the first step toward a lasting solution. Moisture under bathtubs typically originates from several common sources, each requiring a specific approach to diagnosis and repair.
1. Failing Caulk and Grout Lines
The seal around your bathtub and the grout between tiles are critical barriers against water intrusion. Over time, caulk can crack, peel, or shrink, while grout can become porous or crumble. This allows water from showers and baths to seep behind tiles and down into the subfloor, creating persistent dampness.
- Caulk Failure: Look for cracks, discoloration, or separation between the tub and the wall tiles.
- Grout Deterioration: Check for crumbling, missing pieces, or excessive staining in the grout lines.
2. Leaky Drains and Overflow Plates
The bathtub’s drain assembly is a common source of leaks. The rubber gaskets or putty that seal the drain shoe to the tub can degrade, or the connecting nuts and pipes can loosen. Similarly, the overflow plate, designed to prevent the tub from overflowing, has its own gasket and connections that can fail, especially if rarely used or improperly installed.
- Main Drain: Water can seep around the drain opening or through loose connections underneath the tub.
- Overflow Assembly: A faulty gasket or loose connection can allow water to escape when the tub is filled above a certain level.
3. Plumbing Fixture Leaks (Faucets and Showerheads)
While often more visible, leaks from the bathtub faucet or showerhead connections can also contribute to hidden moisture. A slow drip from a faulty valve or a compromised pipe connection within the wall can travel down behind the tub, accumulating unseen.
- Faucet Drips: Even seemingly minor drips can lead to significant water accumulation over time.
- Shower Arm Connection: Water can leak where the shower arm connects to the wall pipe.
4. Compromised P-Trap or Drain Pipes
The P-trap, a U-shaped bend in the drainpipe, holds water to prevent sewer gases from entering your home. Cracks in the P-trap, loose connections, or corrosion in the adjacent drainpipes can all lead to leaks. These are often more challenging to detect as they are typically located further under the tub or within the vanity space.
5. Cracked Bathtub or Shower Pan
Less common but more severe, a crack in the bathtub basin itself or in the shower pan can be a direct source of a major leak. These cracks can be hairline and difficult to spot, especially in acrylic or fiberglass tubs, allowing water to escape directly to the subfloor with every use.
6. Condensation Issues
While not a “leak,” high humidity combined with poor ventilation can lead to condensation forming on cold pipes or surfaces under the tub. Over time, this constant dampness can mimic a leak, promoting mold growth and wood rot, especially in poorly insulated bathrooms or crawl spaces.
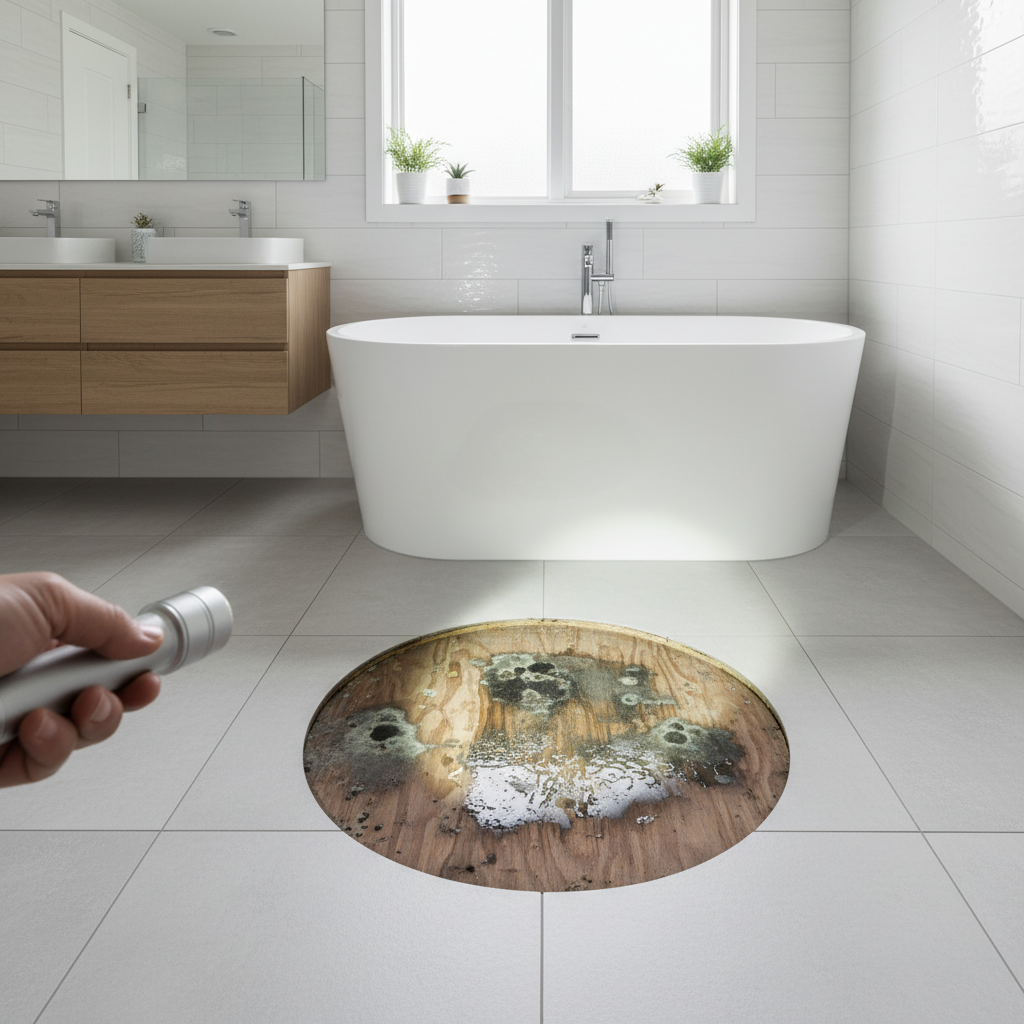
Warning Signs: How to Spot Hidden Moisture
Because moisture under the bathtub is often out of sight, recognizing the subtle signs is crucial for early intervention. Don’t wait for a ceiling to collapse; keep an eye out for these indicators:
- Musty Odor: A persistent, earthy, or damp smell in the bathroom, even after cleaning, is a strong indicator of mold or mildew growth.
- Stains on Ceilings or Walls: If your bathroom is on an upper floor, water stains or discoloration on the ceiling or walls below are clear signs of a leak. These stains might be yellow, brown, or even greenish.
- Peeling Paint or Wallpaper: Moisture causes paint to bubble, crack, or peel, and wallpaper to detach from the wall.
- Soft, Spongy, or Uneven Flooring: Wood rot underneath the floor will make the floor feel soft or spongy when you step on it near the tub. You might also notice tiles lifting or grout cracking in the affected area.
- Visible Mold or Mildew: Although the primary problem is hidden, mold might eventually spread to visible areas like baseboards, grout lines, or even up the wall.
- Increased Pest Activity: Cockroaches, silverfish, and other moisture-loving pests are often drawn to damp environments.
- Higher Water Bills: An unexplained spike in your water bill could indicate a persistent leak, even if it’s small.
The Dangers of Neglecting Moisture Under Your Bathtub
Ignoring the early signs of moisture can lead to a cascade of problems, impacting both your home and your health.
- Structural Damage: Continuous exposure to water will cause wooden subfloors, joists, and studs to rot and weaken. This can compromise the structural integrity of your bathroom and potentially the entire floor level.
- Mold and Mildew Growth: The warm, dark, and damp environment under a bathtub is ideal for mold and mildew. These fungi can spread quickly, leading to poor indoor air quality, unpleasant odors, and potential health issues for occupants, especially those with allergies, asthma, or respiratory sensitivities. For more information on dealing with mold, consider resources like Good Housekeeping’s guide to removing mold.
- Pest Infestations: Many household pests, including termites, carpenter ants, and various insects, thrive in damp, decaying wood. A prolonged moisture problem can turn your bathroom into an attractive habitat for these unwelcome guests.
- Reduced Property Value: Extensive water damage and mold issues can significantly decrease your home’s resale value and make it difficult to sell without extensive and costly repairs.
- Electrical Hazards: If water reaches electrical wiring or outlets behind or near the bathtub, it can create a serious electrocution hazard or increase the risk of an electrical fire.
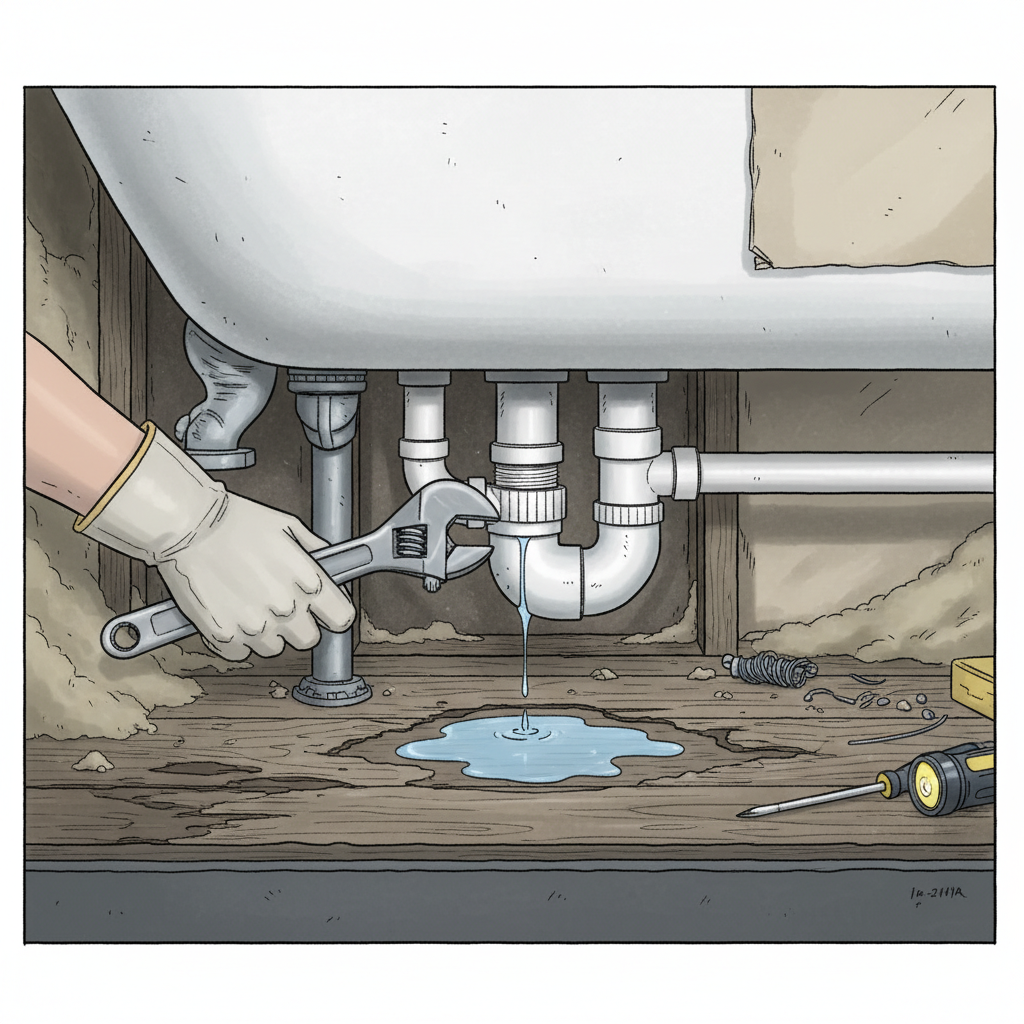
Detecting the Exact Source of the Leak: Your DIY Investigation
Once you suspect moisture, the next step is to pinpoint the exact origin. This often requires a methodical approach and a bit of patience.
Step 1: Visual Inspection (The Obvious & Hidden)
- Check Visible Areas: Begin by inspecting all visible caulk lines around the tub, the grout between tiles, the overflow plate, and the drain stopper for any obvious cracks, gaps, or deterioration.
- Access Panel: If your tub has an access panel (often found on the opposite side of the bathroom wall or in an adjacent closet), open it. Use a flashlight to inspect the plumbing connections, pipes, and the underside of the tub. Look for visible drips, puddles, water stains, or mold growth.
- Floor Below: If applicable, check the ceiling and walls of the room directly below the bathroom for stains or dampness.
Step 2: The Tissue Paper Test
This simple test can help identify small, persistent leaks.
- Dry the area thoroughly around the drain, overflow, and any visible pipe connections.
- Place dry tissue paper or paper towels around these potential leak points.
- Run the faucet into the tub and then drain the water. Let it sit for a while, and then check the tissue paper for any signs of dampness.
Step 3: The Targeted Water Test
This systematic approach helps isolate the leak to a specific component.
- Faucet Only: Plug the tub drain. Run only the faucet for 10-15 minutes, allowing water to hit the tub walls and flow down. Check for leaks from the faucet connections and around the tub rim. If no leak, proceed.
- Drain Only: Fill the tub with a few inches of water (not enough to reach the overflow). Add a few drops of food coloring near the drain. Observe the drain pipe from the access panel for any colored drips. If no leak, proceed.
- Overflow Only: Fill the tub until the water reaches the overflow drain. Add food coloring near the overflow. Observe the overflow pipe for colored drips.
- Showerhead Test: If you have a shower, direct the showerhead to spray against the tiled walls for several minutes, simulating a shower. Check for leaks behind the walls or around the tub perimeter.
Step 4: Advanced Tools (Optional)
- Moisture Meter: A handheld moisture meter can accurately detect moisture levels in walls, subfloors, and wood, even when there are no visible signs.
- Infrared Camera: For serious or persistent issues, an infrared camera can reveal temperature differentials caused by hidden moisture, making leaks easier to spot.
DIY Fixes for Minor Moisture Issues
If you’ve identified a minor leak, some repairs can be tackled by a confident DIYer.
1. Re-caulking Your Bathtub
Failing caulk is a very common cause of leaks and is relatively easy to fix.
- Remove Old Caulk: Use a caulk removal tool or utility knife to scrape away all existing caulk. Clean the area thoroughly with a cleaner and let it dry completely.
- Apply New Caulk: Apply a continuous bead of high-quality silicone caulk specifically designed for bathrooms and kitchens. Smooth it with a caulk tool or a wet finger.
- Cure Time: Allow the caulk to cure fully as per manufacturer instructions before using the tub again (usually 24-48 hours).
2. Repairing Grout
Cracked or missing grout can also be a simple fix.
- Remove Old Grout: Use a grout saw or utility knife to carefully remove damaged grout.
- Clean and Mix: Clean the area thoroughly. Mix new grout according to package directions.
- Apply and Seal: Apply new grout with a rubber float, pushing it firmly into the joints. Wipe away excess with a damp sponge. Once cured, apply a grout sealer to protect it.
3. Tightening Drain Connections
If the leak is from a loose drain or overflow nut, tightening it might solve the problem.
- Access: Gain access to the underside of the tub.
- Tighten: Use a wrench or channel locks to gently tighten the large nuts connecting the drain and overflow pipes. Do not overtighten, as this can crack plastic pipes.
- Test: Run water and check for leaks immediately.
When to Call a Professional Plumber or Contractor
While some issues are DIY-friendly, others demand expert attention. Don’t hesitate to call a professional if:
- You can’t find the source: Hidden leaks can be notoriously difficult to pinpoint.
- The leak is extensive: Large puddles or continuous dripping suggest a significant plumbing issue.
- There’s structural damage: Soft spots in the floor or visible damage to joists require a contractor.
- You suspect mold: Large areas of mold may require professional remediation for safe removal.
- The repair involves major plumbing: Replacing a cracked P-trap or dealing with rusted pipes might be beyond your skill level.
- It’s a cracked tub: Repairing or replacing a cracked bathtub usually requires a professional.
Preventing Future Moisture Under Bathtub Issues
Once the current problem is resolved, implement preventative measures to keep your bathroom dry and healthy.
- Regular Inspections: Periodically check caulk and grout lines, and inspect accessible plumbing for any signs of wear or leaks. Make this a part of your routine bathroom cleaning.
- Maintain Caulk and Grout: Re-caulk or re-grout at the first sign of deterioration. This is much easier and cheaper than fixing water damage.
- Ensure Adequate Ventilation: Use your bathroom exhaust fan during and after showers/baths for at least 20-30 minutes to remove humidity. If you don’t have one, consider installing one.
- Fix Leaks Promptly: Don’t procrastinate on small drips or minor seepage. What starts as a small issue can quickly escalate.
- Use a Bath Mat: A bath mat helps absorb water splashes, preventing it from pooling on the floor and potentially seeping into vulnerable areas.
- Proper Drainage: Ensure your tub drains freely and doesn’t hold standing water, which can stress seals over time.
Conclusion
Moisture under your bathtub is more than just a nuisance; it’s a potential harbinger of significant home damage and health risks. By understanding its common causes, learning to recognize the warning signs, and taking prompt, appropriate action—whether it’s a DIY fix or calling in a professional—you can protect your home’s structural integrity, maintain healthy indoor air quality, and save yourself from expensive repairs down the line. Regular vigilance and preventative maintenance are your best allies in keeping your bathroom a dry, safe, and pleasant space for years to come.
Frequently Asked Questions About Moisture Under Bathtub
Q1: How long does it take for mold to grow under a bathtub?
Mold can begin to grow within 24 to 48 hours of consistent moisture exposure, especially in dark, undisturbed areas like under a bathtub. The longer the moisture persists, the more extensive the mold growth will become.
Q2: Can a small leak under a bathtub cause serious damage?
Absolutely. Even a small, persistent drip can lead to significant water damage over time. It can rot wooden subflooring and joists, cause ceiling damage in rooms below, promote extensive mold growth, and attract pests, ultimately leading to thousands of dollars in repairs.
Q3: What kind of professional fixes bathtub leaks?
For most plumbing-related leaks, a licensed plumber is the professional you need. If the moisture has caused extensive structural damage or significant mold growth, you may also need to consult with a general contractor or a mold remediation specialist, respectively.
Q4: How often should I check for leaks around my bathtub?
It’s advisable to perform a visual check of your bathtub’s caulk, grout, and accessible plumbing connections at least once every six months, or whenever you notice a persistent musty smell. Promptly address any visible signs of wear or dampness.
Q5: Is moisture under a bathtub covered by home insurance?
This depends on your specific insurance policy and the cause of the leak. Generally, sudden and accidental damage (like a burst pipe) may be covered, but damage from long-term, neglected leaks or poor maintenance (like failing caulk) is typically not covered. Always check with your insurance provider for clarification.


