Hey there, fellow home renovator! Ever stare at your kitchen cabinets, sigh, and wish you had a magic wand to make them look brand new? We’ve all been there. The thought of a full kitchen cabinet replacement often brings with it visions of eye-watering costs, weeks of disruption, and a whole lot of decision fatigue. But what if I told you there’s a much smarter, more budget-friendly way to achieve that fresh, updated look without tearing everything out?
You absolutely can upgrade your old kitchen cabinets and give your entire kitchen a magnificent glow-up without replacing a single box. As someone who’s personally navigated the world of kitchen updates on a budget (and helped friends do the same!), I can tell you that the satisfaction of transforming something old into something beautiful with your own hands is truly unbeatable. So, put down that expensive cabinet catalog, grab a cup of coffee, and let’s dive into some practical, high-impact strategies to refresh your kitchen.
The Magic of Paint: A Fresh Coat Changes Everything
This is, without a doubt, the most impactful and cost-effective upgrade you can make. It’s truly astonishing what a few cans of paint can do! It might seem daunting, but with the right preparation and technique, you’ll be amazed at the professional-looking finish you can achieve.
Preparation is Your Best Friend (Seriously!)
I caot stress this enough: your paint job will only be as good as your prep work. This is where most people cut corners, and it shows!
- Clean, Clean, Clean: Kitchen cabinets accumulate grease and grime like nobody’s business. Use a good degreaser (TSP substitute works wonders) and warm water to thoroughly clean every surface. Rinse well and let them dry completely.
- Dismantle: Remove all cabinet doors, drawer fronts, and hardware. Label them carefully (e.g., “upper left door, hinge B”) so you know exactly where everything goes back. This makes painting much easier and ensures an even finish.
- Sanding for Adhesion: A light scuff-sand is crucial for the paint to adhere properly. Use 120-180 grit sandpaper. You don’t need to strip the existing finish, just rough it up enough to give the primer something to grab onto. Wipe away all dust with a tack cloth or damp cloth.
- Prime Time: This step is non-negotiable, especially for old, possibly greasy, or dark-stained cabinets. An oil-based or shellac-based primer (like Zinsser B-I-N or Kilz Original) is fantastic for blocking stains and ensuring excellent adhesion. Apply one or two thin, even coats and let it cure fully according to the manufacturer’s instructions.
Choosing the Right Paint and Application
Once primed, you’re ready for color! But don’t just grab any wall paint.
- Paint Type: Look for high-quality acrylic-latex cabinet paint or an enamel paint specifically designed for cabinets and trim. These are formulated for durability, easy cleaning, and a hard, smooth finish. I’ve personally had great results with Sherwin-Williams ProClassic or Benjamin Moore Advance.
- Sheen: A semi-gloss or satin finish is generally recommended for cabinets. They’re more durable and easier to wipe clean than matte finishes, but less reflective than high-gloss.
- Application: For the smoothest finish, I highly recommend using a high-density foam roller for flat surfaces and a good quality angled brush for detailed areas and edges. For an even more professional look, consider renting or buying an HVLP (High Volume Low Pressure) paint sprayer – it gives an incredibly smooth, factory-like finish, but has a steeper learning curve. Apply several thin coats rather than one thick one. This prevents drips and ensures a robust finish. Lightly sand with a super-fine grit (220-320) between coats if needed for extra smoothness.
Be patient! Drying times between coats and the final cure time are critical for a durable finish. It might take a week or two for the paint to fully harden, so treat your newly painted cabinets gently during this period.
Hardware Heroes: New Knobs & Pulls Make a Big Difference
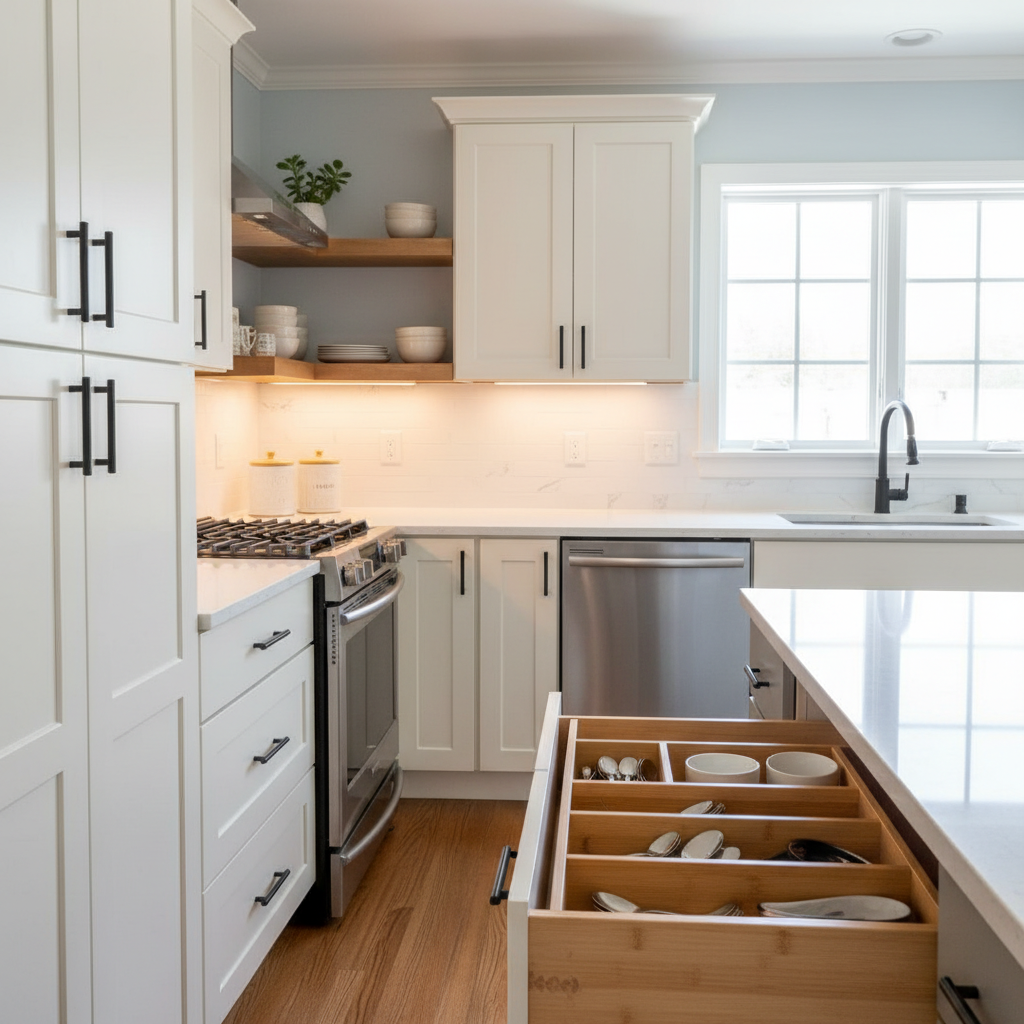
If painting is the blockbuster movie, new hardware is the Oscar-wiing supporting actor. It’s incredible how simply changing out your knobs and pulls can instantly modernize or redefine the style of your entire kitchen.
Style and Installation
- Match Your Vision: Do you want a sleek, modern look? Go for matte black bar pulls. Craving a farmhouse vibe? Opt for cup pulls and simple round knobs. Thinking classic? Brushed nickel or polished chrome can elevate any space. Browse online and in stores for inspiration.
- Measure Carefully: If you’re replacing existing pulls, measure the distance between the two screw holes (center-to-center) to ensure your new hardware fits without drilling new holes. For knobs, it’s usually just one screw.
- Installation Ease: This is typically a very straightforward DIY task, requiring just a screwdriver. If you’re changing from knobs to pulls, or if the new pulls have different hole spacing, you might need to fill the old holes with wood filler, sand smooth, and then drill new ones. A drilling template is your best friend here for consistency!
I once helped a friend update her kitchen from dated brass knobs to sleek, brushed nickel bar pulls. The change was so dramatic, her husband thought she’d replaced the cabinets! It’s a testament to the power of small details.
Beyond Aesthetics: Boosting Functionality and Organization
Upgrading isn’t just about how things look; it’s also about how they work. Enhancing the functionality of your old cabinets can make your kitchen a joy to use every day.
Smart Storage Solutions
- Pull-Out Shelves or Drawers: Oh, the deep, dark abyss of lower cabinets! Installing pull-out shelves or full-on drawers can transform these spaces, making everything accessible. You can buy DIY kits that are relatively easy to install, often just screwing tracks into the cabinet interior. No more getting on your hands and knees to find that lost pot!
- Drawer Organizers: Simple cutlery trays are a start, but consider dedicated spice drawer inserts, knife blocks, or even custom dividers for plates and bowls. These small additions keep things tidy and make finding what you need a breeze.
- Lazy Susans: Corner cabinets are notoriously tricky. A Lazy Susan, either a full-round or pie-shaped unit, maximizes the usable space and prevents items from getting lost in the back.
- Trash/Recycling Pull-Outs: Tuck away those unsightly bins into a dedicated cabinet with a pull-out system. It’s cleaner, more hygienic, and frees up floor space.
Illumination Inspiration: Under-Cabinet Lighting
Installing under-cabinet lighting isn’t just for ambiance (though it certainly adds that!). It provides crucial task lighting for food prep and brightens up your countertops. You have options:
- Puck Lights: Easy to install, often battery-operated or plug-in. Great for small areas.
- Strip Lights (LED): These provide a continuous, even glow. Many are peel-and-stick and can be hardwired or plugged in. They come in various color temperatures to match your kitchen’s vibe.
I added LED strip lights to my own kitchen, and it made such a huge difference – not just for chopping veggies but also for creating a warm, inviting atmosphere in the evenings.
Adding Architectural Interest: Molding and Trim
Sometimes, old cabinets just lack that custom, built-in look. Adding simple trim or molding can dramatically elevate their appearance.
From Flat Panel to Shaker-Style
Do you have flat, plain cabinet doors? You can easily give them a classic Shaker-style appearance. Purchase thin strips of wood trim (often called screen molding or small base cap molding) from your local hardware store. Cut them to size, miter the corners for a clean look, and then glue and nail them onto the flat panel to create a raised “frame.” Fill any nail holes and seams, sand, and then paint them along with the rest of your cabinets. It’s a surprisingly simple way to add depth and character.
Crown Molding for a Custom Finish
If your cabinets don’t extend all the way to the ceiling, adding crown molding to the top can make them look taller, more substantial, and give your kitchen a truly custom, finished feel. This requires careful measuring and miter cuts, so it might be a job for someone with a bit more DIY experience or a good miter saw. But the payoff in terms of visual appeal is enormous!
The Open Shelf Trend: A Breath of Fresh Air
Open shelving has been a popular trend for a while, and it’s a fantastic way to open up a small kitchen or showcase beautiful dishware. You don’t need to replace cabinets to get this look.
- Select Your Spot: Choose one or two upper cabinets that aren’t critical for concealed storage. Corners or cabinets above a peninsula are great candidates.
- Remove the Doors: Carefully unscrew and remove the cabinet doors.
- Finish the Interior: Fill hinge holes with wood filler, sand smooth, and then paint or wallpaper the interior of the cabinet box. You could even add a contrasting color for a pop!
- Style with Intention: This is where your ier designer comes out! Arrange a curated selection of attractive dishes, cookbooks, plants, or decorative items. Less is more here to avoid a cluttered look.
I’ve seen this done in kitchens where people only converted one upper cabinet, and it totally transformed the feel of that section of the kitchen. It’s a bold move, but when done well, it’s stuing!
Interior Love: Liners and Fresh Paint
While most of the focus is on the exterior, don’t forget the inside! A clean, fresh interior makes opening your cabinets a pleasant experience.
- Cabinet Liners: These are easy to install, protect your shelves from spills and scratches, and can add a pop of color or pattern. Peel-and-stick options are great for a semi-permanent solution, while non-adhesive liners are easy to change out.
- Painting the Interior: If your cabinet interiors are looking tired or dark, consider painting them with a light, bright color. This can make the cabinet feel cleaner and even make it easier to see what’s inside. Just be sure to use a low-VOC, durable paint since it will be in contact with your dishes.
Conclusion: Your Dream Kitchen Awaits!
Upgrading your old kitchen cabinets without replacing them is a powerful way to inject new life into your home. It saves you a significant amount of money, reduces waste, and allows you to customize your space to your exact tastes and needs. Whether you choose to tackle one project or embrace a full cabinet overhaul, the process is incredibly rewarding.
You don’t need to be a professional contractor to achieve stuing results. With patience, good preparation, and a willingness to learn, you can transform your kitchen into a space you truly love. So, go ahead, pick one of these ideas to start with, roll up your sleeves, and get ready to enjoy the beautiful, refreshed kitchen you deserve!


