There are few things as unsettling for a homeowner as noticing a structural issue with their property. Among these concerns, a porch roof sagging often ranks high due to both aesthetic implications and potential safety hazards. A once proud and welcoming entrance can suddenly appear neglected or even dangerous, casting a shadow over your home’s curb appeal and raising serious questions about its structural integrity. Addressing a sagging porch roof isn’t just about restoring visual appeal; it’s a critical step in ensuring the safety of your family and guests, protecting your investment, and preventing more extensive, costly damage down the line. This comprehensive guide will delve into the root causes of this common problem, illuminate the risks involved, and provide actionable steps for repair and prevention, empowering you to tackle the issue with confidence.
Understanding the Core Reasons Behind a Sagging Porch Roof
Before you can effectively repair a sagging porch roof, it’s crucial to understand why it’s happening in the first place. The causes can range from environmental factors to foundational issues, and correctly identifying the culprit is the first step toward a lasting solution. Here are the most common reasons:
1. Water Damage and Rot
This is arguably the most frequent cause of a sagging porch roof. Wood, especially when exposed to consistent moisture, is highly susceptible to rot. Over time, water infiltration can weaken the structural components like rafters, beams, and support posts. This can happen due to:
- Leaky Gutters: Clogged or damaged gutters can cause water to overflow and constantly drench the fascia, soffits, and underlying structural wood.
- Damaged Shingles or Flashing: Missing or broken shingles, or compromised flashing around the roof’s edges or where it meets the house, can allow water to seep directly into the roof structure.
- Poor Drainage: If the porch roof doesn’t have an adequate slope for water to drain off, or if the surrounding landscaping directs water towards the porch, moisture accumulation becomes a persistent problem.
- Condensation: Inadequate ventilation in the porch roof cavity can lead to condensation build-up, slowly rotting the wood from within.
2. Structural Weakness and Improper Construction
Sometimes, the problem isn’t due to external factors but rather inherent flaws in the porch’s original construction. This can include:
- Inadequate Support: The porch roof may not have enough posts, beams, or rafters to properly bear its own weight, especially if heavy roofing materials were used.
- Undersized Lumber: Using lumber that is too small for the span or load can lead to deflection and sagging over time. Building codes specify minimum sizes for structural members to prevent this.
- Improper Fastening: Joists, rafters, and beams might not be adequately connected, leading to gradual separation and a loss of structural integrity.
- Weakened Connections: Metal connectors can corrode, or nails/screws can pull out over time, especially in high-stress areas or where there’s movement.
3. Excessive Weight and Load
The weight placed on a porch roof can exceed its design capacity, leading to sagging. This is particularly common in regions with harsh weather conditions:
- Heavy Snow and Ice: A significant accumulation of snow and ice can exert immense pressure on the roof structure, pushing it downward.
- Accumulated Debris: Leaves, branches, and other organic matter can collect on the roof, especially in low-slope areas, adding substantial weight and often trapping moisture.
- Heavy Roofing Materials: While charming, materials like slate, tile, or thick asphalt shingles are much heavier than standard options. If the original structure wasn’t designed for this load, sagging can occur.
4. Age and Wear
Even the best-built structures succumb to the relentless march of time. Materials degrade, fasteners loosen, and the constant stress of weather takes its toll. Older porches are naturally more prone to sagging as their components reach the end of their lifespan.
5. Pest Infestation
Termites, carpenter ants, and other wood-boring insects can wreak havoc on the structural components of a porch roof. These pests tunnel through and consume wood, hollowing out beams and rafters from the inside, significantly reducing their strength and leading to noticeable sagging.
6. Foundation Settling (for the entire porch structure)
While less common for *just* the roof, if the entire porch’s foundation (posts, footings) is settling unevenly, it can cause the entire structure, including the roof, to shift and sag. This is a more serious issue that requires expert assessment.
The Dangers of an Untreated Sagging Porch Roof
Ignoring a sagging porch roof is not merely an aesthetic oversight; it’s a gamble with significant consequences. The dangers extend beyond the visual, impacting safety, property value, and potentially leading to more extensive and costly repairs. Understanding these risks underscores the urgency of addressing the problem promptly.
1. Immediate Safety Hazard: Risk of Collapse
This is the most critical and alarming danger. A structurally compromised porch roof is an accident waiting to happen. The weakened components could fail suddenly, especially under additional stress from heavy rain, snow, wind, or even just the weight of a person working on the roof. A collapse can result in severe injuries or even fatalities to anyone standing beneath or near the porch. This risk should be the primary motivator for immediate action.
2. Progressive Structural Damage to Your Home
A porch roof is often attached directly to the main house structure. When the porch roof sags, it can exert undue stress on the connecting points, pulling on fascia boards, eave lines, and even the main house wall. This can lead to:
- Cracks in exterior siding or stucco.
- Compromised flashing, leading to leaks into your home’s interior.
- Damage to the main roofline, potentially creating a domino effect of structural problems.
What starts as a porch issue can quickly become a whole-house problem, exponentially increasing repair costs.
3. Reduced Curb Appeal and Property Value
Your porch is often the first impression visitors and potential buyers have of your home. A noticeable sag immediately signals neglect and potential structural problems. This significantly detracts from your home’s curb appeal, making it appear poorly maintained. For those looking to sell, a sagging porch roof can be a major red flag, potentially leading to lower offers or even deterring buyers altogether. It implies a lack of care and can make buyers wary of other hidden issues within the property.
4. Water Infiltration and Secondary Damage
A sagging roof creates pockets where water can pool instead of draining properly. This pooling exacerbates existing water damage and can create new vulnerabilities. The prolonged presence of moisture leads to:
- Accelerated wood rot in beams, rafters, and posts.
- Mold and mildew growth, which can spread to the main house structure and pose health risks.
- Further deterioration of roofing materials and flashing, creating a vicious cycle of leaks and damage.
5. Pest Infestation Opportunities
Damaged, rotting, and moist wood provides an ideal breeding ground for pests like termites, carpenter ants, and other wood-boring insects. These pests can further weaken the structure and, if left unchecked, migrate from the porch into the main framework of your home, creating an even more significant and expensive problem. Sagging wood also creates gaps and openings that can invite rodents, birds, and other unwanted critters.
Given these serious risks, it’s clear that a sagging porch roof demands prompt attention. Prioritizing its repair is not just about maintaining your home’s aesthetics; it’s about safeguarding its structural integrity, protecting your investment, and, most importantly, ensuring the safety of everyone who steps onto your porch.
Assessing the Damage: When to Call a Professional vs. DIY
Once you’ve identified a sagging porch roof, the next crucial step is to assess the extent of the damage to determine if it’s a DIY project or if professional intervention is necessary. Making the wrong call here could jeopardize your safety and the structural integrity of your home.
When to Consider DIY (for minor issues):
DIY repair is generally only advisable for very minor, localized, and non-structural issues. These might include:
- Small, Localized Water Stains: If you catch a small leak early and the sag is barely perceptible, the issue might be confined to a few damaged shingles or a small section of fascia that can be replaced without disturbing the main structural elements.
- Minor Cosmesis: If the sag is extremely slight and purely aesthetic, without any underlying structural weakness or rot, and you are certain it’s not progressing.
- Gutter Repair/Replacement: Addressing clogged or poorly installed gutters that are causing overflow, assuming the underlying wood hasn’t yet rotted or sagged significantly.
Even for these minor tasks, a thorough understanding of roofing, carpentry, and safety practices is essential. You’ll need basic tools, ladders, and potentially temporary supports.
When to Call a Professional (for major or uncertain issues):
In most cases involving a noticeable sag, calling a professional is the safest and most effective course of action. Here’s when expert help is non-negotiable:
- Significant Sagging: If the sag is clearly visible, greater than an inch or two across a span, it almost certainly indicates structural failure.
- Widespread Rot or Pest Damage: If you see extensive wood rot, fungal growth, or signs of pest infestation (sawdust trails, tunneling, weakened wood), the damage is likely beyond a simple patch.
- Cracked or Split Beams/Rafters: Any visible cracks, splits, or significant bowing in the main structural beams, rafters, or support posts are critical red flags.
- Movement or Instability: If the porch feels wobbly, or if the sag changes after rain or snow, it indicates dynamic structural issues.
- Involvement of Main House Structure: If the porch roof sag affects the main house wall, siding, or roofline, a structural engineer or experienced contractor must be consulted.
- Uncertainty About the Cause: If you can’t definitively determine why the roof is sagging, a professional can accurately diagnose the problem.
- Lack of Experience or Tools: Working on roofs and structural elements requires specific knowledge, safety equipment, and specialized tools. If you lack these, a DIY attempt is dangerous.
- Permit Requirements: Significant structural repairs often require building permits, which professionals are familiar with navigating.
Which Professional to Call:
- General Contractor: A reputable general contractor with experience in home renovations and structural repairs is often the best first point of contact. They can oversee the entire project, coordinating different trades if needed.
- Roofer: If the primary cause is clearly a roofing issue (shingles, flashing) and the underlying structure appears sound, a skilled roofer can address it. However, if structural wood is involved, they might defer to a carpenter or general contractor.
- Structural Engineer: For complex or highly concerning structural issues, especially if the main house is affected, a structural engineer can provide an unbiased assessment and detailed repair plans, which a contractor can then execute.
- Carpenter: For extensive wood rot and replacement of structural wood components, a skilled carpenter is essential.
When in doubt, always err on the side of caution and consult with a qualified professional. The cost of an inspection is minimal compared to the potential dangers and expenses of a DIY repair gone wrong.
Essential Tools and Materials for Assessment and Minor Repairs
Even if you decide to call a professional, having some basic tools on hand for initial assessment and cleanup can be helpful. For minor DIY repairs, a more extensive list will be necessary.
For Assessment:
- Ladder: A sturdy, stable ladder is crucial for visual inspection. Ensure it’s tall enough and rated for your weight.
- Tape Measure: To quantify the sag and measure damaged areas.
- Level: To check for levelness and deviations. A long level is ideal for spans.
- Flashlight: For inspecting dark attic spaces, soffits, and undersides of the roof.
- Moisture Meter: A relatively inexpensive tool that can help detect hidden moisture within wood, indicating rot.
- Pry Bar/Screwdriver: To gently probe suspicious wood for softness or rot.
- Camera: To document damage for professionals or insurance claims.
- Safety Gear: Work gloves, safety glasses, and a hard hat are always recommended.
For Minor DIY Repairs (in addition to above):
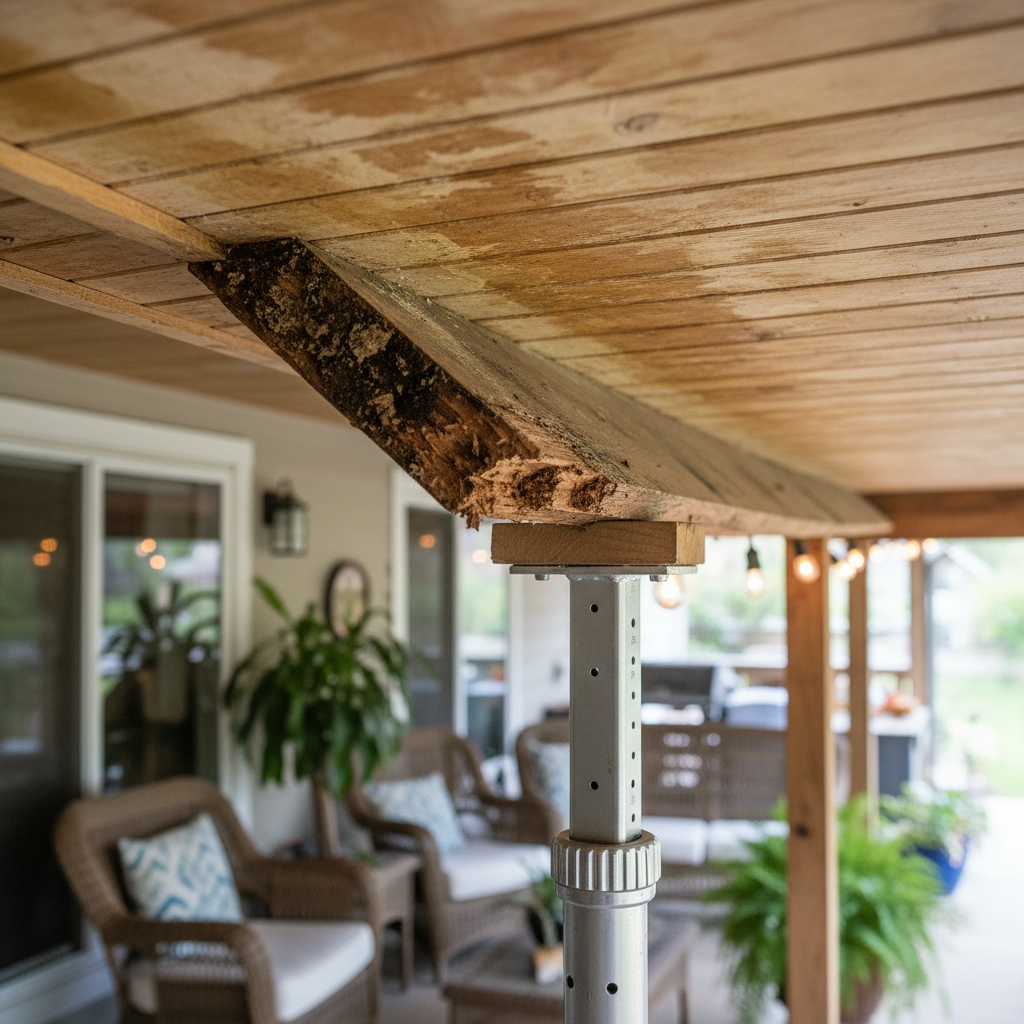
- Temporary Supports: Adjustable steel columns (ACRO props) or sturdy 4×4 lumber with jacks can temporarily support the roof during repair.
- Lumber: Treated lumber (for exterior applications) of appropriate dimensions for replacing rotten fascia, soffits, or small non-structural components.
- Plywood: For sheathing replacement if damaged.
- Roofing Materials: Shingles, roofing felt, and flashing to match existing materials.
- Caulk and Sealant: Exterior-grade, waterproof caulk for sealing small gaps.
- Fasteners: Galvanized or stainless steel nails/screws designed for outdoor use.
- Drill/Driver: With appropriate bits for fastening.
- Circular Saw/Jigsaw: For cutting lumber or plywood.
- Hammer.
- Utility Knife/Shears: For cutting roofing felt, flashing, etc.
- Tarpaulin/Plastic Sheeting: To protect the area from further water intrusion during repairs.
Always prioritize safety. When working at heights, always have a spotter, secure your ladder, and consider using a safety harness if working on the roof itself. Never attempt structural repairs without proper knowledge and experience.
Steps to Repair a Sagging Porch Roof (General Principles)
While specific repair methods will vary greatly depending on the cause and extent of the sag, here are the general steps a professional or experienced DIYer would follow to address a sagging porch roof:
Step 1: Secure the Area and Implement Safety Measures
Before any work begins, ensure the area below and around the porch is clear of people and objects. Yellow caution tape or temporary fencing can delineate a safe zone. Wear appropriate personal protective equipment (PPE) including hard hats, safety glasses, gloves, and sturdy footwear. If working at height, use a properly secured ladder and consider a fall arrest system.
Step 2: Temporarily Support the Sagging Roof
This is a critical safety step. Using adjustable steel support columns (ACRO props) or sturdy wooden posts (e.g., 4x4s) positioned under the main beams or rafters, gently lift and support the sagging section of the roof. This relieves pressure, prevents further collapse, and allows for safe access and repair. Ensure these temporary supports are stable and on solid ground or load-bearing shoring.
Step 3: Identify and Address the Root Cause
With the roof temporarily supported, a thorough inspection is performed to pinpoint the exact cause of the sag. This involves:
- Checking for Water Damage: Inspecting shingles, flashing, gutters, fascia, and soffits for leaks or rot.
- Assessing Structural Members: Examining rafters, beams, and posts for cracks, splits, pest damage, or undersizing.
- Looking for Foundation Issues: Although less common for just the roof, ensuring the porch’s overall foundation is stable.
- Checking Connections: Verifying that all joints and fasteners are secure and free from corrosion.
Fixing the underlying cause is paramount. If it’s a gutter issue, repair or replace them. If it’s pest damage, extermination may be needed before repair.
Step 4: Remove Damaged Materials
Carefully remove all compromised materials, including rotten wood (e.g., fascia, soffit, sheathing, or even sections of rafters/beams), damaged roofing materials, or pest-infested sections. This often involves peeling back shingles, removing felt, and cutting out sections of wood. Be meticulous to remove all affected material to prevent recurrence.
Step 5: Repair or Replace Structural Components
This is the core of the repair. Depending on the damage:
- Sistering Rafters/Beams: If a rafter or beam is merely cracked or weakened but not completely destroyed, a new piece of lumber of the same or greater dimension can be fastened securely alongside it, essentially doubling its strength.
- Replacing Sections: For severely rotted or damaged sections, the compromised portion is cut out, and new, appropriately sized lumber is spliced in using strong connectors (e.g., timber screws, metal plates, or joist hangers).
- Adding New Supports: If the original structure was undersized, additional posts, beams, or rafters might be installed to properly support the load.
- Replacing Posts: If porch posts are rotted at the base, they will need to be replaced, ensuring they are properly anchored to solid footings.
All new wood used for exterior applications should be pressure-treated or naturally rot-resistant (like cedar or redwood).
Step 6: Ensure Proper Drainage and Waterproofing
Once the structure is sound, focus on preventing future water damage. This may involve:
- Installing new roofing felt and shingles.
- Replacing or repairing flashing around edges, chimneys, and where the porch meets the house.
- Ensuring gutters are correctly installed, free-flowing, and direct water away from the porch and house foundation.
- Adjusting the roof’s slope slightly if possible and necessary for better drainage.
Step 7: Reinstall Roofing Materials and Finishing Touches
Lay down new roofing materials (shingles, metal, etc.) according to manufacturer instructions and local building codes. Replace any removed fascia, soffit, or trim boards. Paint or seal exposed wood to protect it from the elements. Once all repairs are complete and the structure is stable, the temporary supports can be carefully removed.
Step 8: Final Inspection
Perform a thorough final inspection to ensure all repairs are complete, secure, and aesthetically pleasing. Check for any remaining gaps, leaks, or structural weaknesses. If a professional was hired, they will typically conduct this final review.
Always remember that structural work requires precision and adherence to safety standards. If you’re unsure at any point, do not hesitate to consult a qualified professional.
Preventing Future Porch Roof Sagging: A Proactive Approach
Once your porch roof is repaired, the focus shifts to prevention. Proactive maintenance and smart design choices can significantly extend the lifespan of your porch and help you avoid future sagging issues. Here’s how to keep your porch roof robust and reliable for years to come:
1. Regular Inspections and Maintenance
Make it a habit to inspect your porch roof at least twice a year, ideally in spring and fall, and after any major storm. Look for:
- Damaged or Missing Shingles: Replace them immediately.
- Cracked or Peeling Paint/Sealant: These are entry points for moisture. Reapply as needed.
- Signs of Rot or Pests: Look for discoloration, softness in wood, sawdust, or insect activity.
- Sagging or Bowing: Catch small issues before they become major problems.
A comprehensive approach to home maintenance, including checking all exterior elements, is crucial. For a broader perspective on keeping your home in top shape, consider resources like Good Housekeeping’s Home Maintenance Checklist, which offers valuable tips beyond just your porch roof.
2. Prompt Gutter Cleaning and Repair
Clogged gutters are a primary culprit for water damage. Clean your gutters regularly to ensure water flows freely away from the porch and foundation. Repair any leaks, ensure downspouts are properly directed, and check that gutters are securely fastened and sloped correctly.
3. Ensure Proper Drainage
Beyond gutters, assess the overall drainage around your porch. Make sure the ground slopes away from the foundation, preventing water from pooling near posts or footings. Consider adding splash blocks or extenders to downspouts to direct water further away.
4. Adequate Ventilation
If your porch roof has an enclosed attic space or soffits, ensure there’s proper ventilation to prevent heat and moisture buildup. Good airflow helps prevent condensation, which can lead to rot and mold within the roof structure.
5. Use Appropriate Materials
When building or repairing, opt for materials designed for longevity and resilience in your climate:
- Pressure-Treated Lumber: For all structural components exposed to the elements or in contact with the ground.
- Weather-Resistant Fasteners: Use galvanized, stainless steel, or ceramic-coated fasteners to prevent rust and corrosion.
- Durable Roofing: Choose roofing materials suitable for your local weather conditions (e.g., heavy-duty shingles for snow-prone areas).
6. Professional Installation and Maintenance
If building a new porch or undertaking major repairs, always hire qualified and experienced professionals. Proper design, adherence to building codes, and skilled craftsmanship are the best defenses against future structural issues. They can also advise on the best materials and construction techniques for your specific situation.
7. Snow and Debris Removal
In snowy regions, regularly clear heavy snow accumulation from your porch roof. While a well-built roof can handle a certain snow load, excessive weight is a common cause of sagging. Similarly, remove accumulated leaves, branches, and other debris that can trap moisture and add weight.
8. Address Pest Issues Immediately
If you suspect or find any signs of wood-boring pests, act quickly. Consult with a pest control professional to eliminate the infestation and assess the damage. Early intervention can save your structural components from irreparable harm.
By integrating these preventative measures into your home maintenance routine, you can significantly reduce the risk of future porch roof sagging, ensuring your porch remains a safe, beautiful, and welcoming extension of your home for many years to come.
Frequently Asked Questions About Sagging Porch Roofs
Q1: How much does it cost to fix a sagging porch roof?
A: The cost to fix a sagging porch roof varies widely depending on the cause, the extent of the damage, the materials needed, and local labor rates. Minor repairs, like replacing a few rotted fascia boards or fixing gutters, might cost a few hundred dollars. However, if the sag is due to structural damage (rotted beams, rafters, or posts), pest infestation, or requires lifting and rebuilding sections of the roof, costs can range from $2,000 to upwards of $10,000 or more. Obtaining multiple quotes from qualified contractors is always recommended.
Q2: Can I live in a house with a sagging porch roof?
A: While you can technically “live” in the house, it is generally unsafe to use a porch with a noticeable sag. A sagging porch roof indicates a structural compromise that could lead to a sudden and dangerous collapse, especially under additional weight (e.g., snow, multiple people). It’s crucial to cordon off the area and address the issue as soon as possible to ensure safety. Ignoring it also risks further damage to your main home structure.
Q3: How do I know if my porch roof is sagging? What are the warning signs?
A: Look for visual cues such as a noticeable dip or curve in the roofline, especially when viewed from a distance or from certain angles. Other signs include:
- Cracks or splits in beams, rafters, or support posts.
- Water stains on the ceiling of the porch or interior walls.
- Visible rot or soft spots in wood components.
- Gaps appearing where the porch roof meets the house.
- Difficulty opening or closing doors or windows near the porch.
- Excessive pooling of water on the roof after rain.
If you suspect a sag, use a long level or string line to check for deviations from a straight line.
Q4: What kind of professional should I call to fix a sagging porch roof?
A: For a sagging porch roof, your best first contact is usually a reputable General Contractor experienced in structural repairs and home renovations. They can assess the overall issue, determine the root cause, and coordinate any specialized trades needed (like roofers, carpenters, or pest control). For complex or severe structural concerns, especially if the main house is affected, you might also want to consult a Structural Engineer for an independent assessment and repair plan before hiring a contractor.
Q5: Is a sagging porch roof covered by home insurance?
A: It depends on your policy and the cause of the sag. Generally, home insurance covers sudden and accidental damage, such as a roof sag caused by a severe storm, falling tree, or fire. However, damage resulting from neglect, poor maintenance, rot from long-term leaks, or pest infestations (which are often considered preventable) is typically NOT covered. Always review your specific policy and contact your insurance provider directly to understand your coverage.
Conclusion: Restoring Strength and Safety to Your Porch
A sagging porch roof is more than just an eyesore; it’s a critical indicator of underlying structural distress that demands prompt and decisive action. From the subtle signs of water infiltration to the glaring dangers of structural failure, understanding the causes and consequences is the first step toward a safe and lasting solution. By performing regular inspections, maintaining proper drainage, and addressing issues proactively, you can safeguard your porch against future damage. Whether you’re equipped for minor DIY repairs or recognize the need for expert professional intervention, prioritizing the integrity of your porch roof is an investment in your home’s safety, longevity, and curb appeal. Don’t let a sagging roof diminish your home’s welcome; take action today to restore its strength and ensure a secure, beautiful entrance for years to come.


