There’s something incredibly captivating about an old brick wall, isn’t there? It’s not just a structure; it’s a storyteller. Each weathered brick, every uneven joint, whispers tales of time gone by, of lives lived within its embrace. As homeowners, we often dream of restoring these beautiful relics, breathing new life into them. But here’s the kicker: how do you bring an old brick wall back to health without stripping away the very character that makes it so special? How do you restore without making it look “new” and losing that irreplaceable vintage magic?
I hear you, because I’ve been there. I’ve seen countless homeowners, myself included, grapple with this dilemma. The fear of ruining that authentic patina is real. But I’m here to tell you it’s absolutely possible to restore your old brick wall, making it structurally sound and visually stuing, all while preserving its rich history and unique texture. It’s an art form, really, a dance between preservation and careful intervention. Let’s dive in.
Why Preserving Vintage Texture is Your Top Priority
Before we even think about touching that wall, let’s solidify why maintaining its original texture is paramount. It’s more than just aesthetics; it’s about value – both historical and monetary. That uneven, slightly chipped surface, the subtle variations in brick color, the unique mortar joints – these are the hallmarks of age and craftsmanship that can’t be replicated. They give your home soul, character, and a coection to its past. Stripping this away can actually devalue your property and, more importantly, erase a piece of history.
First Things First: Understanding Your Wall
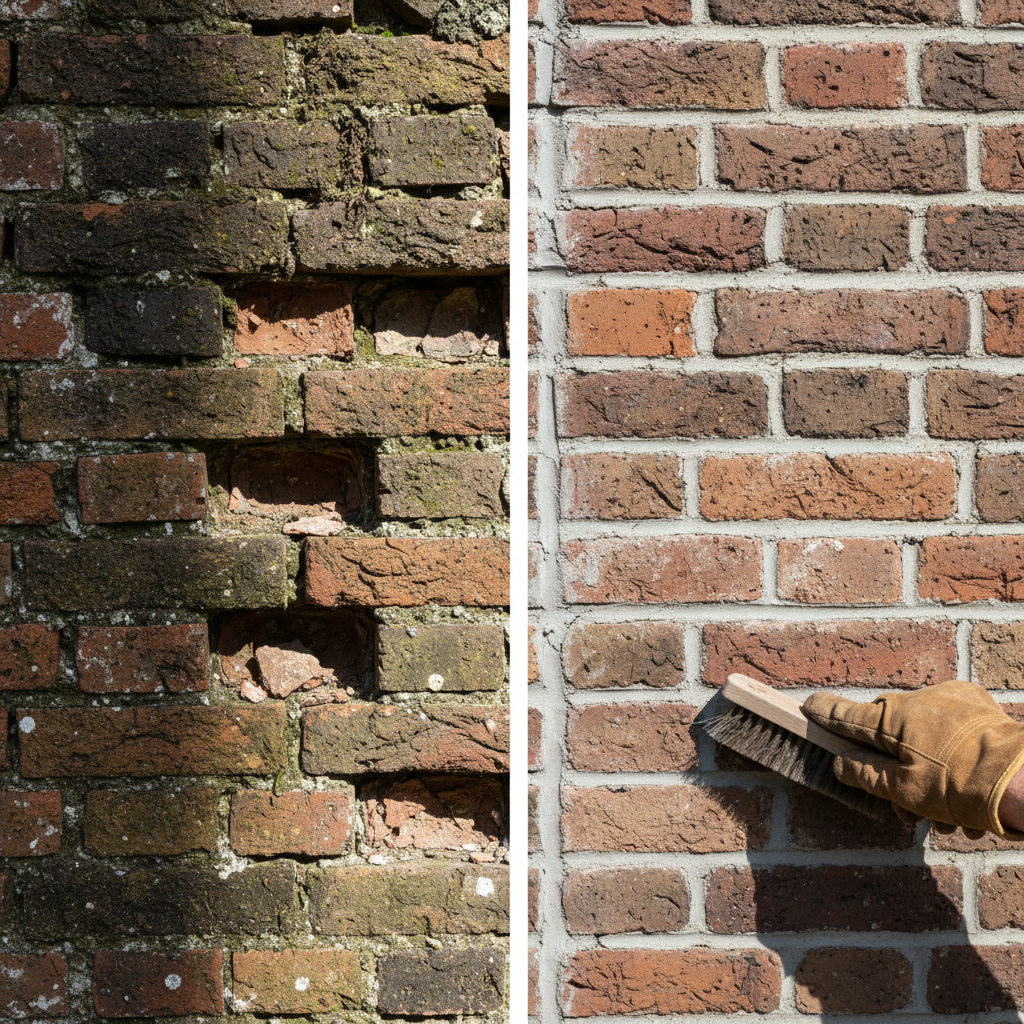
Think of this as a detective mission. Before you start any work, you need to thoroughly assess your wall. What kind of brick is it? Is it soft, porous handmade brick, or harder, more uniform machine-made brick? What’s the condition of the mortar? Are there cracks, crumbling sections, or signs of efflorescence (that white, powdery deposit)?
Look for:
- Loose or crumbling mortar: This is a common issue and a primary reason for restoration.
- Damaged bricks: Spalling (where the face of the brick peels off), cracks, or severely eroded bricks.
- Biological growth: Moss, algae, or mildew.
- Stains: From pollution, rust, or previous repairs.
- Efflorescence: Mineral salts seeping from the brick or mortar.
This initial assessment will guide your entire restoration plan, helping you choose the right tools and techniques.
The Golden Rule: Gentle Cleaning is Key
This is where many go wrong. It’s tempting to grab the most powerful pressure washer you can find, but resist! High-pressure washing can severely damage old, soft bricks and erode fragile mortar joints, permanently altering the texture you’re trying to preserve. Instead, embrace the gentle approach.
Step-by-Step Gentle Cleaning:
- Dry Brush First: Use a stiff, natural bristle brush (never wire brushes on old brick!) to remove loose dirt, dust, and spiderwebs. This is surprisingly effective.
- Low-Pressure Water Wash: If dry brushing isn’t enough, use a garden hose with a spray nozzle or a very low-pressure washer (under 500 PSI, with a wide fan tip) to rinse the wall. Always test a small, inconspicuous area first. Let the water do the work, not the pressure.
- Tackling Stubborn Grime & Growth: For moss, algae, or tougher dirt, mix a mild detergent (like dish soap) or a specialized non-acidic brick cleaner with water. Apply it with a soft brush, let it sit for a few minutes (as per product instructions), and then rinse thoroughly with low-pressure water. For biological growth, a diluted bleach solution (1 part bleach to 10 parts water) can be effective, but rinse *very* well afterwards to avoid damage to surrounding plants.
- Dealing with Efflorescence: For that stubborn white powdery stuff, dry brush it off first. If it persists, a specialized efflorescence remover, typically a mild acid solution, might be needed. Caution: These can be aggressive on old brick. Always dilute heavily, test in an hidden area, and rinse immediately and thoroughly. Often, efflorescence is a symptom of a moisture problem within the wall, so addressing the underlying issue (e.g., poor drainage, leaky gutters) is crucial.
Remember, the goal is to clean without stripping away the patina or damaging the brick face. Embrace the slightly aged look; it’s part of the charm.
The Art of Repointing: Breathing New Life into Mortar
Crumbling mortar is not just unsightly; it can compromise the structural integrity of your wall and allow moisture to penetrate. Repointing – the process of removing old, deteriorated mortar and replacing it with new – is often the most critical step in restoring old brick walls. But here’s the secret to preserving texture: matching the new mortar to the old.
Key Considerations for Repointing:
- Mortar Composition: Old homes often used lime-based mortars, which are softer and more breathable than modern Portland cement mortars. Using a hard Portland cement mortar on old, soft bricks can lead to spalling because the brick, not the mortar, becomes the weakest link, taking all the stress. Research your home’s era and aim for a historically appropriate lime mortar (Type O or N, or even pure lime mortar for very old buildings).
- Color Match: This is crucial for seamless restoration. Collect a sample of your old mortar (if possible) and take it to a specialized masonry supplier. They can often custom-match the color. You can also experiment with different sands and pigments yourself.
- Joint Profile: Observe the original mortar joints. Are they flush, struck, raked, or something else? Replicating this profile is vital for maintaining the wall’s authentic look. Using modern tooling on old joints will stick out like a sore thumb.
- Careful Removal: Use a hammer and chisel (or a specialized mortar raking tool for power users, but be extremely careful) to *gently* remove only the deteriorated mortar. Aim for a depth of about 2-2.5 times the joint width. Be meticulous and avoid damaging the surrounding bricks.
- Proper Application: Dampen the joints before applying new mortar. Pack the new mortar firmly in thin layers, ensuring it bonds well. Allow it to “cure” slightly before tooling it to match the existing profile.
Repointing is a slow, methodical process that requires patience and a good eye. If you’re unsure, consulting with or hiring a skilled mason specializing in historic preservation is highly recommended.
Repairing Damaged Bricks: Patch or Replace?
Sometimes, individual bricks are too far gone. If a brick is severely spalled, cracked, or deteriorated, you have two main options:
- Patching: For minor spalling or chips, specialized brick patching compounds can be used. These can be colored to match your existing brick. It’s an art to make them blend seamlessly, often involving replicating texture with a brush or sponge.
- Replacing: For extensively damaged bricks, replacement is the best option. The challenge here is finding matching bricks. Look for reclaimed bricks from similar-era buildings, or sometimes, you might find suitable bricks in a less visible area of your own property (e.g., behind a bush, in an old shed). When replacing, remove the old brick carefully with a chisel and mallet, clean the cavity, and install the new brick using your matched mortar.
Always prioritize minimal intervention. If a brick has some charming wear but is structurally sound, leave it be. Those imperfections are part of its story.
Considering a Sealer: When and Why
Once your wall is clean and repointed, you might consider applying a breathable sealer. This isn’t always necessary, especially if your wall is well-maintained and doesn’t face extreme weather exposure. However, a good quality, breathable penetrating sealer can:
- Help prevent future efflorescence.
- Protect against moisture penetration.
- Resist staining.
It’s crucial to choose a breathable sealer. Non-breathable sealers can trap moisture within the brick, leading to accelerated deterioration. Always test the sealer in an inconspicuous area first to ensure it doesn’t alter the color or finish of your brick in an undesirable way.
Things to Absolutely Avoid
- High-Pressure Washing: As mentioned, it’s a brick killer.
- Sandblasting: This is an absolute no-go. It removes the hard outer “skin” of the brick, leaving it porous, vulnerable, and forever altered.
- Harsh Acid Washes (without extreme caution): While sometimes used for severe stains, they can etch old brick and mortar. If used, always dilute heavily, apply precisely, and neutralize/rinse immediately.
- Painting Old Brick (without careful thought): While painting can be an option for some, it’s generally discouraged for historic brick unless it was originally painted. Once painted, it’s a continuous maintenance cycle, and removing paint from old brick is incredibly difficult and often damaging.
- Using Incompatible Mortar: This is a structural and aesthetic disaster waiting to happen.
Embrace the Imperfections, Cherish the Character
Restoring an old brick wall isn’t about making it look brand new. It’s about respecting its age, enhancing its strength, and celebrating its unique imperfections. When you take the time to clean gently, repoint thoughtfully with matching materials, and repair judiciously, you’re not just fixing a wall; you’re preserving a piece of history. You’re ensuring that the whispers of the past continue to tell their stories, adding irreplaceable character and warmth to your home for generations to come. So, go forth with confidence, and let the vintage magic shine through!


