From a small, yellowish ring to a spreading, brown patch, ceiling stains are usually a clear indicator of an underlying issue that needs prompt attention. Ignoring these marks can lead to more significant structural damage, health hazards, and costly repairs down the line. This comprehensive guide will walk you through identifying the various types of stains, pinpointing their sources, and outlining effective solutions and preventative measures to keep your ceilings spotless.
Immediate Steps When You Discover a Ceiling Stain
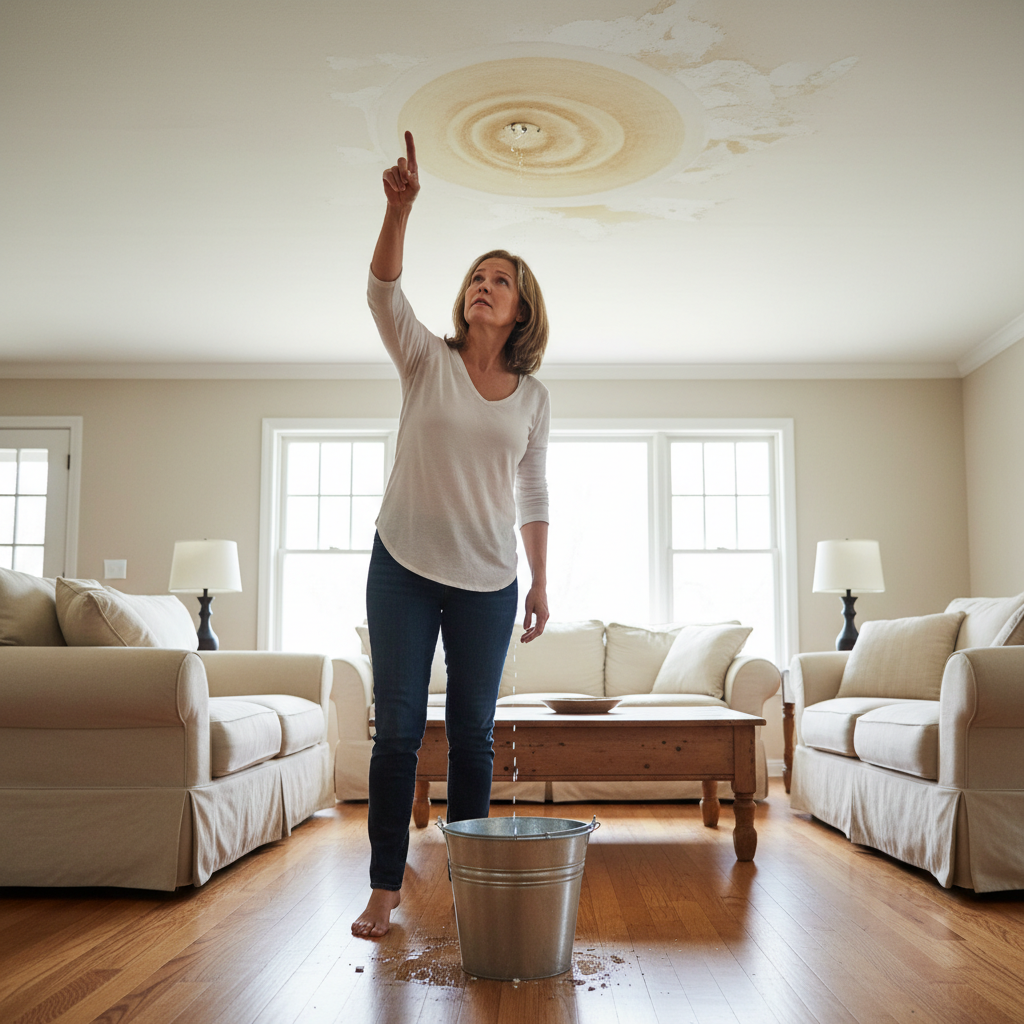
The moment you notice a stain on your ceiling, especially one that wasn’t there the night before, a swift and systematic approach is crucial. Don’t let fear paralyze you; instead, empower yourself with these immediate actions.
Don’t Panic, But Act Swiftly
- Take a deep breath. While concerning, many ceiling stains are fixable.
- Grab your phone and take photos of the stain from different angles. These can be valuable for tracking its growth, showing professionals, or for insurance claims.
Assess the Extent and Character of the Stain
- Size and Shape: Is it a small, isolated spot, or a large, spreading patch? Is it circular, irregular, or following a linear path?
- Color: Yellow, brown, black, grey, or greenish? The color can often give clues about the source. Yellowish-brown usually indicates water, while black or greenish might point to mold.
- Texture: Does the ceiling feel damp, soft, or crumbly to the touch? Be cautious if touching a potentially water-damaged area, as it could crumble.
- Location: Is it directly under a bathroom, a roof line, a vent, or a pipe? The location is often the strongest indicator of the source.
Prioritize Safety
- Electrical Hazards: If the stain is near light fixtures, electrical outlets, or ceiling fans, and especially if it feels wet, immediately turn off the power to that area or the entire room at your electrical panel. Water and electricity are a dangerous combination.
- Falling Debris: If the ceiling appears saturated, bulging, or sagging, there’s a risk of it collapsing. Place a bucket or tarp underneath to catch any drips or falling debris, and keep people and pets away from the area.
- Ventilation: If you suspect mold, open windows and doors to improve airflow, but avoid direct contact with the mold and consider wearing a mask.
Common Culprits Behind Overnight Ceiling Stains
Understanding the potential sources of your ceiling stain is the first step toward effective remediation. Most overnight stains point to an active issue, often involving moisture.
Water Leaks: The Usual Suspect
Water is, by far, the most common cause of sudden ceiling stains. A leak can develop quickly and spread rapidly, leaving visible marks within hours.
-
Roof Leaks
If your ceiling stain is on the top floor, especially near an exterior wall or directly under your roofline, a roof leak is a prime candidate. This could be due to:
- Damaged or Missing Shingles: Storms, high winds, or aging can dislodge or crack shingles, creating entry points for water.
- Compromised Flashing: The metal strips (flashing) around chimneys, skylights, vents, or dormers can corrode, become loose, or be improperly installed, allowing water to seep in.
- Clogged Gutters: Overflowing gutters can cause water to pool and back up under shingles or behind fascia boards.
-
Plumbing Leaks
If the stain is beneath an upstairs bathroom, kitchen, or laundry room, plumbing is likely the issue. These leaks can originate from:
- Leaky Pipes: Old, corroded, or frozen pipes can burst or develop small pinhole leaks. Fittings and joints are also common failure points.
- Toilet Seals: A worn-out wax ring beneath a toilet can cause water to leak with every flush.
- Shower/Bathtub Grout or Seals: Cracked grout, deteriorated caulk, or a faulty shower pan can allow water to escape during bathing.
- Appliance Hoses: Washing machine or dishwasher hoses can leak, especially if they are old or improperly connected.
-
HVAC Condensation
Your heating, ventilation, and air conditioning system can also be a source of ceiling stains, particularly during humid seasons.
- Clogged Condensate Drain Pan: AC units remove humidity from the air, producing condensation. If the drain pan or line becomes clogged with algae or debris, it can overflow.
- Poorly Insulated Ducts: In humid attics, cold air ducts can sweat, causing condensation to drip onto the ceiling.
-
Attic Issues
Beyond roof leaks, other attic problems can lead to ceiling stains.
- Ice Dams: In cold climates, poor attic insulation and ventilation can cause snow to melt and refreeze at the roof’s edge, creating an “ice dam” that traps water and forces it under shingles.
- Lack of Ventilation: High humidity in an unventilated attic can lead to condensation buildup on the underside of the roof deck, eventually dripping down.
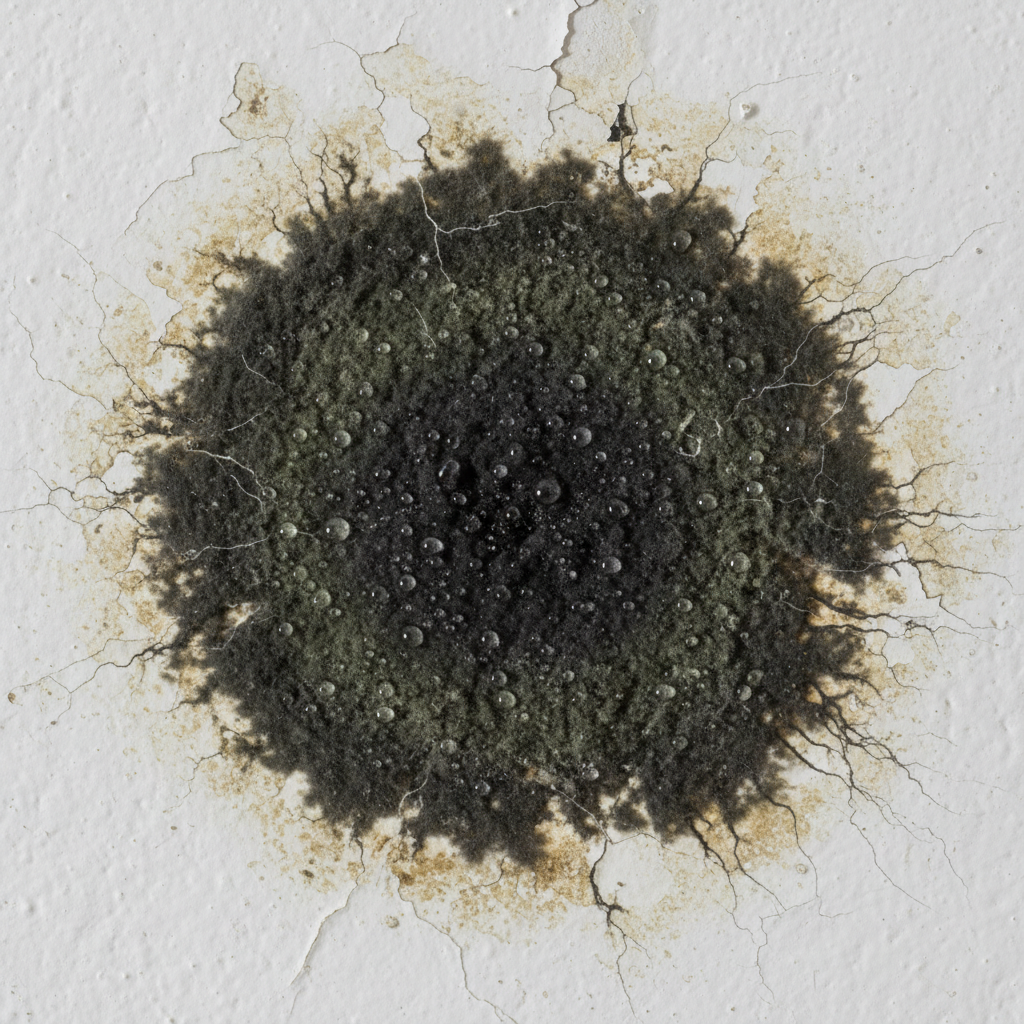
Mold and Mildew Growth
While often a consequence of water damage, mold and mildew can also be the direct cause of discolored patches. These typically appear as black, green, or dark grey spots and often have a musty odor.
- Understanding the Conditions for Growth: Mold thrives in damp, dark, and poorly ventilated environments. A persistent, slow leak or high humidity can create ideal conditions for mold spores to proliferate rapidly.
- Health Implications: Beyond being unsightly, mold can pose serious health risks, triggering allergies, respiratory issues, and other symptoms, especially for sensitive individuals.
Pest Activity
Though less common for large, overnight stains, pests can contribute to ceiling discoloration.
- Rodent Urine: Rats, mice, or squirrels living in the attic can urinate, and over time, these excretions can seep through the drywall, creating yellowish-brown stains and often an unpleasant odor.
- Insect Droppings: In rare cases, large infestations of certain insects (like cockroaches or bats) can leave droppings that stain the ceiling, though this is usually a gradual process.
Poor Ventilation and Condensation
In areas with high humidity and inadequate airflow, condensation can form directly on the ceiling.
- Bathrooms and Kitchens: Without proper exhaust fans, steam from showers or cooking can condense on cold ceiling surfaces, leading to dampness that can stain or encourage mildew.
- Cold Spots: Areas with poor insulation can create cold spots where warm, moist air condenses.
“Bleed-Through” from Previous Stains
If you’ve recently painted your ceiling, and new stains appear, it might not be a fresh leak but an old one resurfacing. If previous water stains weren’t properly treated with a stain-blocking primer before painting, the residual minerals and discoloration can “bleed through” the new paint as it dries or over time, especially in humid conditions.
Chimney and Fireplace Issues
If the stain is near a chimney, it could be related to combustion byproducts.
- Soot and Creosote: Cracks in the chimney liner or a lack of proper sealing can allow soot or creosote (a tar-like residue from wood burning) to seep through the masonry and stain the surrounding ceiling.
- Leaky Chimney Cap or Flashing: Water can enter through a damaged chimney cap or faulty flashing, much like a roof leak, and stain the ceiling below.
Diagnosing the Exact Source of the Stain
Once you have a general idea of potential causes, it’s time to play detective and pinpoint the exact source of the moisture or discoloration. This often requires investigating the area directly above the stain.
Visual Inspection
- Look Above: If the stain is on a lower floor, go to the room directly above it. Check for dampness around toilets, sinks, showers, and appliances. Look for any visible leaks or drips.
- Inspect the Attic: With a flashlight, carefully enter your attic space (if accessible). Look for damp insulation, dripping pipes, mold growth on wood rafters, or water marks on the underside of the roof sheathing. Pay close attention to areas above the ceiling stain.
- Check the Roof: From the ground with binoculars, or safely from a ladder, inspect the roof directly above the stain. Look for missing or damaged shingles, compromised flashing around penetrations (chimney, vents, skylights), or debris buildup in gutters.
Touch and Smell Test
- Touch: Carefully touch the stained area. Is it wet, damp, or dry? If it’s wet, the leak is active. If it’s dry but stained, the leak might be intermittent or old, but the stain itself could be reactivating.
- Smell: A musty, earthy odor strongly indicates mold or mildew. A strong, acrid smell might suggest pest urine. Soot or creosote might have a distinct smoky odor.
Monitoring the Stain
If you can’t immediately find the source and the stain is damp, place a bucket underneath and monitor it. Does it grow? Does it dry up and then reappear after rain or when an upstairs appliance is used? This can help narrow down if it’s a roof leak (weather-dependent) or a plumbing leak (usage-dependent).
Using a Moisture Meter
A non-invasive moisture meter can be a homeowner’s best friend for diagnosing leaks. By pressing it against the ceiling around the stain, you can determine if there’s active moisture in the drywall or plaster, even if it doesn’t feel wet to the touch. This can help confirm if a “dry” stain is indeed a reactivated old issue or a very slow, persistent current leak.
Cleaning and Repairing Your Ceiling Stains
Once you’ve identified and fixed the source of the stain, it’s time to clean and repair the visible damage. Remember, always fix the source first; otherwise, the stain will simply reappear.
Addressing the Root Cause First
This cannot be stressed enough. Whether it’s patching a roof, fixing a leaky pipe, sealing a toilet, or cleaning out an HVAC drain, the underlying problem must be resolved completely before any cosmetic repairs begin. For comprehensive advice on dealing with water stains, HGTV offers detailed guidance on how to effectively remove water stains from a ceiling, emphasizing the importance of solving the leak first.
Preparing the Area
- Safety First: Wear gloves, eye protection, and a mask, especially when dealing with potential mold or strong cleaning agents. Lay down drop cloths or tarps to protect your floors and furniture.
- Ventilation: Open windows and doors to ensure good airflow, especially when using cleaners or primers.
Cleaning Water Stains
For most yellowish-brown water stains (once dry and the source is fixed):
- Bleach Solution: Mix a solution of 1 part bleach to 3 parts warm water. Apply it carefully to the stain with a sponge or spray bottle. Let it sit for a few minutes, then gently blot clean. Test on an inconspicuous area first.
- Commercial Stain Removers: Various products are specifically designed to remove water stains from ceilings. Follow the manufacturer’s instructions carefully.
- Vinegar Solution: For a less harsh alternative, a white vinegar solution (equal parts vinegar and water) can sometimes work on milder stains.
Dealing with Mold Stains
Mold remediation can be hazardous. For small areas (less than 10 square feet):
- Personal Protective Equipment (PPE): Wear an N-95 respirator mask, gloves, and eye protection.
- Cleaning Solution: A solution of 1 cup bleach per gallon of water, or a specialized mold cleaner, can be effective. Spray the solution directly onto the mold and allow it to penetrate.
- Scrub and Dry: Scrub the mold away with a stiff brush. Ensure the area is thoroughly dried afterward to prevent recurrence.
- When to Call a Pro: If the mold covers a large area, if you suspect it’s growing behind the drywall, or if anyone in your household has severe allergies or respiratory issues, it’s safer to hire a professional mold remediation specialist.
Using Stain-Blocking Primers
This step is critical for preventing stains from bleeding through new paint. Once the ceiling is clean and completely dry:
- Oil-Based or Shellac-Based Primer: These are generally the most effective at sealing in stains. Brands like Kilz or Zinsser B-I-N are popular choices.
- Application: Apply one to two coats of the stain-blocking primer over the entire stained area, extending slightly beyond its original boundaries. Allow it to dry completely according to manufacturer instructions.
Patching and Repainting
- Repair Damage: If the ceiling drywall or plaster was damaged (e.g., softened, crumbly, or required cutting to fix a leak), you’ll need to patch it. This might involve cutting out damaged sections of drywall, installing new pieces, taping, mudding, and sanding until smooth.
- Paint the Ceiling: Once primed and any repairs are complete, apply two coats of high-quality ceiling paint. To ensure a seamless finish, it’s often best to paint the entire ceiling, not just the stained area, as spot-painting can result in visible differences in sheen or color.
Preventing Future Ceiling Stains
An ounce of prevention is worth a pound of cure, especially when it comes to ceiling stains. Regular maintenance and proactive measures can save you from future headaches and costly repairs.
Regular Home Maintenance Checks
- Roof Inspection: Annually inspect your roof for damaged or missing shingles, cracked flashing, and debris buildup. After severe storms, perform an immediate check.
- Gutter Cleaning: Keep gutters and downspouts clear of leaves and debris to ensure proper water drainage away from your home’s foundation and roofline.
- Plumbing Check: Periodically inspect exposed pipes under sinks, in basements, and in utility rooms for any signs of leaks, drips, or corrosion. Check appliance hoses for wear.
- Attic Inspection: Every year, check your attic for signs of moisture, mold, pests, or compromised insulation. Ensure attic vents are clear.
- HVAC System Maintenance: Have your HVAC system professionally serviced annually. Ensure condensate drain pans are clear and working correctly.
Ensuring Proper Ventilation
- Bathroom and Kitchen Fans: Always use exhaust fans when showering, bathing, or cooking to vent moist air outside. Run them for at least 15-20 minutes after use.
- Attic Ventilation: Ensure your attic has adequate ventilation (soffit and ridge vents) to prevent heat and moisture buildup, especially in humid climates.
Insulating Your Attic
Proper insulation helps maintain consistent temperatures, preventing condensation from forming on cold surfaces in the attic and on the ceiling below. It also helps prevent ice dams in colder regions.
Addressing Small Leaks Promptly
Even a tiny, slow drip can lead to significant damage and mold growth over time. Don’t procrastinate on small plumbing or roof repairs. The sooner a leak is fixed, the less damage it will cause.
Using Quality Paints and Primers
When repainting, especially after any moisture issues, invest in a good quality stain-blocking primer. This creates a barrier that prevents old stains from leaching through your fresh paint, giving you a clean, lasting finish.
When to Call a Professional
While many ceiling stains can be handled with DIY efforts, there are situations where calling in an expert is not just recommended, but essential for safety and effective resolution.
Persistent or Large Leaks
If you’ve attempted to fix a leak and the stain reappears, or if the leak is extensive, causing significant water flow, a professional plumber or roofer can use specialized equipment to locate and repair the issue effectively.
Extensive Mold Growth
If mold covers more than 10 square feet, if it’s deeply embedded in drywall or insulation, or if you suspect it’s impacting indoor air quality, a professional mold remediation company has the expertise and equipment to safely remove it and prevent recurrence.
Structural Concerns
If the ceiling is sagging, bulging significantly, or if you see cracks or other signs of structural weakness, immediately contact a structural engineer or a general contractor. Water damage can compromise the integrity of your home’s framing.
Electrical Issues
If the stain is near electrical wiring, light fixtures, or outlets, and especially if there’s any smell of burning or visible charring (though less common for “overnight” stains, safety is paramount), call a licensed electrician immediately. Do not attempt to fix this yourself.
Unidentifiable Sources
If you’ve tried to diagnose the source of the stain and simply cannot find it, a professional might have thermal imaging cameras or other tools to locate hidden moisture issues behind walls or ceilings.
Frequently Asked Questions About Ceiling Stains
Q: Can ceiling stains be dangerous?
A: Yes, they can. Water stains indicate active moisture, which can lead to structural damage (rotting wood, compromised drywall), electrical hazards if near wiring, and mold growth, which poses health risks. Black or greenish stains usually signify mold, which is particularly dangerous for those with respiratory issues or allergies.
Q: How quickly do ceiling stains appear?
A: The appearance speed varies. A sudden, heavy leak (like a burst pipe) can cause a noticeable stain overnight or even within hours. Slower, intermittent leaks might take days or weeks for a visible stain to form. “Bleed-through” stains from old issues can appear days or weeks after painting.
Q: What’s the difference between a water stain and mold?
A: Water stains are typically yellow, brown, or rust-colored, and are caused by minerals and debris carried by water drying on the ceiling surface. Mold, on the other hand, is a living fungus, usually appearing as black, green, grey, or white fuzzy patches. Mold often has a distinct musty odor, while a water stain might just smell damp or earthy. A water stain creates the conditions for mold to grow.
Q: Can I paint over a ceiling stain?
A: You should never paint directly over a ceiling stain without addressing the underlying issue and treating the stain first. Painting over a stain without fixing the source will only hide the problem temporarily; the stain will eventually bleed through the new paint, and the underlying issue (e.g., leak, mold) will continue to worsen.
Q: Is it safe to clean mold myself?
A: For very small areas of surface mold (less than 10 square feet) and if you don’t have respiratory sensitivities, you can often clean it yourself with appropriate protective gear and cleaning solutions. However, for larger infestations, mold that has penetrated materials (like drywall), or if you or family members have health concerns, it is always safest to hire a professional mold remediation specialist.
Discovering stains appearing on your ceiling overnight is a clear signal that your home needs attention. By taking immediate action, accurately diagnosing the source, and implementing the right repairs and preventative measures, you can effectively resolve the problem and protect your home’s integrity and your family’s health. Don’t let a mysterious stain become a major headache – act swiftly and wisely.


