Understanding the Leaking Toilet Tank Valve: More Than Just a Drip
Before diving into fixes, it’s essential to understand what a toilet tank valve actually is and its critical role in your toilet’s operation. When we talk about a “leaking toilet tank valve,” we’re often referring to one of two main components that control water flow within the tank: the fill valve or the flapper valve. Both can lead to water loss from the tank, but they serve different purposes and require different repair approaches.
The Two Main Culprits: Fill Valve vs. Flapper Valve
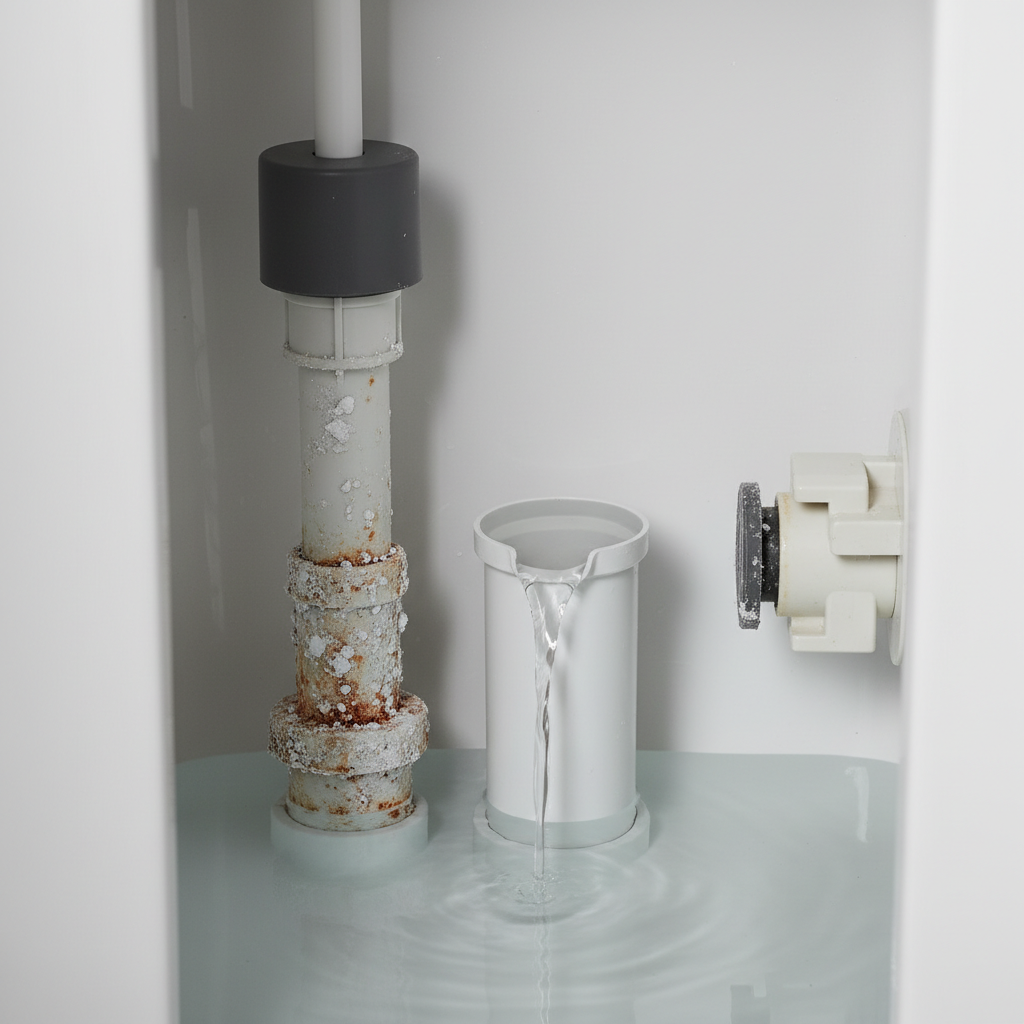
- The Fill Valve (Ballcock): This is the tall mechanism typically located on the left side of the toilet tank as you face it. Its job is to refill the tank with water after you flush, stopping automatically once the water reaches a predetermined level. A leak from the fill valve usually means water is continuously running into the overflow tube, or the valve itself is faulty and leaking around its base or connections.
- The Flapper Valve (Flush Valve Seal): Situated at the bottom center of the tank, the flapper is a rubber or plastic seal that lifts when you flush, allowing water to rush into the bowl. Once the tank empties, it drops back down to create a watertight seal, preventing water from continuously draining from the tank into the bowl. A leak here means water is silently seeping from the tank into the bowl, often undetected.
While the term “tank valve” might generically refer to either, knowing which one is the culprit is the first step toward an effective repair.
Why is Your Toilet Tank Valve Leaking? Common Causes
Toilet tank leaks are rarely a mystery without an explanation. Several factors can contribute to a valve failing to hold water or operating correctly. Identifying the root cause will help you choose the right repair strategy.
Wear and Tear: The Inevitable Culprit
Over time, the components within your toilet tank are subjected to constant water exposure, flushing cycles, and friction. Rubber seals, gaskets, and plastic parts can degrade, harden, or become brittle. This natural wear and tear is arguably the most common reason for a leaking toilet tank valve. A worn-out flapper, for instance, might no longer create a tight seal, leading to a slow, silent leak into the bowl.
Mineral Buildup: Hard Water’s Revenge
If you live in an area with hard water, mineral deposits (calcium and magnesium) can accumulate on and around the moving parts of your toilet’s fill and flapper valves. This buildup can interfere with the smooth operation of the fill valve, causing it to stick open slightly, or prevent the flapper from seating properly, leading to a persistent trickle of water.
Improper Installation or Adjustment
Sometimes, a leak isn’t due to a fault in the valve itself but rather incorrect installation or adjustment. A fill valve set too high can cause water to continuously flow into the overflow tube. Similarly, a flapper chain that’s too short or tangled can prevent the flapper from fully closing, leading to a constant leak. Even loose nuts or washers at the base of the fill valve can be the source of a drip outside the tank.
Damaged Components: Cracks and Corrosion
Beyond simple wear, components can suffer more significant damage. A crack in the plastic housing of the fill valve or corrosion on metal parts can compromise its integrity, leading to leaks. While less common, extreme temperature fluctuations or impacts can also cause physical damage.
High Water Pressure
Excessive water pressure entering your home can put undue stress on all your plumbing fixtures, including your toilet’s valves. High pressure can cause the fill valve to operate incorrectly, wear out faster, or even lead to leaks at connection points that might otherwise hold firm under normal pressure. If you suspect high water pressure, a pressure regulator might be a worthwhile investment for your entire home.
Detecting the Silent Leaker: How to Confirm a Leaking Toilet Tank Valve
Many toilet leaks are silent and invisible, slowly draining water and money without you realizing it. Early detection is key to preventing wasted water and potential damage. Here’s how to play detective in your bathroom:
The Dye Test: Your Best Friend for Invisible Leaks
This is the most effective and easiest way to detect a silent leak from your flapper valve:
- Remove the toilet tank lid.
- Add a few drops of food coloring (dark colors like blue or green work best) or a toilet dye tablet to the water in the tank.
- Do NOT flush the toilet for at least 15-30 minutes, or even an hour for a very slow leak.
- After the waiting period, check the toilet bowl. If you see colored water in the bowl, it indicates that water is leaking from the tank into the bowl, meaning your flapper valve or flush valve seal is faulty.
This test is specifically for leaks from the tank into the bowl. For leaks *from* the fill valve (e.g., into the overflow tube), you’ll need other methods.
Auditory Clues: Listening for the Tell-Tale Signs
Sometimes your ears are your best diagnostic tool:
- Phantom flushing: If you hear your toilet “refill” itself randomly when no one has flushed it, it’s a strong sign of a slow leak, most likely from the flapper. The water level in the tank drops, triggering the fill valve.
- Constant running water: A constant, low-level hiss or trickle, even after the tank has supposedly refilled, often points to a fill valve issue. Water might be continuously flowing into the overflow tube, or the fill valve isn’t fully closing.
Visual Inspection: Looking for the Obvious
Open the tank lid and take a good look:
- Water level too high: If the water level in the tank is above the top of the overflow tube, the fill valve is allowing too much water in, and it’s constantly spilling into the tube.
- Flapper issues: Check if the flapper appears warped, cracked, or if the chain is tangled, too short, or too long, preventing it from sealing properly.
- Visible drips: Look for any visible drips or streams of water around the base of the fill valve or from any hose connections within the tank.
Checking for Water on the Floor
If you find puddles of water around the base of your toilet, the leak is external. While this might not directly be a “tank valve” leak, the fill valve’s connection to the tank or the water supply line can be a source. Feel around the connections and the exterior of the tank for moisture.
According to Good Housekeeping, “Even a small, silent toilet leak can waste hundreds of gallons of water per day, leading to unexpectedly high water bills.” This emphasizes the importance of regular leak checks.
DIY Fixes: How to Repair a Leaking Toilet Tank Valve
Most toilet tank valve leaks are relatively simple to fix for the average DIYer. With basic tools and a trip to the hardware store, you can save yourself a plumber’s fee. Always prioritize safety and preparation before you begin.
Before You Begin: Safety First!
- Turn off the water supply: Locate the shut-off valve behind or beneath the toilet. Turn it clockwise until the water flow stops completely.
- Flush the toilet: Hold down the flush handle to empty as much water from the tank and bowl as possible.
- Sop up remaining water: Use a sponge or towel to remove any residual water from the bottom of the tank.
- Prepare your workspace: Lay down towels or a tarp around the toilet to catch any spills.
Step-by-Step Guide for a Leaking Fill Valve
If your fill valve is constantly running or leaking around its base, here’s how to address it:
- Remove Tank Lid and Observe: With the water supply off, remove the tank lid. If water is still present, sponge it out.
- Inspect for Simple Adjustments:
- Water Level: Check the water level adjustment on the fill valve. There’s usually a clip or screw to raise or lower the float. The water level should be about an inch below the top of the overflow tube. Adjust it if it’s too high.
- Float Mechanism: Ensure the float (whether a cup or arm-style) moves freely and isn’t snagged on anything.
- Clean Components (If Mineral Buildup is Suspected): If mineral buildup is visible, you might be able to clean the fill valve. Disassemble accessible parts according to manufacturer instructions (often involving twisting or unsnapping components). Use white vinegar and an old toothbrush to remove deposits.
- Replace Faulty Components (If Possible): Some fill valves allow for replacement of just the diaphragm or washer. Consult your valve’s manual or a hardware store expert.
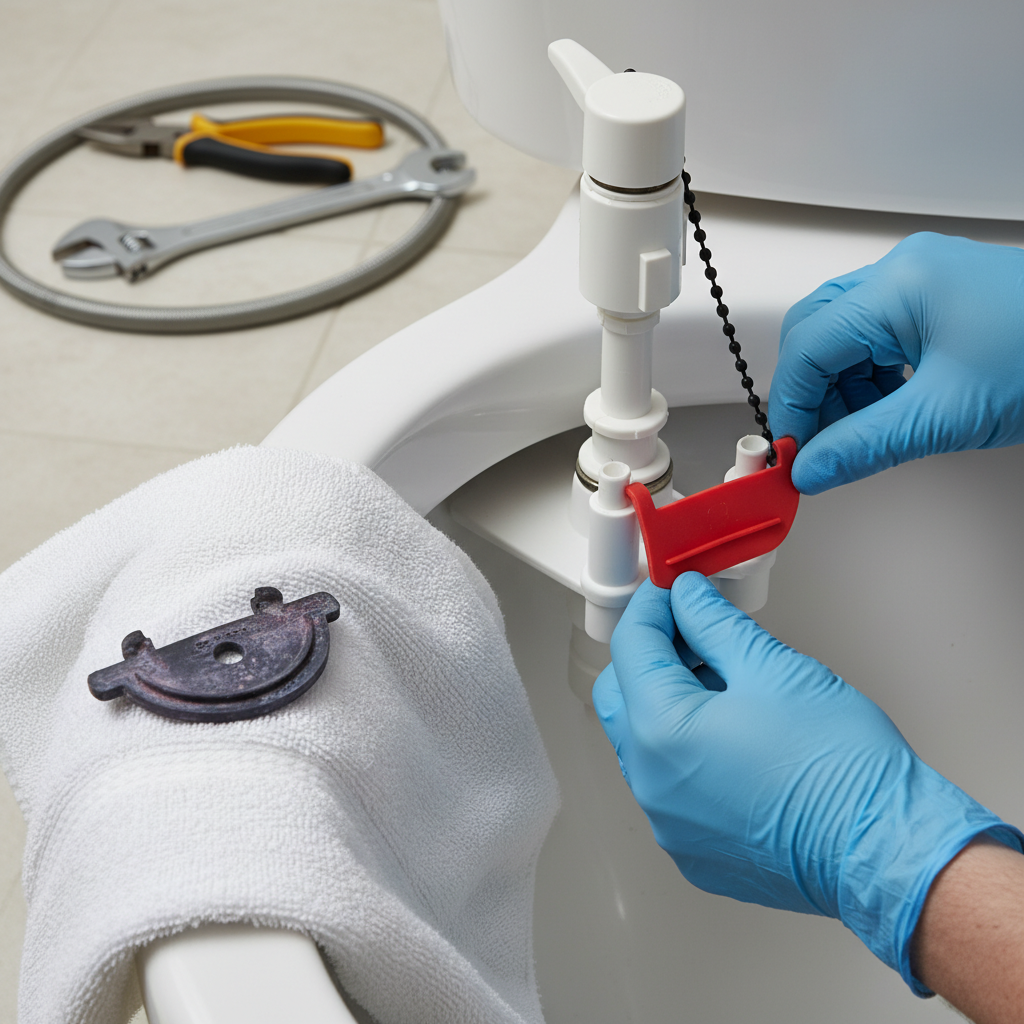
- Replacing the Entire Fill Valve: If adjustments or cleaning don’t work, or if the valve is old/damaged, a full replacement is often the most reliable fix.
- Disconnect Water Supply Line: Use a wrench to disconnect the flexible water supply line from the bottom of the fill valve.
- Unscrew Mounting Nut: Beneath the tank, you’ll find a large plastic nut holding the fill valve in place. Unscrew it.
- Remove Old Fill Valve: Lift the old fill valve out of the tank.
- Install New Fill Valve: Insert the new fill valve into the hole in the bottom of the tank. Ensure the rubber washer is correctly seated beneath the tank (or integrated into the valve itself).
- Secure Mounting Nut: Hand-tighten the mounting nut from underneath the tank, then give it a quarter-turn more with a wrench. Do not overtighten, as this can crack the tank.
- Reconnect Water Supply Line: Connect the flexible supply line to the new fill valve. Hand-tighten, then a quarter-turn with a wrench.
- Adjust Water Level: Follow the new fill valve’s instructions to set the appropriate water level.
- Turn On Water and Test: Slowly turn the water supply back on. Check for any leaks around the base of the valve and the supply line connections. Flush several times to ensure proper operation.
Step-by-Step Guide for a Leaking Flapper Valve
If your dye test indicates a leaky flapper, here’s how to replace it:
- Turn Off Water and Flush: As before, turn off the water supply and flush the toilet to empty the tank.
- Remove the Old Flapper:
- Chain: Unclip the flapper chain from the flush lever.
- Flapper Attachment: Most flappers either slide off two posts on the sides of the flush valve or have a ring that slips over the overflow tube. Gently unhook or slide off the old flapper.
- Clean the Flush Valve Seat: Use a non-abrasive scrubber or a mild abrasive pad (like a Scotch-Brite pad) to gently clean the rim (the “seat”) where the flapper rests. Mineral buildup, grime, or even small nicks can prevent a good seal. Do not use harsh chemicals or anything that could scratch the porcelain.
- Install a New Flapper:
- Choose the Right Flapper: Bring your old flapper to the hardware store to ensure you get a compatible replacement (universal flappers exist, but specific models might offer better performance).
- Attach New Flapper: Secure the new flapper to the posts or slip the ring over the overflow tube, ensuring it sits flat and evenly on the flush valve seat.
- Connect the Chain: Attach the flapper chain to the flush lever. There should be a slight amount of slack in the chain when the flapper is closed – about ½ to 1 inch. If it’s too tight, the flapper won’t seal; if too loose, it won’t lift fully.
- Turn On Water and Test: Slowly turn the water supply back on. Allow the tank to refill. Perform the dye test again to confirm the leak has stopped. Flush several times to check for proper operation.
Tightening Connections: The Simple Fix
Sometimes, the leak isn’t from the valve itself but from a loose connection. Check the large nut that secures the fill valve to the bottom of the tank, and the nuts connecting the water supply line to both the fill valve and the wall. Use a wrench to gently tighten them, being careful not to overtighten and cause damage.
When to Call a Professional Plumber
While many toilet leaks are DIY-friendly, there are situations where calling a professional plumber is the best course of action. Knowing your limits can save you from bigger headaches and more costly repairs down the line.
Persistent Leaks After DIY Attempts
If you’ve tried the common fixes and your toilet tank valve is still leaking, it might indicate a more complex issue. A professional plumber has specialized tools and experience to diagnose obscure problems that might be beyond the scope of a typical homeowner.
Visible Cracks in the Toilet Tank
If you notice any cracks in the porcelain of your toilet tank, even hairline ones, do not attempt to repair them yourself with sealants. A cracked tank can fail catastrophically, leading to significant water damage. This requires a full toilet replacement, a job best left to experts who can safely remove and install a new fixture.
Lack of Confidence or Tools
If you’re uncomfortable working with plumbing, don’t have the necessary tools, or simply prefer to avoid the hassle, there’s no shame in calling a professional. Plumbing tasks can be messy, and improper repairs can lead to greater problems.
Complex Plumbing Issues
Sometimes, a persistent toilet leak might be a symptom of a larger plumbing problem within your home, such as extremely high water pressure, corroded pipes, or issues with your main water shut-off valve. A plumber can assess the entire system and address the root cause, not just the symptom.
Preventing Future Leaks: Proactive Toilet Maintenance
Prevention is always better (and cheaper) than repair. A little regular maintenance can significantly extend the life of your toilet components and prevent future leaks.
Regular Cleaning
Periodically clean the inside of your toilet tank, especially the flush valve seat, to remove mineral buildup and grime. Use a non-abrasive cleaner and a soft brush. Avoid harsh chemical drop-in tablets, as they can degrade rubber and plastic components over time, actually causing leaks.
Periodic Inspection of Components
Once or twice a year, remove your toilet tank lid and perform a quick visual inspection. Check the flapper for signs of wear (cracks, stiffness, discoloration), ensure the fill valve float moves freely, and look for any visible corrosion or damage to hoses and connections. Perform the dye test every few months to catch silent leaks early.
Water Pressure Monitoring
If you suspect high water pressure, consider purchasing a water pressure gauge (available at hardware stores) to test your home’s water pressure. Ideal pressure is typically between 40-60 psi. If it’s consistently higher, consult a plumber about installing a pressure regulator to protect all your plumbing fixtures.
Using Approved Replacement Parts
When you do need to replace a component, always use high-quality, reputable replacement parts. While generic parts might be cheaper, they often don’t last as long or fit as precisely, potentially leading to more frequent repairs.
The Environmental and Financial Impact of a Leaking Toilet
It’s easy to dismiss a minor toilet leak as insignificant, but the cumulative effect can be staggering. A continuously running toilet can waste hundreds, even thousands, of gallons of water per month. This not only translates to a higher water bill but also contributes to unnecessary strain on local water resources. In a world increasingly conscious of sustainability, fixing a leaking toilet tank valve is not just about saving money; it’s about responsible resource management.
FAQs About Leaking Toilet Tank Valves
What is the most common cause of a toilet tank leaking?
The most common cause of a toilet tank leaking is a faulty flapper valve. Over time, the rubber or plastic material of the flapper can degrade, warp, or become stiff, preventing it from creating a watertight seal against the flush valve seat, allowing water to continuously seep into the toilet bowl.
Can a leaking toilet tank valve increase my water bill significantly?
Absolutely. Even a small, silent leak from a toilet tank valve can waste a surprising amount of water. A leak of just one gallon per hour can add over 700 gallons to your water bill each month, and faster leaks can easily waste thousands, leading to significantly higher utility costs.
How long does it take to fix a leaking toilet tank valve?
For most DIYers, replacing a flapper valve or a fill valve can take anywhere from 15 minutes to an hour, assuming you have the right replacement parts and basic tools. Diagnosing the issue might add a bit more time, especially if you’re performing a dye test.
Are all toilet fill valves universal?
While many fill valves are designed to be “universal” and fit most standard toilets, there can be variations in height, attachment mechanisms, and water-level adjustment methods. It’s always best to check the specifications or bring your old fill valve to the hardware store to ensure compatibility.
Is it safe to use toilet tank drop-in cleaners?
Many plumbers and toilet manufacturers advise against using drop-in toilet tank cleaners that contain harsh chemicals (like bleach or chlorine). These chemicals can accelerate the degradation of rubber and plastic components (like flappers and gaskets) inside the tank, leading to premature failure and leaks. It’s better to clean the tank manually with a brush and mild cleaner when needed.
Conclusion: Don’t Let a Drip Turn into a Deluge
A leaking toilet tank valve is more than just an annoyance; it’s a silent drain on your wallet and an unnecessary waste of water. By understanding the common causes, learning how to detect these elusive leaks, and knowing the steps for DIY repair, you can effectively tackle this common household problem. Regular maintenance and timely intervention will ensure your toilet runs efficiently, saving you money, conserving water, and keeping your bathroom dry for years to come.


