Ever walked into a space with gracefully curved walls and thought, “Wow, that looks incredible… but how on earth do they do that?” For a long time, I was in that same boat. Curved features add a touch of sophistication, organic flow, and unique character that straight lines simply can’t replicate. They can soften a room, guide the eye, and even improve acoustics. The idea of bringing that elegance into my own projects, especially as wall cladding, always fascinated me.
But let’s be honest, the thought of bending rigid plywood into a smooth, continuous curve can feel like trying to fold a brick. It seems like the exclusive domain of high-end architects and specialized fabricators, right? Well, I’m here to tell you, from personal experience, that it’s absolutely within reach for the dedicated DIY enthusiast or a small workshop. It requires patience, a bit of plaing, and a willingness to learn, but the results? Pure satisfaction.
Join me as I pull back the curtain on the journey of creating beautiful curved plywood panels for wall cladding. We’ll explore the ‘why,’ the ‘how,’ the tools you’ll need, and the crucial lessons I learned along the way.
Why Go Curved? The Irresistible Appeal of Organic Shapes
Before we dive into the nitty-gritty, let’s quickly touch on why you might even consider adding curves to your walls. Beyond the obvious aesthetic appeal, curved surfaces can:
- Soften Harsh Lines: They break up the monotony of rectangular rooms, making spaces feel more inviting and less ‘boxy.’
- Create Visual Flow: Curves can subtly direct foot traffic or guide the eye towards a focal point.
- Enhance Acoustics: Unlike flat walls that bounce sound directly, curved surfaces diffuse sound waves, potentially improving the sound quality within a room.
- Add Unique Character: Let’s face it, curved walls are distinctive. They elevate a design from ordinary to extraordinary, giving your space a custom, high-end feel.
For wall cladding, curved plywood offers a warm, tactile surface that can be stained, painted, or left natural, fitting seamlessly into various design aesthetics from modern minimalist to rustic chic.
Understanding Plywood’s Potential: Not Just for Flat Surfaces!
Plywood, at its core, is an engineered wood product made from thin layers (plies) of wood veneer glued together with adjacent layers having their wood grain rotated up to 90 degrees to one another. This cross-graining makes it incredibly strong and stable in flat dimensions. However, it also makes it notoriously stiff when you try to bend it.
So, how do we get it to curve? There are two primary methods we’ll explore, each with its own advantages and challenges:
- Kerfing: This involves making a series of closely spaced cuts (kerfs) on one side of the plywood, allowing it to bend along the uncut side.
- Lamination: This method involves gluing together multiple thin sheets of flexible plywood or standard plywood over a form (mold) to create a thicker, curved panel.
I’ve experimented with both, and while kerfing has its place, for robust wall cladding that needs structural integrity and a smooth finish, lamination generally wins out. However, understanding kerfing can be useful for shallower curves or smaller accents.
The Heart of the Curve: Building Your Formwork (Mold)
This, for me, is where the rubber meets the road. If you’re going the lamination route, your formwork is everything. It dictates the final shape, smoothness, and accuracy of your curved panel. Don’t skimp here; a well-made formwork saves countless headaches later.
My first attempt involved a hastily assembled mold from scrap timber. Let’s just say the result was… rustic. I quickly learned the value of precision. Here’s what I recommend:
- Design First: Sketch out your desired curve. Use a flexible strip of wood or metal to visualize it in 3D. Determine the radius.
- Material Matters: For your formwork, MDF or particle board are excellent choices. They’re stable, relatively inexpensive, and easy to cut accurately. Thicker is better for stability (e.g., 3/4 inch or 18mm).
- Creating the Shape:
- Cut several identical ‘ribs’ or ‘formers’ to your exact curve. A router with a template bit or a bandsaw/jigsaw with careful sanding can achieve this. The more accurate your ribs, the smoother your curve will be.
- Attach these ribs to a sturdy base (another sheet of MDF or strong plywood) at regular intervals (e.g., 12-16 inches apart). Ensure they are perfectly perpendicular and aligned.
- Clad the ribs with a thin, flexible material like hardboard (masonite) or even thin plywood. This creates the continuous, smooth surface that your final plywood will conform to. Secure it well with screws or nails, ensuring there are no bumps or gaps.
- Positive or Negative? You can create a ‘positive’ mold (where you bend the plywood *over* the form) or a ‘negative’ mold (where you bend the plywood *into* the form). For wall panels, a positive mold is often easier to clamp and work with.
- Surface Prep: Cover your mold with a release agent – packing tape, wax paper, or even specialized mold release wax – to prevent your glued plywood from sticking permanently to the form. Trust me, you don’t want to learn this lesson the hard way!
The Bending Battle: Laminating Your Layers
Now for the fun part – or at least, the most involved part! This is where thin, flexible sheets of plywood transform into a robust, curved panel.
Choosing Your Plywood
For lamination, you’ll want thin sheets of plywood, typically 1/8 inch (3mm) or 1/4 inch (6mm). “Flexible plywood” (also known as “bendy plywood” or “wacky wood”) is specifically designed for this purpose, featuring a very thin face veneer and core veneers that allow it to bend along one axis. If flexible plywood isn’t available or is too costly, standard thin plywood can work, but you’ll likely need more layers for the same thickness and it will resist tighter curves more.
The Lamination Process: My Step-by-Step Experience
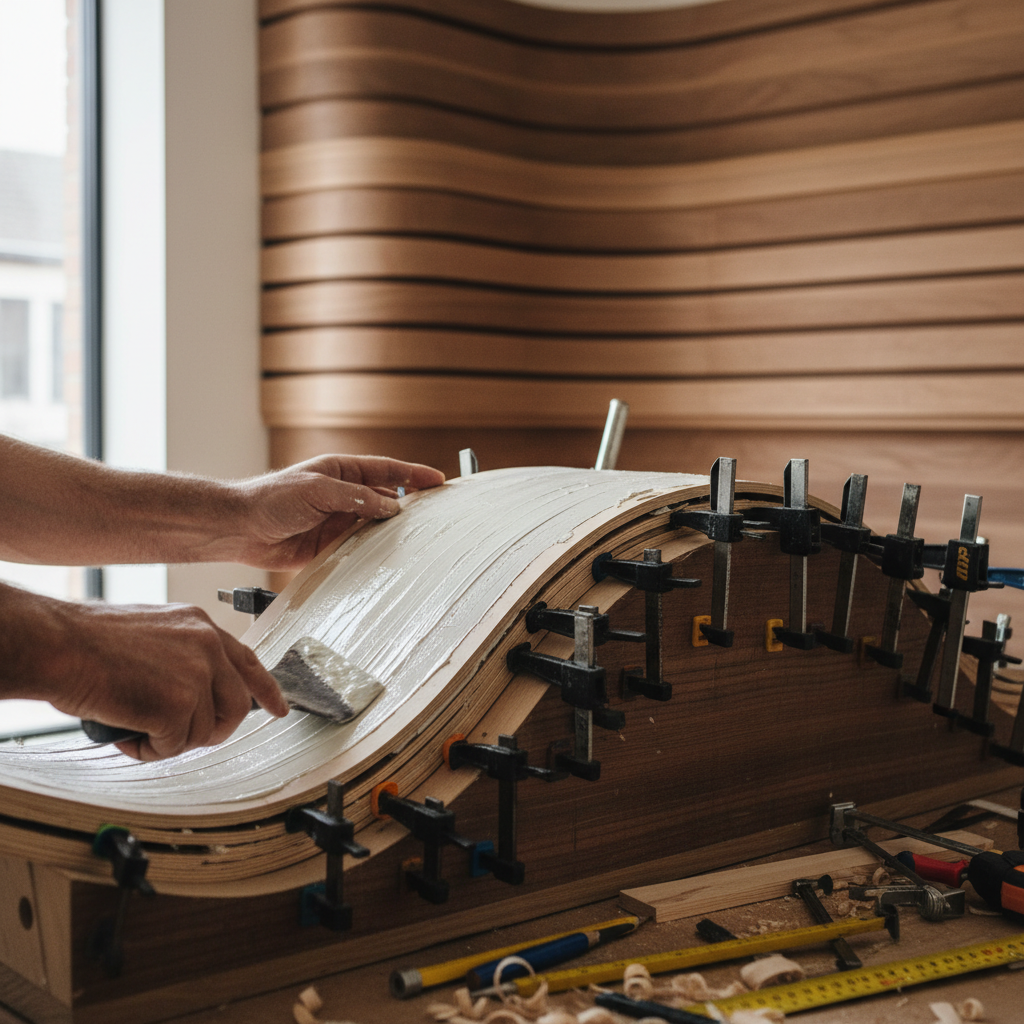
- Gather Your Materials: You’ll need your chosen plywood sheets, a good quality wood glue (PVA glue like Titebond III works well, or even epoxy for extreme strength and water resistance), glue rollers or brushes, plenty of clamps, and a helping hand if available.
- Prepare the Glue: Mix your glue if necessary, and ensure you have enough. Ruing out mid-process is a nightmare.
- Apply the Glue: This is where things get messy and fast-paced. Apply a generous, even layer of glue to one side of a plywood sheet. Don’t be stingy, but avoid huge puddles. A notched glue spreader or a paint roller works wonders for even coverage.
- Layer Up: Carefully place the glued sheet onto your formwork. Immediately apply glue to the next sheet and lay it precisely on top of the first. It’s crucial to align the edges as best as you can. For plywood with a good face veneer, ensure that veneer is on the outside of your final panel. If using standard plywood, consider staggering the grain directions for added strength, though for wall cladding, this might not be strictly necessary.
- Clamp Like Crazy: This is the most critical step for a strong, smooth lamination. Starting from the center and working outwards, apply clamps. And when I say clamps, I mean *many* clamps. Every 4-6 inches along the curve. The goal is even, consistent pressure across the entire surface. If you have access to a vacuum press, this is its prime moment to shine, as it provides incredibly uniform pressure.
- Curing Time: Now, you wait. And wait. Follow the glue manufacturer’s recommendations for clamping and full cure time. For PVA glues, I usually leave them clamped for at least 12-24 hours, often longer for peace of mind, especially in cooler temperatures. Resist the urge to peek early!
I remember my first large panel. I didn’t have enough clamps, and the result was a slightly lumpy, delaminated mess in spots. Lesson learned: you can *never* have too many clamps, and even pressure is paramount!
Kerfing in Action (For Lighter Curves or Specific Applications)
While I advocate for lamination for robust wall cladding, kerfing is worth a mention for its simplicity in certain situations. It’s often used for smaller, shallower curves or for bending a single, thicker sheet of plywood.
- The Principle: By cutting grooves into the back of the plywood, you remove material, allowing the remaining wood fibers to compress and bend.
- Making the Cuts: This is usually done on a table saw or with a router. You’ll need to calculate the depth and spacing of your kerfs. The deeper and closer the cuts, the tighter the curve you can achieve.
- Depth: Cut almost all the way through the plywood, leaving only the face veneer and perhaps one ply intact.
- Spacing: Experiment with test pieces. Common spacing ranges from 1/4 inch to 1 inch, depending on your desired curve radius.
- Bending and Securing: Once kerfed, the plywood will bend relatively easily. You can then glue a thin veneer or another sheet of plywood to the kerfed side to provide stability and a smooth back, clamping it to your formwork while the glue dries.
Kerfing is faster, but it leaves the back of your panel looking like a series of ribs, which might not be ideal if the back is visible, and it’s generally not as strong as a laminated panel for structural wall cladding.
Finishing Strong: The Art of the Perfect Panel
Once your curved panel is liberated from its formwork, it’s time to bring it to life.
- Trimming: The edges will likely be uneven. Use a router with a flush trim bit to perfectly trim the edges of your curved panel. If you need a specific edge profile, this is also the time to apply it.
- Sanding: Oh, the sanding! Start with a coarser grit (e.g., 80 or 100) to smooth out any glue squeeze-out or minor imperfections, then progressively move to finer grits (150, 220) for a silky-smooth finish. Curved surfaces can be tricky; a flexible sanding pad or sponge can be your best friend here.
- Filling Imperfections: If there are any small gaps or voids in the plywood edges or surface, fill them with wood filler.
- Finishing Coats: This is where your panel gets its final look and protection.
- Stain: If you want to enhance the wood grain.
- Paint: For a solid color.
- Varnish/Polyurethane: For durability and protection, especially important for wall cladding that might see some wear and tear. Apply multiple thin coats, sanding lightly between each.
- Installation: For wall cladding, consider using a French cleat system for hidden mounting, or simply screw through the panel into wall studs from the front (then fill and sand the screw holes). Plan your installation method before you start building to ensure proper backing and support.
My Takeaways & Tips for Your Own Curved Journey
Embarking on a curved plywood project is incredibly rewarding, but it’s definitely a learning curve (pun intended!). Here are a few things I wish I knew upfront:
- Start Small: Don’t tackle your magnum opus as your first curved piece. Practice with smaller curves or narrower panels to get a feel for the process.
- Test Pieces are GOLD: Always make a test strip for kerfing patterns or glue adhesion/clamp pressure before committing to your final panel.
- Patience is a Virtue: Rushing any step, especially glue drying, will lead to inferior results. Let the materials do their job.
- Safety First: When using power tools like table saws or routers, always wear appropriate safety gear (eye protection, hearing protection) and understand how to operate them safely.
- Embrace the Imperfect: Your first piece might not be showroom perfect, and that’s okay! Learn from it, adjust your technique, and appreciate the fact that you built something truly unique.
Conclusion: The Reward of Bending Reality
Creating curved plywood panels for wall cladding might seem daunting at first glance. It’s a journey that involves precision in mold making, a bit of messy glue work, and a whole lot of patience during clamping and drying. But having gone through the process, I can tell you that the satisfaction of seeing those organic, flowing lines take shape, transforming a flat, ordinary space into something truly special, is immensely gratifying.
It’s not just about the final product; it’s about the skills you gain, the problems you solve, and the pride in knowing you crafted something beautiful with your own hands. So, if you’ve been dreaming of adding some elegant curves to your home or next project, I encourage you to take the plunge. With careful plaing and a commitment to the process, you too can master the curve!


