Let’s be honest, living in a rental can sometimes feel a bit… temporary. You want to make it feel like home, but you’re also hesitant to invest too much or make permanent changes that might aoy your landlord (or your security deposit). One area that often gets overlooked, but has a massive impact, is the kitchen lighting – especially under-cabinet lighting.
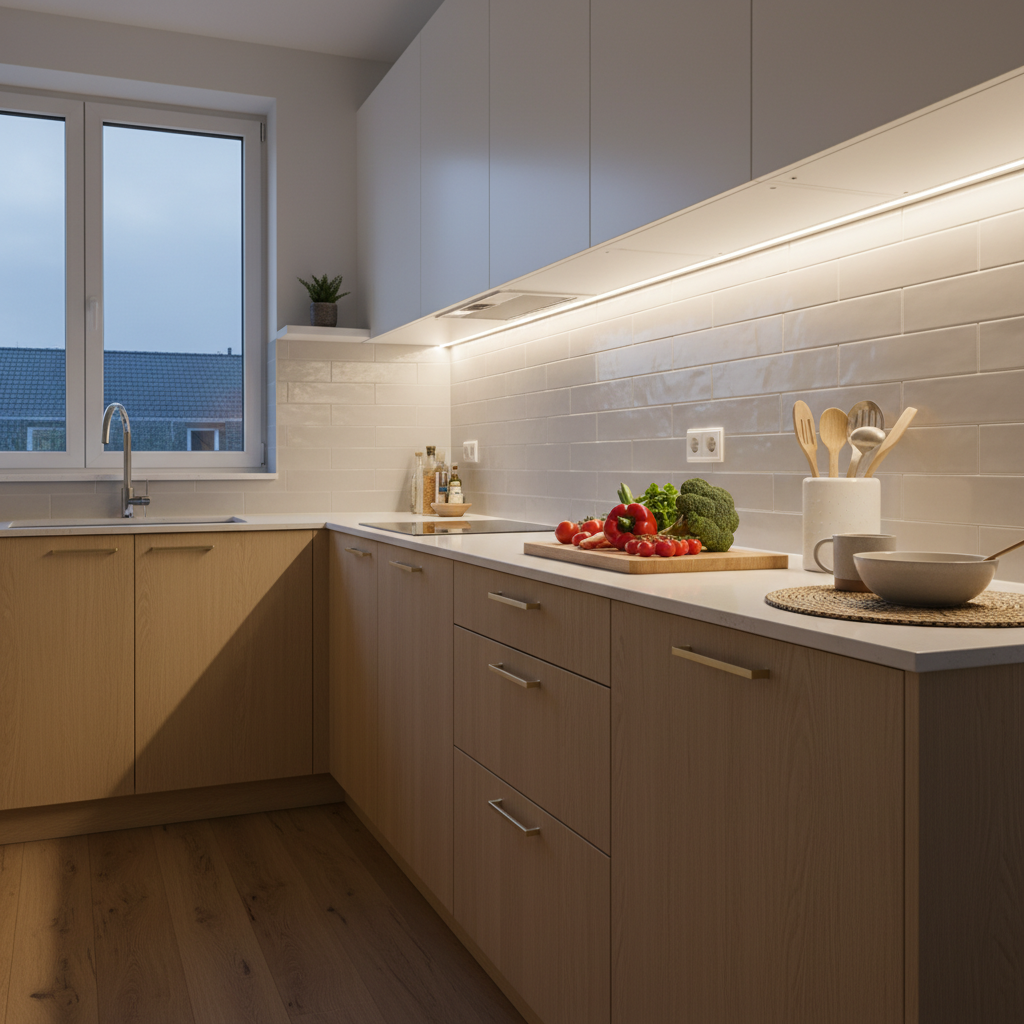
You know the feeling: you’re chopping veggies on a dimly lit counter, casting shadows with your own body, or trying to find that missing spice jar in a dark corner. Rental kitchens often come with basic, sometimes harsh, overhead lighting, leaving your countertops in the dark ages. But what if I told you that transforming your kitchen with bright, inviting under-cabinet LED lighting is not only super easy and affordable but also completely renter-friendly?
That’s right! I’ve been there, staring at a dull kitchen, dreaming of a brighter, more functional space. And after a bit of research and some hands-on experience, I discovered the magic of DIY under-cabinet LED lighting that leaves no trace when it’s time to move out. This guide is built from my own trial-and-error, my triumphs, and everything I learned along the way, so you can skip the guesswork and go straight to enjoying your beautifully lit kitchen. Let’s dive in!
Why Bother with Under-Cabinet Lighting in a Rental?
You might be thinking, “It’s just a rental, why go through the effort?” Trust me, the benefits far outweigh the minimal effort involved:
- Improved Task Lighting: This is huge. When your countertops are properly lit, prepping food becomes safer and more enjoyable. No more squinting or relying on a single overhead fixture that casts shadows exactly where you need light the most.
- Instant Ambiance Upgrade: Beyond functionality, under-cabinet lighting adds a warm, inviting glow that completely changes the feel of your kitchen. It can make a dated rental feel more modern and welcoming, perfect for cozy evenings or entertaining guests.
- Makes It “Yours” (Temporarily!): This is one of those small, reversible changes that makes a rental feel less like a temporary space and more like your own home, reflecting your style without breaking any lease rules.
- Enhanced Safety: A well-lit workspace reduces the risk of accidents, especially when you’re dealing with sharp knives or hot pans.
- Energy Efficiency: LED lights are incredibly energy-efficient, meaning your small lighting upgrade won’t lead to a big hike in your electricity bill.
Choosing the Right LED Strips for Your Rental Kitchen
This is where the magic begins! Picking the right type of LED strip is crucial for a successful, renter-friendly installation. Based on my experience, here’s what to consider:
Types of LED Strips:
- Plug-in LED Strips: These are generally my top recommendation for rentals. They come with an adhesive backing, coect to a standard wall outlet, and often include a switch or even a remote control for dimming and color temperature adjustments. They offer consistent, bright light.
- Battery-Powered LED Strips: Great for areas without easy access to outlets or for very short sections. However, they can require frequent battery changes depending on usage, which can be a bit of a hassle. I’d suggest these for accent lighting rather than primary task lighting.
- Strip Lights vs. Puck Lights: While both are options, LED strip lights are usually more versatile for under-cabinet applications. They provide continuous, even light, whereas puck lights can create distinct pools of light. Strips are also often easier to cut to size and hide.
Key Features to Look For:
- Self-Adhesive Backing: This is NON-NEGOTIABLE for renters. Look for strips with strong (but removable) 3M adhesive. Always check reviews to see if users mention any residue upon removal.
- Cuttable Strips: Most LED strips are designed to be cut every few inches at designated points, allowing you to customize the length perfectly for your cabinets. This prevents unsightly overhangs.
- Brightness (Lumens) & Color Temperature (Kelvin):
- Brightness: For task lighting, aim for at least 300-500 lumens per foot.
- Color Temperature:
- Warm White (2700K-3000K): Creates a cozy, inviting atmosphere. Great if your kitchen already has warm tones.
- Cool White (4000K-5000K): Brighter, more modern, and excellent for task lighting as it mimics natural daylight. This is often my preference for kitchen workspaces.
- Daylight (5000K-6500K): Very bright, almost blue-white. Can feel a bit sterile for some, but fantastic for high-concentration tasks.
Many kits now offer adjustable color temperature, which is a fantastic feature!
- Ease of Removal: While adhesive is good, you want it to be removable without damaging the cabinet finish. Again, user reviews are your best friend here.
- Power Cord Length: Ensure the power cord is long enough to reach your nearest outlet discreetly.
Gathering Your DIY Toolkit (It’s Simpler Than You Think!)
You won’t need a toolbox full of power tools for this project. Here’s what I used:
- Your Chosen LED Light Strips: The star of the show!
- Measuring Tape: To get those accurate lengths.
- Sharp Scissors: If your strips are cuttable (which they should be!).
- Rubbing Alcohol or Isopropyl Alcohol & Clean Cloth: Absolutely crucial for preparing the surface. Don’t skip this!
- Pencil: For marking your measurements.
- Small Cable Clips or Clear Command Strips: For neatly managing any excess wires. Command hooks can also be great for hiding the power adapter.
- A Step Stool or Small Ladder: To reach those higher cabinets safely.
- Optional: A friend for an extra set of hands, especially if you have long runs of cabinetry.
My Step-by-Step Installation Journey (Rental-Friendly Edition)
This is where the rubber meets the road! Follow these steps for a smooth installation:
Step 1: Plan Your Layout & Measure
First things first, figure out where your lights will go. I usually recommend placing them towards the front edge of the cabinet underside. This prevents shadows from the cabinet lip and distributes light more evenly across the countertop.
- Measure each section of your cabinet where you want the lights.
- Mark the cutting points on your LED strip with a pencil. Remember, only cut at the designated copper pads/lines!
- Also, plan where your power source will coect and where the wire will run to the nearest outlet. You want this to be as discreet as possible.
Step 2: Clean the Surface – Seriously, Don’t Skip This!
This is probably the most important step for ensuring your adhesive sticks properly and stays put. Trust me, I learned this the hard way on my first try when the strips started peeling after a week!
- Wipe down the underside of your cabinets thoroughly with rubbing alcohol and a clean cloth.
- Allow it to dry completely. This removes any grease, dust, or residue that would prevent the adhesive from bonding.
Step 3: Test Before Sticking
Before you commit to sticking anything, plug in your LED strip and test it.
- Temporarily hold the strip in place (or use painter’s tape) to ensure the length is correct, the brightness is what you want, and all segments light up properly.
- This is also a good time to check if your plaed power source location and cable run look good.
Step 4: Start Sticking (Carefully!)
Now for the satisfying part!
- Peel back a small section of the adhesive backing from one end of your LED strip.
- Carefully align the strip with your plaed path on the cabinet underside.
- Press down firmly as you slowly peel off more of the backing, sticking the strip as you go. Work in small sections, pressing firmly to ensure a good bond.
- Take your time to ensure it’s straight and doesn’t have any air bubbles.
Step 5: Manage Those Wires
Unless you’re going for the “electrical spaghetti” look, you’ll want to manage your cables.
- Use small, clear cable clips or clear Command mini hooks to neatly route the power cord along the underside of cabinets, around corners, or down to the outlet.
- Try to hide the adapter behind an appliance (like a coffee maker) or tuck it up under the cabinet if there’s enough space.
- The goal is for the wires to be as invisible as possible.
Step 6: Power Up & Enjoy!
Plug everything in, flip the switch, and bask in the glorious glow of your newly lit kitchen! Take a moment to appreciate the difference. It’s truly transformative for such a simple DIY.
Troubleshooting & Pro-Tips for Renters
Even with the best plaing, sometimes little quirks pop up. Here’s what I’ve encountered and how to deal with it, especially with a rental in mind:
- Adhesive Not Sticking? If parts of your strip aren’t holding, it’s almost always due to improper surface cleaning. Re-clean with alcohol. For extra stubborn spots, or if the original adhesive isn’t strong enough, small pieces of heavy-duty double-sided tape (like Gorilla Glue Mounting Tape, but test a tiny piece first for residue!) or clear Command Strips can be used in short sections to reinforce.
- Uneven Lighting? If one section seems dimmer or a different color, check all your coections. Sometimes a coector isn’t fully seated.
- Hiding the Power Source: Get creative! Behind the toaster, inside an empty decorative vase, or even a small decorative box can conceal the bulkier adapter.
- When It’s Time to Remove Them: This is critical for renters!
- Go Slow: Don’t just rip them off. Slowly and gently peel the strips away, pulling at an angle parallel to the surface rather than perpendicular.
- Gentle Heat: If the adhesive is particularly strong, you can try gently warming it with a hairdryer on a low setting for a few seconds. This can soften the adhesive, making it easier to peel without leaving residue. TEST on an inconspicuous area first!
- Adhesive Remover: If a tiny bit of residue is left, rubbing alcohol or a product like Goo Gone can work wonders. Again, ALWAYS TEST on a hidden spot first to ensure it won’t damage your cabinet finish.
- Future-Proofing: Keep the original packaging and any instructions. This can be helpful if you need to remove them or troubleshoot later.
Conclusion
There you have it! Installing DIY under-cabinet LED lighting in your rental kitchen is one of those simple, high-impact projects that genuinely makes a difference. From improving functionality and safety to totally transforming the ambiance, it’s an upgrade that feels luxurious without being permanent or breaking the bank.
I hope my experience and these tips empower you to take on this project. It’s incredibly satisfying to see your kitchen bathed in a warm, inviting glow, knowing you created that transformation yourself, without any landlord drama. So, go ahead – light up your rental life and make that temporary space truly feel like home!
