Understanding the Toilet Tank Valve System
Before diving into repairs, it’s helpful to understand what a toilet tank valve is and how it functions. Essentially, your toilet tank contains two primary valve systems that control the water flow: the fill valve and the flush valve.
The Fill Valve (Ballcock)
The fill valve is responsible for refilling the toilet tank after each flush. It’s typically located on the left side of the tank (when facing the toilet) and connects to the water supply line. As the tank empties, a float mechanism (either a cup or a traditional ball float) drops, opening the fill valve and allowing fresh water to enter. Once the water level reaches a predetermined point, the float rises, closing the valve and stopping the water flow.
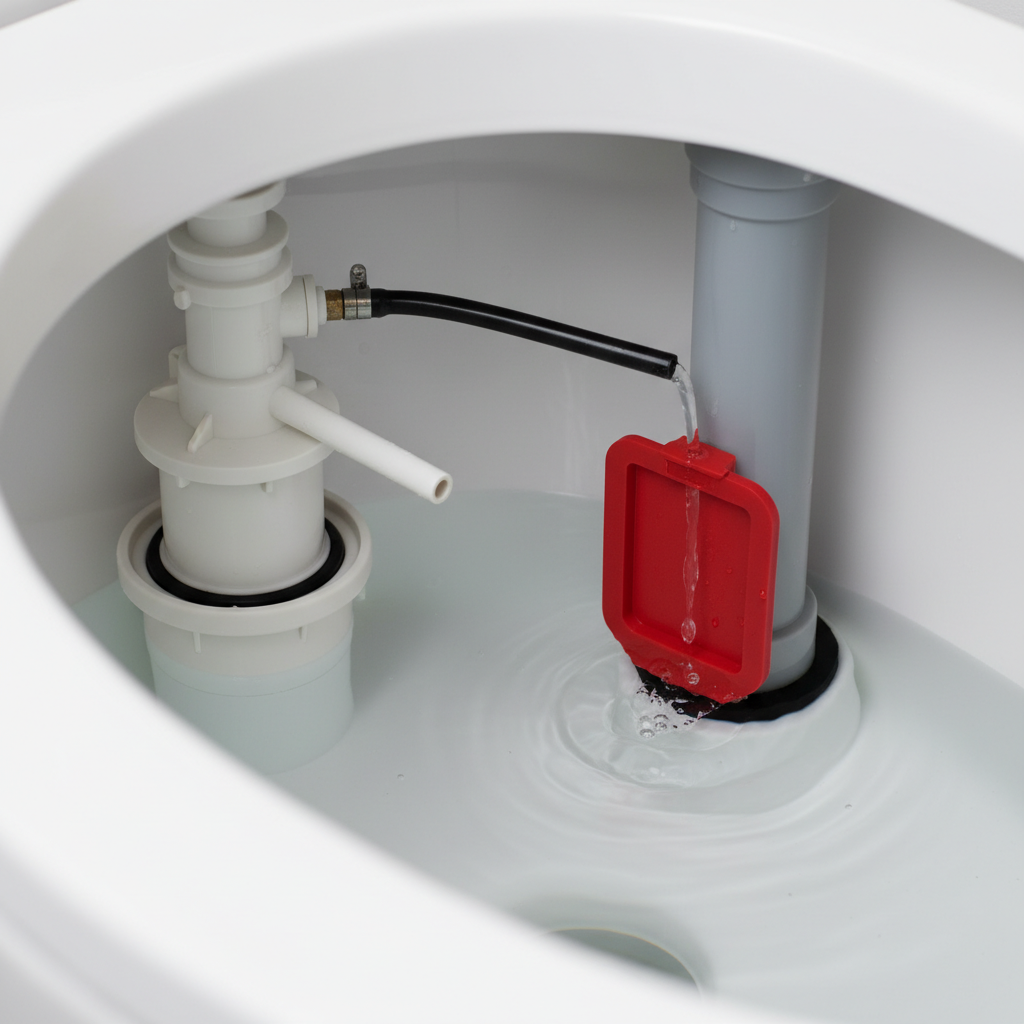
The Flush Valve (Flapper or Canister)
The flush valve, situated at the bottom center of the tank, is what initiates the flush. When you press the flush handle, a chain lifts a rubber flapper or a canister seal, allowing the water in the tank to rapidly flow into the toilet bowl and down the drain. After the tank empties, the flapper or canister falls back into place, sealing the opening and allowing the fill valve to begin refilling the tank.
A leak can originate from either of these crucial components, or from their connections, making proper diagnosis the first step in effective repair.
Signs You Have a Leaking Toilet Tank Valve
Identifying a leak early can save you a significant amount of money and prevent potential damage. Here are the most common indicators of a leaking toilet tank valve:
-
Audible Running Water: The most obvious sign is the sound of water constantly running or refilling in the tank, even when no one has flushed the toilet. This can be intermittent or constant.
-
“Phantom Flushes”: Your toilet seems to flush itself for a few seconds every so often, without any human interaction. This happens when the water level in the tank drops just enough to trigger the fill valve to replenish it.
-
High Water Bills: A sudden, unexplained increase in your monthly water bill is a strong indicator of a continuous leak. Even a small drip can waste hundreds of gallons of water per day.
-
Visible Water Around the Toilet Base: While not always directly from the tank valve, water pooling around the base of the toilet could mean a leak from the tank bolts, supply line, or even a cracked tank. It’s essential to investigate immediately.
-
Water Level in the Tank is Too High: If the water level in the tank reaches the top of the overflow tube of the flush valve, and water is continuously flowing down it, your fill valve is not shutting off correctly.
-
Dye Test Results: A simple dye test can confirm a leak in the flush valve. Add a few drops of food coloring or a toilet dye tablet to the tank water. Wait 15-30 minutes without flushing. If color appears in the toilet bowl, your flush valve (flapper or seal) is leaking.
Common Causes of a Leaking Toilet Tank Valve
Understanding why your toilet tank valve might be leaking helps in pinpointing the problem and selecting the right repair strategy. Here are the frequent culprits:
1. Worn-Out Flapper or Flush Valve Seal
The most common cause of a toilet tank leak is a worn, degraded, or stiff rubber flapper or flush valve seal. Over time, the rubber can lose its elasticity, become brittle, or accumulate mineral deposits, preventing it from creating a perfect seal against the flush valve seat. This allows water to slowly seep from the tank into the bowl.
2. Faulty Fill Valve
The fill valve can malfunction in several ways. The internal components, such as the diaphragm gasket or float assembly, can wear out or become misaligned. If the float doesn’t rise correctly, or if the valve’s sealing mechanism fails, it can cause water to continuously run, either directly into the tank and then down the overflow tube, or into the tank itself without properly shutting off.
3. Misadjusted or Damaged Float
If the float mechanism (whether a cup or a ball-on-rod style) is set too high or is damaged, it can prevent the fill valve from closing completely, causing water to continually flow into the overflow tube.
4. Loose or Corroded Tank-to-Bowl Bolts
The bolts that connect the toilet tank to the bowl have rubber washers that can degrade. If these bolts become loose or if their washers fail, water can leak from the tank at its base and drip onto the floor. This is often distinguishable from valve leaks because the water appears outside the toilet, not just internally.
5. Loose Water Supply Line Connection
The flexible water supply line connects the wall shut-off valve to the bottom of the toilet tank’s fill valve. If this connection is loose or the washer inside it is worn, water can drip from this point.
6. Mineral Buildup
Hard water contains minerals that can accumulate on the working parts of both the fill valve and the flush valve, particularly around the flapper seat. This buildup can interfere with the proper seating and sealing of these components, leading to leaks.
Tools You’ll Need for Repair
Most toilet leak repairs are straightforward and require only a few basic tools:
-
Adjustable wrench or channel-lock pliers
-
Screwdriver (Phillips and flathead may be useful)
-
Sponge and old towels or rags
-
Bucket or small pan
-
Rubber gloves
-
New flapper or fill valve replacement kit (ensure it’s compatible with your toilet model)
-
Utility knife (for trimming flapper chains)
-
Wire brush or sandpaper (for cleaning mineral deposits)
-
Food coloring or dye tablet (for leak testing)
Step-by-Step Guide to Fixing a Leaking Toilet Tank Valve
Once you’ve identified that you have a leaking toilet tank valve, follow these steps to diagnose and repair it.
Step 1: Shut Off the Water Supply
This is the most crucial first step for any toilet repair. Locate the small shut-off valve on the wall near the base of the toilet, usually to the left. Turn it clockwise until the water flow stops completely. Flush the toilet to empty the tank and bowl as much as possible. Use a sponge or towel to soak up any remaining water in the tank.
Step 2: Identify the Source of the Leak
Reconfirm the leak source if you haven’t already:
-
For a Fill Valve Leak: If water is constantly running into the overflow tube, or if you hear a faint hissing sound even after the tank has filled, the fill valve is likely the culprit. Also, check the water level; if it’s above the critical fill line (usually marked on the tank or valve), the fill valve is letting too much water in.
-
For a Flush Valve/Flapper Leak: Perform the dye test. Add a few drops of food coloring to the tank water and wait 15-30 minutes without flushing. If color appears in the bowl, the flapper or its seal is leaking.
-
For Other Leaks: Check the supply line connection for drips. Feel around the tank-to-bowl bolts for any moisture.
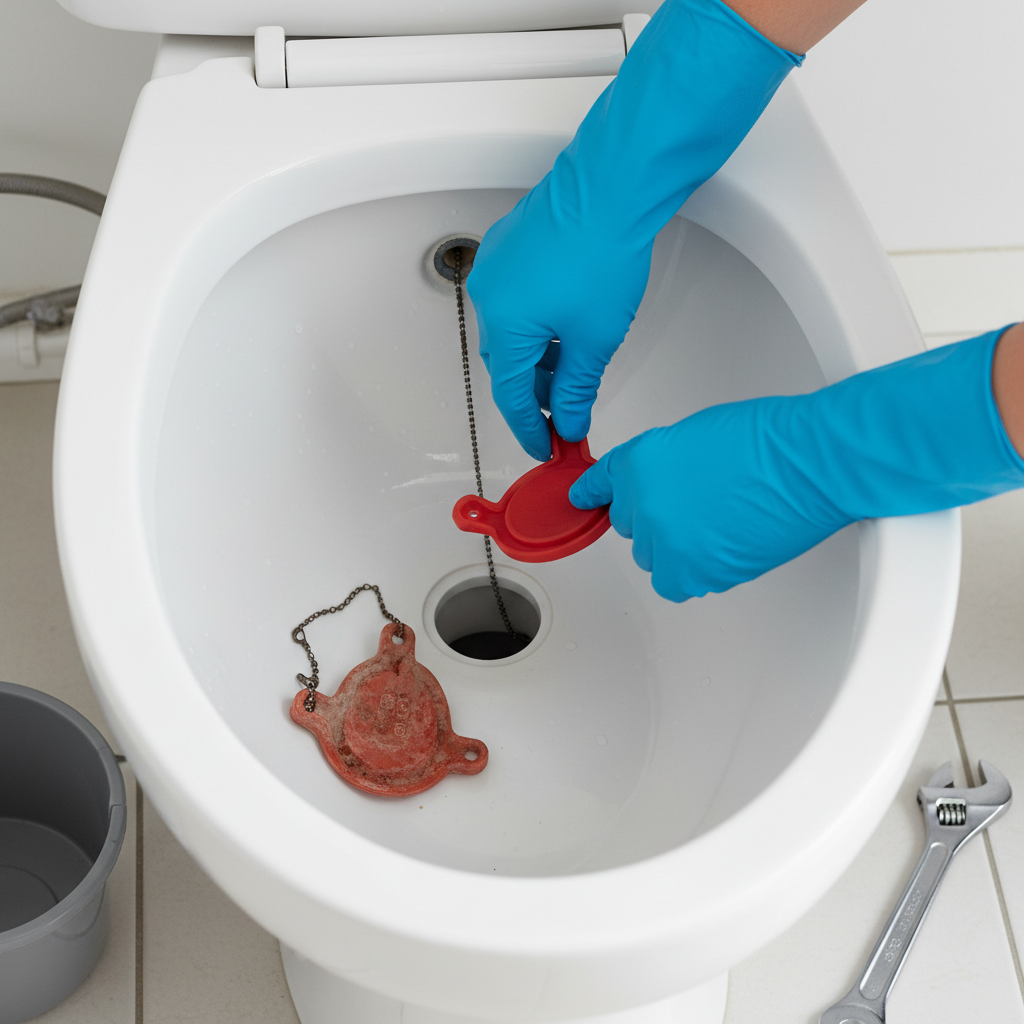
Step 3: Repairing a Leaking Flapper/Flush Valve
If your dye test revealed a flapper leak, follow these steps:
-
Inspect the Flapper and Chain: Check the flapper for any visible signs of wear, cracks, or stiffness. Ensure the chain connecting the flapper to the flush handle is not too long (which can get caught) or too short (which can prevent proper sealing).
-
Clean the Flapper Seat: With the tank empty, carefully remove the old flapper. Using a soft cloth or a non-abrasive scrubber, clean the flush valve seat where the flapper rests. Mineral buildup can prevent a good seal. Avoid harsh chemicals or abrasive tools that could scratch the surface.
-
Replace the Flapper: Purchase a new flapper that is compatible with your toilet model (universal flappers are often available). Attach the new flapper to the two small ears on either side of the flush valve. Connect the chain to the flush handle lever, ensuring there’s a small amount of slack (about 1/2 to 1 inch) when the flapper is closed. Trim any excess chain if necessary.
-
Test the Repair: Turn the water supply back on slowly. Allow the tank to fill completely. Flush the toilet several times and check for any leaks from the flapper using the dye test again.
Step 4: Repairing a Leaking Fill Valve
If the fill valve is the source of the leak, you might be able to adjust it or you may need to replace the entire unit.
-
Adjust the Float: If water is flowing into the overflow tube, the float might be set too high. On most fill valves, there’s an adjustment screw or a clip that allows you to lower the float mechanism. Adjust it so the water level sits about 1 inch below the top of the overflow tube when the tank is full.
-
Replace the Fill Valve (If Adjustment Fails or Valve is Old):
-
Disconnect the water supply line from the bottom of the fill valve using an adjustable wrench. Be prepared for a small amount of water to drain.
-
Unscrew the large locknut on the underside of the tank that holds the fill valve in place.
-
Remove the old fill valve from inside the tank.
-
Insert the new fill valve into the hole at the bottom of the tank. Ensure it is properly oriented.
-
Secure it from the underside with the new locknut, tightening it by hand first, then a quarter turn with a wrench (do not overtighten).
-
Reconnect the water supply line to the new fill valve. Hand-tighten, then a quarter turn with a wrench.
-
Attach the small refill tube from the new fill valve to the overflow tube of the flush valve.
-
Adjust the float height as described above, ensuring the water level is below the overflow tube.
-
-
Test the Repair: Turn the water supply back on slowly. Let the tank fill and ensure the fill valve shuts off completely. Flush several times and check for any running water or leaks.
Step 5: Checking Other Connections (Tank-to-Bowl Bolts and Supply Line)
If the leak persists or if you initially suspected other connection points:
-
Tank-to-Bowl Bolts: Gently try to tighten the nuts on the tank-to-bowl bolts from underneath the tank. Do not overtighten, as this can crack the porcelain. If tightening doesn’t stop the leak, you may need to replace the bolt and washer assembly, which requires removing the tank from the bowl.
-
Water Supply Line: Ensure the nuts connecting the supply line to the shut-off valve and the fill valve are snug. If there’s a drip, you may need to replace the rubber washer inside the coupling nut or replace the entire supply line if it’s old or damaged.
When to Call a Professional Plumber
While many toilet tank valve leaks are DIY-friendly, there are situations where calling a professional plumber is the wisest course of action:
-
Uncertainty or Discomfort: If you’re unsure about the source of the leak or uncomfortable performing the repairs yourself, don’t hesitate to call an expert. Attempting a repair incorrectly can lead to larger, more costly problems.
-
Persistent Leaks: If you’ve tried the common fixes and the toilet continues to leak, there might be a more complex underlying issue that requires professional diagnosis.
-
Cracked Porcelain: If you discover a crack in your toilet tank or bowl, it’s beyond a simple valve repair and will likely require a full toilet replacement. A plumber can advise on the best solution.
-
Rusted or Seized Bolts: If bolts are rusted solid or break during removal, it can complicate the repair significantly, especially for tank-to-bowl bolt replacement.
-
Main Shut-Off Valve Issues: If your toilet’s individual shut-off valve is faulty and you can’t turn off the water without shutting off the main house supply, it’s best to have a plumber address both issues.
Preventative Maintenance Tips to Avoid Future Leaks
Regular maintenance can significantly extend the life of your toilet components and prevent future leaks:
-
Regular Visual Inspections: Periodically check your toilet for any signs of wear and tear, especially on rubber components like the flapper. Look for puddles or listen for phantom running.
-
Clean Regularly: Use non-abrasive cleaners. For mineral buildup, a vinegar solution can be effective. Pour a cup or two of white vinegar into the tank and let it sit for 30 minutes before flushing. You can also clean the flapper seat with vinegar and a soft cloth.
-
Avoid Harsh Chemicals: Drop-in tank cleaners, especially those containing bleach or strong chemicals, can corrode and degrade rubber and plastic components over time, leading to premature failure of your flapper and fill valve. It’s better to clean the bowl and tank manually.
-
Check the Flapper and Chain: Ensure the flapper chain has adequate slack and isn’t tangled. Replace the flapper every 3-5 years as part of general maintenance, even if it’s not actively leaking.
-
Test for Leaks Annually: Perform the dye test annually to catch small, imperceptible leaks before they become big problems and waste water. The Environmental Protection Agency (EPA) estimates that household leaks can waste more than 10,000 gallons of water per year. Regularly checking your toilet for leaks is a simple yet effective way to conserve water and money. For more tips on saving water around your home, you can refer to resources like Good Housekeeping’s guide to saving water.
-
Monitor Water Pressure: Extremely high water pressure can put undue stress on plumbing components, including toilet valves. If you suspect high water pressure, a plumber can install a pressure reducing valve.
Environmental and Financial Impact of Leaking Toilets
A leaking toilet tank valve is not just an annoyance; it has significant environmental and financial consequences. A toilet that constantly runs can waste hundreds of gallons of water per day – sometimes up to 200 gallons or more for severe leaks. Over a month, this can translate to thousands of gallons, leading to substantially higher water bills. Beyond the cost, this represents a considerable waste of a precious natural resource. Timely repair of a leaking toilet is a responsible action that benefits both your wallet and the environment, underscoring the importance of addressing these issues promptly.
Frequently Asked Questions About Leaking Toilet Tank Valves
Q1: How long do toilet fill valves and flappers typically last?
A1: The lifespan can vary, but generally, flappers tend to last 3-5 years, while fill valves might last 5-10 years. Factors like water quality (hard water with high mineral content), frequency of use, and chemical cleaners can shorten their lifespan.
Q2: Can a running toilet fix itself?
A2: No, a running toilet will not fix itself. The problem is usually due to a worn-out component (like a flapper or fill valve) or a misalignment, which requires manual intervention to correct. Ignoring it will only lead to continued water waste and higher bills.
Q3: What causes a toilet to run intermittently?
A3: Intermittent running, often called “phantom flushing,” is almost always caused by a slow leak from the flush valve (flapper) or its seal. Water slowly seeps from the tank into the bowl, and once the tank’s water level drops enough, the fill valve activates briefly to refill it.
Q4: Is it hard to replace a toilet fill valve?
A4: Replacing a toilet fill valve is a relatively straightforward DIY task for most homeowners. It requires basic tools and an hour or less of time. The key is to shut off the water supply, drain the tank, and follow the instructions provided with the new fill valve kit carefully.
Q5: How do I know if my fill valve is letting too much water into the overflow pipe?
A5: Observe the water level when the tank is full. If the water level is at or above the top of the overflow pipe (the tall, open pipe in the center of the tank) and continuously flows down it, then your fill valve is not shutting off properly and is letting too much water in, indicating a leak or a misadjusted float.
Conclusion
A leaking toilet tank valve is a common plumbing issue that can be easily overlooked but has significant implications for your home and utility bills. By understanding the components of your toilet, recognizing the signs of a leak, and knowing the steps for diagnosis and repair, you can effectively address these problems. Whether it’s a simple flapper replacement or a new fill valve installation, tackling a leaking toilet tank valve is a manageable DIY project for most. However, never hesitate to call a professional plumber if you encounter challenges or suspect a more complex issue. Prompt action ensures water conservation, protects your home from damage, and keeps your water bills in check.


