How to Identify and Fix Noisy Dripping in Your Wall: A Complete Homeowner’s Guide
If you’ve recently been disturbed by the annoying sound of noisy dripping in your wall, you’re not alone. This common household nuisance not only disrupts peace but can also signal underlying issues that, if left untreated, could lead to costly repairs. Understanding the causes, detecting the source, and effectively fixing noisy dripping in the wall are essential steps for any homeowner committed to maintaining a safe and comfortable living environment.
Why Is There Noisy Dripping Sound in My Wall?
Hearing dripping noises coming from within your walls often indicates the presence of water leaks or plumbing issues hidden from plain sight. Common causes include:
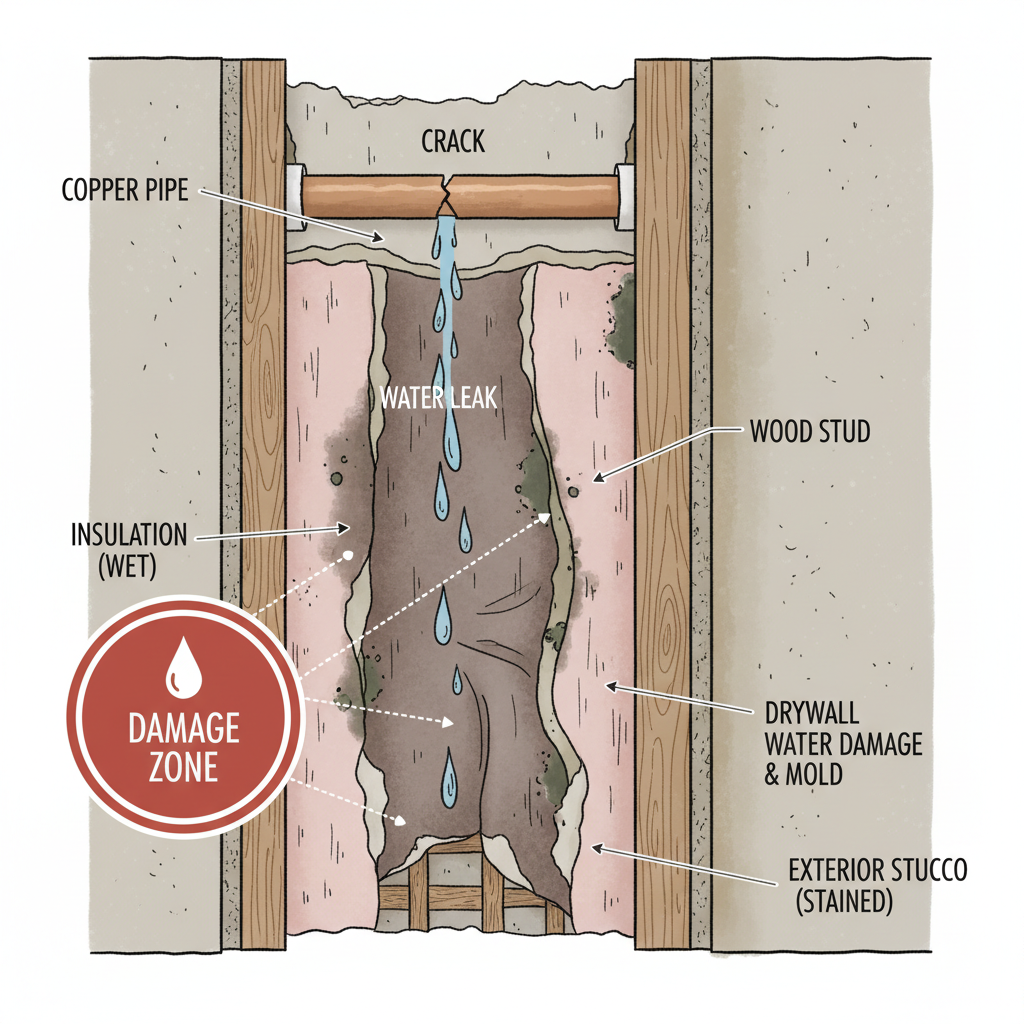
- Leaking Pipes: Pipes running inside walls can develop leaks due to corrosion, loose fittings, or cracks, causing water to drip and create a distinctive sound.
- Condensation: In humid environments, condensation can collect on cold water pipes, producing water droplets that drip and cause noise inside the wall cavity.
- Appliance Malfunctions: Faulty water heaters, dishwashers, or washing machines connected through wall plumbing may leak intermittently, leading to dripping sounds.
- Roof or Exterior Wall Leaks: Water intrusion from rain may seep through exterior walls, ceiling joints, or roof structures, generating similar dripping noises inside walls.
How to Detect the Source of Dripping Inside Walls
Tracking down the origin of water dripping inside walls can be challenging, but following a systematic approach simplifies the process:
- Listen Carefully: Try to localize the sound by standing quietly near different walls or rooms at various times of day to see if the dripping sound changes or intensifies.
- Inspect Wall Surfaces: Look out for visible signs like damp spots, mold growth, bubbling paint, or warped drywall which often indicate water presence behind the wall.
- Check Plumbing Fixtures: Examine sinks, toilets, and appliances for leaks. Don’t forget to inspect less obvious spots such as under cabinets or behind toilets.
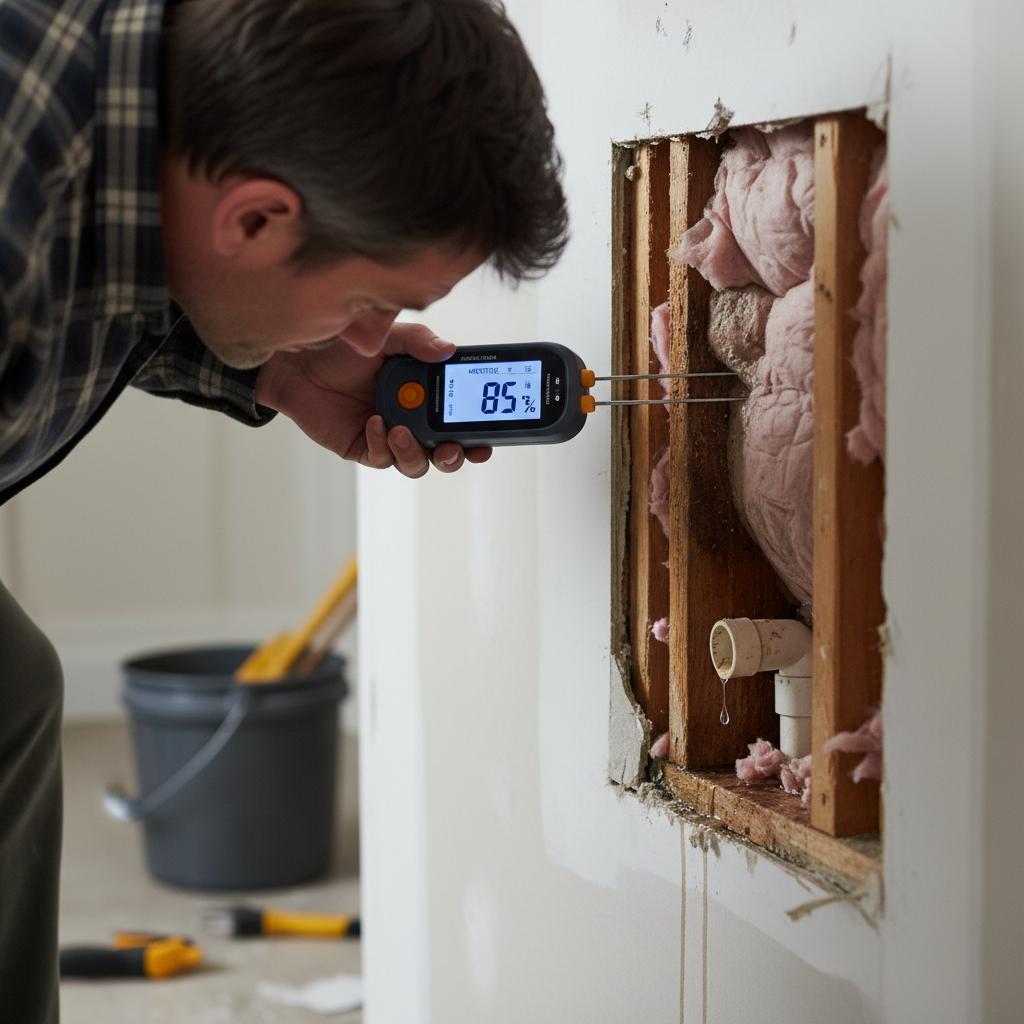
- Use Moisture Meters or Infrared Cameras: These tools reveal hidden moisture levels and temperature anomalies, helping to locate water leaks without invasive wall damage.
- Shut Off Water Supply: In some cases, turning off the main water supply can help determine if the dripping sound stops, confirming a plumbing leak.
Common Risks of Ignoring Noisy Dripping in Walls
While it might seem like a minor inconvenience at first, ignoring water dripping inside your walls can lead to serious consequences:
- Structural Damage: Persistent leaks can weaken framing, drywall, and flooring, compromising your home’s structural integrity.
- Mold and Mildew Growth: Moist environments foster mold, which can cause health problems including allergies, asthma, and respiratory issues.
- Electrical Hazards: Water near electrical wiring increases the risk of short circuits or even electrical fires.
- Increased Repair Costs: The longer a leak goes undetected, the more extensive and expensive repairs become.
Step-by-Step Guide to Fix Noisy Dripping in Wall
Once you have identified the source of the drip, immediate action is crucial. Below is a comprehensive approach to fix the issue:
1. Turn Off the Water Supply
Before starting any repairs, shut off the main water valve to prevent additional water damage. If the leak is localized, you can shut off the water supply to just the affected area.
2. Access the Leak
Remove the drywall or paneling carefully around the area where the dripping sound is loudest. Use a stud finder to avoid cutting into electrical wiring or plumbing.
3. Assess and Repair the Leak
- Pipe Repair: For minor leaks, consider using pipe repair clamps, epoxy putty, or replacing faulty pipe sections. In case of extensive damage, call a licensed plumber.
- Seal Exterior Leaks: If rainwater is infiltrating, seal gaps around windows, roof joints, and siding with waterproof caulk or flashing.
- Mitigate Condensation: Insulate cold pipes with foam sleeves to prevent condensation dripping inside walls.
4. Dry the Area Thoroughly
Use fans, dehumidifiers, or professional drying equipment to eliminate moisture inside the wall cavity. This step is critical to prevent mold growth.
5. Repair Wall Surfaces
Replace any damaged drywall and repaint or apply new wallpaper. Consider using mold-resistant drywall in areas prone to moisture issues.
Preventing Noisy Dripping and Water Leaks in Walls
Prevention is always better than dealing with the aftermath of water damage. Here are practical tips to keep your walls dry and quiet:
- Schedule annual plumbing inspections to catch early signs of leaks.
- Maintain gutters and downspouts to direct rainwater away from your home.
- Insulate pipes in colder areas to avoid condensation and freezing.
- Use moisture-resistant materials in bathrooms, kitchens, and basements.
- Monitor humidity levels using dehumidifiers or vents to reduce moisture buildup.
When to Call a Professional
If you’ve tried locating and fixing the dripping sound without success or if the leak appears extensive, it’s best to contact a professional. Licensed plumbers and water damage restoration experts have the tools and expertise to manage complex leaks safely and efficiently.
Frequently Asked Questions
Q: Can noisy dripping inside walls cause health problems?
A: Yes, the moisture from leaks can lead to mold growth, which is linked to respiratory issues, allergies, and other health concerns.
Q: Will turning off the water stop the dripping sound immediately?
A: Most of the time, yes. Turning off water prevents further leaks, which usually stops the dripping. If the sound continues, the cause might be condensation or exterior water intrusion.
Q: How long does it take to repair a dripping wall leak?
A: Repair time varies depending on complexity. Simple pipe repairs may take a few hours, while larger leaks or water damage restoration can take several days.
Q: Are there any temporary fixes for dripping inside walls?
A: Temporary fixes such as pipe tape or sealant can reduce leaks until professional repairs are completed, but they are not a permanent solution.
Additional Resources
For more detailed guidance on spotting and repairing home leaks, visit the Good Housekeeping’s Leak Repair Guide.


