Understanding Why Your Door Hinges Are Pulling from the Frame
Before diving into the fix, it’s crucial to understand why your door hinges might be failing. Identifying the root cause will help you choose the most effective repair strategy and prevent future occurrences of sagging doors or loose hinge problems.
Common Causes of Hinge Sagging and Looseness
- Loose or Stripped Screws: Over time, the constant swinging motion and weight of the door can cause hinge screws to loosen. If the screws are overtightened or removed multiple times, the wood fibers in the door frame can become damaged, leading to stripped screw holes where the screws can no longer grip effectively. This is arguably the most frequent culprit behind door hinges pulling from the frame.
- Damaged or Deteriorated Wood: The wood in the door frame or the door itself can weaken due to moisture, rot, pest infestation, or simply age and wear. When the wood around the hinge plate deteriorates, it loses its ability to hold the screws firmly, causing the hinges to pull away.
- Heavy Doors: Solid core or extra-large doors naturally exert more stress on their hinges and frame. Standard hinges might not be robust enough to support such weight over an extended period, leading to premature wear and pulling.
- Improper Installation: If the hinges were not installed correctly from the start – perhaps with screws that were too short, misaligned hinge plates, or inadequate reinforcement – they are more prone to failing prematurely.
- Frequent Use and Wear: Doors in high-traffic areas, like an entryway or a bathroom, experience more opening and closing cycles. This constant movement contributes to the gradual loosening of screws and wear on the hinge components and surrounding wood.
- Environmental Factors: Fluctuations in temperature and humidity can cause wood to expand and contract. This movement can stress the hinge screws and the wood fibers, exacerbating existing problems or creating new ones.
The Essential Tools and Materials You’ll Need
Tackling door hinge repair is a DIY-friendly project for most homeowners. Having the right tools and materials on hand will make the job much smoother and ensure a lasting fix. Gather these items before you begin:
- Screwdriver: A Phillips head screwdriver is most common, but check your hinge screws for a flat head or Torx drive. An impact driver can be useful for stubborn screws, but be cautious not to overtighten.
- Drill and Drill Bits: Essential for drilling pilot holes, especially when using longer screws or repairing stripped holes.
- Wood Glue: A strong woodworking adhesive is vital for repairing stripped screw holes with wood fillers.
- Wood Shims, Toothpicks, or Wooden Dowels: These are critical for filling stripped screw holes to give new screws a solid anchor.
- Longer and/or Thicker Screws: Often, simply replacing the existing screws with longer ones (typically 2.5 to 3 inches) can reach the framing studs behind the jamb, providing a much stronger hold.
- Utility Knife: Useful for trimming shims or dowels flush with the door frame.
- Wood Filler or Epoxy Putty: For more significant damage to the wood around the hinge, a strong wood filler can create a new, durable surface for screws.
- Hammer: To gently tap dowels or shims into place.
- Chisel: If you need to make minor adjustments to the hinge mortise (the recessed area where the hinge plate sits).
- Pencil: For marking pilot holes.
- Clamps: If you need to secure the door or a damaged section of the frame during repair.
- Safety Glasses: Always recommended when working with power tools or cutting.
Step-by-Step Guide: How to Fix Door Hinges Pulling from the Frame
Once you’ve identified the problem and gathered your tools, follow these steps to restore your door to proper working order.
Step 1: Assess the Damage
Begin by closely examining the hinges and the surrounding wood on both the door and the frame. Open and close the door a few times to observe how it moves. Does it sag? Does it rub against the frame? Identify which hinge (top, middle, or bottom) is the primary culprit. Look for:
- Visible gaps between the hinge plate and the door or frame.
- Screws that are protruding or spinning freely.
- Cracked or splintered wood around the screw holes.
- Rust or corrosion on the hinges themselves (which might indicate moisture damage).
For doors that are very heavy or severely damaged, it might be beneficial to carefully remove the door from its frame for easier access. Use caution and get help if the door is too heavy to handle safely on your own.
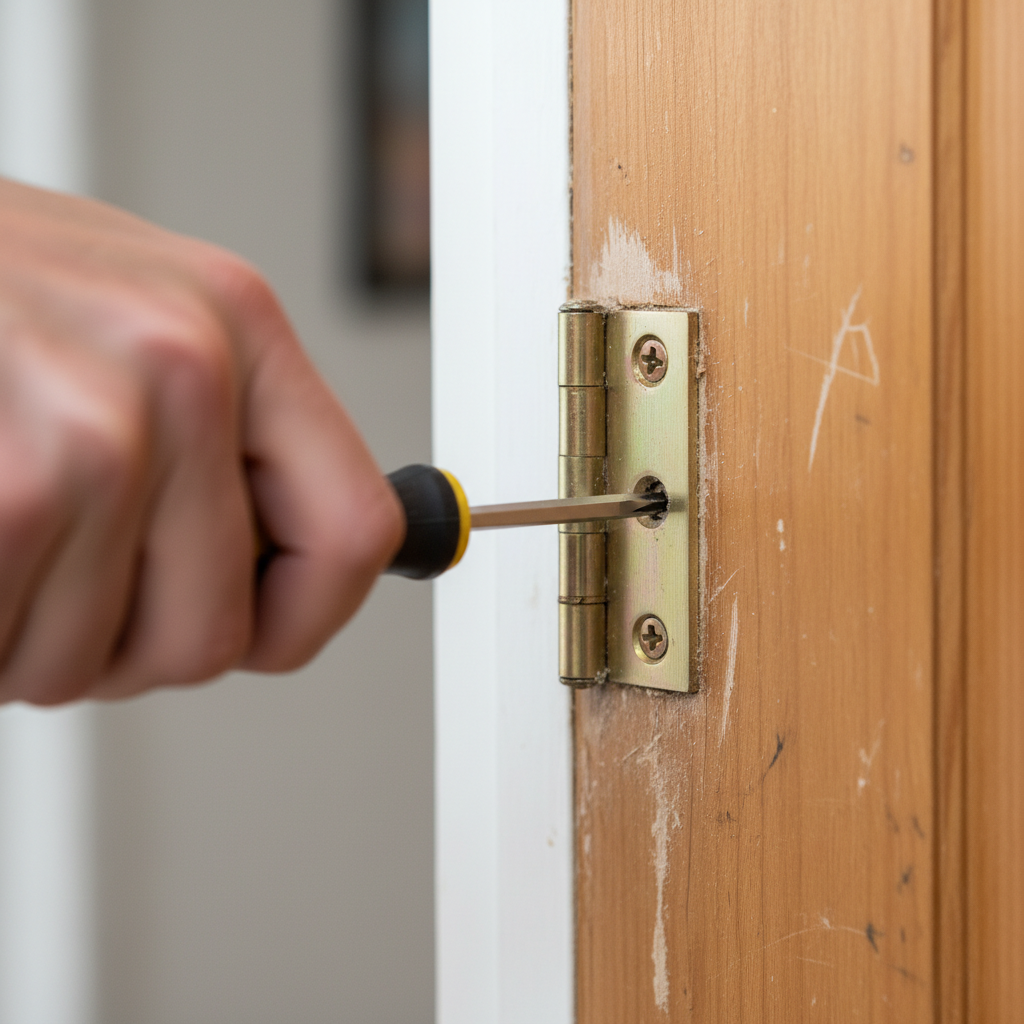
Step 2: Tighten Loose Screws (Initial Fix)
If the screws are merely loose, this is the easiest fix. Use the appropriate screwdriver to tighten all the hinge screws firmly. Be careful not to overtighten, as this can strip the screw holes further. If tightening the screws resolves the issue and the door operates smoothly, you’re all set. However, if the screws keep spinning without biting, or if the problem quickly returns, you’re dealing with stripped screw holes.
Step 3: Repair Stripped Screw Holes
Stripped screw holes are the most common reason door hinges pull from the frame. This happens when the wood fibers around the screw hole are worn away, preventing the screw from gripping. Here’s how to fix it:
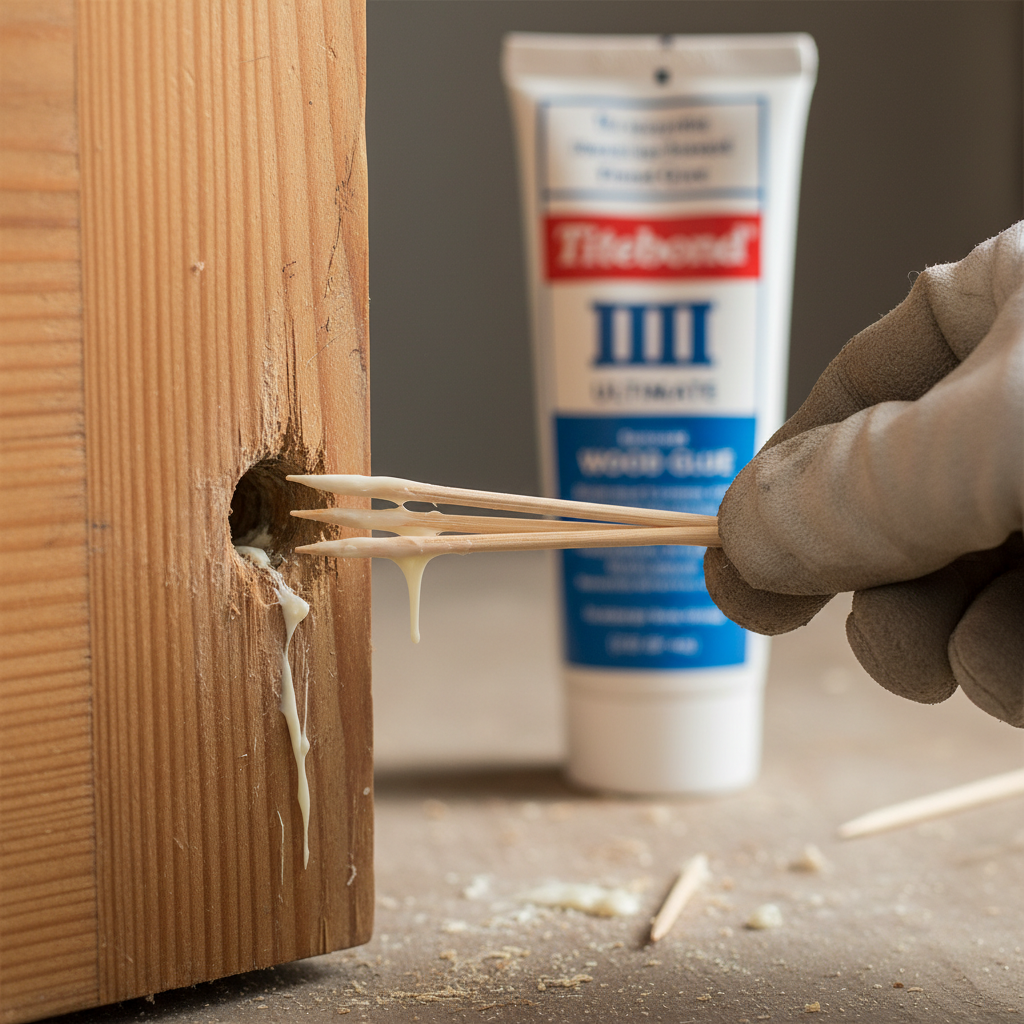
Method A: Toothpicks or Wooden Dowels and Wood Glue
This is a quick and effective method for minor stripping.
- Carefully remove one screw at a time from the problematic hinge.
- Apply a small amount of wood glue to a few toothpicks or a small wooden dowel (the same diameter as the screw hole).
- Insert the glued toothpicks or dowel pieces into the stripped hole until it’s packed tightly. Break them off flush with the surface using a utility knife or by bending them.
- Allow the glue to dry completely according to the manufacturer’s instructions (usually a few hours).
- Once dry, pre-drill a small pilot hole through the new wood filler. The pilot hole should be slightly smaller than the diameter of your screw.
- Reinsert the original hinge screw and tighten it firmly.
- Repeat this process for all other stripped screws, working one screw at a time to keep the hinge aligned.
Method B: Wood Filler or Epoxy Putty
For more extensively damaged or larger stripped holes, wood filler or epoxy putty provides a stronger, more permanent solution.
- Remove all screws from the affected hinge plate. It might be necessary to temporarily support the door or remove it entirely.
- Clean out any loose wood debris from the stripped holes.
- Apply wood filler or epoxy putty into the holes, ensuring they are completely filled and slightly mounded above the surface.
- Allow the filler to cure completely. This can take several hours or overnight, depending on the product.
- Once dry, sand the filled areas flush with the door frame or door surface.
- Mark new pilot holes precisely where the original screws were. Use a drill bit that is slightly smaller than the screw shank.
- Reattach the hinge plate with the original screws, tightening them carefully into the newly created, solid base.
Step 4: Addressing Damaged Wood in the Frame
If the wood itself around the hinge mortise (the recessed area for the hinge) is cracked, split, or deteriorated, you’ll need a more robust solution.
Option A: Using Longer Screws to Reach Studs
This is a highly recommended long-term fix, especially for top hinges that bear the most weight. Often, the screws provided with hinges are only about 3/4 to 1 inch long, barely penetrating the jamb. By replacing at least one screw per hinge (typically the middle or top one) with a 2.5-inch or 3-inch screw, you can anchor the hinge directly into the structural stud behind the door frame.
- Identify the screw hole that offers the best path to the framing stud (usually the top or middle screw on each hinge).
- Remove the original short screw.
- Using a drill bit slightly smaller than your new, longer screw, drill a pilot hole deep enough to reach the stud (usually 2.5 to 3 inches).
- Insert the new, longer screw and tighten it firmly. Be careful not to overtighten and strip the wood.
- Repeat for the other hinges if necessary.
This method significantly reinforces the hinge, preventing future sagging and pulling. For more insights on general door maintenance, you might find valuable tips from resources like Better Homes & Gardens.
Option B: Repairing the Mortise with Wood Shims or Patching
If the hinge mortise itself is damaged, preventing the hinge plate from sitting flush, you may need to rebuild that section.
- Carefully remove the hinge.
- If the wood is deeply splintered or rotted, you may need to cut out the damaged section of the door jamb using a chisel. Ensure the cut is clean and square.
- Cut a piece of wood (a shim or a small block) that precisely fits the void you created. Use wood glue to secure it in place.
- Once the glue is dry, use a plane or sandpaper to bring the patch flush with the surrounding jamb.
- Re-cut the mortise into the new wood using a chisel and hammer, making sure it’s the correct depth for the hinge plate.
- Drill new pilot holes into the repaired section and reattach the hinge.
Step 5: Re-hanging the Door and Testing
Once all repairs are made, carefully re-hang the door if you removed it. Tighten all hinge screws. Test the door by opening and closing it several times. It should swing freely, close securely without rubbing, and latch properly. Check for any remaining sag or looseness. Make minor adjustments to screws if needed.
Step 6: Dealing with Deeper Structural Issues (When to Call a Pro)
While most hinge pulling issues are DIY-friendly, some problems indicate deeper structural damage. If you encounter any of the following, it might be time to call a professional carpenter or handyman:
- Extensive rot or insect damage to the entire door jamb or framing.
- The door frame itself is severely warped or out of square.
- Multiple hinges are failing, and the door is extremely heavy or an exterior door.
- You’ve tried the above fixes, and the problem persists or worsens.
A professional can assess the underlying issues, which might include foundation problems, significant water damage, or structural deficiencies that are beyond typical door hinge repair.
Preventing Future Door Hinge Problems
Once you’ve fixed your door, taking a few proactive steps can help prevent door hinges pulling from the frame again in the future.
- Regular Maintenance Checks: Periodically (perhaps once or twice a year), check all your door hinges for any signs of loosening screws. A quick tighten can prevent a bigger problem down the line.
- Use Appropriate Hardware: When installing new doors, especially heavy ones, ensure you use heavy-duty hinges designed for the door’s weight. Also, always use screws that are long enough to penetrate the door jamb and ideally reach the framing studs.
- Reinforce New Installations: For new door installations, consider using at least two 3-inch screws per hinge from the outset to secure them firmly into the wall studs.
- Address Moisture Immediately: Water damage is a significant cause of wood deterioration. Fix any leaks around windows or doors promptly to prevent rot in the door frame.
- Avoid Hanging Heavy Items: Refrain from hanging heavy coats, bags, or other items on door handles, as this puts unnecessary stress on the hinges and frame.
- Proper Painting Techniques: When painting doors or frames, avoid painting over the hinge pins or plates, which can cause hinges to seize up or create friction that wears them down faster.
FAQs About Door Hinge Repair
How often should I check my door hinges?
It’s a good practice to check your door hinges for looseness or wear annually, especially for high-traffic doors or heavier doors. A quick visual inspection and a gentle wiggle can reveal potential issues before they become major problems.
Can I use wood glue alone to fix stripped holes?
No, wood glue alone is not sufficient. Wood glue needs wood fibers to bond to, and a stripped hole has lost those fibers. The glue acts as a binder to secure toothpicks, dowels, or wood filler into the hole, creating new wood for the screw to bite into. Without a filler material, the glue will not provide a secure anchor for the screw.
What size screws should I use for hinge repair?
For repairing stripped holes, it’s best to reuse the original screws if they are in good condition after you’ve filled the holes. For reinforcing hinges, especially on the frame side, replacing one or two screws per hinge with 2.5-inch to 3-inch screws is recommended. These longer screws can reach the wall studs behind the door jamb, providing a much more secure anchor.
Is it normal for new doors to have hinge issues?
While less common, new doors can develop hinge issues if they were installed improperly, if the hinges were undersized for the door’s weight, or if the initial screws were too short. It’s always a good idea to inspect new installations for proper hinge seating and secure screws.
When should I replace the entire door frame?
You should consider replacing the entire door frame if there is extensive and irreversible damage, such as severe wood rot that compromises the structural integrity, significant pest infestation that has eaten away at the wood, or if the frame is severely warped and cannot be straightened. For minor repairs like stripped hinge holes, replacing the entire frame is usually unnecessary.
Conclusion
Dealing with door hinges pulling from the frame can be an annoyance, but it’s a very solvable problem for most homeowners. By understanding the common causes and following these detailed steps, you can effectively repair loose door hinges, reinforce your door’s stability, and enjoy smoothly operating doors for years to come. Remember, early detection and a little preventative maintenance go a long way in keeping your home’s doors in top condition.


