Understanding Your Sink Stopper: Types and Mechanisms
Before diving into troubleshooting, it’s helpful to understand the different types of sink stoppers and how they typically operate. Knowing your stopper type will guide you toward the most effective solution.
1. Pop-Up Stopper (Lift Rod & Pivot Rod Assembly)
This is arguably the most common type found in bathroom sinks. It’s characterized by a small knob or lever (the lift rod) usually located behind the faucet. When you pull this rod up, the stopper descends to seal the drain. Pushing it down lifts the stopper. The magic happens beneath the sink, where the lift rod connects to a clevis strap, which in turn connects to a pivot rod. This pivot rod goes through the drainpipe and pushes against the bottom of the stopper to move it up or down.
2. Push-Pull Stopper (or Lift-and-Turn)
These stoppers have a small knob or handle on top of the stopper itself. To close the drain, you push down on the knob. To open it, you pull up and often give it a quarter turn. This mechanism usually involves a shaft that moves vertically to engage or disengage a seal. Some versions require twisting to lock in the open or closed position.
3. Toe-Touch Stopper (or Flip-It/Foot Actuated)
Similar to push-pull stoppers, these are operated by pressing down on the top of the stopper with your toe (or finger). A spring-loaded mechanism inside engages and disengages, allowing the stopper to click into the open or closed position with each push.
4. Drop-In or Rubber Stopper
These are the simplest types, often found in kitchen sinks or tubs, but can also be temporary solutions for bathroom sinks. They are simply placed into the drain opening to create a seal and removed manually to drain water. While less likely to be “stuck” in the mechanical sense, they can become wedged or difficult to remove if there’s a vacuum or significant debris.
Why Your Sink Stopper Gets Stuck: Common Culprits
A sink stopper stuck in closed position is rarely a sudden mystery. Most often, the cause can be traced back to one of these common issues:
-
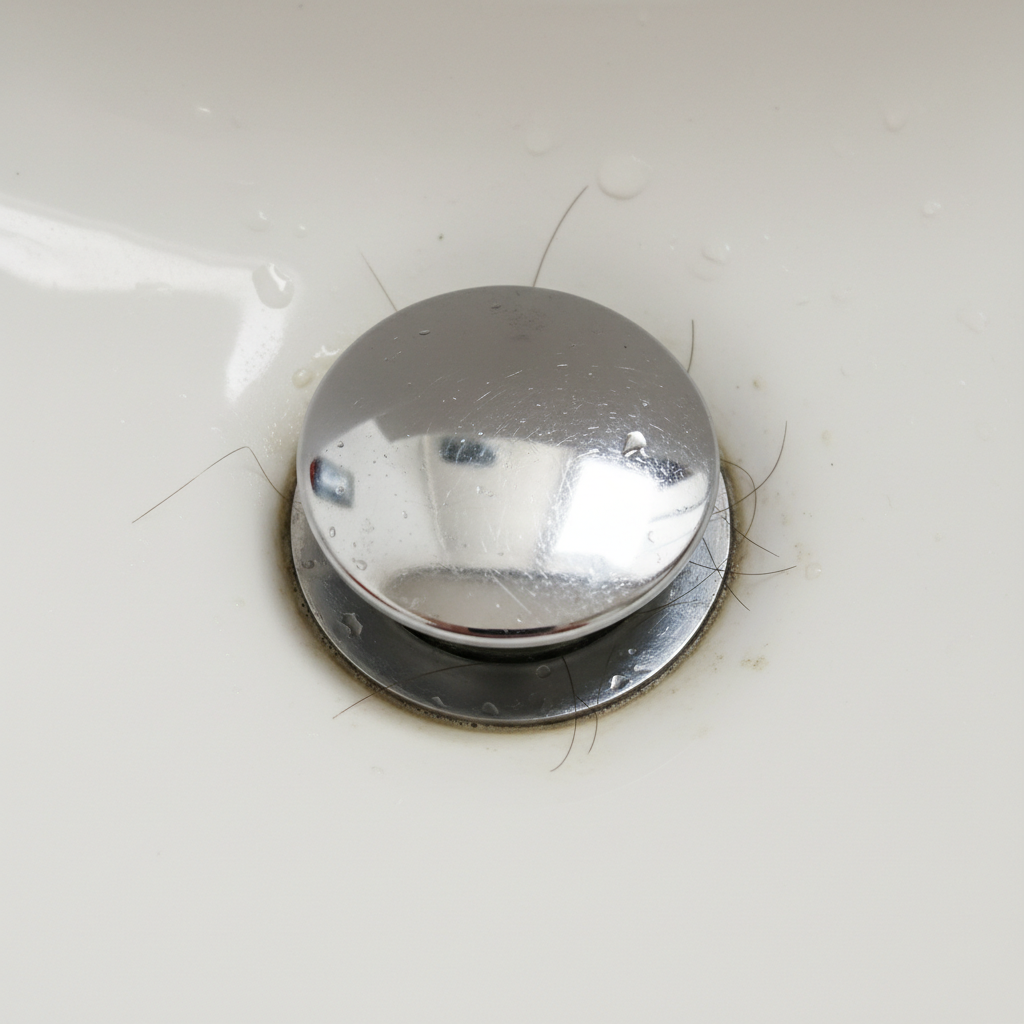
Debris and Hair Buildup: This is by far the most frequent offender. Over time, hair, soap scum, toothpaste, and other gunk accumulate around the stopper itself, its shaft, or the pivot rod assembly. This buildup can create friction, preventing the stopper from moving freely, or even physically jam it in place.
-
Corrosion or Mineral Deposits: Hard water and moisture can lead to rust or mineral deposits forming on metal components of the stopper mechanism, especially the pivot rod and its housing. These deposits can seize up the moving parts, making it impossible to operate the stopper.
-
Misaligned or Damaged Linkage (Pop-Up Stoppers): The pivot rod, clevis strap, or lift rod beneath the sink can become loose, bent, or disconnected. If these components aren’t properly aligned, the stopper won’t respond to the lift rod’s commands.
-
Worn or Damaged Stopper Components: The stopper itself, its sealing gasket, or internal springs (for toe-touch types) can wear out or break. A warped stopper might get wedged, or a broken internal spring could leave it permanently depressed.
-
Improper Installation or Adjustment: If the stopper was recently installed or adjusted incorrectly, it might not have enough clearance to move freely, or the linkage might be too tight or too loose.
-
Soap Scum and Grease: In kitchen sinks, food particles, grease, and heavy soap scum can congeal around a stopper, effectively gluing it in place.
Safety First: Before You Start Troubleshooting
Working with plumbing, even minor fixes, requires a few precautions to ensure your safety and prevent further damage:
-
Wear Protective Gear: Gloves are essential to protect your hands from grime, sharp edges, and cleaning chemicals. Eye protection is also recommended, especially if you’re dealing with pressurized water or corrosive substances.
-
Clear the Area: Make sure the area under the sink is clear of any items that could be damaged by water or that might impede your access.
-
Turn Off Water (If Necessary): For most stopper fixes, turning off the water to the sink isn’t strictly necessary. However, if you plan on disconnecting drainpipes or dealing with significant leaks, locate the shut-off valves under the sink (usually two, one for hot and one for cold) and turn them clockwise until tight. You might also consider shutting off the main water supply to your house for more extensive work.
-
Use Proper Tools: Have the right tools on hand (pliers, screwdrivers, a flashlight, a bucket, and towels) to avoid stripping screws or damaging components.
-
Be Gentle: Never force components. If something feels stuck, there’s usually a reason. Applying excessive force can break plastic parts or strip threads.
Step-by-Step Troubleshooting Guide: Getting Your Stopper Moving Again
The method for unsticking your stopper depends largely on its type. Here’s how to approach the most common scenarios:
Method 1: For Pop-Up Stoppers (Lift Rod & Pivot Rod Assembly)
This is the most common and often most involved fix. You’ll likely need to work both above and below the sink.
Step 1: Attempt to Free the Stopper from Above
-
Wiggle and Twist: With the lift rod pushed down as if to open the stopper, try gently wiggling and twisting the stopper itself in the drain opening. Sometimes, this can dislodge minor debris or break a seal.
-
Pull Up Firmly: Grip the stopper firmly and try to pull it straight up. Some pop-up stoppers are designed to be removable from above. If it comes out, great! You can then clean it thoroughly and proceed to inspect the drain. If it’s still stuck, you’ll need to work from below.
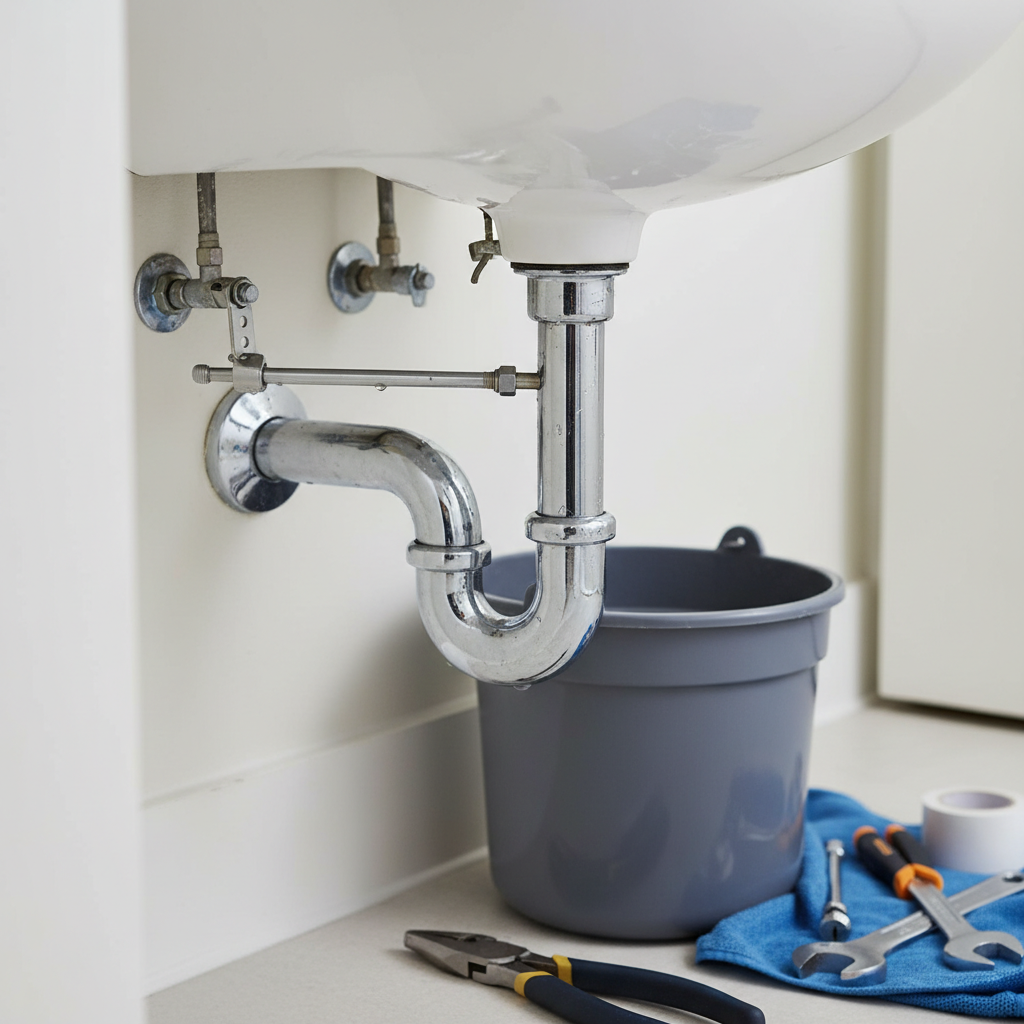
Step 2: Access the Linkage Below the Sink
-
Clear the Cabinet: Remove everything from under the sink for clear access.
-
Locate the Pivot Rod: Look at the drainpipe (P-trap) directly below the sink. You’ll see a horizontal rod (the pivot rod) entering the side of the pipe, secured by a large nut and often a spring clip and clevis strap.
Step 3: Disconnect the Pivot Rod and Remove the Stopper
-
Place a Bucket: Position a bucket directly under the pivot rod assembly, as some water and debris might leak out.
-
Remove the Spring Clip: Find the small spring clip that holds the clevis strap to the pivot rod. Squeeze the ends of the clip and slide it off the pivot rod. This will disconnect the lift rod assembly.
-
Loosen the Pivot Rod Nut: Unscrew the large nut (often plastic, sometimes metal) that secures the pivot rod to the drainpipe. You might need pliers, but often it can be done by hand.
-
Withdraw the Pivot Rod: Gently pull the pivot rod straight out from the drainpipe. Be prepared for a small amount of water to come out.
-
Remove the Stopper: Once the pivot rod is removed, the stopper in the basin above should now be free to lift straight out. If it’s still wedged, use a screwdriver to gently pry it up, being careful not to scratch the sink finish.
Step 4: Clean and Inspect Components
-
Clean the Stopper: Thoroughly clean the stopper itself. Remove all hair, soap scum, and grime. Pay close attention to the pivot rod hole on the stopper and any sealing gaskets.
-
Clean the Pivot Rod: Scrape off any gunk, rust, or mineral deposits from the pivot rod, especially the ball joint that sits inside the drainpipe. Use a stiff brush or old toothbrush.
-
Clean the Drain Opening: With the stopper out, use a flashlight to inspect the drain opening. Remove any visible hair or debris that might have been catching the stopper or pivot rod. A zip-it tool or needle-nose pliers can be useful here.
-
Inspect the Lift Rod Assembly: Check the clevis strap and lift rod for any bends or damage.
Step 5: Reassemble and Adjust
-
Insert the Stopper: Place the clean stopper back into the drain opening, ensuring the pivot rod hole on the stopper faces the same direction as the pivot rod entry point in the drainpipe below.
-
Reinsert the Pivot Rod: Slide the clean pivot rod back into the drainpipe, ensuring it goes through the hole in the stopper. You might need to gently manipulate the stopper from above to align the holes.
-
Tighten the Pivot Rod Nut: Hand-tighten the pivot rod nut back onto the drainpipe. Do not overtighten, as this can crack plastic pipes or seals. If there’s a rubber gasket, ensure it’s properly seated to prevent leaks.
-
Reconnect the Clevis Strap: Attach the clevis strap to the pivot rod using the spring clip. Ensure the clevis strap is aligned with the lift rod from above.
-
Test and Adjust: Operate the lift rod to check if the stopper moves smoothly up and down. If the stopper doesn’t seal properly or doesn’t lift high enough, you might need to adjust the position of the clevis strap on the lift rod. There are usually multiple holes on the clevis strap to allow for this adjustment. For more tips on drain care, you can refer to resources like Good Housekeeping’s guide to cleaning drains.
-
Check for Leaks: Run water into the sink and let it drain, observing the pivot rod nut connection for any drips. Tighten slightly if needed, but again, avoid overtightening.
Method 2: For Push-Pull or Lift-and-Turn Stoppers
These are generally easier to remove and troubleshoot.
Step 1: Unscrew the Stopper Knob
-
Twist the Top: Grip the knob or cap at the top of the stopper and twist it counter-clockwise. It should unthread from the shaft below.
-
Remove the Stopper: Once the knob is off, the rest of the stopper assembly can usually be lifted straight out of the drain.
Step 2: Clean and Inspect
-
Thorough Cleaning: Remove all accumulated hair, soap scum, and grime from the stopper assembly, especially the shaft and any threads. Use a brush and cleaning solution.
-
Inspect for Damage: Check if any part of the stopper is bent, broken, or corroded. The rubber gasket (if present) should be intact.
-
Clear the Drain: Use a flashlight to inspect the drain opening and remove any debris that might have been catching the stopper.
Step 3: Reassemble
-
Reinsert: Place the clean stopper assembly back into the drain. Guide the shaft down into the drain opening.
-
Screw On the Knob: Thread the knob or cap back onto the shaft, turning clockwise until snug. Do not overtighten.
-
Test: Operate the stopper to ensure it moves smoothly and seals properly.
Method 3: For Toe-Touch Stoppers
These also usually detach from the top.
Step 1: Unscrew the Top Cap
-
Twist Counter-Clockwise: Firmly grip the top cap of the stopper and twist it counter-clockwise. It should unscrew from the internal spring mechanism.
-
Remove the Mechanism: Once the cap is off, the entire internal spring and shaft mechanism can usually be lifted out of the drain.
Step 2: Clean and Inspect
-
Deep Clean: Clean the cap, the internal mechanism, and the drain opening thoroughly. Pay attention to the spring and any moving parts, removing all hair and grime.
-
Check for Damage: Inspect the spring and shaft for any bends, breaks, or corrosion. A broken spring is a common reason these stoppers get stuck.
Step 3: Reassemble or Replace
-
Reinsert: If the mechanism is intact, place it back into the drain.
-
Screw On the Cap: Thread the cap back onto the mechanism, turning clockwise until snug.
-
Test: Press the stopper down to ensure it clicks open and closed smoothly. If the spring is broken, you may need to replace the entire toe-touch stopper mechanism, which is a relatively simple swap.
Method 4: For Simple Drop-In or Rubber Stoppers
While not “stuck” in a mechanical sense, these can sometimes be difficult to remove.
-
Use Suction: If the stopper has a chain or handle that broke, or if it’s just really wedged in, try using a small plunger or a strong suction cup to pull it out.
-
Pry Gently: If it’s a flat rubber stopper, you can carefully use a flathead screwdriver or a butter knife to pry up one edge. Be very careful not to scratch the sink surface.
Dealing with Stubborn Clogs and Debris
Sometimes, the stopper isn’t the only problem. Significant debris in the drain itself can prevent it from sealing or opening properly, or make removing the stopper difficult.
-
Manual Removal: After removing the stopper, use needle-nose pliers, tweezers, or a bent wire hanger to manually fish out any visible hairballs or large pieces of debris from the drain opening.
-
Baking Soda and Vinegar: This natural method can help break down minor clogs and odors. Pour 1/2 cup baking soda down the drain, followed by 1/2 cup white vinegar. Let it fizz for 30 minutes to an hour, then flush with hot water. Repeat if necessary.
-
Plunger (Use with Caution): If you suspect a clog further down, a plunger can be effective. For pop-up stoppers, remove the stopper first. For other types, ensure the overflow hole (if present) is covered to create a good seal. Plunge firmly for 10-20 seconds. Be cautious if you’ve recently used chemical drain cleaners, as splashes can be dangerous.
-
Drain Snake or Zip-It Tool: These inexpensive tools can reach deeper into the drain to grab and pull out stubborn hair clogs. Follow the manufacturer’s instructions, inserting gently and rotating as you pull it back out.
-
Chemical Drain Cleaners (Last Resort): Use these with extreme caution. They contain corrosive chemicals that can damage pipes over time, are harmful to the environment, and pose a significant safety risk. If you choose to use one, follow product instructions precisely, ensure good ventilation, and never mix different cleaners. Avoid using them if you have a septic system or older pipes. Always try other methods first.
When to Call a Professional Plumber
While many stuck stoppers can be a DIY fix, there are situations where calling a professional is the best course of action:
-
Extensive Damage: If components are severely corroded, broken, or if pipes are leaking after your attempts.
-
Persistent Issues: If the stopper continues to get stuck or the drain remains clogged despite your best efforts.
-
Lack of Confidence or Tools: If you’re uncomfortable performing the repair or lack the necessary tools.
-
Water Leaks: If you notice water leaking from the pivot rod assembly or elsewhere under the sink after working on it, and you cannot stop it.
-
Major Clog: If the clog is severe and affecting multiple drains in your home, it indicates a larger plumbing issue.
Preventative Maintenance Tips
An ounce of prevention is worth a pound of cure, especially when it comes to plumbing. Here’s how to keep your sink stopper from getting stuck again:
-
Regular Cleaning: Make it a habit to regularly remove and clean your sink stopper (at least monthly for bathroom sinks). This prevents hair and soap scum from building up.
-
Use a Hair Catcher: For bathroom sinks, a simple drain protector or hair catcher can significantly reduce the amount of hair that goes down the drain and gets caught in the stopper mechanism.
-
Flush Drains with Hot Water: After each use, let hot water run for a minute or two to help rinse away soap scum and oils that can congeal.
-
Avoid Pouring Grease Down the Drain: In kitchen sinks, grease solidifies as it cools, leading to serious clogs. Scrape grease into the trash instead.
-
Periodically Check Linkage: For pop-up stoppers, occasionally check the pivot rod and clevis strap under the sink to ensure they are clean and properly aligned.
-
Mineral Deposit Treatment: If you have hard water, occasionally flush your drain with a mixture of vinegar and water to help dissolve mineral deposits before they become a problem.
Frequently Asked Questions (FAQs)
Q1: Can I use WD-40 on a stuck sink stopper?
A1: While WD-40 is a lubricant, it’s generally not recommended for plumbing components that come into contact with water. It can attract more dirt and debris, potentially worsening the problem in the long run. For lubricating moving parts, a silicone-based plumber’s grease is a better option, but usually, a thorough cleaning is sufficient.
Q2: How do I prevent my sink stopper from getting stuck in the future?
A2: The best prevention is regular cleaning. Aim to remove and clean your sink stopper and inspect the drain opening every few weeks. Using a hair catcher in bathroom sinks and avoiding grease in kitchen sinks will also significantly help.
Q3: Is it safe to use chemical drain cleaner to unstick a stopper?
A3: Chemical drain cleaners should be a last resort. They are highly corrosive and can damage pipes, especially older ones, and are dangerous if they splash onto skin or eyes. They are also harmful to the environment. Always try manual removal, plunging, or natural solutions like baking soda and vinegar first.
Q4: How often should I clean my sink stopper?
A4: For high-use bathroom sinks, cleaning the stopper monthly is a good practice. For less frequently used sinks, every two to three months might suffice. If you notice slow draining or difficulty operating the stopper, clean it immediately.
Q5: What if the stopper is broken inside the drain?
A5: If a part of the stopper has broken off inside the drain, you’ll need to carefully extract it. For pop-up stoppers, remove the pivot rod and try to fish out the broken piece. For other types, you might need needle-nose pliers, a drain snake, or even to disassemble the P-trap to retrieve it. If you can’t get it out, it’s time to call a plumber.
Conclusion
A sink stopper stuck in closed position is a common household annoyance, but one that is usually within the realm of a DIY fix. By understanding the type of stopper you have, identifying the likely cause, and following our step-by-step troubleshooting guide, you can often restore your sink’s functionality with minimal effort and cost. Remember to prioritize safety, work gently, and perform regular maintenance to keep your drains flowing smoothly for years to come. If, despite your best efforts, the problem persists, don’t hesitate to consult a professional plumber.


