Understanding Your Toilet Tank: The Basics
Before diving into repairs, it’s helpful to understand the key components within your toilet tank and how they work together to facilitate flushing and refilling. The toilet tank valve, specifically the fill valve, is central to this operation, but it interacts with several other parts.
What is a Toilet Tank Valve?
When we talk about a “toilet tank valve” in the context of leaks, we are typically referring to the fill valve (also sometimes called a ballcock valve, especially in older models). This mechanism is responsible for refilling the toilet tank with water after each flush. It’s connected to your home’s water supply line and controls the flow of water into the tank, shutting off automatically once the water reaches a predetermined level, usually set by an attached float mechanism. A properly functioning fill valve ensures your toilet is ready for the next use without wasting water.
Key Components Related to the Fill Valve:
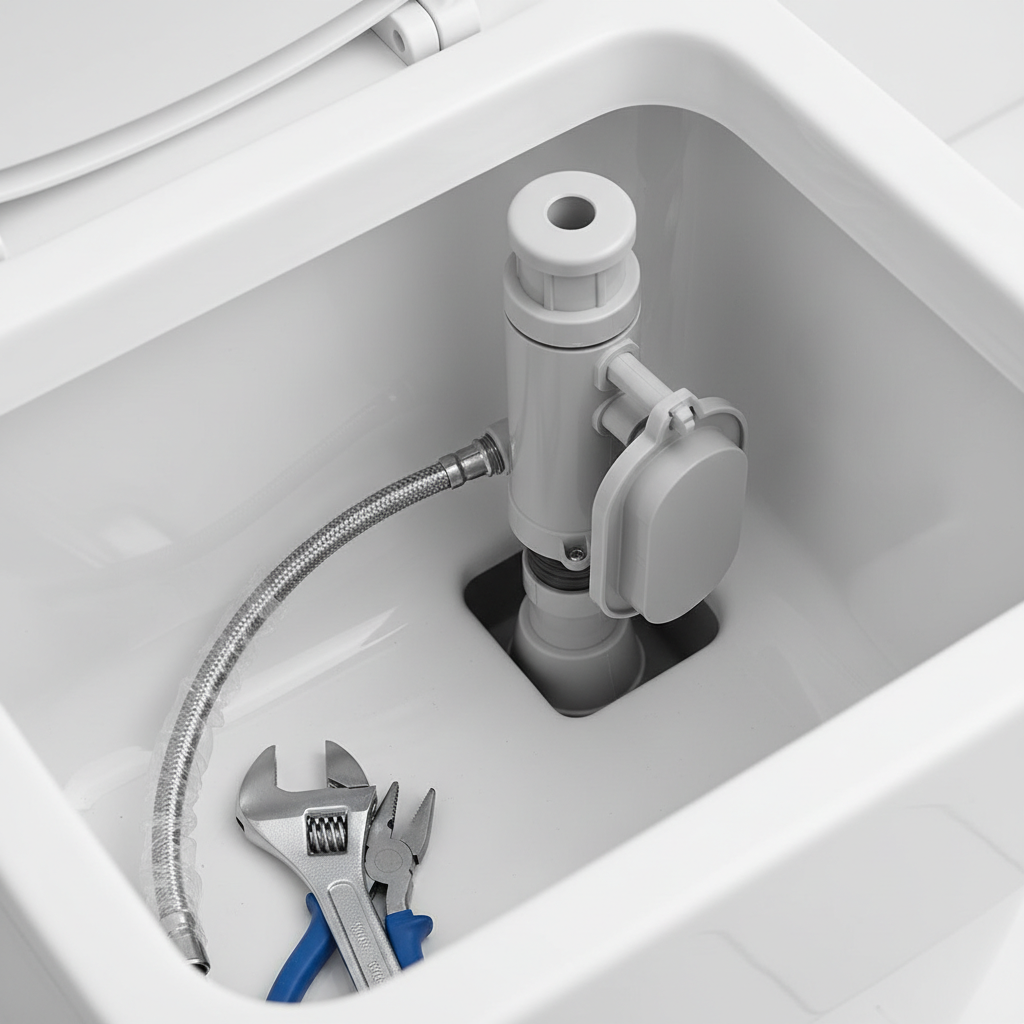
- Fill Valve (Ballcock Valve): The primary mechanism that controls water flow into the tank. Modern fill valves often feature a float cup, while older ones might have a large, buoyant ball attached to an arm.
- Float: This component senses the water level in the tank. As the water rises, the float rises with it. Once it reaches the correct height, it signals the fill valve to shut off the water.
- Overflow Tube: A vertical tube inside the tank that prevents the tank from overflowing if the fill valve malfunctions and doesn’t shut off. Excess water flows down this tube and into the toilet bowl.
- Flapper: A rubber or plastic stopper that seals the tank’s drain hole, holding water in the tank. When you flush, the flapper lifts, allowing water to rush into the bowl. A worn flapper is a common cause of “phantom flushes” or constant running.
- Tank Bolts and Gasket: These secure the tank to the toilet bowl and create a watertight seal between the two. Leaks from these areas are often mistaken for fill valve issues.
Understanding how these parts interact is crucial for accurate diagnosis. A leak from the fill valve can manifest in various ways, from a constant drip to a full-blown stream, impacting both your water bill and the integrity of your bathroom.
Why is Your Toilet Tank Valve Leaking? Common Causes
A leaking toilet tank valve doesn’t just happen out of nowhere. Several factors contribute to its failure, ranging from simple wear and tear to more complex installation issues. Identifying the root cause is the first step toward a successful repair.
Wear and Tear on Components
The components of a toilet fill valve, particularly the rubber seals, gaskets, and O-rings, are constantly exposed to water and pressure. Over time, these materials can degrade, become brittle, crack, or lose their elasticity. This natural wear and tear is perhaps the most common reason for a leaking toilet tank valve. A worn washer at the base of the fill valve shank or a deteriorated seal within the valve body itself can allow water to escape.
Cracked or Damaged Fill Valve Assembly
While modern fill valves are often made of durable plastic, they are not impervious to damage. Cracks can develop in the plastic body due to excessive tightening during installation, accidental impacts, or even extreme temperature fluctuations. A hairline crack in the fill valve housing can lead to a slow, insidious leak that might be difficult to spot until water has accumulated.
Improper Installation or Loose Connections
Sometimes, a leak isn’t due to component failure but rather an issue from the initial installation. A fill valve that wasn’t tightened sufficiently, a cross-threaded connection with the water supply line, or a misaligned gasket can all create pathways for water to escape. Even if the toilet has been working fine for years, vibrations or slight shifts can loosen connections over time, leading to new leaks.
High Water Pressure
Consistently high water pressure in your home’s plumbing system can put undue stress on all toilet components, including the fill valve. While fill valves are designed to withstand normal household water pressure, excessively high pressure can accelerate wear on seals, cause parts to fail prematurely, or even lead to burst pipes and connections. If you suspect high water pressure, installing a pressure reducing valve (PRV) for your home’s main water line might be a wise investment.
Mineral Buildup (Hard Water)
Homes with hard water are particularly susceptible to issues caused by mineral buildup. Calcium and magnesium deposits can accumulate on the moving parts and seals of the fill valve, hindering its proper operation. These deposits can prevent seals from seating correctly, obstruct the valve’s shut-off mechanism, and ultimately lead to a constant drip or a more significant leak. Regular cleaning or the use of a water softener can mitigate these problems.
Signs Your Toilet Tank Valve is Leaking
Recognizing the symptoms of a leaking toilet tank valve early can save you from costly repairs and significant water waste. The signs can be subtle at first, but they typically become more noticeable over time.
Visible Water Puddles Around the Toilet
This is perhaps the most obvious indicator. If you find puddles of water on the bathroom floor around the base or behind the toilet, it’s a clear sign of a leak. While this could originate from tank bolts, a cracked bowl, or the water supply line, the fill valve assembly is a prime suspect, especially if the water appears to be seeping directly from the tank’s underside or connections.
Constant Running Toilet or Hissing Sound
If your toilet seems to run continuously, or you hear a subtle hissing sound from the tank even when it’s not being flushed, it indicates that water is constantly flowing. While a faulty flapper is often the cause of a constantly running toilet (as water leaks from the tank into the bowl), a leaking fill valve that doesn’t fully shut off can also contribute, leading to water constantly trying to fill a tank that isn’t empty.
Phantom Flushes
The “phantom flush” phenomenon occurs when your toilet randomly flushes itself without anyone touching the handle. This is a classic symptom of an internal leak. Water slowly seeps out of the tank (often past a faulty flapper, but sometimes due to a fill valve issue allowing too much water into the overflow tube), causing the water level to drop. Once the level falls below a certain point, the fill valve kicks in to refill the tank, mimicking a flush.
High Water Bills
An unexplained spike in your monthly water bill is a strong red flag that you have a leak somewhere in your plumbing system. A continuously running or intermittently leaking toilet, even a slow drip from a toilet tank valve, can waste hundreds or even thousands of gallons of water per month, translating directly into higher utility costs. This can be one of the most financially impactful signs.
Corrosion or Rust Stains
If you notice rust stains on the exterior of the toilet tank, on the floor around the toilet, or on the water supply line, it suggests prolonged exposure to water. These stains are tell-tale signs of a leak that has been present for some time. White or green mineral deposits can also indicate hard water leaks. Inspecting these areas can help pinpoint the exact location of the leak.
Diagnosing the Exact Source of the Leak
Pinpointing the precise origin of the leak is crucial for an effective repair. Sometimes, a leak might appear to come from the fill valve but is actually originating from another component. A thorough diagnosis prevents unnecessary repairs and ensures you fix the actual problem.
The Dye Test for Internal Leaks
This simple and effective test helps determine if water is leaking from the tank into the bowl, which could be due to a faulty flapper or a fill valve that’s overfilling the tank and sending water down the overflow tube.
- Remove the toilet tank lid.
- Add a few drops of food coloring (any dark color works) or a specialized dye tablet into the toilet tank water.
- Do NOT flush the toilet for at least 15-30 minutes.
- After the waiting period, check the toilet bowl. If you see colored water in the bowl, it indicates an internal leak. The most common culprit is a worn-out flapper, but if the water level is consistently too high and spilling into the overflow tube, the fill valve’s adjustment or function could be the issue.
Visual Inspection of the Fill Valve and Connections
After checking for internal leaks, perform a detailed visual inspection of the fill valve and all related connections.
- Around the Base of the Fill Valve: Look closely at where the fill valve enters the bottom of the toilet tank. Is there any dripping, moisture, or mineral buildup?
- Water Supply Line Connection: Check the nut connecting the water supply line to the underside of the fill valve shank. Feel for moisture or visible drips. Ensure it’s snug, but do not overtighten.
- Tank Exterior and Floor: Run your hand along the entire exterior of the tank, feeling for dampness. Pay attention to the tank bolts. Wipe the floor dry and observe if new puddles form.
Listening for Hissing or Trickling Sounds
With the toilet tank lid removed, listen carefully. A continuous faint hissing or trickling sound, even when the toilet hasn’t been flushed recently, can indicate a leak. This might be water escaping past a seal in the fill valve, or water constantly running into the overflow tube because the float is set too high or the fill valve isn’t shutting off properly.
Feel for Cold Spots
Water leaks can sometimes create noticeable cold spots on the exterior of the tank or on the floor. Carefully feel around the base of the tank and the fill valve connections for any areas that feel cooler than the surrounding surface, which could indicate the presence of seeping water.
By combining these diagnostic methods, you should be able to confidently identify whether your toilet tank valve is leaking and, more specifically, from which part of the assembly the leak is originating.
DIY Steps to Fix a Leaking Toilet Tank Valve
Once you’ve diagnosed that the fill valve is indeed the source of your leak, you’re ready to tackle the repair. In most cases, fixing a leaking toilet tank valve involves replacing the entire fill valve assembly, as individual parts can be hard to source and matching them can be tricky. This process is generally straightforward and achievable for most homeowners.
1. Gather Your Tools and Materials
Preparation is key to a smooth repair. Ensure you have everything you need before you start.
- New Fill Valve Kit: Purchase a universal fill valve replacement kit from any hardware store. They typically come with all necessary seals and nuts. Make sure it’s compatible with your toilet’s make and model, though most modern kits are universal.
- Adjustable Wrench or Pliers: For loosening and tightening nuts.
- Screwdriver (Phillips or Flathead): May be needed for some older fill valve models or supply line adjustments.
- Bucket and Sponges/Old Towels: To catch residual water and clean up spills.
- Gloves: For hygiene and protection.
- Wire Brush (Optional): For cleaning mineral buildup around connections.
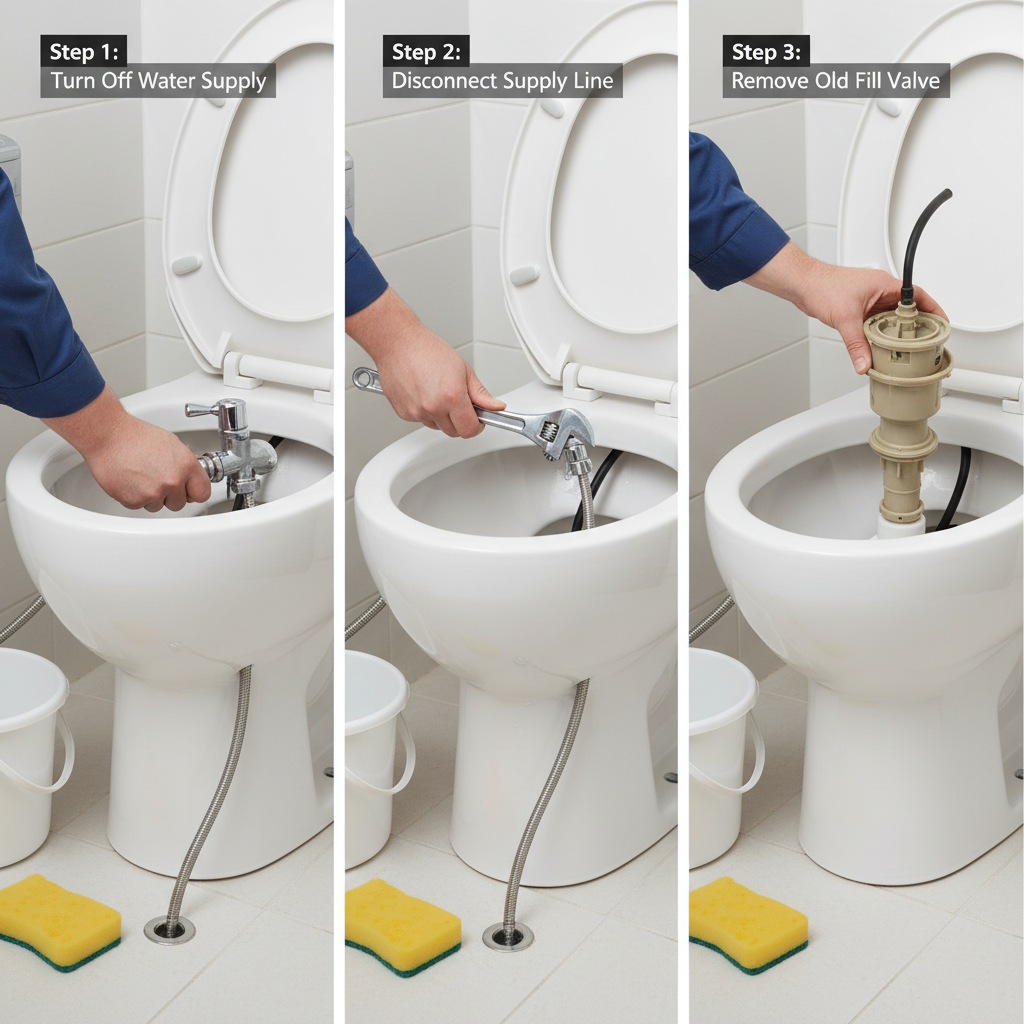
2. Turn Off the Water Supply
This is the most critical first step. Locate the shut-off valve on the wall behind or beneath the toilet, where the water supply line connects. Turn the handle clockwise until the water flow completely stops. If your toilet doesn’t have a dedicated shut-off valve or if it’s seized, you’ll need to turn off the main water supply to your house. Flush the toilet once after turning off the supply to empty most of the water from the tank.
3. Flush the Toilet to Empty the Tank
Even after turning off the water, there will still be water in the tank. Flush the toilet to drain the remaining water into the bowl. Hold the handle down to allow as much water as possible to empty. Use a sponge or towel to soak up any remaining water at the bottom of the tank, ensuring a dry working environment.
4. Disconnect the Water Supply Line
Place your bucket beneath the water supply line connection at the bottom of the toilet tank. Using your adjustable wrench or pliers, carefully loosen the nut connecting the flexible water supply line to the fill valve shank. Be prepared for a small amount of residual water to drain out. Once loosened, completely disconnect the supply line and set it aside, making sure its washer is intact.
5. Remove the Old Fill Valve
Inside the tank, you’ll see the fill valve assembly standing vertically. Underneath the tank, on the outside, there will be a large mounting nut that secures the fill valve to the tank. Use your wrench or pliers to loosen and remove this nut. Once the mounting nut is off, you can lift the entire old fill valve assembly out of the tank from the inside. Be mindful of any small washers or gaskets that might fall off as you remove it.
6. Install the New Fill Valve
Carefully follow the instructions provided with your new fill valve kit, as designs can vary slightly.
- Insert the new fill valve into the hole at the bottom of the tank from the inside.
- Ensure the rubber gasket (often pre-installed on the valve’s shank or placed on the inside of the tank around the valve stem) is properly seated to create a watertight seal.
- From underneath the tank, thread the mounting nut onto the fill valve shank. Hand-tighten it first, then use your wrench to give it an additional quarter to half turn. Be firm but avoid overtightening, which can crack the tank or the valve.
7. Reconnect the Water Supply Line
Attach the water supply line back to the bottom of the new fill valve shank. Make sure the small rubber washer is correctly seated inside the supply line connector (it often stays in the connector, but sometimes falls out). Hand-tighten the nut first to prevent cross-threading, then use your wrench to tighten it an additional quarter turn or until snug. Again, avoid excessive force.
8. Turn On the Water Supply and Test
Slowly turn the water shut-off valve (beneath the toilet or main) counter-clockwise to restore the water supply. Watch the tank as it fills. Once the tank is full, carefully inspect all connections – especially at the base of the fill valve inside and outside the tank, and where the supply line connects – for any signs of leaks. Feel for moisture with a dry paper towel. If you see any drips, gently tighten the corresponding nut a little further.
9. Adjust Water Level (if necessary)
Most modern fill valves have an adjustment screw or clip on the float mechanism. The water level in the tank should typically reach about an inch below the top of the overflow tube. If the water level is too high and spilling into the overflow tube, or too low, adjust the float mechanism according to the manufacturer’s instructions until the water level is correct. This ensures efficient flushing and prevents overfilling, which can cause a constant running sound or subtle waste.
After successfully installing your new fill valve, flush the toilet a few times to ensure everything is working correctly and there are no lingering leaks. Congratulations, you’ve successfully fixed your leaking toilet tank valve!
For a visual guide on replacing a toilet fill valve, Better Homes & Gardens offers helpful step-by-step instructions.
Troubleshooting Specific Leaks Related to the Fill Valve
Even after installing a new fill valve, you might encounter persistent leaks or new drips. Here’s how to troubleshoot some common scenarios related to the fill valve.
Leak at the Base of the Fill Valve Shank
This is a very common leak point. If water is dripping from underneath the tank where the fill valve enters, even after replacement:
- Check Mounting Nut Tightness: The nut securing the fill valve to the tank might not be tight enough. Gently tighten it with your wrench, but be careful not to overtighten, which can crack the tank.
- Inspect the Shank Washer/Gasket: The large rubber washer or gasket between the fill valve and the inside of the tank is crucial. It might be pinched, misaligned, or defective. Turn off the water, empty the tank, and re-seat or replace this gasket if necessary.
- Cracked Tank: In rare cases, a hairline crack at the hole where the fill valve enters the tank could be the cause. This usually requires professional repair or tank replacement.
Leak from the Top of the Fill Valve / Overflow Tube
If water is continuously running down the overflow tube, or if the fill valve itself appears to be constantly letting a small amount of water out from its top:
- Float Adjustment: The most common reason is that the float mechanism is set too high, causing the tank to overfill and water to spill into the overflow tube. Adjust the float arm or cup downwards until the water level is about 1 inch below the top of the overflow tube when the tank is full.
- Faulty Fill Valve Diaphragm: If the float is correctly adjusted and the water is still running, the internal diaphragm or seal within the fill valve might be faulty, preventing it from shutting off completely. If this happens with a new valve, it could be a defective unit; if it’s an old valve, replacement is the best option.
- Mineral Buildup: Hard water deposits can prevent the float from moving freely or the valve from seating properly. Attempt to clean the fill valve’s internal components if possible (some modern valves can be disassembled for cleaning, refer to the manufacturer’s instructions).
Leak at the Water Supply Line Connection
Drips coming from where the flexible water supply line connects to the bottom of the fill valve shank are usually easier to fix:
- Tighten the Connection: Ensure the coupling nut on the supply line is adequately tightened. Hand-tighten first, then use a wrench for a final quarter turn.
- Check the Washer: The small rubber or fiber washer inside the supply line’s connector can become worn, cracked, or simply not seated correctly. Turn off the water, disconnect the line, inspect or replace the washer, and then reconnect. Always use a new washer with a new supply line.
- Damaged Supply Line: Inspect the supply line itself for any cracks, kinks, or signs of wear. If the line is old or damaged, replacing it is a simple and inexpensive fix that can prevent future leaks.
Persistent leaks after troubleshooting might indicate a more complex issue, at which point it’s often best to consult a professional plumber.
When to Call a Professional Plumber
While fixing a leaking toilet tank valve is often a manageable DIY project, there are specific situations where calling a professional plumber is the wisest course of action. Knowing when to defer to an expert can save you time, money, and potential headaches.
Complex or Unidentified Issues
If you’ve followed all the diagnostic and repair steps, replaced the fill valve, and the leak persists, or if you simply cannot identify the source of the leak, it’s time to call a plumber. There might be a more complex underlying issue, such as a hairline crack in the porcelain tank itself, a problem with the toilet’s internal trap, or even an issue with your home’s main water pressure regulator that’s affecting the toilet.
Cracked Toilet Tank or Bowl
While usually not directly related to the fill valve, a crack in the porcelain tank or bowl can mimic some fill valve leak symptoms. If you discover a crack during your inspection, attempting a DIY repair is generally not recommended. Most cracks in porcelain cannot be reliably repaired to hold water pressure long-term, and attempting to do so might only delay the inevitable need for a full toilet replacement. A plumber can advise on the best course of action, which often means installing a new toilet.
Main Water Shut-Off Problems
If your toilet’s individual shut-off valve is seized, broken, or if you’re unable to locate or operate your home’s main water shut-off valve, you won’t be able to safely proceed with any repair. In such cases, a plumber can assist with turning off the water supply, repairing or replacing faulty shut-off valves, and then proceeding with the toilet repair. Attempting to force a seized valve can lead to bigger plumbing emergencies.
Lack of Confidence or Time
Even with a detailed guide, some homeowners might not feel comfortable performing plumbing repairs, or they simply may not have the time. If you’re unsure about your abilities, worried about causing further damage, or pressed for time, a professional plumber offers peace of mind. They have the experience and specialized tools to diagnose and fix the problem quickly and efficiently.
Extensive Water Damage
If the leaking toilet tank valve has been neglected and has caused significant water damage to your bathroom floor, subfloor, or ceiling below (if applicable), a plumber can address the leak, but you’ll likely need to consult with a contractor or restoration specialist for the water damage itself. A plumber can assess the extent of the water-related plumbing issues.
Ultimately, a plumber’s expertise is invaluable when facing stubborn leaks, complex plumbing situations, or when your comfort level with DIY repairs is low. Investing in professional help when needed can prevent minor issues from escalating into major, expensive problems.
Preventative Maintenance for Your Toilet Tank Valve
Preventing a leaking toilet tank valve is always better than repairing one. Regular, simple maintenance can significantly extend the life of your toilet components and help you catch potential issues before they become major leaks. Incorporating these habits into your home maintenance routine can save you money on water bills and repair costs.
Regular Visual Inspections
Make it a habit to periodically lift your toilet tank lid and take a look inside.
- Check Water Level: Ensure the water level is consistently about one inch below the top of the overflow tube. If it’s higher, adjust the float. If it’s unusually low, investigate.
- Inspect Components: Look at the fill valve, flapper, and other components for any visible signs of wear, such as cracks, deterioration, or discoloration of rubber parts.
- Check for Mineral Buildup: Observe if there’s any calcium or mineral deposits on the fill valve, float, or flapper, especially if you have hard water.
- Listen: Pay attention for any faint hissing, trickling, or intermittent running sounds when the toilet hasn’t been used.
These quick checks can reveal issues before they turn into full-blown leaks.
Address Small Issues Promptly
Don’t ignore minor drips, occasional phantom flushes, or a toilet that runs for an unusually long time. These are early warning signs that a component, including the fill valve, might be failing. Addressing a small issue, like adjusting a float or replacing a cheap flapper, is far easier and less expensive than dealing with the aftermath of a significant leak or water damage. Keeping an eye on your water bill can also alert you to potential hidden leaks.
Consider a Water Softener (If You Have Hard Water)
If you live in an area with hard water, mineral buildup can significantly shorten the lifespan of your toilet’s internal components, including the fill valve. Installing a whole-house water softener can dramatically reduce mineral deposits, protecting not just your toilet but all your plumbing fixtures and appliances from the corrosive effects of hard water. This is a larger investment but can offer long-term savings and convenience.
Avoid Harsh Chemicals for Cleaning the Tank Interior
While it might be tempting to use strong chemical cleaners to remove stains or mildew from inside the toilet tank, many of these chemicals can degrade rubber and plastic components over time. This includes drop-in toilet bowl tablets that constantly sit in the tank water. Opt for gentler, natural cleaning solutions or simply use a brush with some vinegar to clean the tank components. Always follow manufacturer guidelines for cleaning products and toilet components.
Periodically Inspect the Water Supply Line
The flexible water supply line connecting to the bottom of your fill valve is also a potential leak point. Over time, these lines can develop kinks, cracks, or their connections can loosen. Periodically inspect the line for any visible damage or signs of moisture. If your supply line is old and rigid, consider proactively replacing it with a new, flexible braided stainless steel line, which is more durable and less prone to leaks.
By implementing these simple preventative measures, you can significantly reduce the likelihood of experiencing a leaking toilet tank valve and ensure your toilet operates efficiently for years to come.
FAQs About Leaking Toilet Tank Valves
Q: Can a leaking toilet tank valve increase my water bill significantly?
A: Absolutely. Even a seemingly small leak from a toilet tank valve can waste hundreds to thousands of gallons of water per month. A constant drip can be just as wasteful as a continuously running toilet, leading to a noticeable and often significant increase in your water bill. It’s one of the most common causes of unexplained high water bills.
Q: How long do toilet fill valves typically last?
A: The lifespan of a toilet fill valve can vary depending on factors like water quality, usage, and the quality of the valve itself. Generally, a fill valve can last anywhere from 5 to 10 years. In areas with hard water, mineral buildup can shorten this lifespan, while well-maintained valves in areas with soft water might last even longer.
Q: Is it difficult to replace a toilet fill valve myself?
A: For most homeowners, replacing a toilet fill valve is considered a moderately easy DIY project. It requires basic tools, a clear understanding of the steps, and about 30-60 minutes of time. The most important steps are turning off the water supply and ensuring all connections are properly tightened without overtightening. If you’re comfortable with basic home repairs, you can likely do it yourself.
Q: What’s the difference between a fill valve and a flapper?
A: Both are crucial components inside your toilet tank, but they serve different functions. The fill valve (or ballcock valve) is responsible for refilling the tank with water after each flush and shutting off the water supply once the tank is full. The flapper is a rubber or plastic stopper that seals the large opening at the bottom of the tank, holding water in the tank until you flush. When you press the flush handle, the flapper lifts, allowing water to flow into the bowl.
Q: Can I just repair parts of the fill valve, or do I need to replace the whole thing?
A: While some older fill valves might have individual repair kits available (e.g., for specific seals or diaphragms), most modern fill valves are designed to be replaced as a complete unit. It’s generally more cost-effective and reliable to replace the entire fill valve kit, as you’ll get all new components, including seals and gaskets, ensuring a fresh start and a longer-lasting repair. Universal fill valve kits are readily available and relatively inexpensive.
Q: What if I replaced the fill valve, and it’s still leaking?
A: If your toilet continues to leak after replacing the fill valve, re-evaluate the source. Check the tightness of all connections again, especially the mounting nut underneath the tank and the water supply line. Also, ensure the large gasket between the fill valve and the tank bottom is seated correctly. If the leak persists, consider other possibilities like a faulty flapper (if water is leaking into the bowl), deteriorated tank-to-bowl bolts, or even a hairline crack in the toilet tank itself. If you’re unable to diagnose it, it’s best to call a professional plumber.
A leaking toilet tank valve is a common household nuisance, but it’s one that can be effectively tackled with a little know-how and the right tools. By understanding your toilet’s mechanics, accurately diagnosing the leak’s origin, and following the detailed repair steps, you can restore your toilet’s efficiency and prevent unnecessary water waste. Remember, preventative maintenance and addressing small drips promptly are key to a leak-free and smoothly functioning bathroom. Don’t let a minor leak turn into a major headache—empower yourself to fix it and maintain a serene, efficient home.


