Understanding Your Toilet Tank: The Basics
Before diving into repairs, it’s helpful to understand the basic mechanics of your toilet tank. While it might seem like a simple porcelain box, it houses several crucial components that work in harmony to flush away waste and refill the bowl. Knowing these parts will make diagnosing a leak much easier.
Key Components of a Toilet Tank
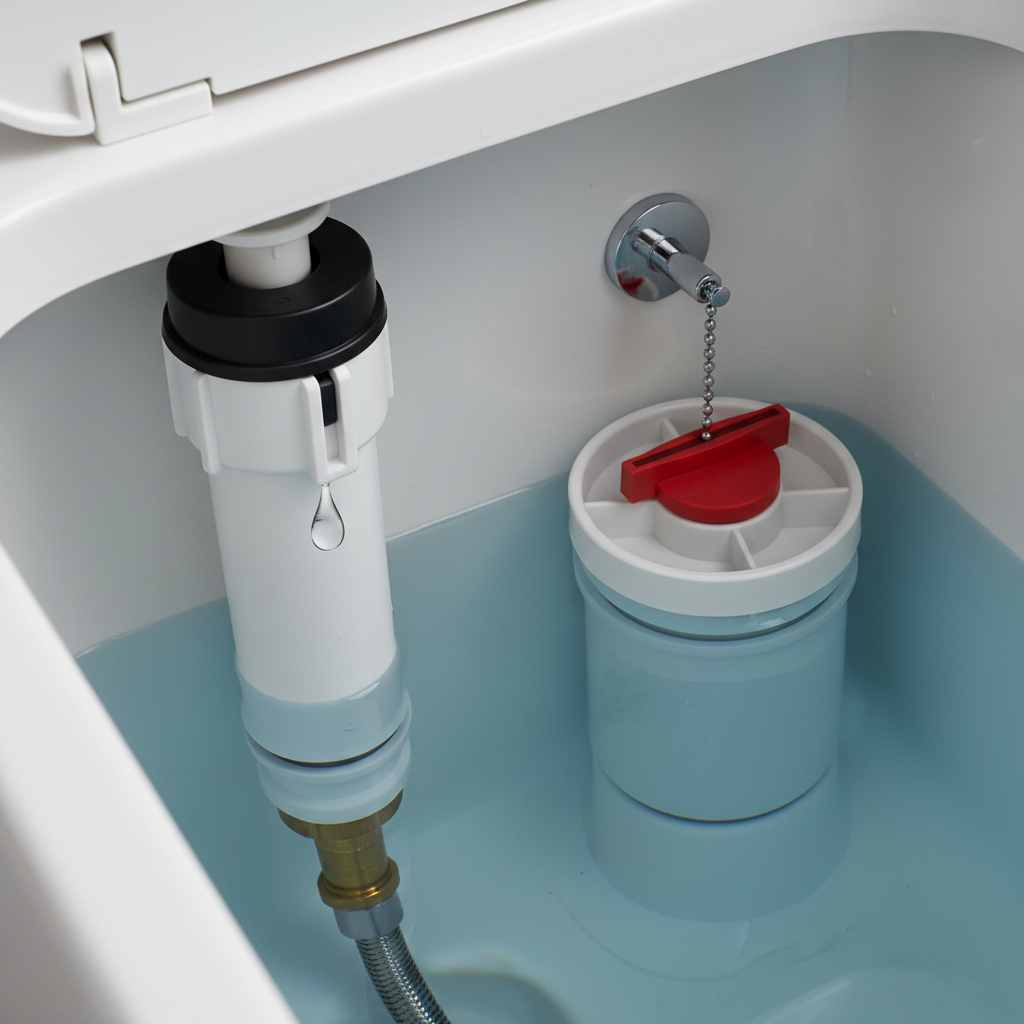
- Fill Valve (Ballcock): This is the primary component we’ll focus on. The fill valve is responsible for refilling the toilet tank with water after each flush. It typically consists of a float mechanism that rises with the water level, shutting off the water supply once the tank is full.
- Flush Valve: Located at the bottom center of the tank, the flush valve allows water to rush from the tank into the bowl when the flush handle is depressed. It includes the flapper or tank ball.
- Flapper/Tank Ball: This rubber or plastic seal covers the opening of the flush valve. When you flush, the flapper lifts, allowing water to flow into the bowl, and then reseals to hold water in the tank.
- Overflow Tube: A vertical pipe attached to the flush valve assembly, the overflow tube prevents the tank from overflowing by directing excess water into the toilet bowl if the fill valve malfunctions.
- Toilet Handle and Chain: The handle you push to flush, connected to the flapper via a chain.
The Role of the Fill Valve
The fill valve, also known as the inlet valve or ballcock, is arguably the most complex and common source of leaks within the toilet tank itself. It connects directly to the main water supply line at the bottom of the tank. When the toilet is flushed, the water level drops, causing the float mechanism on the fill valve to open, allowing fresh water to flow into the tank and into the overflow tube to refill the bowl simultaneously. As the water level rises, the float rises with it, eventually activating a shut-off mechanism within the fill valve, stopping the water flow when the tank is full. A leak here means this delicate dance isn’t happening correctly.
Why is Your Toilet Tank Valve Leaking? Common Causes
A leaking toilet tank valve can manifest in various ways, from a constant trickle into the bowl to water pooling on the floor. Understanding the common culprits behind these leaks is the first step toward a successful repair.
Worn-Out Fill Valve Gasket or Washer
The most frequent cause of a leaking toilet tank valve, especially if water is seeping from the base of the tank or around the connection to the water supply line, is a deteriorated rubber gasket or washer. Over time, these rubber components can become brittle, crack, or compress due to age, water pressure, and mineral buildup. Once compromised, they lose their ability to create a watertight seal, leading to leaks.
Cracked Fill Valve Housing
While less common than a worn gasket, the plastic housing of the fill valve itself can develop cracks. These cracks might be hairline fractures that are difficult to spot, often caused by over-tightening during installation, physical impact, or prolonged exposure to harsh chemicals or extreme temperatures. A cracked housing will allow water to escape directly from the valve, often dripping onto the floor or into the cabinet beneath.
Loose Connections or Nuts
The fill valve is secured to the toilet tank by a large nut on the underside of the tank, and the water supply line connects to the bottom of the valve with another nut. If either of these connections becomes loose, water can easily seep out. This often happens due to vibrations, minor shifts in the toilet’s position, or simply not being tightened sufficiently during installation.
Incorrect Water Pressure
Excessively high water pressure entering your home can put undue stress on all plumbing fixtures, including your toilet’s fill valve. High pressure can cause the valve’s internal components to fail prematurely, or it can exacerbate existing weaknesses, leading to leaks around seals and connections. Some fill valves are designed to operate within a specific pressure range, and exceeding this can cause issues.
Mineral Buildup and Corrosion
Hard water, which contains high levels of minerals like calcium and magnesium, can leave deposits (scale) on the internal components of the fill valve. This buildup can interfere with the float mechanism, preventing the valve from properly shutting off, or it can corrode rubber seals and plastic parts, leading to internal or external leaks. In coastal areas, salt buildup can also be an issue.
Flawed Installation
Sometimes, a leak from a relatively new toilet or recently replaced fill valve can be attributed to improper installation. This might include cross-threading nuts, not using a new gasket, over-tightening, or under-tightening connections, all of which compromise the integrity of the seals.
How to Identify a Leaking Toilet Tank Valve: Detection Methods
Detecting a leak early can save you money and prevent potential water damage. A leaking toilet tank valve isn’t always obvious, but there are several reliable ways to pinpoint the problem.
Visual Inspection
Start with a simple visual check. Look for:
- Water on the floor: This is the most obvious sign. Check around the base of the toilet, especially behind it where the water supply line connects.
- Visible drips: Open the tank lid and observe the fill valve while the tank is full. Do you see water dripping from any part of the valve, particularly where it connects to the tank bottom or the water supply line?
- Condensation: While not a leak, excessive condensation on the outside of the tank can be mistaken for one. This usually happens in humid environments when cold water enters a warm tank. A true leak will show distinct drips rather than general wetness.
The Food Coloring Test
This classic test is excellent for determining if water is silently leaking from the tank into the bowl, which could be a fill valve issue or a flapper issue.
- Remove the toilet tank lid.
- Add a few drops of food coloring (dark colors like blue or green work best) to the water in the tank.
- Do NOT flush the toilet for at least 15-30 minutes.
- After the waiting period, check the toilet bowl. If you see colored water in the bowl, you have a leak. This leak could be from the fill valve (if it’s constantly overfilling the tank and sending water down the overflow tube) or a faulty flapper. Further investigation will be needed to differentiate.
Listening for Phantom Flushes or Running Water
A tell-tale sign of a leak is when your toilet “runs” or “flushes” on its own, seemingly randomly, without anyone touching the handle. This is often called a “phantom flush.” It happens because the water level in the tank has dropped below a certain point (due to a slow leak), causing the fill valve to briefly activate and refill the tank. A continuous, faint hissing sound even when the toilet isn’t being used also indicates water is constantly flowing, suggesting a leak.
Checking the Water Meter
For a comprehensive check, particularly if you suspect multiple leaks or an elusive one, your water meter can provide definitive evidence.
- Ensure all water-using appliances and fixtures in your home are turned off (no faucets running, no washing machine, etc.).
- Locate your water meter (usually near the street or in your basement).
- Note the current reading or observe the leak indicator dial (often a small triangle or star). If the dial is moving, even slowly, or the reading is advancing, it indicates water is flowing somewhere in your home.
- You can then isolate the toilet by turning off its individual shut-off valve at the wall and re-checking the meter. If the meter stops moving, the toilet is the culprit.
Step-by-Step Guide to Fixing a Leaking Toilet Tank Valve
Once you’ve identified that your toilet tank valve is leaking, it’s time to roll up your sleeves and get to work. Most fill valve issues can be resolved with basic tools and a bit of patience. We’ll cover tightening connections, replacing gaskets, and, if necessary, replacing the entire valve.
Safety First: Gather Your Tools and Turn Off Water
Before you begin any plumbing work, prioritize safety and preparation.
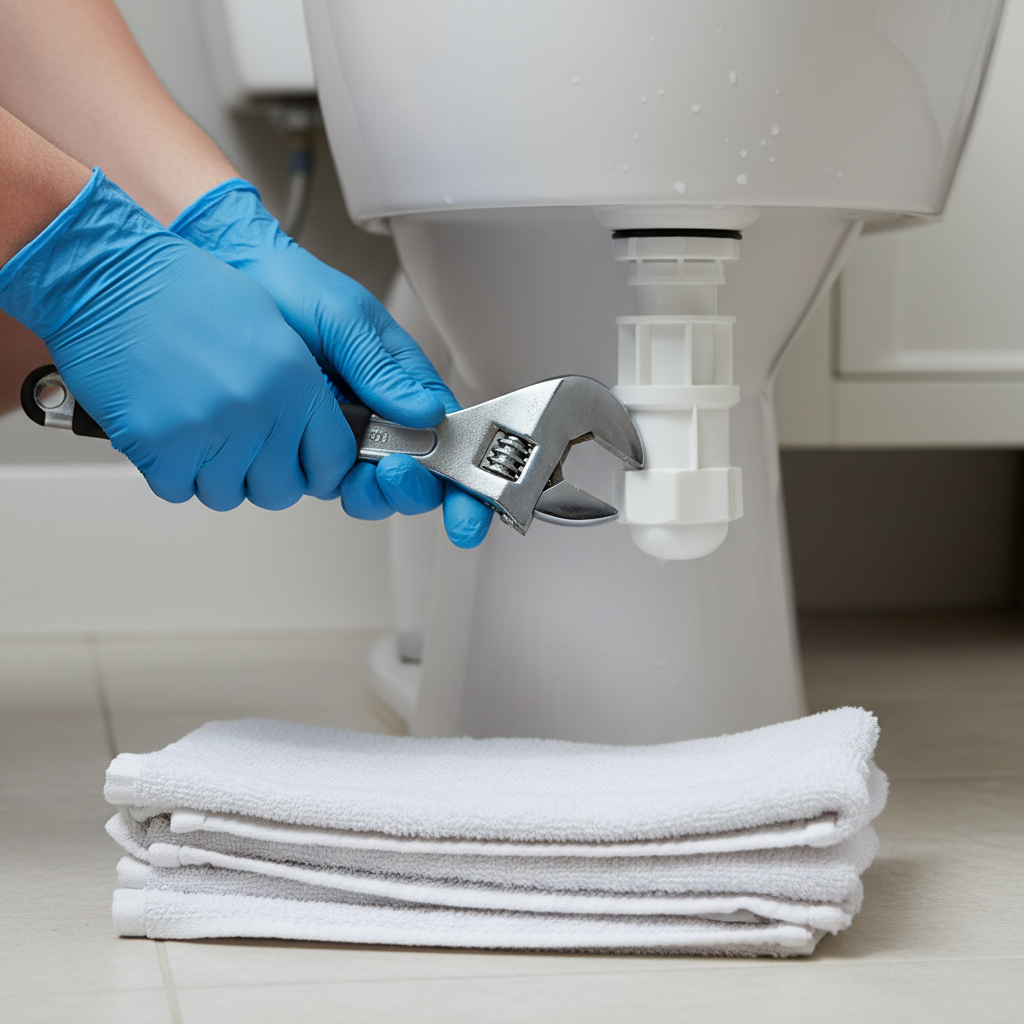
- Tools you might need: Adjustable wrench, pliers, screwdriver (flathead and Phillips), sponge, old towels/bucket, new fill valve kit (if replacing), replacement gasket/washer (if applicable).
- Turn off the water supply: Locate the shut-off valve on the wall behind or beneath the toilet. Turn it clockwise until the water flow stops completely.
- Prepare for drips: Place towels on the floor around the toilet to catch any spills.
Empty the Tank
Once the water supply is off, flush the toilet. This will drain most of the water from the tank into the bowl. Hold the handle down until as much water as possible has drained. Use a sponge or small cup to remove any remaining water from the bottom of the tank.
Assessing the Leak Source
Based on your earlier inspection, you should have an idea of where the leak is originating:
- Leak from the base of the tank (around the large nut): This usually points to a loose connection or a worn gasket between the fill valve and the tank.
- Leak from the inlet hose connection (where the supply line connects to the fill valve): Often a loose connection or a worn washer inside the supply line nut.
- Leak from the top or body of the fill valve: This suggests a cracked housing or an internal failure, likely requiring a full valve replacement.
Tightening Loose Connections
If the leak appears to be from a connection point, try tightening it first.
- For the large nut under the tank: Use an adjustable wrench to carefully tighten the large plastic or brass nut that secures the fill valve to the tank. Do not over-tighten, as this can crack the tank or the valve housing. Tighten until snug, then a quarter turn more.
- For the water supply line connection: Use your wrench to tighten the nut connecting the flexible supply line to the bottom of the fill valve. Again, snug, then a quarter turn more.
- Test: Turn the water supply back on slowly and observe for leaks. If the leak stops, you’re all set! If not, proceed to the next steps.
Replacing the Fill Valve Gasket/Washer
If tightening didn’t work and the leak is still at the base of the tank or the supply line connection, the gasket or washer is likely worn.
- Turn off water and drain tank (as above).
- Disconnect the supply line: Using your wrench, loosen and remove the nut connecting the flexible supply line to the fill valve. Be ready for a small amount of residual water.
- Remove the large securing nut: Underneath the tank, loosen and remove the large plastic or brass nut that holds the fill valve in place.
- Remove the fill valve: Carefully lift the entire fill valve assembly out of the tank.
- Inspect the gasket: The main gasket (often cone-shaped or flat rubber) will be on the shaft of the fill valve, against the bottom of the tank. Also, check the small rubber washer inside the water supply line nut.
- Replace: Take the old gasket/washer to a hardware store to find an exact match, or use a universal replacement kit. Install the new gasket in its correct position. For the supply line, ensure a new washer is seated properly inside the nut.
- Reassemble and test: Reinsert the fill valve, tighten the large nut underneath the tank (snug plus a quarter turn), reconnect the supply line with its new washer (snug plus a quarter turn), and turn the water back on. Check for leaks.
Replacing the Entire Fill Valve Assembly
If the leak is from a cracked fill valve housing, or if the internal components are faulty and constantly running, or if simply replacing gaskets didn’t work, replacing the entire fill valve is the definitive solution. This is often easier than trying to repair internal valve components.
Most modern toilets use a universal design for fill valves, making replacement straightforward. You can purchase a new fill valve kit (like a Fluidmaster 400A or similar) at any hardware store.
- Turn off water and drain tank (as above).
- Disconnect supply line and securing nut: Follow steps 2-3 from “Replacing the Fill Valve Gasket/Washer” to fully detach the old fill valve.
- Remove the old fill valve: Lift it out and discard it.
- Prepare the new fill valve: Unbox your new fill valve kit. It typically includes the valve assembly, a shank washer (the main gasket), a locknut (the large nut that secures it to the tank), and a refill tube.
- Install the shank washer: Slide the new shank washer onto the threaded tailpiece of the new fill valve. Ensure it’s positioned correctly against the base of the valve.
- Insert the new fill valve: Carefully lower the new fill valve into the hole at the bottom of the toilet tank. Make sure it’s centered.
- Secure with the locknut: From underneath the tank, thread the new locknut onto the tailpiece of the fill valve. Hand-tighten it, then use an adjustable wrench to tighten it another quarter to half turn. Avoid over-tightening.
- Adjust the height (if applicable): Many modern fill valves are adjustable in height. Ensure the top of the overflow tube is approximately 1 inch below the critical level mark (often indicated on the valve itself or by the manufacturer) to prevent water from siphoning over. The critical level mark should be above the water line.
- Connect the refill tube: Attach one end of the small rubber refill tube to the top of the fill valve’s outlet nipple and clip the other end to the rim of the overflow tube. This tube directs a small stream of water into the overflow tube to refill the toilet bowl after a flush.
- Reconnect the water supply line: Attach your existing water supply line to the threaded tailpiece of the new fill valve. Make sure the washer is properly seated within the supply line nut. Hand-tighten, then use a wrench for a final quarter turn.
- Turn on the water supply: Slowly open the toilet’s shut-off valve. Observe the tank as it fills.
- Adjust water level: Once the tank is full, check the water level. It should be about 1 inch below the top of the overflow tube. If not, adjust the float mechanism on the fill valve according to the manufacturer’s instructions.
Testing for Leaks After Repair
After completing your repair, it’s crucial to test thoroughly for any new or persistent leaks.
- Visually inspect all connections and the entire fill valve for drips as the tank fills and after it’s full.
- Flush the toilet several times and watch the refilling cycle.
- Perform the food coloring test again to ensure there are no silent leaks into the bowl.
Preventing Future Leaks from Your Toilet Tank Valve
Once you’ve successfully fixed a leaking toilet tank valve, you’ll want to take steps to prevent a recurrence. A little proactive maintenance goes a long way in protecting your home and conserving water.
Regular Inspection and Maintenance
Make it a habit to periodically check your toilet’s internal components. At least once a year, remove the tank lid and:
- Visually inspect the fill valve, flapper, and connections for any signs of wear, cracks, or mineral buildup.
- Listen for phantom flushes or continuously running water.
- Perform the food coloring test to detect silent leaks.
Early detection allows you to address minor issues before they escalate into major leaks.
Addressing Hard Water Issues
If you live in an area with hard water, mineral buildup can significantly shorten the lifespan of your toilet’s components. Consider these solutions:
- Regular cleaning: Occasionally, you can use a diluted vinegar solution to clean visible mineral deposits from the fill valve components. Turn off the water, drain the tank, spray with vinegar, let it sit, then scrub gently.
- Water softener: For persistent hard water problems throughout your home, installing a whole-house water softener can extend the life of all your plumbing fixtures, including your toilet.
- Use appropriate cleaners: Avoid harsh chemical tank cleaners that can corrode rubber seals and plastic parts, contributing to leaks.
Proper Installation Techniques
Whether you’re doing it yourself or hiring a professional, ensuring proper installation is key. For DIYers, always follow the manufacturer’s instructions precisely, pay attention to torque specifications (snug, not overtightened), and use new gaskets and washers. When tightening nuts, remember the “snug then a quarter turn” rule to prevent stripping threads or cracking porcelain.
Choosing Quality Components
When replacing a fill valve or other toilet components, invest in quality parts from reputable brands. While cheaper options might save a few dollars upfront, they often use inferior materials that fail prematurely. A slightly more expensive, high-quality fill valve made with durable plastics and long-lasting rubber seals will offer better performance and longevity, saving you money and hassle in the long run. Good Housekeeping provides excellent advice on home maintenance, including insights into choosing reliable products for your home, which can extend to plumbing components to prevent common issues like leaks. For more tips on maintaining a leak-free home, you might want to visit sources like Good Housekeeping’s home maintenance guides.
When to Call a Professional Plumber
While fixing a leaking toilet tank valve is often a DIY task, there are situations where calling a professional plumber is the wisest course of action. Knowing when to admit defeat can prevent further damage and save you time and frustration.
If You’re Unsure or Uncomfortable
If you’ve followed the steps and still feel uncertain about the cause of the leak, or if you simply don’t feel comfortable undertaking the repair yourself, don’t hesitate to call a professional. Plumbing can be tricky, and an incorrectly performed repair can lead to more significant problems.
Complex Issues or Persistent Leaks
If you’ve replaced the fill valve and the toilet continues to leak, or if the leak seems to be originating from the toilet bowl itself rather than the tank, it might indicate a more complex issue. Problems like a cracked toilet bowl, a faulty wax ring seal at the base of the toilet, or issues with your home’s main water pressure require expert diagnosis and specialized tools.
Water Damage Concerns
If the leak has been ongoing for some time and you suspect or observe water damage to your flooring, subfloor, or ceiling below (if the toilet is on an upper floor), it’s crucial to call a professional immediately. They can not only fix the plumbing issue but also assess the extent of the water damage and advise on remediation to prevent mold growth or structural compromise.
Frequently Asked Questions (FAQs) About Leaking Toilet Tank Valves
Q: What causes a toilet tank valve to leak from the bottom?
A: A leak from the bottom of the toilet tank valve typically indicates either a loose large nut that secures the fill valve to the tank or a worn-out rubber gasket/washer that creates the seal between the valve and the tank bottom. Over-tightening can also crack the plastic components, leading to leaks.
Q: Can I just tighten the nut if my fill valve is leaking?
A: Yes, tightening the nuts is always the first step to try for a leak at a connection point. Both the large nut under the tank and the nut connecting the water supply line to the fill valve can become loose over time. Be careful not to over-tighten, as this can crack plastic parts or the toilet tank itself.
Q: How much does it cost to replace a toilet fill valve?
A: The cost to replace a toilet fill valve can vary. If you do it yourself, a new fill valve kit usually costs between $15 and $30. If you hire a professional plumber, you can expect to pay anywhere from $75 to $200 or more, depending on your location, the plumber’s rates, and the complexity of the job. This usually includes parts and labor.
Q: Is a leaking toilet tank valve an emergency?
A: A slow drip from a toilet tank valve isn’t typically an immediate emergency, but it should be addressed promptly to prevent water waste and potential damage. However, if the leak is significant, causing water to pool rapidly on the floor, or if you can’t stop the water flow by turning off the toilet’s shut-off valve, it can quickly become an emergency, requiring immediate attention to prevent extensive water damage.
Q: How do I know if the leak is coming from the fill valve or the flapper?
A: The food coloring test is the best way to determine if water is leaking from the tank into the bowl. If colored water appears in the bowl after 15-30 minutes without flushing, you have a leak. To differentiate: if the water level in the tank consistently drops below the fill line, causing the fill valve to periodically run to refill the tank, it often points to a flapper leak (water seeping past the flapper). If the tank is constantly overfilling and water is running down the overflow tube, or if you see water dripping directly from the fill valve itself, then the fill valve is the likely culprit.
A leaking toilet tank valve is a common household nuisance, but it doesn’t have to be a major headache. By understanding how your toilet works, accurately diagnosing the source of the leak, and following these step-by-step instructions, you can confidently tackle most repairs yourself. Taking preventative measures and knowing when to call in a professional will ensure your toilet remains a silent, efficient part of your home for years to come, saving you water, money, and unnecessary stress.


