A leaking toilet tank valve is one of those common household nuisances that can quickly escalate from a subtle drip to a frustrating waste of water and money. Whether you hear the tell-tale sound of running water long after you’ve flushed, notice a mysterious puddle forming around the base of your toilet, or see your water bill mysteriously creeping up, a malfunctioning fill valve in your toilet tank is often the culprit. The good news is that for many homeowners, fixing a leaking toilet tank valve is a manageable DIY project that requires only a few basic tools and a bit of patience. This comprehensive guide will walk you through everything you need to know, from identifying the leak to performing the repair yourself, saving you both hassle and the expense of a plumber.
Understanding Your Toilet Tank: The Basics
Before diving into repairs, it’s helpful to understand the basic mechanics of your toilet tank. While seemingly complex, the internal workings are quite simple. When you flush, water from the tank rushes into the bowl. As the tank empties, the float (which can be a ball, cup, or cylinder) drops, triggering the fill valve to open. Fresh water then flows into the tank, refilling it. As the water level rises, the float lifts, and once it reaches a predetermined level, it signals the fill valve to close, stopping the water flow. If any part of this system, particularly the fill valve, malfunctions, you end up with a leaking toilet tank valve.
What is a Fill Valve?
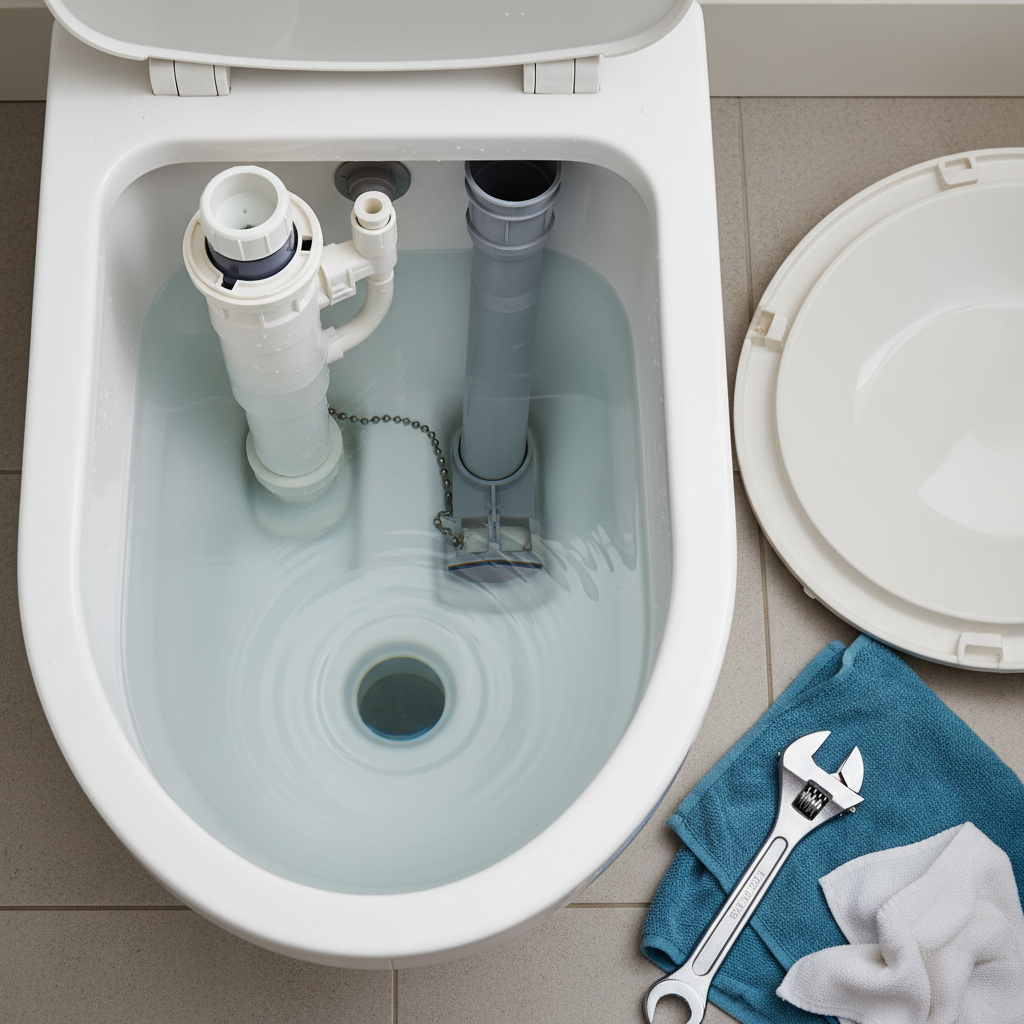
The fill valve, sometimes called the ballcock, is the tall, usually plastic, assembly located on the left side (as you face the toilet) inside your toilet tank. It’s responsible for refilling the tank with water after each flush. Modern fill valves are typically float-cup or float-cylinder designs, which are more compact and efficient than older ballcock mechanisms. A properly working fill valve is crucial for your toilet’s efficiency and your water conservation efforts.
How it Works
When the flush lever is pressed, the flapper lifts, allowing water to exit the tank into the bowl. As the water level drops, the float assembly attached to the fill valve descends. This descent opens a diaphragm or piston inside the fill valve, allowing water from the supply line to enter the tank. A small refill tube attached to the fill valve also sends a controlled amount of water into the overflow tube in the center of the tank, which in turn refills the toilet bowl trap (this prevents sewer gases from entering your home). Once the tank water level reaches the desired height, the float rises, closing the valve and stopping the water flow.
Signs You Have a Leaking Toilet Tank Valve
Identifying a leak early can save significant amounts of water and prevent potential damage to your bathroom floor. Here are the most common indicators of a leaking toilet tank valve:
- Audible Water Running: This is the most obvious sign. If you hear water continuously running or trickling into the toilet bowl, even when it hasn’t been flushed recently, your fill valve might not be sealing properly.
- “Ghost Flushing”: If your toilet seems to flush itself for a few seconds at random intervals, it’s often due to a slow leak from the tank into the bowl. As the water level drops slightly, the fill valve briefly activates to top it off.
- High Water Bills: An unexplained increase in your monthly water bill can be a strong indicator of a silent leak. Even a small, continuous leak can waste hundreds of gallons of water per day.
- Visible Water Around the Base: While this can point to other issues like a leaking wax ring, if the water appears to be originating from the supply line connection or the underside of the tank, a fill valve issue could be contributing.
- The “Dye Test”: This is a simple and effective way to confirm a leak. Add a few drops of food coloring (or a toilet dye tablet) to the water in your toilet tank. Wait about 15-20 minutes without flushing. If the colored water appears in the toilet bowl, you have a leak, most likely from the flapper valve, but sometimes excessive water from a faulty fill valve can cause overflow into the bowl.
Common Causes of a Leaking Toilet Tank Valve
Understanding why your toilet tank valve is leaking can help you approach the repair more effectively. Here are the most frequent culprits:
- Worn-Out Rubber Seals/Gaskets: Over time, the rubber components within the fill valve—like the diaphragm gasket—can harden, crack, or degrade. This prevents them from forming a watertight seal, leading to continuous water flow.
- Cracked or Damaged Fill Valve Body: While less common with modern plastic valves, a severe impact or extreme temperature changes could potentially crack the valve body itself.
- Improper Float Height: If the float is set too high, the water level in the tank can rise above the top of the overflow tube. This causes water to constantly spill down the overflow tube into the bowl, even when the fill valve is technically closed, resulting in a continuous leak.
- Sediment or Mineral Buildup: Hard water can deposit mineral scales and sediment inside the fill valve mechanism. This buildup can obstruct the valve’s ability to fully close, leading to a slow but persistent leak.
- Loose Connections: The nut that secures the fill valve to the bottom of the tank, or the connection where the water supply line meets the fill valve, can become loose over time, causing leaks.
- Manufacturing Defects: Rarely, a new fill valve might have a defect from the factory, leading to immediate or early failure.
Tools and Materials You’ll Need for the Repair
Before you start, gather these essential tools and materials. Having everything on hand will make the repair process smoother and quicker.
- Adjustable Wrench: For loosening and tightening nuts on the water supply line and the fill valve.
- Screwdriver (Flathead and Phillips): Might be needed for some valve types or to adjust screws.
- Pliers: For gripping and turning, especially if nuts are stubborn.
- Bucket/Towels: To catch any residual water when disconnecting the supply line or removing the old valve.
- New Fill Valve Kit: If you’re replacing the entire valve, ensure you buy a universal kit that fits most toilets.
- Sponge/Rags: For cleaning the tank and wiping up spills.
- Utility Knife (Optional): To trim the overflow tube if your new valve requires it.
- Gloves (Optional): To keep your hands clean.
Step-by-Step Guide: How to Fix a Leaking Toilet Tank Valve
Replacing a fill valve is a straightforward process. Follow these steps carefully to ensure a successful, leak-free repair.
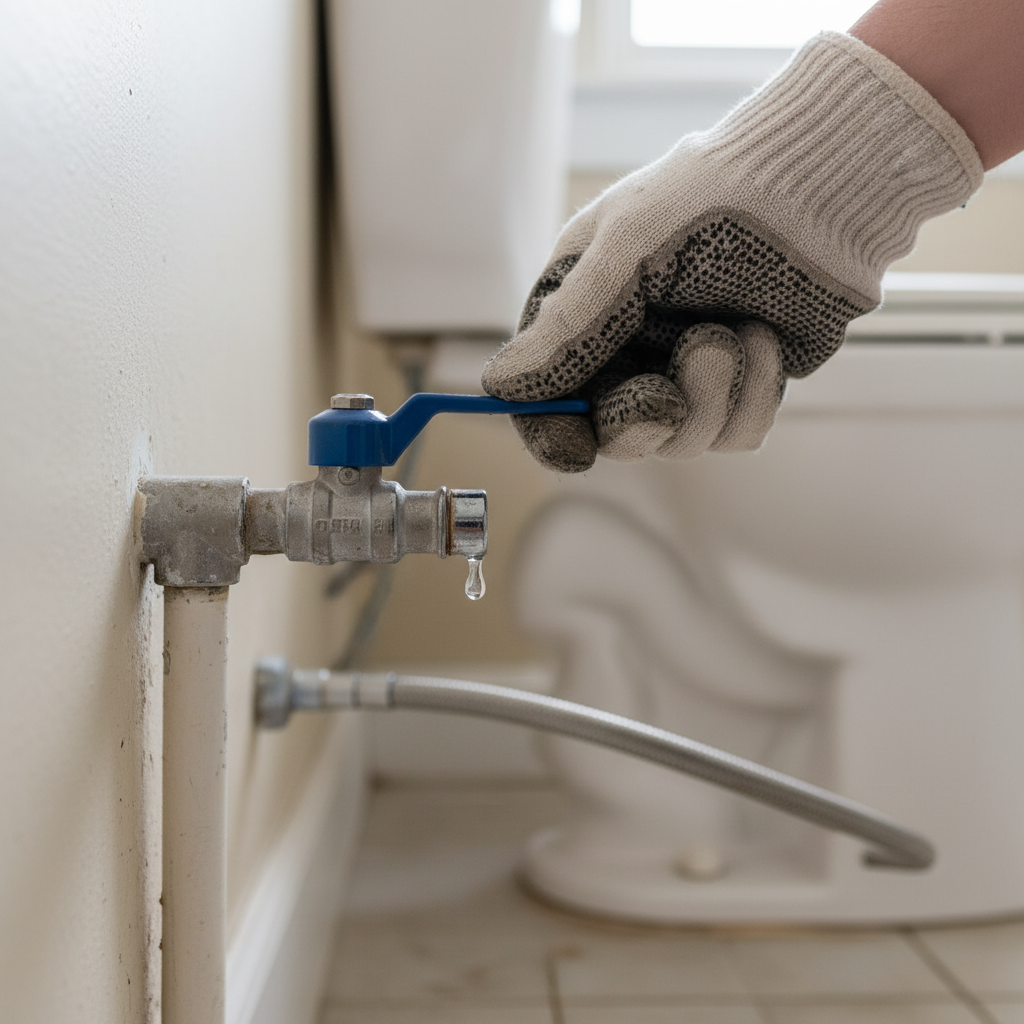
Step 1: Shut Off the Water Supply
Locate the small shut-off valve on the wall near the base of your toilet, typically behind or to the left of the bowl. Turn the handle clockwise until the water supply is completely off. If your toilet doesn’t have a local shut-off valve, you’ll need to turn off the main water supply to your house. Flush the toilet once to verify the water is off; the tank should not refill.
Step 2: Flush the Toilet to Empty the Tank
After turning off the water supply, flush the toilet to drain most of the water from the tank. Hold the handle down until as much water as possible has drained out. Use a sponge or small cup to remove any remaining water from the bottom of the tank. This prevents water from spilling onto your floor when you disconnect components.
Step 3: Disconnect the Water Supply Line
Place your bucket or a thick towel under the toilet’s water supply line connection point, which is typically a flexible hose that connects the wall shut-off valve to the underside of the toilet tank. Using your adjustable wrench, carefully loosen the nut connecting the supply line to the fill valve on the underside of the tank. Turn it counter-clockwise. Be prepared for a small amount of residual water to drip out. Once loose, gently pull the supply line away from the tank.
Step 4: Remove the Old Fill Valve (If Replacing)
Inside the tank, you’ll see the fill valve assembly. On the underside of the tank, directly below where the fill valve enters, there will be a large plastic mounting nut securing it. Use your adjustable wrench (or sometimes pliers, depending on the nut) to loosen this mounting nut by turning it counter-clockwise. Once the nut is fully unscrewed, you can lift the old fill valve assembly straight up and out of the tank. Take this opportunity to clean any sediment or grime from the hole at the bottom of the tank and the surrounding area with a rag or sponge.
Step 5: Install the New Fill Valve
Most modern fill valve kits are universal and come with detailed instructions. Refer to your specific kit’s manual, but the general steps are as follows:
- Insert the New Valve: Place the new fill valve into the hole at the bottom of the toilet tank. Ensure the rubber gasket (usually pre-installed on the new valve) is properly seated against the inside of the tank.
- Tighten the Mounting Nut: From the underside of the tank, thread the new mounting nut onto the shaft of the fill valve. Hand-tighten it first, then use your adjustable wrench to tighten it an additional quarter to half turn. Be firm, but do not overtighten, as this can crack the tank.
- Connect the Refill Tube: Attach the small refill tube from the new fill valve to the clip on the top of the overflow pipe (the central pipe in the tank). Ensure the tube is positioned so water will flow down into the overflow pipe, not spray out. Some valves have an adjustable height for this tube; follow your kit’s instructions.
Step 6: Reconnect the Water Supply Line
Carefully reconnect the water supply line to the bottom of the new fill valve. Hand-tighten the coupling nut first, making sure it’s straight and not cross-threaded. Then, use your adjustable wrench to tighten it gently, about a quarter to half turn past hand-tight. Again, do not overtighten, as this can damage the plastic threads or the supply line.
Step 7: Turn On the Water Supply and Test
Slowly turn the water shut-off valve (clockwise) back on, opening it fully. Watch closely for any leaks around the supply line connection and the fill valve’s mounting nut. As the tank refills, observe the water level. The float should rise with the water, and the fill valve should automatically shut off when the water reaches the desired level (usually about an inch below the top of the overflow tube). If the water continues to run or if the level is too high/low, proceed to the next section for adjustments.
Troubleshooting Minor Leaks and Adjustments
After installation, you might need to make some minor adjustments or troubleshoot small issues:
- Adjusting the Float: Most modern fill valves have an adjustment screw or a clip mechanism on the float assembly. If the water level is too high (causing it to trickle into the overflow) or too low (resulting in a weak flush), adjust the float to raise or lower the water level as needed. The goal is for the water to stop about an inch below the top of the overflow pipe.
- Checking the Refill Tube: Ensure the refill tube is securely clipped to the overflow pipe and that water is flowing into the pipe, not spraying elsewhere. If it’s too deep, it can siphon water out of the bowl.
- Tightening Connections: If you see small drips, gently tighten the supply line connection or the fill valve mounting nut a bit more. Be very cautious not to overtighten.
- Diaphragm Seal Check: Some fill valves allow for the replacement of just the internal diaphragm seal. If your fill valve is still relatively new but leaking, you might be able to replace just this rubber component, which is a quicker and cheaper fix than replacing the entire valve. Check your valve’s manufacturer instructions for this possibility.
Preventing Future Toilet Tank Valve Leaks
A little preventative maintenance can go a long way in extending the life of your toilet components and avoiding future leaks:
- Regular Inspection: Periodically lift your toilet tank lid and inspect the components. Look for signs of wear on rubber parts, listen for continuous running water, and check the water level. Good Housekeeping offers great tips on general toilet maintenance that can help you spot issues early.
- Softening Hard Water: If you live in an area with hard water, mineral buildup can quickly degrade internal components. A whole-house water softener can significantly reduce this problem, extending the life of all your plumbing fixtures.
- Avoid Drop-In Tank Cleaners: While convenient, many drop-in toilet tank tablets contain harsh chemicals that can corrode rubber and plastic components over time, leading to premature failure of your fill valve and flapper. It’s better to clean your toilet bowl manually.
- Annual Maintenance Check: Consider a yearly check of all your toilets. Replace any worn-out flappers or fill valve seals proactively, especially if your toilets are more than 5-7 years old.
When to Call a Professional Plumber
While fixing a leaking toilet tank valve is often a DIY task, there are situations where calling a professional plumber is the best course of action:
- Persistent Leaks: If you’ve followed all the steps and your toilet continues to leak, there might be a more complex underlying issue that requires professional diagnosis.
- Major Damage: If you discover a cracked toilet tank or bowl during your inspection, or if the leak has caused significant water damage to your floor or ceiling below, a plumber is needed for assessment and repair.
- Lack of Confidence/Experience: If you’re uncomfortable working with plumbing or lack the necessary tools, it’s always better to call a professional to prevent further damage.
- Old Plumbing Systems: In older homes, sometimes disconnecting one component can disturb other brittle connections, leading to bigger problems. A professional can handle these situations with care.
- Difficult Access: If the shut-off valve is stuck, broken, or difficult to access, a plumber has the tools and expertise to handle it safely.
FAQs about Leaking Toilet Tank Valves
Q: How much does it cost to replace a toilet fill valve?
A: If you DIY, a new universal fill valve kit typically costs between $15 and $30. If you hire a professional plumber, the cost can range from $75 to $200 or more, depending on your location and the plumber’s rates, which includes parts and labor.
Q: Can I use a universal fill valve?
A: Yes, most modern fill valves are designed to be universal and will fit the vast majority of standard toilet tanks. They often come with adjustable height settings to accommodate different tank sizes. Always check the product description to ensure compatibility, but a standard universal fill valve is usually a safe bet.
Q: How long do toilet fill valves last?
A: A toilet fill valve typically lasts anywhere from 5 to 10 years, depending on water quality, usage, and the quality of the valve itself. Hard water can significantly shorten its lifespan due to mineral buildup and corrosion.
Q: Is a constantly running toilet an emergency?
A: While not typically a burst pipe emergency, a constantly running toilet is an urgent issue. It can waste hundreds or even thousands of gallons of water per day, leading to significantly higher water bills and unnecessary environmental impact. It should be addressed as soon as possible to prevent financial waste and further potential damage.
Q: What’s the difference between a fill valve and a flapper valve?
A: The fill valve (the subject of this article) is responsible for refilling the toilet tank after a flush. The flapper valve (located at the bottom of the tank, covering the opening to the bowl) is responsible for sealing the tank and releasing water into the bowl when you flush. Both can cause a constantly running toilet if they leak, but they serve different functions.
Conclusion
A leaking toilet tank valve is a common plumbing issue that, while annoying, is generally straightforward to diagnose and repair. By understanding the components of your toilet, identifying the signs of a leak, and following our step-by-step guide, you can confidently tackle this DIY project. Regular maintenance and prompt attention to minor issues will not only save you money on water bills and repair costs but also ensure your toilet operates efficiently for years to come. Remember, if you ever feel out of your depth or encounter unexpected complications, a professional plumber is always there to help.


