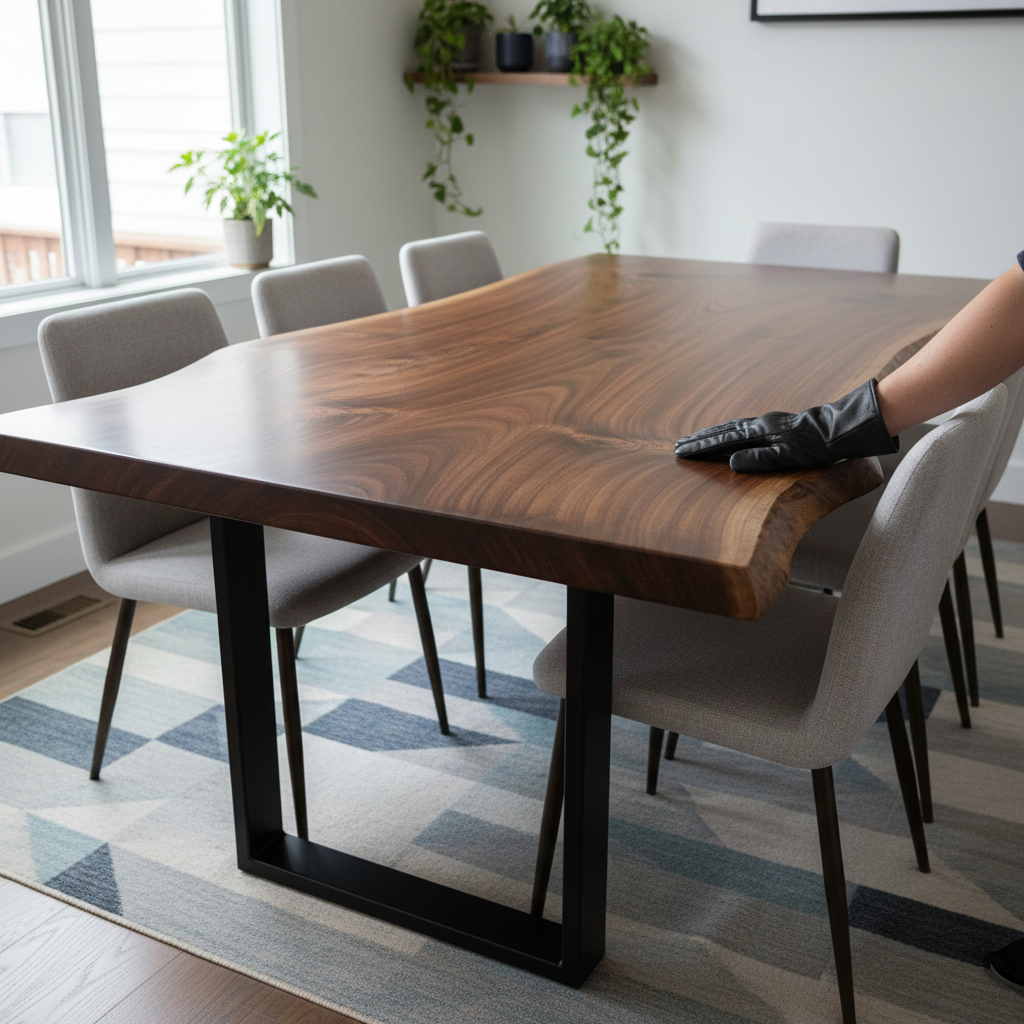
Ever walked into a furniture store and thought, “I could totally build that, but better… and for less?” If you’ve been dreaming of a dining table that truly stands out, one that blends rustic warmth with industrial chic, then you’re in the right place. Building your own wood and metal mixed-material dining table isn’t just a project; it’s an adventure in craftsmanship that results in a unique, custom piece for your home. Trust me, there’s nothing quite like the satisfaction of sharing a meal around a table you built with your own hands.
I’ve seen countless DIY projects, and creating furniture, especially a centerpiece like a dining table, can feel daunting. But with the right guidance, a bit of patience, and a willingness to learn, you’ll surprise yourself. This guide is designed to walk you through the process, from plaing your vision to the final, gleaming finish, drawing on practical experience to help you avoid common pitfalls and enjoy the journey.
Why Choose Wood and Metal? The Best of Both Worlds
Before we dive into the nitty-gritty, let’s talk about why wood and metal are such a fantastic pairing for a dining table:
- Aesthetic Appeal: The natural grain and warmth of wood beautifully contrast with the sleek, often rugged, character of metal. This fusion creates a modern industrial look that’s incredibly versatile, fitting seamlessly into various decor styles from minimalist to farmhouse.
- Unbeatable Durability: Both materials are known for their strength. A solid wood top paired with a sturdy metal base creates a table that can withstand daily use, family diers, and maybe even a few enthusiastic craft sessions for years to come.
- Customization Galore: This isn’t just about building a table; it’s about building your table. You get to choose the wood species, the metal finish, the leg design, and the overall dimensions, ensuring it perfectly fits your space and personal taste. No more compromising on size or style!
- The Pride of Creation: There’s a deep sense of accomplishment that comes with building something substantial and beautiful. Every time you gather around your table, you’ll be reminded of the effort and creativity you poured into it.
Plaing Your Dream Table: Design & Dimensions
The success of your project truly begins long before you pick up a saw or welder. Proper plaing is paramount.
1. Measure Your Space
Grab a measuring tape! How big is your dining area? How many people do you typically need to seat? A good rule of thumb is to allow at least 24-30 inches of table length per person and ensure there’s enough clearance (at least 36-48 inches) between the table and walls or other furniture to comfortably pull out chairs and walk around.
2. Sketch It Out
Don’t be afraid to get creative! Draw different table shapes (rectangular, square, round), leg designs (X-legs, U-legs, A-frames, trestle bases), and how the wood top will interact with the metal base. This visual step helps solidify your vision and spot potential design issues early.
3. Material Selection: The Heart of Your Table
For the Wood Top:
- Hardwoods are King: Oak, walnut, maple, cherry, and even reclaimed wood are excellent choices. They’re durable, beautiful, and can take a beating. Consider your budget; some species are significantly more expensive than others.
- Softwoods (with caution): Pine or fir can be more affordable but are softer and more prone to dents and scratches. If you go this route, ensure a very durable finish.
- Slab vs. Joined Boards: A single live-edge slab offers a natural, organic look but can be pricey. Joining several boards together is a more common and often more affordable approach, allowing you to create any size top.
For the Metal Base:
- Steel is Standard: Mild steel square tubing, rectangular tubing, or flat bar are popular choices. They’re strong, relatively easy to work with (if you’re welding), and can be finished in many ways.
- Aluminum: Lighter than steel, but generally more expensive and requires different welding techniques. Less common for heavy dining table bases.
- Pre-made Legs/Bases: If welding isn’t in your skill set or budget, don’t despair! You can purchase incredibly stylish pre-fabricated metal legs or entire bases online. This significantly simplifies the metalworking aspect of the project.
Gathering Your Arsenal: Tools & Materials List
Here’s a breakdown of what you’ll likely need. Some tools are optional depending on your approach (e.g., buying pre-made metal legs).
Woodworking Tools:
- Miter saw or circular saw (with a good quality blade)
- Table saw (highly recommended for ripping boards accurately)
- Router (for edge profiling, flattening if needed)
- Planer (if working with rough lumber)
- Orbital sander and various grits of sandpaper (80, 120, 180, 220+)
- Wood glue (Titebond III is a popular choice for strong bonds)
- Clamps (lots of them, especially for gluing up a tabletop)
- Drill/driver and appropriate bits
- Measuring tape, straight edge, pencil
- Finishing supplies (stain, oil, polyurethane, brushes/rags)
Metalworking Tools (if fabricating your own base):
- Welder (MIG is often recommended for DIYers due to ease of use)
- Angle grinder (with cutting, grinding, and flap discs)
- Metal saw (chopsaw with metal blade or horizontal bandsaw)
- Clamps (metal clamps, welding magnets)
- Safety gear (welding helmet, gloves, leather apron, eye protection, hearing protection)
- Metal files or deburring tool
- Metal primer and paint (or clear coat)
If you’re buying pre-made legs, you’ll mostly just need a drill, driver, and the appropriate screws or bolts for attachment.
Step-by-Step Construction Guide
Alright, let’s get building! I’ll assume you’re tackling both the wood top and a metal base from scratch, but feel free to adapt if you’re using pre-made components.
Step 1: Preparing Your Wood Top
This is where your tabletop takes shape. Patience is key here for a beautiful, flat surface.
- Sourcing & Cutting: Purchase your lumber (preferably kiln-dried to minimize movement). Cut your boards to the rough length, adding a few inches for trimming later.
- Jointing & Planing (if needed): If your boards aren’t perfectly flat and square, you’ll need to use a jointer to get one flat face and one square edge, then a planer to achieve consistent thickness. This step is crucial for a seamless glue-up.
- Edge Gluing: Apply a generous but even layer of wood glue to the edges of your boards. Clamp them together tightly, ensuring the faces are flush. Use cauls (sacrificial strips of wood clamped across the top and bottom) to keep the tabletop flat during drying. Let the glue cure completely (usually 24 hours).
- Flattening & Squaring: Once dry, remove clamps. You’ll likely have some high spots or uneveess. Use a router sled, hand plane, or a combination of sanding to flatten the top. Then, trim the ends of your tabletop to the final desired length and ensure they are perfectly square.
- Sanding: This is a critical step for a professional finish. Start with a coarser grit (e.g., 80 or 100) to remove milling marks or glue squeeze-out, then progressively move through finer grits (120, 180, 220). Sand until smooth to the touch, always sanding with the grain.
- Edge Profiling (Optional): Use a router with a desired bit (e.g., chamfer, round-over) to soften the edges of your tabletop for comfort and aesthetics.
Step 2: Fabricating the Metal Base
This part requires precision and safety. If you’re new to welding, consider taking a local class or practicing on scrap pieces before tackling your table.
- Accurate Cutting: Using your design plans, precisely cut all metal pieces (legs, stretchers, support brackets) to size. Measure twice, cut once!
- Dry Fit & Clamp: Assemble your base components without welding first. Clamp everything together to ensure all angles are square and dimensions match your plans. This is your chance to make adjustments.
- Tack Welding: Once satisfied with the fit, tack weld the pieces together at key joints. After tacking, double-check all angles and dimensions one last time before fully welding.
- Full Welding: Systematically weld all joints. Aim for strong, consistent welds. Allow welds to cool slowly to prevent warping.
- Grinding & Smoothing: Use an angle grinder to remove excess weld material, smooth out rough spots, and create clean transitions at the joints. A flap disc is excellent for this. The goal is a seamless, professional look.
- Finishing the Metal: Clean the metal thoroughly with a degreaser to remove any oils or grinding dust. Apply a metal primer, then your chosen finish. Popular options include matte black paint, clear coat (to prevent rust and show the raw steel), or a powder coat for extreme durability (requires professional service).
Step 3: Joining Wood & Metal: The Crucial Coection
This step is vital for stability and to allow for wood movement. Wood expands and contracts with changes in humidity, and you don’t want to restrict that movement, or your tabletop could crack.
Here are common methods:
- Z-Clips (Tabletop Fasteners): These are fantastic! They allow the wood top to sit securely on the metal frame while still being able to expand and contract. You’ll need to rout a small dado (groove) on the underside of your tabletop for the Z-clips to slot into, then screw them to the metal frame.
- Figure-8 Fasteners: Similar to Z-clips, these small metal plates are mortised into the wood and screwed to the base. They also allow for movement.
- Slotted Holes: Drill oversized holes (slots) in the metal frame where screws will attach the top. Use washers and don’t overtighten the screws, allowing the wood to shift slightly. For the best result, fix one side firmly and allow the other side to float in the slotted holes.
- Threaded Inserts: If your metal frame has solid members, you can drill and tap holes for threaded inserts directly into the metal, then use machine screws to attach the top. Still, consider slotted holes for wood movement.
Lay your finished wood top upside down on a clean, padded surface. Position your finished metal base precisely where it needs to be. Mark your attachment points, drill pilot holes (if not using Z-clips/figure-8s), and securely fasten the tabletop to the base.
Step 4: The Finishing Touches
You’re almost there! This stage protects your beautiful work and brings out the wood’s natural beauty.
- Final Inspection: Give your entire table a thorough once-over. Are there any missed spots on the metal finish? Any stray glue squeeze-out on the wood?
- Wood Finish Application: Apply your chosen wood finish according to the manufacturer’s instructions. This could be a penetrating oil (like Rubio Monocoat, Osmo Polyx-Oil, or Danish oil for a natural feel), a stain followed by a protective topcoat (polyurethane, lacquer), or an epoxy pour for extreme durability and a glossy look. Apply multiple thin coats, sanding lightly between coats with a fine grit (e.g., 320-400) if recommended.
- Cure Time: Allow your finish ample time to fully cure before heavy use. This can take several days or even weeks, depending on the product.
Troubleshooting Common DIY Table Challenges
- Wobbly Table: This is often due to an uneven base, poorly joined legs, or an uneven floor. Check all your joints on the metal base for squareness and tightness. Use adjustable feet levelers on the bottom of your metal legs.
- Sagging Top: If your wood top is very long and relatively thin, it might sag over time. Ensure your metal base provides adequate support along the length of the table. Adding a central stretcher or more support points can help.
- Uneven Wood Finish: Usually caused by inadequate sanding, uneven application, or not wiping off excess oil/stain properly. Always sand thoroughly and apply finish in thin, even coats.
- Scratched Metal Finish: A common issue. Consider a durable paint or powder coating if you anticipate heavy use. Minor scratches can often be touched up with matching paint.
Customization Ideas to Make It Yours
Once you’ve mastered the basics, think about how you can truly personalize your next project:
- Live Edge Top: Embrace the natural contours of a wood slab for a stuing, organic look.
- Integrated Storage: Add a small shelf or drawer underneath for placemats or condiments.
- Different Leg Geometries: Experiment with trapezoid legs, double pedestals, or a unique truss design.
- Mixed Metal Finishes: Combine polished stainless steel with blackened mild steel for contrast.
- Epoxy River Table: Incorporate a colorful epoxy resin “river” down the center of your wood top.
Conclusion
Building your own wood and metal dining table is a rewarding experience that combines skill, creativity, and patience. From selecting the perfect pieces of wood and metal to crafting each joint and applying the final finish, every step brings you closer to a truly unique piece of furniture that reflects your personal style. It’s more than just a table; it’s a conversation starter, a gathering point, and a testament to your hands-on abilities.
So, roll up your sleeves, gather your tools, and embark on this fantastic DIY journey. You’ll not only save money but also gain invaluable skills and the immense satisfaction of knowing you crafted something beautiful and enduring for your home. Now, go forth and build that dream table!


