Ever look at your aluminum window frames and feel like they’re dragging down the whole vibe of your home? Faded, chalky, or just an outdated color, they can really make your exterior look tired. But guess what? You don’t have to live with them, and you certainly don’t have to replace them to get a fresh, modern look!
I’ve been there. My own aluminum frames were looking sad and oxidized, and a full replacement wasn’t in the budget. So, I rolled up my sleeves, did my research, and tackled the project myself. And let me tell you, the transformation was incredible! Repainting your aluminum window frames is a fantastic, budget-friendly DIY project that can dramatically boost your home’s curb appeal. And the best part? It’s totally achievable, even if you’re not a seasoned painter. I’m going to walk you through every step, sharing all the tips and tricks I learned along the way to ensure you get a professional, long-lasting finish.
Why Repaint Your Aluminum Window Frames? More Than Just Aesthetics!
You might think repainting is just about making things look pretty, but there’s more to it, especially with aluminum. Here’s why I wholeheartedly recommend this project:
- Instant Curb Appeal Boost: This is probably the most obvious benefit. A fresh coat of paint in a modern color (hello, matte black or sleek gray!) can completely transform the exterior of your home, making it look newer and more appealing.
- Cost-Effective Renovation: Replacing window frames is incredibly expensive. Repainting them offers a fraction of the cost for a similar visual impact. My wallet certainly thanked me!
- Protection Against the Elements: Over time, aluminum can oxidize and degrade. A quality paint job adds an extra layer of protection against sun, rain, and environmental wear, potentially extending the life of your frames.
- Personalization: Stuck with builder-grade bronze or silver? Repainting gives you the freedom to choose any color that matches your home’s style and your personal taste.
Gather Your Arsenal: What You’ll Need for a Flawless Finish
Before you dive in, make sure you have all your tools and materials ready. Trust me, nothing derails a DIY project faster than realizing you’re missing something crucial halfway through!
Essential Tools & Materials:
- Drop Cloths or Plastic Sheeting: To protect your surrounding walls, landscaping, and the ground below.
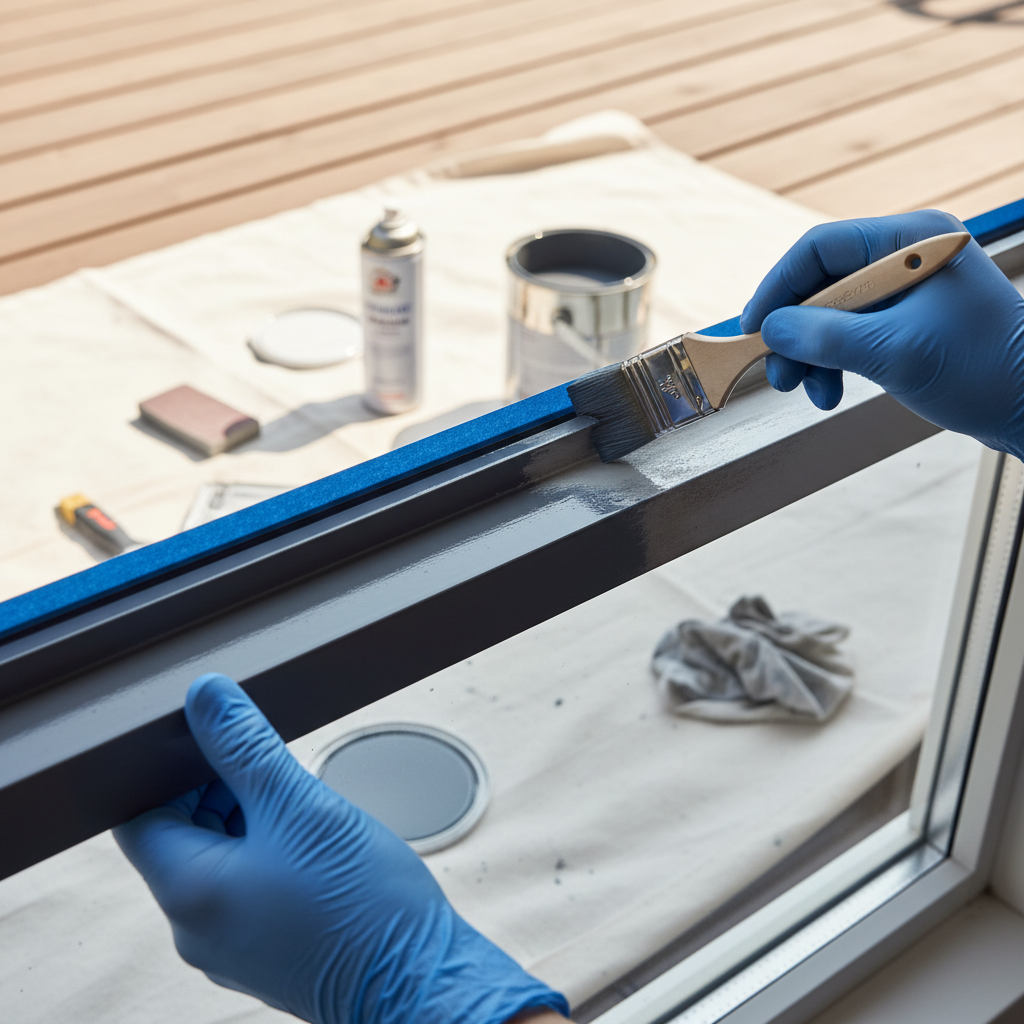
- Painter’s Tape: High-quality tape is non-negotiable for crisp lines. I recommend frog tape or similar for clean edges.
- Cleaning Solution: A good degreaser or TSP (Trisodium Phosphate) substitute is ideal. Even just warm water and dish soap can work for light cleaning.
- Rags or Microfiber Cloths: For cleaning and wiping down surfaces.
- Sandpaper: Various grits – 220-grit for general scuffing, 320-grit or finer for a smoother finish if needed. Sanding sponges can also be very helpful for contoured areas.
- Etching or Self-Etching Primer: This is CRITICAL for aluminum. It helps the paint adhere properly to the smooth, non-porous surface. Don’t skip this step!
- Exterior Grade Paint for Metal: Choose a paint specifically designed for exterior use on metal surfaces. Acrylic latex or oil-based enamel are common choices. Consider a semi-gloss or satin finish for durability and easy cleaning.
- Brushes and/or Rollers: High-quality synthetic brushes for cutting in and detail work, and a small foam roller for larger flat surfaces.
- Safety Gear: Gloves, safety glasses, and a respirator or face mask (especially when sanding or using aerosol primers/paints).
- Screwdriver/Pry Tool: To remove any old caulk if necessary.
- Caulk Gun & Exterior Caulk (Paintable): For re-sealing any gaps after painting, if needed.
Prep Work is Key: The Foundation of a Flawless Finish
I caot stress this enough: preparation is 80% of the job! Skimp on prep, and your beautiful new paint job will chip, peel, and look terrible io time. For aluminum, especially, proper cleaning and priming are paramount.
Step 1: Clean, Clean, Clean!
Aluminum frames often accumulate dirt, grime, and oxidation over the years. This needs to go. Mix your cleaning solution (TSP substitute according to package directions, or a good degreaser) with water. Using a rag or sponge, thoroughly scrub down every surface of the frames. Pay attention to corners and edges where gunk loves to hide. Rinse thoroughly with clean water, making sure no residue remains. Let the frames dry completely. A leaf blower or compressed air can help speed this up, or just good old sunshine.
Step 2: Masking Off Like a Pro
This is where your painter’s tape comes in. Carefully apply tape to all adjacent surfaces you don’t want painted: the glass, the surrounding wall/siding, hinges, locks, and weather stripping. Take your time to ensure straight, crisp lines. Press the tape down firmly with a putty knife or your finger to prevent paint bleed. If you have large areas of glass or walls, use drop cloths or plastic sheeting secured with tape to cover them.
Step 3: Sanding for Adhesion
Sanding aluminum isn’t about removing layers; it’s about creating a “tooth” for the primer to grip onto. Aluminum is smooth, and paint struggles to adhere to smooth surfaces. Using 220-grit sandpaper or a sanding sponge, lightly scuff all surfaces of the frame. You’re not trying to strip anything down, just lightly abrade the surface. For any areas with existing flaking paint or heavy oxidation, you might need a slightly coarser grit (e.g., 180-grit) but use it gently. Once done, wipe down the frames thoroughly with a clean, damp cloth to remove all sanding dust, then let it dry.
Step 4: A Final Wipe Down
Seriously, one more time! Even if you think it’s clean, give it a quick wipe with a lint-free cloth dampened with rubbing alcohol or denatured alcohol. This ensures absolutely no oils, dust, or contaminants are left behind that could interfere with primer adhesion.
Priming Time: The Secret to Long-Lasting Adhesion
I’ve seen so many DIYers skip primer, especially on metal, and it almost always ends in disaster. On aluminum, an etching or self-etching primer is your best friend. These primers contain chemicals that slightly “etch” the metal surface, creating a superior bond.
Apply your chosen primer in thin, even coats. Avoid thick, gloppy layers, as these will sag and take forever to dry. Follow the manufacturer’s instructions for drying times between coats. Usually, two thin coats are better than one thick one. This step is non-negotiable for a durable, professional-looking finish that won’t chip or peel prematurely. If you choose a spray primer, make sure you’re in a well-ventilated area and wearing a respirator.
Painting Your Way to Perfection: The Color Transformation
Once your primer is completely dry and cured according to the instructions, it’s time for the fun part: adding color! Again, patience and thin coats are your mantra here.
Step 1: Choose Your Paint Wisely
As mentioned, use an exterior-grade paint specifically formulated for metal. I’ve had great success with high-quality acrylic latex enamels, which offer good durability and flexibility. Oil-based enamels are also an option for maximum hardness, but they can be a bit more challenging to work with (longer dry times, stronger fumes, harder cleanup). Consider your desired sheen: satin or semi-gloss are popular as they are easy to clean and hide minor imperfections better than high-gloss.
Step 2: Application Techniques
- Brushing: For intricate details, corners, and edges, a good quality synthetic brush is your friend. Dip about one-third of the bristles into the paint, then apply in smooth, even strokes. Don’t overload the brush.
- Rolling: For flatter, larger sections of the frame, a small foam roller can give you a super smooth, even finish quickly. Roll with light, even pressure.
- Spraying (Advanced): If you have access to a paint sprayer and are comfortable using it, this can provide the smoothest, most factory-like finish. However, it requires significantly more masking to protect against overspray.
Step 3: Multiple Thin Coats
Just like with the primer, two or even three thin coats of paint will always look better and last longer than one thick coat. Thick coats tend to sag, show brush marks, and take ages to dry, making them prone to imperfections. Allow each coat to dry completely according to the paint manufacturer’s recommendations before applying the next. This could be a few hours or even overnight, depending on temperature and humidity.
The Grand Reveal: Finishing Touches and Cleanup
You’re almost there! Once your final coat of paint is dry to the touch (but not fully cured!), it’s time for the big reveal.
Step 1: Remove Painter’s Tape
Carefully and slowly pull off the painter’s tape while the paint is still slightly tacky. If you wait until the paint is fully cured, the tape can sometimes pull off dried paint along with it, especially if it’s thick. Pull at a 45-degree angle away from the freshly painted surface for the cleanest line. If you notice any small areas of bleed, you can carefully scrape them off with a razor blade (on glass) or touch them up with a small brush.
Step 2: Touch-Ups and Inspections
Walk around your newly painted frames. Are there any spots you missed? Any tiny imperfections? Use a small artist’s brush to carefully touch up any areas that need it. Resist the urge to over-paint, just a light touch. Also, check if any old caulk was removed or damaged during the process. If so, apply a fresh bead of paintable exterior caulk to seal any gaps, ensuring a watertight and professional finish.
Step 3: Clean Up Your Tools
Clean your brushes, rollers, and other tools immediately after use. Water-based paints clean up easily with soap and water. Oil-based paints will require mineral spirits. Proper cleaning will ensure your tools are ready for your next DIY adventure!
Step 4: Allow Curing Time
While your paint might be dry to the touch in a few hours, it takes several days, sometimes weeks, for it to fully cure and harden. During this time, be gentle with your windows. Avoid aggressive cleaning or bumping the frames.
My Top Tips for a Professional Finish
- Work in Good Weather: Aim for a day that’s not too hot, not too cold, not too humid, and definitely not rainy. Ideal temperatures are usually between 50-85°F (10-30°C).
- Don’t Rush Drying Times: This is a big one. Manufacturers’ instructions are there for a reason. Rushing between coats can lead to poor adhesion and a less durable finish.
- Invest in Quality: Good brushes and paint aren’t just for pros. They make the job easier, give better results, and are often worth the extra cost.
- Test the Color: If you’re unsure about a color, buy a small sample and paint it on an inconspicuous part of the frame or on a piece of scrap metal. View it at different times of day.
- Safety First: Always wear your safety gear. Fumes, dust, and chemicals are no joke.
Ready for Your Window Transformation?
Repainting your aluminum window frames might seem like a daunting task at first, but by breaking it down into manageable steps and focusing on thorough preparation, it becomes a rewarding project. The satisfaction of stepping back and seeing your home’s exterior completely revitalized is truly unmatched. I still smile every time I look at my “new” windows, knowing I did it myself.
So, what are you waiting for? Grab your supplies, put on some tunes, and get ready to give your windows—and your home—the fresh, modern look they deserve!


