There are few things more frustrating on a hot day than an air conditioner that just isn’t doing its job. You turn it on, expect that refreshing blast of cool air, but instead, you’re met with lukewarm breezes or a complete lack of temperature change. If your AC not cooling enough, don’t panic! While a professional HVAC technician might be necessary, there are several common issues you can troubleshoot yourself before reaching for the phone. This comprehensive guide will walk you through a step-by-step checklist to identify and potentially resolve why your AC isn’t cooling as effectively as it should, helping you restore comfort to your home and potentially save on costly service calls.
The Frustration of an Underperforming AC
An underperforming air conditioner doesn’t just make your home uncomfortable; it can also lead to higher energy bills as the unit struggles to reach your desired temperature. Understanding the potential culprits behind your AC’s lackluster performance is the first step toward finding a solution. From simple user errors to more complex mechanical failures, we’ll cover the most frequent reasons why your AC might be struggling to keep you cool.

Crucial Preliminary Checks: Your First Line of Defense
Before you start poking around your AC unit with tools, begin with the easiest and most often overlooked checks. These initial steps are designed to rule out simple issues that can often mimic more serious problems.
Is Your Thermostat Set Correctly?
It sounds obvious, but a misconfigured thermostat is a surprisingly common reason for an AC not cooling effectively. Many people might assume their thermostat is fine, but a quick double-check can save a lot of hassle.
- Mode Setting: Ensure your thermostat is set to “Cool” or “Auto” and not “Heat” or “Fan Only.”
- Temperature Setting: Verify that the desired temperature setting is significantly lower than the current room temperature. If it’s set too high, the AC won’t kick in to cool.
- Fan Setting: Make sure the fan setting is on “Auto” rather than “On.” When set to “On,” the fan runs continuously, which can sometimes make the air feel less cool because it’s constantly circulating unconditioned air. “Auto” ensures the fan only runs when the cooling cycle is active.
- Battery Check: If your thermostat runs on batteries, check if they need replacing. Low batteries can cause intermittent operation or display issues.
- Recalibration/Reset: Some smart thermostats might benefit from a soft reset or recalibration according to the manufacturer’s instructions.
A properly functioning and correctly set thermostat is fundamental to your AC’s operation. This simple check can often resolve issues without any further investigation.
Check Your Air Filter: The Silent Culprit
A dirty air filter is perhaps the most common and easily fixable reason an AC unit struggles to cool. Your air filter is designed to trap dust, pollen, pet dander, and other airborne particles, preventing them from entering your HVAC system and circulating throughout your home. Over time, this filter becomes clogged, restricting airflow significantly.
- Restricted Airflow: A clogged filter forces your AC to work harder to pull air through, reducing its efficiency and cooling capacity. It also means less cool air reaches your living spaces.
- Frozen Evaporator Coil: Severe airflow restriction can cause the evaporator coil (located in your indoor unit) to freeze over. When this happens, the coil becomes a block of ice, preventing heat absorption and air conditioning altogether.
- How to Check: Locate your air filter (usually in the return air duct or within the indoor air handler). Remove it and hold it up to a light source. If you can’t see light through it, or it’s visibly caked with dirt and dust, it needs to be replaced.
- Replacement Frequency: Most manufacturers recommend changing your air filter every 1-3 months, especially if you have pets, allergies, or live in a dusty environment.
Replacing a dirty air filter with a clean one is a quick, inexpensive fix that can dramatically improve your AC’s cooling performance and energy efficiency. It’s an essential part of regular home maintenance.
Inspect Your Vents: Blockages and Airflow
Even if your AC unit is working perfectly, blocked vents can prevent cool air from reaching your rooms, leaving you feeling hot and bothered.
- Clear Obstructions: Walk around your home and ensure all supply vents (where cool air comes out) are open and unobstructed by furniture, curtains, rugs, or decorative items.
- Don’t Close Too Many Vents: While it might seem logical to close vents in unused rooms, closing too many can actually be detrimental to your AC system. It can create back pressure, reducing efficiency and potentially leading to system strain or freezing issues. Ideally, keep all vents open to allow for proper airflow throughout the system.
Ensuring proper airflow from your vents is crucial for distributing the cool air your AC produces effectively.
Outdoor Unit Inspection: The Condenser’s Role
Your outdoor AC unit, known as the condenser, plays a critical role in expelling heat from your home. If it’s not working efficiently, your AC won’t be able to cool properly.
Clear Debris Around the Condenser Unit
The outdoor condenser unit houses the compressor and condenser coils, which are responsible for releasing heat extracted from your home into the outside air. For this process to be efficient, airflow around the unit must be unrestricted.
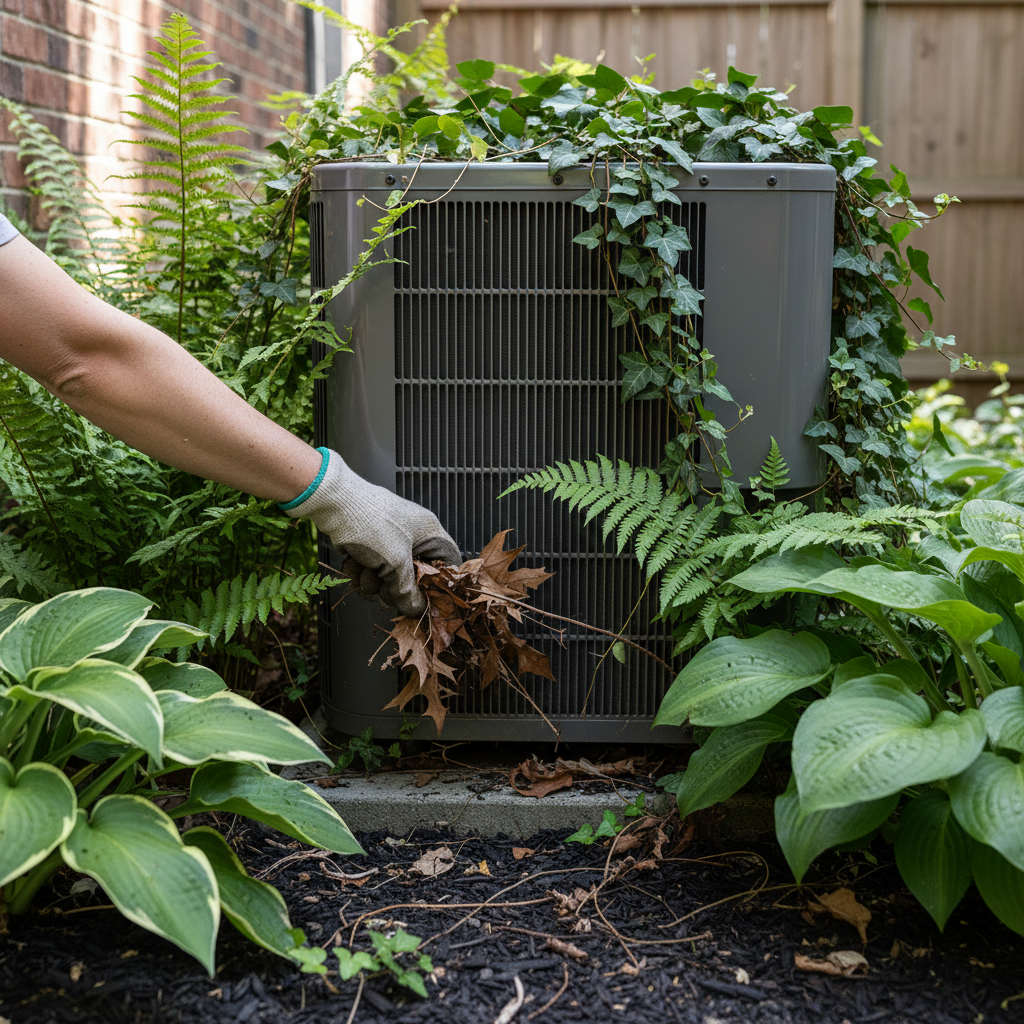
- Accumulated Debris: Over time, leaves, grass clippings, dirt, spiderwebs, and other yard debris can accumulate on and around the condenser unit.
- Reduced Heat Dissipation: This debris acts as an insulator, preventing the coils from effectively releasing heat. When the condenser can’t dissipate heat, the refrigerant remains warmer, and the AC struggles to cool your home.
- How to Check and Clear: Ensure the power to your outdoor unit is OFF at the breaker box for safety. Carefully remove any large debris from the top and sides of the unit. Trim back any shrubs, bushes, or tall grass that are within two feet of the unit on all sides. This allows for proper airflow.
Maintaining a clear perimeter around your condenser unit is a simple yet effective way to boost its efficiency.
Wash the Condenser Coils
Beyond surface debris, the delicate fins of the condenser coils can become clogged with a layer of grime, dirt, and dust. This is particularly true if you live in a dusty area, have pets, or your unit is near a dryer vent.
- Impact of Dirty Coils: Just like a dirty air filter restricts airflow inside, dirty condenser coils restrict heat transfer outside. This makes your AC work harder, increases energy consumption, and reduces its cooling capacity.
- How to Clean:
- Safety First: Absolutely crucial – turn off the power to your outdoor unit at the main electrical panel (breaker box) before touching anything.
- Remove Outer Casing (if applicable): Some units have a protective cage or top grill that can be removed for better access to the coils.
- Gentle Rinse: Using a garden hose with a gentle spray nozzle (do NOT use a high-pressure washer, as it can bend the delicate fins), spray the coils from the inside out to push dirt away from the unit. If you can only spray from the outside, do so gently, aiming to rinse dirt downwards and out.
- Coil Cleaner (Optional): For stubborn grime, you can purchase a specialized no-rinse coil cleaner from an HVAC supply store. Follow the product instructions carefully.
- Allow to Dry: Let the coils air dry completely before restoring power.
Cleaning your condenser coils can significantly improve your AC’s heat exchange capabilities. For more detailed guidance on maintaining your outdoor unit, you might find valuable tips from reputable home and garden sources. For instance, Good Housekeeping offers practical advice on cleaning your outdoor AC unit.
Indoor Unit Examination: The Evaporator and Drainage
The indoor unit, or air handler, contains the evaporator coil, which is responsible for absorbing heat from your home’s air. Problems here directly impact cooling.
Look for a Frozen Evaporator Coil
If your AC is running but blowing warm air or very little air, a frozen evaporator coil is a likely culprit. This happens when the coil gets too cold, and moisture in the air condenses and freezes onto its surface.
- Symptoms: You might see ice on the copper lines entering your indoor unit, a visible layer of ice on the coil itself (if accessible), reduced airflow from vents, or water leaking from the indoor unit.
- Common Causes:
- Dirty Air Filter: The most common cause, as restricted airflow prevents the coil from absorbing enough heat, causing it to overcool.
- Low Refrigerant: A leak in the system can lead to low refrigerant pressure, which in turn causes the evaporator coil to get excessively cold and freeze.
- Blocked Condensate Drain Line: If water can’t drain, it can back up and freeze on the coil.
- Faulty Blower Fan: If the indoor fan isn’t moving enough air across the coil, it can also lead to freezing.
- What to Do:
- Turn Off AC (Cooling): Immediately switch your thermostat from “Cool” to “Off.”
- Run Fan Only: Set the fan to “On” (not “Auto”). This will help melt the ice off the coil faster and circulate air, reducing the chance of water damage.
- Wait: Allow several hours for the coil to completely thaw. You might want to place towels around the indoor unit to catch any dripping water.
- Address the Cause: Once thawed, replace your air filter if it’s dirty. If the problem persists after changing the filter, or if you suspect a refrigerant leak, it’s time to call a professional.
A frozen coil is a clear sign that something is amiss, and while thawing it is a temporary fix, identifying and resolving the root cause is essential.
Check the Condensate Drain Line
As your AC cools, it removes humidity from the air, and this moisture collects on the evaporator coil. This water then drains into a pan and exits your home through a condensate drain line. If this line becomes clogged, water can back up.
- Clog Symptoms: Water leaking from the indoor unit, moldy or musty smells, or the AC unit shutting off automatically (some units have a safety switch that triggers when the drain pan overflows).
- How to Check and Clear:
- Safety First: Turn off the power to your indoor unit at the breaker box.
- Locate Drain Line: Find the condensate drain line, usually a PVC pipe that comes out of your indoor unit and often runs outdoors.
- Clear the Clog: You can often clear minor clogs by carefully pouring a cup of distilled vinegar (not bleach, as it can corrode certain components) down the access port on the drain line or by using a wet/dry shop vacuum to suction out the blockage from the outdoor end of the pipe.
- Flush: After clearing, flush with water to ensure it flows freely.
A clear condensate drain line is vital for preventing water damage and maintaining efficient operation.
Deeper Dive: When Things Get More Technical
If the above checks haven’t solved your problem, the issue might be more complex, often requiring the expertise of a professional HVAC technician. However, knowing about these potential problems can help you understand what might be happening and communicate effectively with a service technician.
Low Refrigerant Levels (Freon/Coolant)
Refrigerant (often called Freon, though that’s a brand name for R-22) is the chemical compound that absorbs heat from your indoor air and releases it outside. Your AC unit is a closed system, meaning refrigerant should never “run out” or need to be “recharged” unless there’s a leak.
- Signs of Low Refrigerant:
- The AC is running constantly but barely cooling.
- Hissing or bubbling noises coming from the outdoor unit (indicating a leak).
- Ice buildup on the evaporator coil or the larger copper line (suction line) entering the outdoor unit.
- Higher utility bills as the unit struggles.
- Why it’s a Problem: Low refrigerant prevents proper heat transfer. If the levels are too low, the system can’t absorb enough heat indoors, leading to poor cooling and potentially causing components like the compressor to overheat and fail.
- Professional Help Needed: Diagnosing and fixing a refrigerant leak, as well as recharging the system, requires specialized tools and EPA certification. This is NOT a DIY job and is illegal for untrained individuals.
Fan Motor Issues (Indoor Blower or Outdoor Condenser Fan)
Both your indoor and outdoor units have fans that are critical for moving air and facilitating heat exchange.
- Indoor Blower Motor: This fan pushes cool air through your home’s ductwork. If it’s failing or the blower wheel is dirty, airflow will be reduced, and your home won’t cool effectively. You might hear squealing or grinding noises, or the fan might not spin at all.
- Outdoor Condenser Fan: This fan pulls air over the condenser coils to dissipate heat. If it’s not working, heat can’t be released, and the compressor can overheat, potentially shutting down the entire unit. You might notice the outdoor unit running, but the fan blades aren’t spinning, or it’s making unusual noises.
- What to Check (Safely): With the power OFF at the breaker, you can gently try to spin the fan blades by hand. If they are stiff or wobbly, it could indicate a motor bearing issue. Ensure there are no obstructions (like sticks or debris) preventing the blades from spinning.
- Professional Help Needed: Fan motor replacement or repair typically requires a professional.
Electrical Problems
An AC system has various electrical components, and a fault in any of them can lead to cooling issues or complete system shutdown.
- Tripped Circuit Breaker: Your AC unit draws a lot of power, and if there’s an overload or a short, its dedicated circuit breaker in your electrical panel might trip. Check your electrical panel and reset any tripped breakers. If it trips repeatedly, there’s a more serious electrical issue.
- Faulty Capacitors: Capacitors are like batteries that provide a jolt of electricity to start the fan motor and compressor, and then help them run efficiently. A failing capacitor (common in older units) can cause the fan or compressor not to start, or to run sluggishly.
- Worn Wiring/Connections: Loose or corroded wiring can interrupt power flow to critical components.
- Professional Help Needed: Electrical issues can be dangerous and should always be diagnosed and repaired by a qualified HVAC technician or an electrician.
Preventing Future AC Woes: Regular Maintenance is Key
Many of the problems that cause an AC not cooling enough can be prevented with routine maintenance. A proactive approach can extend the life of your unit, improve its efficiency, and save you money in the long run.
- Annual Professional Tune-Ups: Schedule a professional HVAC technician to inspect, clean, and tune-up your system annually, ideally in the spring before the cooling season begins. They will check refrigerant levels, electrical connections, moving parts, and overall system performance.
- Regular Filter Changes: Make changing your air filter a habit. Set a reminder on your phone or mark it on your calendar.
- Keep Units Clean: Regularly clear debris from around your outdoor condenser unit and consider gently rinsing the coils once a year.
- Inspect Ductwork: Periodically check your home’s ductwork for any obvious leaks or disconnections, which can lead to significant air loss. Sealing leaks can improve efficiency.
- Smart Thermostat Usage: Utilize programmable or smart thermostat features to manage temperatures efficiently, avoiding extreme temperature settings.
When to Call a Professional HVAC Technician
While DIY troubleshooting can resolve many common AC problems, there are times when professional expertise is essential. Don’t hesitate to call a certified HVAC technician if:
- The Issue Persists: You’ve gone through all the basic checks, and your AC is still not cooling effectively.
- Strange Noises or Smells: Grinding, banging, hissing, or bubbling noises, or burning/musty smells, indicate serious internal problems.
- Refrigerant Concerns: You suspect a refrigerant leak or low refrigerant levels. Handling refrigerant without proper training and equipment is dangerous and illegal.
- Electrical Problems: Repeatedly tripped breakers, sparks, or exposed wiring should only be handled by a qualified professional.
- Complex Repairs: Any issue involving internal components like the compressor, fan motors, or circuit boards.
- Safety First: If you feel uncomfortable or unsure about any step, always err on the side of caution and call a professional.
Frequently Asked Questions About AC Not Cooling Enough
Q: Why is my AC blowing air but not cooling?
A: This is a common symptom. The most frequent causes include a dirty air filter, a frozen evaporator coil, low refrigerant levels (due to a leak), or a problem with the outdoor condenser unit (e.g., dirty coils, a non-working fan). Start by checking your air filter and looking for ice on the indoor unit.
Q: Can I add refrigerant myself?
A: No. Adding refrigerant requires specialized tools, training, and EPA certification. Refrigerant is a regulated substance, and simply “topping off” the system without finding and fixing a leak is a temporary and often harmful solution. It’s illegal for untrained individuals to handle refrigerant.
Q: How often should I clean my AC coils?
A: You should inspect and clear debris from around your outdoor condenser coils annually and gently rinse them with a garden hose. The indoor evaporator coils are less exposed to external dirt but should be professionally cleaned every few years as part of a routine maintenance check, especially if you notice a decrease in efficiency.
Q: What temperature should I set my thermostat for optimal cooling and efficiency?
A: For a balance of comfort and energy efficiency, many experts recommend setting your thermostat between 72°F and 78°F (22°C to 26°C) during the summer months when you are home. Setting it too low makes the AC work harder, consumes more energy, and doesn’t necessarily make you feel cooler due to humidity.
Having your AC not cooling enough can be a real headache, but by systematically checking the common issues outlined in this guide, you might be able to diagnose and even fix the problem yourself. Remember, regular maintenance is your best defense against AC breakdowns. If your efforts don’t resolve the issue or if you encounter complex problems, don’t hesitate to contact a qualified HVAC professional. They have the expertise and tools to safely and effectively get your cooling system back to peak performance, ensuring your home remains a comfortable haven all summer long.


