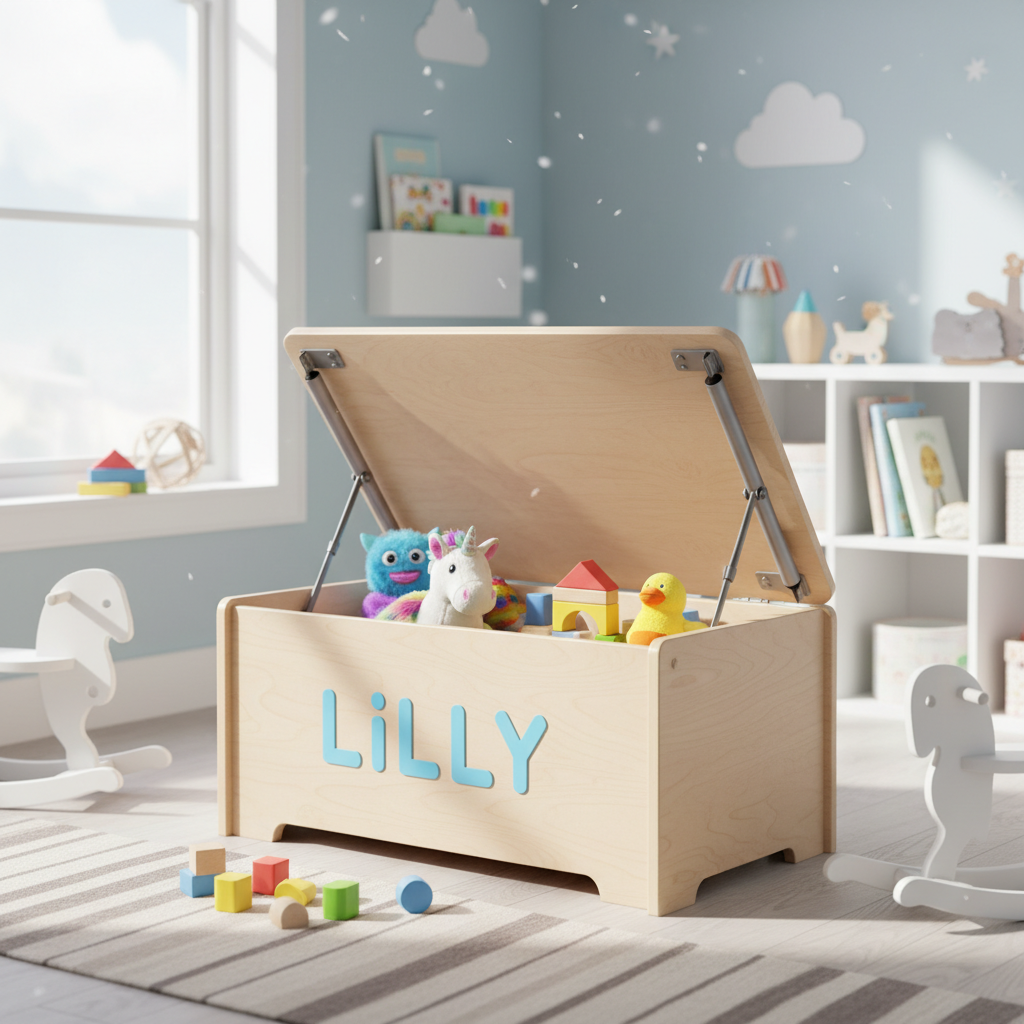
Oh, the joys of parenthood! Among the many delightful challenges, one stands out in almost every home with little ones: the relentless, ever-multiplying toy clutter. Stuffed animals, building blocks, tiny cars, and action figures seem to sprout from every corner. If you’re nodding along, you’ve probably considered a toy chest. But why settle for a flimsy, mass-produced option when you can create something truly special, sturdy, and most importantly, incredibly safe for your child? Today, we’re diving into the wonderful world of DIY to build a wooden child’s toy chest complete with essential safety hinges.
I remember when my own living room started resembling a toy-filled obstacle course. My initial thought was to just buy a toy chest, but then I started thinking about pinched fingers, falling lids, and the general durability of mass-market products. That’s when the idea sparked: I’ll build one myself! Not only would it be custom-fit for our space, but I could ensure it met the highest safety standards. And let me tell you, there’s an immense sense of pride in seeing your child safely and happily rummage through something you built with your own two hands. Ready to roll up your sleeves? Let’s get started!
Why Build, Not Buy? The Joy of DIY for Your Little Ones
You might be thinking, “Isn’t it just easier to buy one?” And yes, in some ways, it might seem so. But building your own toy chest offers a treasure trove of benefits that a store-bought item simply can’t match:
- Personalization: You get to choose the exact dimensions, wood type, finish, and even add personal touches like your child’s name or custom designs. It becomes a unique piece, not just another piece of furniture.
- Quality Control: This is a big one, especially for furniture meant for children. You select the best, non-toxic materials, ensuring superior craftsmanship and durability that will withstand years of enthusiastic play. No more wobbly parts or cheap particle board!
- Cost-Effectiveness: Often, building a high-quality wooden toy chest yourself can be more affordable than buying a comparable, well-made one. Plus, you’re investing in skills that will serve you for future DIY projects.
- The Pride of Creation: There’s an unparalleled satisfaction in creating something tangible and useful for someone you love. Every time your child uses it, you’ll be reminded of the care and effort you put into it.
- Uncompromised Safety: This is arguably the most crucial point. When you build it yourself, you have complete control over every safety feature, especially the hinges, ensuring there are no shortcuts taken. You’ll know *exactly* how safe it is.
Safety First, Always: Understanding Safety Hinges
Before we even touch a piece of wood, let’s talk about the star of our show: safety hinges. For a child’s toy chest, these are non-negotiable. A heavy lid can be a serious hazard, leading to pinched fingers, hands, or even head injuries if it slams shut unexpectedly.
So, what exactly are safety hinges? They’re often called “lid stays,” “soft-close hinges,” or “gas struts.” Their primary function is to prevent the lid from slamming shut and to hold it open at various angles without it falling. This gives your child plenty of time to safely retrieve or put away their toys without fear of injury.
When you’re shopping for these, look for:
- Gas Struts: These are like miniature shock absorbers. They provide smooth, controlled opening and closing, and will hold the lid securely at any position. Make sure to get ones rated for the weight and size of your lid.
- Spring-Loaded Lid Supports: Similar to gas struts, these use spring tension to control the lid’s movement.
- Heavy-Duty Lid Stays: Some simple mechanical stays can hold the lid open at a 90-degree angle. While better thaothing, the soft-close feature of gas struts offers superior protection.
I highly recommend investing in good quality gas struts. They offer the best protection and peace of mind. Make sure to read the manufacturer’s instructions carefully, as installation can vary.
Gathering Your Arsenal: Tools and Materials You’ll Need
Every great project starts with the right gear. Here’s a comprehensive list of what you’ll need. Don’t be intimidated; many of these tools are versatile and will serve you well for future home projects!
Materials:
- Wood:
- ¾-inch plywood (birch, maple, or cabinet-grade pine are excellent choices for strength and finish) for the sides, front, back, bottom, and lid.
- 1×2 or 1×3 solid wood (pine, poplar) for optional trim pieces, reinforcing cleats, or a base.
- Pro Tip: Always choose formaldehyde-free or low-VOC plywood and solid wood.
- Hardware:
- 2 high-quality safety hinges/gas struts (ensure they are rated for your lid’s weight).
- 1½-inch wood screws (Kreg pocket hole screws if using a jig, or general wood screws).
- Wood glue (Titebond III is a good, strong, water-resistant choice).
- Sandpaper (80-grit, 120-grit, 220-grit).
- Child-safe paint, stain, or clear finish (look for “non-toxic,” “low VOC,” or “Zero VOC” labels).
- Optional: Small felt pads for the bottom corners to protect floors.
Tools:
- Measuring & Marking:
- Tape measure
- Pencil
- Speed square or combination square
- Cutting:
- Circular saw with a straight-edge guide or a table saw (for accurate panel cuts).
- Jigsaw (useful for cutting out finger pulls or decorative shapes, if desired).
- Sawhorses or a sturdy workbench.
- Drilling & Fastening:
- Cordless drill/driver
- Drill bits (various sizes, including a pilot hole bit and a countersink bit).
- Kreg Pocket-Hole Jig (highly recommended for strong, concealed joints, especially for begiers).
- Clamps (bar clamps or parallel clamps are essential for holding pieces while glue dries and screws are driven).
- Finishing:
- Orbital sander (makes sanding much faster and smoother) or a sanding block.
- Paintbrushes, rollers, or foam applicators for finishing.
- Clean rags for wiping sawdust and applying finish.
- Safety Gear (Non-Negotiable!):
- Safety glasses/goggles
- Hearing protection
- Dust mask
Let’s Get Building! Your Step-by-Step Construction Guide
Alright, tools ready, materials sorted, and safety gear on! Let’s transform that stack of wood into a beautiful, safe toy chest.
Step 1: Design & Cut List – Plan Your Masterpiece
Before making any cuts, decide on your dimensions. A common size for a toy chest is around 30-36 inches long, 18-20 inches deep, and 18-24 inches high. Adjust these to fit your space and needs. Once you have your desired dimensions, create a detailed cut list for each piece:
- Side Panels (2): Height x Depth
- Front & Back Panels (2): Length x Height
- Bottom Panel (1): Length x Depth (this might be slightly smaller to fit inside the assembled box, or flush if you prefer to attach it from the bottom).
- Lid (1): Length x Depth (this should slightly overhang the box on all sides, e.g., by ¼ inch on each side).
- Optional Trim Pieces: Dimensions as needed.
Sketching out your plan can help visualize the final product and identify any potential issues.
Step 2: Cutting Your Panels – Precision is Key
Accuracy here makes a huge difference in the final product. Using a circular saw with a straight-edge guide or a table saw will ensure perfectly straight and square cuts.
- Measure twice, cut once!
- Cut all your plywood pieces according to your cut list.
- Label each piece (e.g., “Front,” “Side R”) as you cut it to avoid confusion later.
Step 3: Assembling the Box – Building the Core
Now for the satisfying part: watching it take shape! I’m a huge fan of pocket holes for this kind of project because they create incredibly strong, invisible joints. If you don’t have a Kreg jig, you can use traditional butt joints reinforced with screws and glue, but pocket holes make it much easier.
- Drill Pocket Holes: If using a Kreg jig, drill pocket holes along the short edges of your front and back panels (the ends that will coect to the side panels). Also, drill pocket holes around the perimeter of your bottom panel if you plan to recess it inside the box, or along the bottom edge of the side/front/back panels if the bottom will sit flush underneath.
- Assemble Sides: Apply wood glue to the edges, then use clamps to hold the side panels to the front and back panels. Drive your pocket hole screws into place. Work on one joint at a time, ensuring everything is square as you go.
- Attach the Bottom: Once your four sides are assembled and square, slide in your bottom panel (if recessed) or attach it from underneath (if flush). Glue and screw it securely.
- Check for Squareness: Use your speed square or a large framing square to check all corners. This ensures your lid will fit perfectly.
Step 4: Adding Trim and Details (Optional but Recommended)
This is where you can add flair and extra safety features:
- Base Trim: If you want a more finished look or to lift the chest slightly off the floor, cut and attach a base frame or trim pieces around the bottom.
- Rounded Edges: Use a router with a round-over bit to soften all external edges of the box and especially the lid. This makes it safer for kids and gives it a professional look.
- Finger Pulls: Instead of external handles (which can snag clothing or be a bump hazard), consider cutting a small semi-circular finger pull on the front of the lid or even the front panel of the chest. Use a jigsaw or router for this.
Step 5: Finishing Touches – Sanding & Painting/Staining
This stage is crucial for both aesthetics and safety. Smooth surfaces prevent splinters and look fantastic.
- Sanding: Start with 80-grit sandpaper to remove any rough spots or glue squeeze-out. Progress to 120-grit, then finish with 220-grit for a silky smooth feel. Pay extra attention to all edges and corners.
- Cleanliness: After sanding, thoroughly wipe down the entire chest with a tack cloth or a damp cloth to remove all sawdust. Any dust left behind will compromise your finish.
- Apply Finish:
- Primer (if painting): Apply a thin coat of child-safe primer. Let it dry completely.
- Paint/Stain/Clear Coat: Apply your chosen finish. Remember to use only non-toxic, low-VOC products specifically designed for children’s furniture. Read the instructions for drying times and apply multiple thin coats as needed, sanding lightly with 220-grit between coats if recommended for a smoother finish.
- Allow Curing Time: Even after the finish feels dry, it needs time to “cure” or harden completely. This can take several days or even weeks depending on the product. Resist the urge to rush this step, especially for something a child will use.
Step 6: The Grand Finale – Installing the Safety Hinges
This is it! The moment your toy chest becomes truly child-safe. Follow the manufacturer’s instructions for your specific hinges *exactly*. While instructions vary, here’s a general guide:
- Position the Lid: Place the lid on top of the assembled box, ensuring your desired overhangs are even on all sides. You might want to use some shims or spacers to keep it perfectly centered.
- Mark Hinge Locations: Typically, hinges are installed a few inches in from the left and right edges of the lid and the back of the chest. Mark the screw hole locations with a pencil.
- Pre-Drill: Use a drill bit slightly smaller than your screws to pre-drill pilot holes. This prevents the wood from splitting.
- Install Hinges: Attach one part of the hinge to the back edge of the toy chest and the corresponding part to the underside of the lid. Screw them in securely.
- Test, Test, Test!: Carefully open and close the lid several times. Does it open smoothly? Does it stay open at various angles? Does it close slowly and gently without slamming? If not, check the installation and make any necessary adjustments. Ensure there’s no way a child’s hand could get caught or crushed.
Finally, attach those small felt pads to the bottom corners of the chest to protect your floors.
Personalizing Your Toy Chest: Make It Truly Theirs
Now that the structural and safety work is done, have fun with the aesthetics! This is where your child’s personality can really shine through:
- Paint Colors: Let your child help pick out the colors (from child-safe paint options, of course!).
- Stencils: Add their favorite animals, shapes, or characters using stencils.
- Personalized Name: Stencil or paint their name on the front or lid.
- Decorative Elements: You could add small, safe wooden appliqués or carved details (ensure they are securely attached and don’t pose a choking hazard).
Conclusion: A Place for Everything, and Everything in its Place (Eventually!)
Congratulations! You’ve not only tackled a fantastic woodworking project but you’ve also created a safe, durable, and beautiful piece of furniture that will help bring order to the wonderful chaos of childhood. There’s something truly special about knowing you built this with your own hands, providing a safe haven for your child’s imagination to live.
This toy chest isn’t just a box; it’s a testament to your care, your effort, and your desire to provide the best for your little one. It will stand the test of time, hold countless memories, and maybe, just maybe, encourage those toys to find their way home at the end of the day. So, go forth, embrace the sawdust, and enjoy the incredible satisfaction of building something truly meaningful for your family!


