There’s nothing quite like the refreshing sight of rain from the comfort of your home, until you notice water seeping under your patio sliding door. A patio sliding door leaking water is more than just an inconvenience; it can lead to costly damage, mold growth, and decreased energy efficiency. Addressing this issue promptly is crucial for maintaining the integrity of your home and ensuring a healthy living environment. This comprehensive guide will walk you through identifying the source of the leak, implementing effective DIY fixes, and establishing preventive measures to keep your sliding door watertight for years to come.
Why Do Patio Sliding Doors Leak Water? Understanding the Root Causes
Before you can fix a leak, you need to understand what’s causing it. Patio sliding doors are complex systems, and several factors can contribute to water infiltration. Identifying the correct cause will save you time, effort, and potentially money. Here are the most common culprits:

Degraded or Damaged Weather Stripping
Weather stripping is the flexible material that creates a seal between the sliding panel and the door frame when the door is closed. Over time, exposure to sun, extreme temperatures, and general wear and tear can cause weather stripping to crack, shrink, or detach, creating gaps through which water can easily pass.
Clogged or Damaged Weep Holes
Many patio sliding doors have small drainage holes, known as weep holes, located in the exterior track. These holes are designed to allow any water that collects in the track (from condensation or minor rain) to drain outwards. If these holes become clogged with dirt, debris, or insects, water will build up in the track and eventually overflow into your home, resulting in your sliding door leaking water.
Compromised Caulking or Sealant
Caulk and sealant are used around the perimeter of the door frame where it meets the wall, as well as sometimes around the glass panes within the door panels. Over time, caulk can dry out, crack, peel, or lose its adhesion, creating pathways for water to penetrate the structure and eventually find its way indoors.
Poor Door Alignment or Roller Issues
If your sliding door isn’t properly aligned or if its rollers are damaged, the door panels may not close tightly against the frame or each other. This misalignment can prevent the weather stripping from compressing effectively, leaving gaps that allow water to enter, especially during heavy rains or high winds.
Damaged Door Frame or Sill
The door frame and sill (the bottom track) can suffer damage from impact, rot, or corrosion. Cracks, warping, or deterioration in these structural components can create direct entry points for water. A damaged sill, in particular, can prevent proper drainage and create pooling water near the threshold.
Faulty Glass Seals
The insulated glass units (IGUs) in your patio door are sealed around their edges. If these seals fail, moisture can get between the glass panes (often visible as fogging), but more critically, water can also penetrate around the glass edge and leak into the door panel or frame, eventually seeping indoors.
Improper Installation
Sometimes, the root cause of a sliding door leaking water stems from its initial installation. If the door was not properly leveled, flashed, or sealed during installation, it can create long-term vulnerabilities to water infiltration. This often requires professional intervention to correct.
How to Identify Where Your Patio Sliding Door is Leaking Water
Pinpointing the exact source of a leak can be challenging but is essential for an effective repair. Here’s a systematic approach to finding the leak:
Step 1: Visual Inspection
Start by thoroughly inspecting your sliding door from both the inside and outside on a dry day. Look for:
- Cracks, gaps, or deterioration in the caulk around the frame.
- Damaged, brittle, or missing weather stripping along the edges of the sliding panels and where they meet the stationary frame.
- Debris, dirt, or standing water in the bottom track, especially checking the weep holes for blockages.
- Any visible damage to the door frame, sill, or glass panes.
- Signs of water damage on the interior wall, floor, or trim near the door.
Step 2: The Water Test (Hose Test)
This is often the most effective way to simulate rain and identify the leak’s entry point. You’ll need a garden hose and a helper.
- Have your helper stand inside with paper towels or rags, ready to spot the first sign of water.
- From the outside, start by gently spraying water at the top of the door frame, working your way down. Focus on the caulk lines, the seams where the frame meets the wall, and the top weather stripping.
- Gradually move the spray to the vertical sides, paying close attention to the weather stripping between the door panels and the side frame.
- Finally, spray the bottom track and the sill area, ensuring the weep holes are getting wet.
- Observe closely where and when the water appears inside. This will help you narrow down the specific area needing repair.
Important Note: Do not use high-pressure spray, as this can force water into areas that wouldn’t normally leak and might damage the door.
Step 3: The Smoke Test (Optional)
For very subtle drafts or leaks, a smoke test can be useful, though it’s more for air leaks that allow water in with wind. With the door closed and sealed, light an incense stick or use a smoke pencil around the door seams. If the smoke is drawn inward, it indicates an air gap that could also be letting water in.
DIY Fixes for Common Patio Sliding Door Leaks
Once you’ve identified the source, many leaks can be fixed with basic tools and a bit of DIY know-how. Always prioritize safety, and wear appropriate protective gear.
Repairing or Replacing Weather Stripping
This is one of the most common causes of a patio sliding door leaking water and often one of the easiest to fix.
- Identify the Type: Weather stripping comes in various forms (adhesive-backed foam, brush sweeps, compression bulbs). Determine the type used on your door.
- Remove Old Stripping: Carefully peel or pry off the old, damaged weather stripping. Clean the surface thoroughly to remove any adhesive residue, dirt, or grime.
- Measure and Cut New Stripping: Measure the length needed precisely and cut the new weather stripping to size.
- Install New Stripping: Apply the new weather stripping, ensuring a snug fit. For adhesive types, press firmly along the entire length. For brush or bulb types, slide them into the designated channels.
- Test: Close the door and check for a tight seal. Repeat the water test if necessary.
Re-Caulking Around the Door Frame
Old, cracked caulk is a prime entry point for water.
- Remove Old Caulk: Using a utility knife or caulk removal tool, carefully cut and peel away all old, cracked, or loose caulk from around the door frame where it meets the house siding or wall. Clean the surface with rubbing alcohol to ensure good adhesion for the new caulk.
- Apply New Caulk: Load a tube of exterior-grade, waterproof silicone or polyurethane caulk into a caulk gun. Cut the tip of the caulk tube at a 45-degree angle, making an opening just wide enough to cover the gap.
- Apply a Smooth Bead: Apply a continuous, even bead of caulk along all seams, maintaining steady pressure on the trigger and moving at a consistent pace.
- Smooth the Caulk: Use a caulk tool, a gloved finger, or a damp cloth to smooth the caulk line, pushing it into the gap for a watertight seal.
- Allow to Cure: Follow the manufacturer’s instructions for drying and curing time before exposing the door to water.
For detailed tips on proper caulking techniques, resources like HGTV offer excellent step-by-step guides.
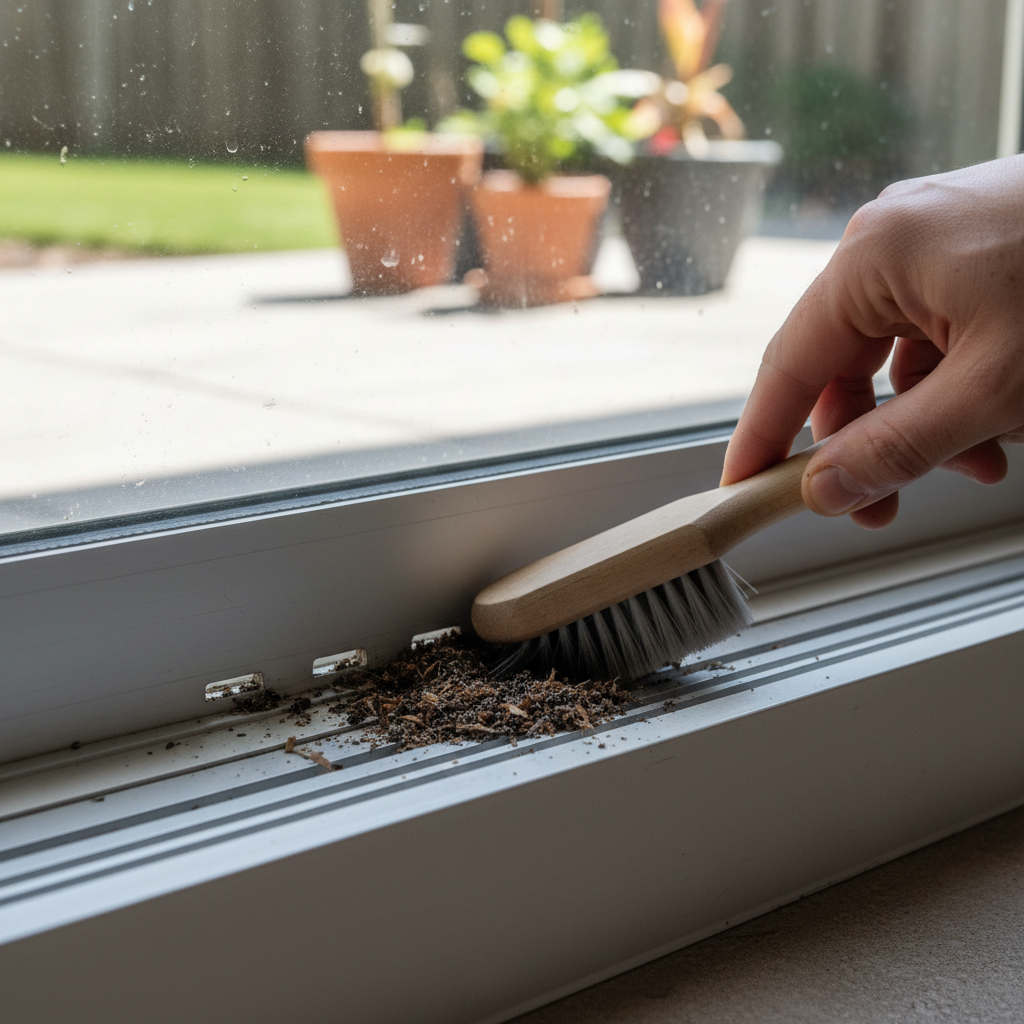
Clearing Clogged Weep Holes
If water is pooling in the track, clogged weep holes are likely the culprit.
- Locate Weep Holes: These are usually small slots or holes on the exterior side of the bottom track.
- Clear Debris: Use a small, stiff wire, a thin screwdriver, or even a straightened paperclip to gently poke and dislodge any dirt, leaves, or insect nests blocking the holes.
- Flush with Water: After clearing, pour a small amount of water (or spray gently with a hose) into the track to ensure water drains freely through the weep holes.
Addressing Door Alignment and Roller Issues
A misaligned door can prevent a proper seal.
- Clean Tracks: Thoroughly clean the top and bottom tracks of any dirt, debris, or pet hair that could be hindering smooth operation. Use a vacuum, brush, and damp cloth.
- Inspect Rollers: Open the door and lift it slightly to inspect the rollers at the bottom. If they are worn, broken, or seized, they may need cleaning, lubrication, or replacement.
- Adjust Rollers: Many sliding doors have adjustment screws on the bottom edge of the door panel (sometimes behind a removable cover) that allow you to raise or lower the panel. Adjust these screws incrementally to ensure the door closes flush and the weather stripping compresses evenly.
- Check Lock Alignment: Ensure the door latches and locks properly, as this indicates good alignment.
Temporarily Fixing a Failed Glass Seal
If water is visibly seeping from around the glass within the door panel, the insulated glass unit’s seal has likely failed. This is typically a job for a professional glazier, as the entire glass unit usually needs replacement. However, as a temporary measure to prevent further water intrusion, you can carefully apply a bead of exterior-grade silicone sealant around the exterior perimeter of the glass where it meets the door frame.
When to Call a Professional for a Leaking Patio Sliding Door
While many leaks can be tackled by a DIY enthusiast, some situations warrant professional expertise:
- Persistent Leaks: If you’ve tried multiple DIY fixes and your patio sliding door is still leaking water, there might be a more complex underlying issue.
- Structural Damage: Significant damage to the door frame, sill, or surrounding wall often requires carpentry or specialized repair skills. This can indicate a deeper problem with the home’s water barrier system.
- Failed Glass Seals: As mentioned, replacing a sealed glass unit is a job for a glazier.
- Installation Issues: If you suspect the leak is due to improper original installation, a professional contractor can assess the flashing and sealing around the rough opening.
- Rot or Mold: If you discover extensive wood rot or significant mold growth, it’s crucial to have a professional remediate it safely and effectively.
Preventive Maintenance to Stop Future Leaks
The best way to deal with a leaking patio sliding door is to prevent it from happening in the first place. Regular maintenance is key:
- Annual Inspection: Once a year, thoroughly inspect all weather stripping, caulk lines, and the door frame for any signs of wear or damage. Replace or repair as needed.
- Keep Tracks Clean: Regularly vacuum or brush out the bottom track to prevent debris from accumulating and clogging weep holes. A small, stiff brush or a crevice tool on your vacuum works well.
- Check Weep Holes: Ensure weep holes are clear and functional, especially before and after rainy seasons.
- Lubricate Moving Parts: Apply a silicone-based lubricant to rollers and tracks to ensure smooth operation and reduce wear.
- Maintain Proper Drainage Around the Door: Ensure that your landscaping directs water away from your home’s foundation and the patio door area. Avoid creating garden beds that slope towards the door or allow water to pool.
- Inspect Exterior Finishes: Check the siding or brickwork directly above and around the door for any cracks or gaps that could allow water to enter behind the door frame.
Seasonal Considerations for Your Sliding Door
The changing seasons bring different challenges and necessitate specific checks to prevent your patio sliding door from leaking water:
- Before Rainy Season: This is the prime time to perform a thorough inspection of all seals, caulk, and weep holes. Ensure everything is in top condition to handle heavy downpours.
- Winterizing: In colder climates, good seals not only prevent water leaks but also improve energy efficiency by preventing drafts. Check weather stripping and caulk before winter sets in.
- Summer Sun: While less likely to cause immediate leaks, prolonged sun exposure can degrade weather stripping and caulk. Be mindful of this when conducting your annual checks.
Benefits of a Leak-Free Patio Sliding Door
Beyond the immediate relief of stopping water intrusion, ensuring your patio sliding door is watertight offers several long-term advantages:
- Preserves Home Structure: Prevents wood rot, damage to drywall, and degradation of flooring.
- Prevents Mold and Mildew: Eliminates the damp conditions necessary for mold and mildew to thrive, protecting your family’s health and air quality.
- Improves Energy Efficiency: A sealed door prevents drafts, reducing heat loss in winter and cool air escape in summer, leading to lower energy bills.
- Extends Door Lifespan: Protecting the door from water damage significantly increases its durability and functional lifespan.
- Maintains Home Value: A well-maintained and leak-free home holds its value better and avoids costly repairs down the line.
Conclusion
A patio sliding door leaking water can be a frustrating problem, but with a systematic approach to diagnosis and repair, most issues can be resolved effectively. By understanding the common causes, carefully identifying the leak source, and implementing the appropriate DIY fixes or calling in professionals when needed, you can safeguard your home against water damage. Remember that consistent preventive maintenance is your best defense, ensuring your sliding door remains a beautiful, functional, and watertight gateway to your outdoor space.
Frequently Asked Questions About Patio Sliding Door Leaks
How do I stop my sliding door from leaking water?
To stop your sliding door from leaking water, first identify the source of the leak through visual inspection and a water test. Common fixes include replacing damaged weather stripping, re-caulking around the frame, clearing clogged weep holes, or adjusting the door’s alignment. For more complex issues like frame damage or failed glass seals, professional help may be needed.
What causes a patio door to leak?
Patio doors typically leak due to damaged or degraded weather stripping, clogged weep holes in the track, cracked or missing caulk around the frame, poor door alignment, a damaged door frame or sill, or failed seals around the glass panes. Improper initial installation can also be a significant factor.
Can I fix a leaking patio door myself?
Yes, many common patio door leaks can be fixed by a DIY enthusiast. Replacing weather stripping, re-caulking, and clearing weep holes are relatively straightforward tasks. However, issues involving significant structural damage, complex glass replacement, or suspected installation defects are best handled by a professional.
How often should I check my patio door for leaks?
It’s recommended to conduct a thorough inspection of your patio door at least once a year, ideally before the rainy season or winter. Regularly clean the tracks and check weep holes every few months, especially if you live in an area with a lot of debris or heavy rainfall.
Is a leaking patio door a big deal?
Yes, a leaking patio door is a big deal and should be addressed promptly. Unattended leaks can lead to serious problems such as wood rot, structural damage to your home, mold and mildew growth (posing health risks), increased energy bills due to drafts, and a significant decrease in your home’s overall value.

