Understanding Your Toilet Tank: A Brief Anatomy
Before you can fix a leak, it’s essential to understand the basic mechanics of your toilet tank. While different models exist, most toilets operate on similar principles, utilizing a few key components to manage water flow and flushing. Familiarizing yourself with these parts will make troubleshooting and repairs much more straightforward.
The Fill Valve
The fill valve, also known as the ballcock or inlet valve, is responsible for refilling the toilet tank after each flush. It’s typically located on the left side (when facing the toilet) inside the tank and connects to the water supply line from the wall. This valve has a float mechanism that rises with the water level. Once the water reaches a predetermined point, the float triggers the fill valve to shut off the water supply, preventing the tank from overflowing.
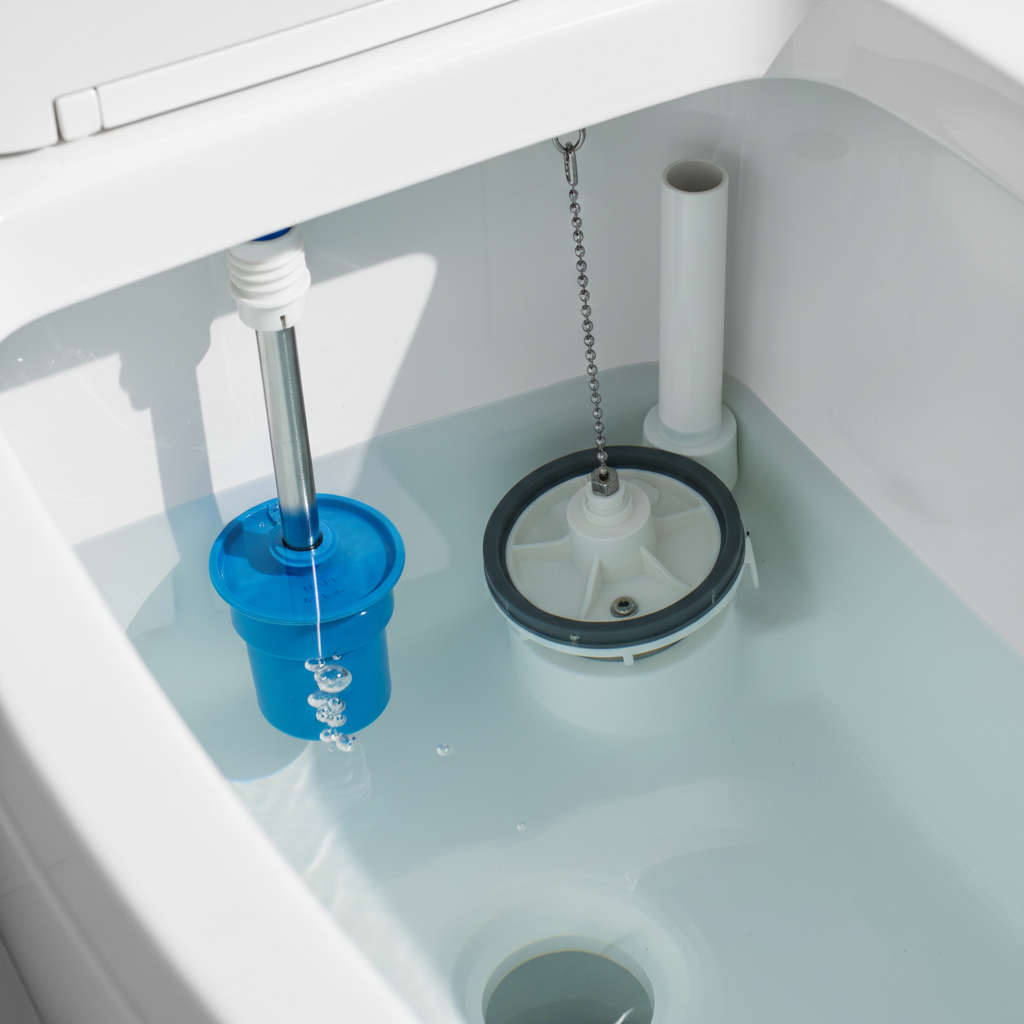
The Flush Valve (and Flapper)
The flush valve assembly is usually located in the center or right side of the tank. It consists of an opening at the bottom of the tank, a seal (often a rubber flapper), and an overflow tube. When you press the flush handle, a chain lifts the flapper, allowing water to rush from the tank into the bowl, creating the siphon action that clears waste. After the tank empties, the flapper falls back into place, sealing the opening.
The Overflow Tube
This is a vertical pipe, usually part of the flush valve assembly, that extends upward from the base of the tank. Its primary purpose is to act as a safety mechanism, directing excess water into the toilet bowl if the fill valve malfunctions and fails to shut off, preventing water from spilling onto your bathroom floor. A small refill tube from the fill valve usually empties into the overflow tube to replenish water in the bowl after a flush.
Why is Your Toilet Tank Valve Leaking? Common Culprits
Leaks in a toilet tank can manifest in various ways, from silent internal drips to noticeable external puddles. Pinpointing the exact source is the first crucial step in resolving the issue. Here are the most common reasons you might have a leaking toilet tank valve or related components:
Worn-Out Fill Valve Seal or Gasket
Over time, the rubber seals and gaskets within the fill valve can degrade, harden, or become covered in mineral deposits. This wear and tear prevents them from creating a watertight seal, leading to water constantly trickling into the tank or even out of the fill valve body itself.
Cracked Fill Valve Body
While less common, extreme water pressure, accidental damage, or manufacturing defects can cause the plastic body of the fill valve to crack. A cracked body will inevitably lead to an external leak, often visible as water pooling around the base of the toilet or dripping from the tank.
Misaligned or Damaged Flapper
The flapper is one of the most frequent culprits behind a running toilet. A flapper can become stiff, warped, or develop tears due to age and exposure to chlorinated water. If it doesn’t create a perfect seal over the flush valve opening, water will continuously seep from the tank into the bowl, causing the fill valve to periodically activate to refill the tank, leading to “phantom flushes.” The chain connecting the flapper to the flush handle can also be too long or too short, preventing a proper seal.
High Water Level in the Tank
If the water level in your tank is set too high, it can continuously flow into the overflow tube. This effectively means water is constantly draining from the tank, prompting the fill valve to keep working to maintain the excessive water level. This is often a simple adjustment of the fill valve’s float mechanism.
Loose or Corroded Tank Bolts/Gaskets
The toilet tank is attached to the bowl using a few bolts that pass through the bottom of the tank. Gaskets seal these bolt openings. If these bolts loosen over time or the rubber gaskets corrode and crack, water can leak externally from the base of the tank where it meets the toilet bowl. This is a more serious type of leak as it’s often visible on the floor.
Faulty Float Mechanism
The float mechanism, whether it’s an old-style ball float or a modern cup float, tells the fill valve when to shut off. If the float becomes waterlogged, gets stuck, or is improperly adjusted, it may not signal the fill valve to stop filling the tank when the water reaches the appropriate level, leading to an overflow into the tube or over the tank rim.
Signs You Have a Leaking Toilet Tank Valve
Catching a toilet leak early can save you from significant water waste and potential damage. Here are the key indicators that your toilet tank valve or another component might be leaking:
Phantom Flushes
This is perhaps the most telltale sign. If your toilet randomly runs for a few seconds every so often without anyone flushing it, it’s experiencing a “phantom flush.” This happens when water silently leaks from the tank into the bowl, causing the water level to drop enough for the fill valve to kick in and refill the tank.
Constant Running Water Sound
You might hear a faint hissing, trickling, or gurgling sound coming from the toilet, even when it hasn’t been flushed. This indicates that water is continuously flowing, either into the bowl or, less commonly, out of the tank itself.
High Water Bills
A leaking toilet, even a small one, can waste hundreds of gallons of water per day. If your water bill suddenly jumps without a corresponding increase in usage, a leaky toilet is a prime suspect. According to the EPA WaterSense program, leaks can account for more than 10,000 gallons of water waste in a home each year.
Visible Water Puddles (External Leaks)
This is the most obvious sign. If you see water pooling around the base of your toilet, or if the bathroom floor feels damp near the toilet, you have an external leak. This could be due to loose tank bolts, a cracked tank, or a compromised supply line connection.
Rust or Mineral Buildup
In areas with hard water, a constant slow leak can leave behind visible streaks of rust, lime, or other mineral deposits inside the toilet bowl, particularly at the back where water from the tank would enter. This suggests water is consistently flowing, even when it shouldn’t be.
The Dye Test (How to Confirm Internal Leaks)
If you suspect an internal leak but don’t see any obvious signs, the dye test is a simple and effective method.
- Remove the lid from your toilet tank.
- Add a few drops of dark food coloring (blue or green works well) or a toilet tank dye tablet to the water in the tank.
- Do not flush the toilet for at least 15-30 minutes, or even an hour for very slow leaks.
- After the waiting period, check the toilet bowl. If you see colored water in the bowl, you have a leak from the tank into the bowl, most likely due to a faulty flapper or flush valve seal. If the water in the bowl remains clear, the flapper isn’t the issue.
DIY Guide: How to Fix a Leaking Toilet Tank Valve
Once you’ve identified the type of leak you’re dealing with, you can often tackle the repair yourself. Here’s a step-by-step guide to fixing the most common toilet tank valve leaks.
Safety First: Turning Off the Water Supply
Before attempting any repair inside your toilet tank, you must turn off the water supply.
- Locate the shut-off valve, usually a small knob or lever, on the wall behind or beneath the toilet where the water supply line connects.
- Turn the valve clockwise until the water flow stops completely.
- Flush the toilet to empty most of the water from the tank and bowl. You may need to hold the handle down to ensure as much water drains as possible.
- Use a sponge or towel to soak up any remaining water in the tank.
Addressing a Worn Fill Valve Seal
Sometimes, only the rubber seal at the bottom of the fill valve needs replacement, not the entire valve.
- With the water off and tank drained, unclip the refill tube from the overflow tube.
- Depending on your fill valve model, you might be able to twist off the top cap of the fill valve or locate a locking collar at the base of the valve inside the tank.
- Remove the internal components or simply access the rubber seal (often a diaphragm gasket or O-ring) at the base.
- Inspect the seal for cracks, hardening, or mineral buildup.
- Replace it with an exact matching new seal.
- Reassemble the fill valve, turn the water back on, and test for leaks.
Replacing the Entire Fill Valve
If the fill valve body is cracked, or if replacing the seal doesn’t stop the leak, a full fill valve replacement is necessary. This is a common and relatively straightforward repair.
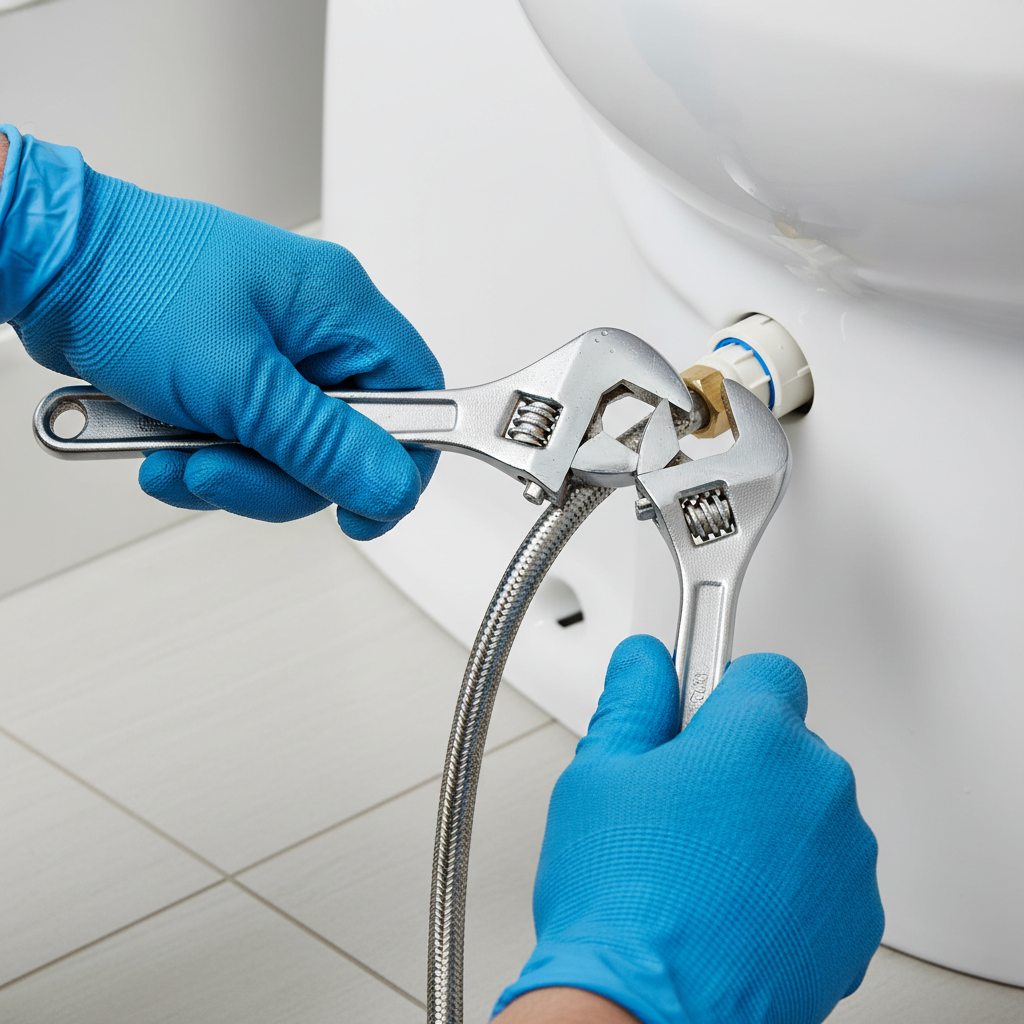
- Disconnect Water Line: Use an adjustable wrench to disconnect the flexible water supply line from the bottom of the fill valve (on the outside of the tank). Have a small bucket or towel ready for any residual water.
- Remove Old Valve: Inside the tank, locate the large nut holding the fill valve in place at the bottom. Use channel lock pliers or a basin wrench to unscrew this nut. Once the nut is removed, you can lift the old fill valve out of the tank.
- Clean the Opening: Clean any debris or mineral buildup around the hole at the bottom of the tank where the fill valve sits.
- Install New Valve: Insert the new fill valve into the hole from the inside of the tank. Ensure the rubber washer is correctly seated on the threaded shank outside the tank. Hand-tighten the plastic lock nut onto the shank from underneath the tank, then use your wrench or pliers for an additional quarter to half turn, being careful not to overtighten and crack the tank.
- Reconnect Water Line: Reconnect the water supply line to the new fill valve’s threaded shank, tightening it securely with your wrench (again, don’t overtighten).
- Attach Refill Tube: Attach the small refill tube from the new fill valve to the overflow tube. It should be positioned so water flows into the overflow tube.
- Adjust Water Level: Most new fill valves have a height adjustment mechanism. Adjust the fill valve so the water level in the tank, when full, is about an inch below the top of the overflow tube. There’s often a marking inside the tank indicating the optimal water level.
- Test for Leaks: Slowly turn the water supply back on and check for any leaks around the new fill valve connection points, both inside and outside the tank. Flush the toilet a few times to ensure it fills and shuts off properly.
Fixing a Faulty Flapper
A leaky flapper is one of the most common causes of a constantly running toilet.
- Inspect the Flapper: With the water off and tank drained, examine the flapper for any signs of wear, cracks, stiffness, or mineral buildup. Check its connection to the chain from the flush handle.
- Check the Chain: Ensure the chain from the flush handle to the flapper has a slight amount of slack (about 1/2 to 1 inch). If it’s too tight, it prevents the flapper from sealing. If it’s too loose, it might get caught under the flapper.
- Clean the Flush Valve Seat: The flush valve seat is the rim at the bottom of the tank where the flapper rests. Clean it thoroughly with a scrub brush and vinegar or a non-abrasive cleaner to remove any mineral deposits or grime that might be preventing a good seal.
- Replace the Flapper: If the flapper itself is damaged, remove it by unhooking it from the ears on the overflow tube and unclip the chain. Take the old flapper to the hardware store to ensure you purchase an identical replacement. Install the new flapper, ensuring it’s properly seated and the chain has the correct amount of slack.
- Test: Turn the water back on and flush the toilet several times to confirm the flapper seals correctly and the toilet stops running. Perform the dye test again if unsure.
Adjusting the Water Level
If your water level is too high and overflowing into the overflow tube, adjust the fill valve.
- Most fill valves have an adjustment screw or a clip that allows you to raise or lower the float mechanism.
- Lower the float gradually until the water level in the tank is about an inch below the top of the overflow tube.
- Flush the toilet and observe the water level as it refills, making further small adjustments if needed.
Tightening Tank Bolts
If water is leaking from the base of the tank where it connects to the bowl, you might have loose tank bolts or worn gaskets.
- Turn off the water and drain the tank completely.
- From underneath the tank (between the tank and bowl), locate the nuts on the tank bolts.
- Use a wrench to carefully tighten these nuts, alternating between bolts to ensure even pressure.
- Caution: Do not overtighten, as this can crack the porcelain tank or bowl. Tighten until snug and the leak stops. If the leak persists after tightening, the rubber gaskets or washers around the bolts likely need to be replaced, which involves removing the tank from the bowl – a more involved repair best left to a professional if you’re uncomfortable.
When to Call a Professional Plumber
While many toilet leaks are DIY-friendly, there are times when calling a professional plumber is the wisest course of action. Knowing your limits can save you time, frustration, and potentially more costly damage.
Complex Repairs
If the leak is coming from a crack in the toilet tank or bowl itself, or if the internal mechanisms are severely corroded or broken in a way you can’t identify, a professional is needed. Replacing a cracked toilet is a significant job that plumbers handle regularly.
Lack of Tools or Confidence
If you don’t have the necessary tools (like a basin wrench or channel locks) or simply aren’t confident in your ability to perform the repair without causing further damage, don’t hesitate to call for help. A professional has the right equipment and expertise.
Persistent Leaks After DIY Attempts
If you’ve tried to fix the leak yourself following all the steps, but the problem persists, it’s time to bring in an expert. There might be an underlying issue you haven’t identified or a subtlety in the repair that requires a seasoned eye.
Structural Damage or Multiple Issues
Any signs of structural damage to the floor around the toilet, or if you’re experiencing multiple plumbing issues simultaneously, warrants a professional assessment. What appears to be a simple toilet leak could be a symptom of a larger plumbing problem in your home.
Preventing Future Toilet Tank Valve Leaks
Proactive maintenance can significantly extend the life of your toilet components and prevent future leaks.
Regular Inspection and Maintenance
Make it a habit to periodically inspect your toilet. Listen for running water, check for phantom flushes, and perform the dye test once or twice a year. Visually inspect the flapper and fill valve for signs of wear. Early detection is key to preventing major leaks.
Using Quality Replacement Parts
When replacing a flapper or fill valve, opt for high-quality, durable parts. While cheaper options might save a few dollars upfront, they often wear out faster, leading to more frequent repairs. Universal parts can work, but manufacturer-specific parts often provide the best fit and longevity.
Being Mindful of Cleaning Products
Avoid using harsh chemical drop-in toilet bowl cleaners that sit in the tank. These products can corrode and degrade the rubber and plastic components of your fill valve and flapper over time, leading to premature failure and leaks. Stick to cleaning the bowl directly with brushes and appropriate cleaners.
Addressing Hard Water Issues
If you live in an area with hard water, mineral buildup can quickly gum up and stiffen toilet components. Consider installing a whole-house water softener, or regularly clean your toilet tank components with white vinegar to dissolve mineral deposits. Periodically flushing your water heater can also help reduce sediment that makes its way into your plumbing.
FAQs About Leaking Toilet Tank Valves
Q1: How long does a toilet tank valve typically last?
The lifespan of toilet tank components varies depending on water quality, usage, and material quality. A fill valve or flapper can last anywhere from 3 to 10 years. In areas with very hard water or high chlorine, components might degrade faster, requiring replacement every few years.
Q2: Can a small leak really impact my water bill?
Absolutely. Even a seemingly insignificant drip can waste hundreds, even thousands, of gallons of water per month. A continuously running toilet can waste up to 200 gallons of water a day, leading to a substantial increase in your monthly water bill. Fixing even a small leak can result in noticeable savings.
Q3: Is it better to repair or replace the entire toilet?
For most tank valve leaks, repair is almost always more cost-effective than replacing the entire toilet. Replacement parts like fill valves and flappers are relatively inexpensive. You should only consider replacing the entire toilet if the porcelain is cracked, the toilet is very old and inefficient, or if you’re undertaking a full bathroom renovation.
Q4: What tools do I need for a DIY repair?
For most common toilet tank valve repairs, you’ll need basic tools like an adjustable wrench or channel lock pliers, a screwdriver (flathead and/or Phillips), a sponge, towels, and possibly a small bucket. For flapper replacement, usually no tools are required beyond your hands. For a full fill valve replacement, the wrenches are essential.
Q5: How do I choose the right replacement parts?
The best way to ensure you get the correct replacement part is to take the old part with you to the hardware store. Many parts are universal, but some toilet brands and models have specific designs. If you can’t take the old part, note the toilet brand and model number (often found inside the tank or on the underside of the tank lid). For flappers, pay attention to the type (e.g., standard, 2-inch, 3-inch, specific brand models).
Conclusion: Don’t Let a Drip Become a Deluge
A leaking toilet tank valve is a common household problem, but it doesn’t have to be a costly or complicated one. By understanding the components of your toilet tank, accurately diagnosing the source of the leak, and following these detailed DIY instructions, you can effectively repair most issues yourself. Not only will this save you money on water bills and plumber fees, but it will also give you a sense of accomplishment and contribute to water conservation. Remember, even a small leak can become a significant issue over time, so address it promptly to keep your home running smoothly and silently.

