Few household annoyances are as persistent, or as wasteful, as a leaking toilet tank valve. That subtle, continuous drip, drip, drip – or worse, a steady trickle of water – isn’t just irritating; it’s a silent drain on your wallet through inflated water bills and a potential hazard to your bathroom floor and subfloor over time. Understanding what causes this common plumbing headache and, more importantly, how to fix it, is crucial for any homeowner. Whether you’re a seasoned DIY enthusiast or new to home repairs, this comprehensive guide will equip you with the knowledge and steps needed to tackle a leaking toilet tank valve with confidence, restoring peace and efficiency to your bathroom.
Understanding Your Toilet Tank: The Anatomy of a Flush
Before diving into repairs, it’s helpful to understand the basic components within your toilet tank. This knowledge will make diagnosing and fixing a toilet valve leak much easier:
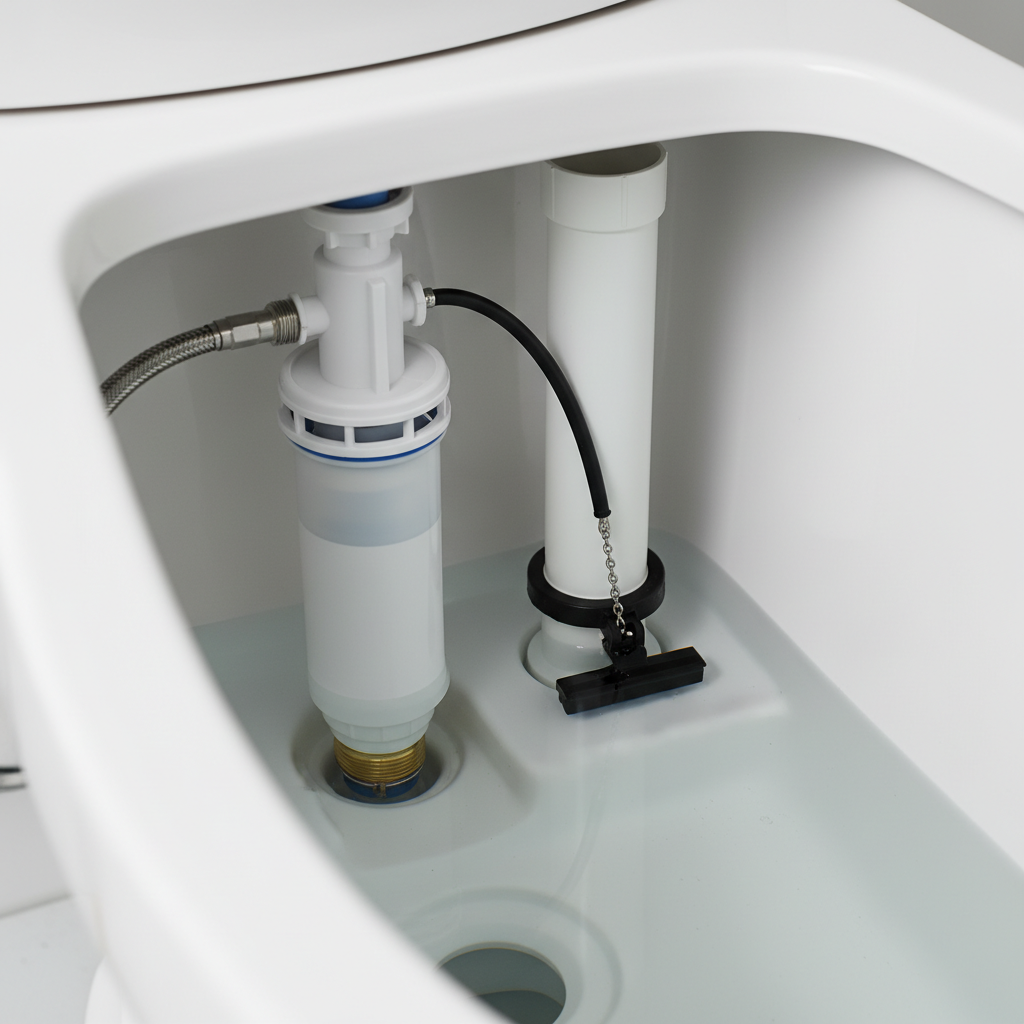
- The Fill Valve (Ballcock): This is the star of our show. The fill valve is responsible for refilling the toilet tank with water after each flush. It’s usually a tall, vertical mechanism located on the left side of the tank (when facing it). It connects directly to the water supply line and features a float mechanism that rises with the water, signaling the valve to shut off when the tank is full.
- The Flush Valve and Flapper: On the opposite side, or in the center, is the flush valve assembly, which includes the overflow tube and the flapper. The flapper is a rubber or plastic seal that covers the opening at the bottom of the tank, holding water in until you flush.
- The Overflow Tube: Part of the flush valve, this vertical tube prevents the tank from overflowing onto your bathroom floor if the fill valve malfunctions and fails to shut off.
- The Toilet Supply Line: This flexible hose connects the main water supply coming out of your wall or floor to the fill valve on the underside of your toilet tank.
A leak involving the toilet tank valve typically originates from the fill valve or its connections, leading to water escaping either externally or internally.
Why Does Your Toilet Tank Valve Leak? Common Causes Unveiled
Pinpointing the exact reason for a leaking toilet tank valve is the first step towards a successful repair. Here are the most frequent culprits:
1. Worn-Out Fill Valve Components
- Internal Seals and Gaskets: Over time, the rubber and plastic components inside the fill valve that control water flow can degrade, harden, or become brittle. These seals are designed to create a watertight barrier; when they fail, water can seep through and cause an internal leak into the bowl or an external drip.
- O-Rings and Washers: The connections where the fill valve meets the tank and where the supply line connects often rely on rubber O-rings or washers for a tight seal. These can compress, crack, or deteriorate, leading to a visible drip around the base of the fill valve or the supply line connection.
2. Loose Connections
- Fill Valve Mounting Nut: Beneath the toilet tank, a large nut secures the fill valve to the tank. If this nut loosens over time due to vibrations or improper installation, water can escape from around the base of the fill valve and pool on the floor.
- Supply Line Nut: The nut connecting the flexible supply line to the fill valve can also loosen. This often results in a slow, steady drip where the supply line meets the tank.
3. Cracked Fill Valve Housing
While less common, the plastic body of the fill valve itself can develop small cracks, especially if it’s old, has been subjected to freezing temperatures (unlikely in an indoor bathroom but possible in extreme situations), or was overtightened during installation. A cracked housing is usually irreparable and requires a full valve replacement.
4. Improper Float Adjustment or Faulty Float
The float mechanism within the fill valve dictates when the water supply should shut off. If the float is set too high, stuck, or damaged, the water level in the tank might rise above the overflow tube. In such cases, the “leak” isn’t from the valve directly, but rather water continuously overflowing down the tube and into the toilet bowl, making it seem like the toilet is constantly running or leaking internally.
5. Mineral Buildup and Corrosion
Hard water, rich in minerals like calcium and magnesium, can lead to scale buildup within the fill valve’s intricate mechanisms. This buildup can impede the proper functioning of internal components, preventing seals from closing completely and causing leaks. Corrosion, particularly on metal parts of older valves, can also compromise their integrity.
6. Damage from Harsh Cleaners
Using abrasive or chemical-laden toilet bowl cleaners can inadvertently damage the rubber and plastic components within the tank. Splashes or fumes can degrade seals and flappers, accelerating their wear and leading to leaks.
7. High Water Pressure
Excessive water pressure can put undue stress on all plumbing fixtures, including your toilet fill valve. Over time, high pressure can wear out internal components faster and potentially lead to stress fractures or failed seals, resulting in a toilet valve leak.
Identifying the Leak: Detective Work for Your Bathroom
Before you grab your tools, it’s essential to confirm that your toilet tank valve is indeed the source of the leak. Here’s how to play detective:
- Visual Inspection (External Leaks):
- Check the Tank Exterior: Wipe down the outside of your toilet tank. Wait a few minutes and check for any visible drips or wet spots. Pay close attention to the bottom edge of the tank where it meets the bowl, and around the connections of the supply line and the fill valve.
- Look for Puddles: Is there water pooling on the floor around the base of your toilet? This often points to a leak from a loose supply line or a faulty fill valve mounting nut.
- Inspect the Supply Line: Run your hand along the entire length of the flexible water supply line, from the wall shut-off valve to the tank connection, feeling for any moisture. Check the nuts at both ends.
- Listen for Sounds (Internal Leaks/Running Water):
- Constant Running Water: If you hear a faint hissing or trickling sound even when the toilet hasn’t been flushed recently, it indicates water is continuously flowing. This is often an internal leak, where water is escaping into the bowl.
- The Dye Test (Internal Leaks):
- This test is primarily for identifying leaks from the flapper, but it can also help confirm if the fill valve is overfilling. Add a few drops of food coloring or a dye tablet (available at hardware stores) to the toilet tank water. Do NOT flush. Wait 15-30 minutes. If colored water appears in the toilet bowl, you have an internal leak. If the water level in the tank consistently drops below the fill line and the bowl water remains clear, the fill valve might be failing to shut off properly, causing an overflow into the tube.
- Check the Water Level: Open the tank lid and observe the water level. It should be approximately 1 inch below the top of the overflow tube. If the water level is higher and continuously trickling into the overflow tube, the fill valve’s float mechanism needs adjustment or replacement.
Tools You’ll Need for the Fix
Having the right tools on hand will make the repair process smoother and more efficient. Gather these essentials before you begin:
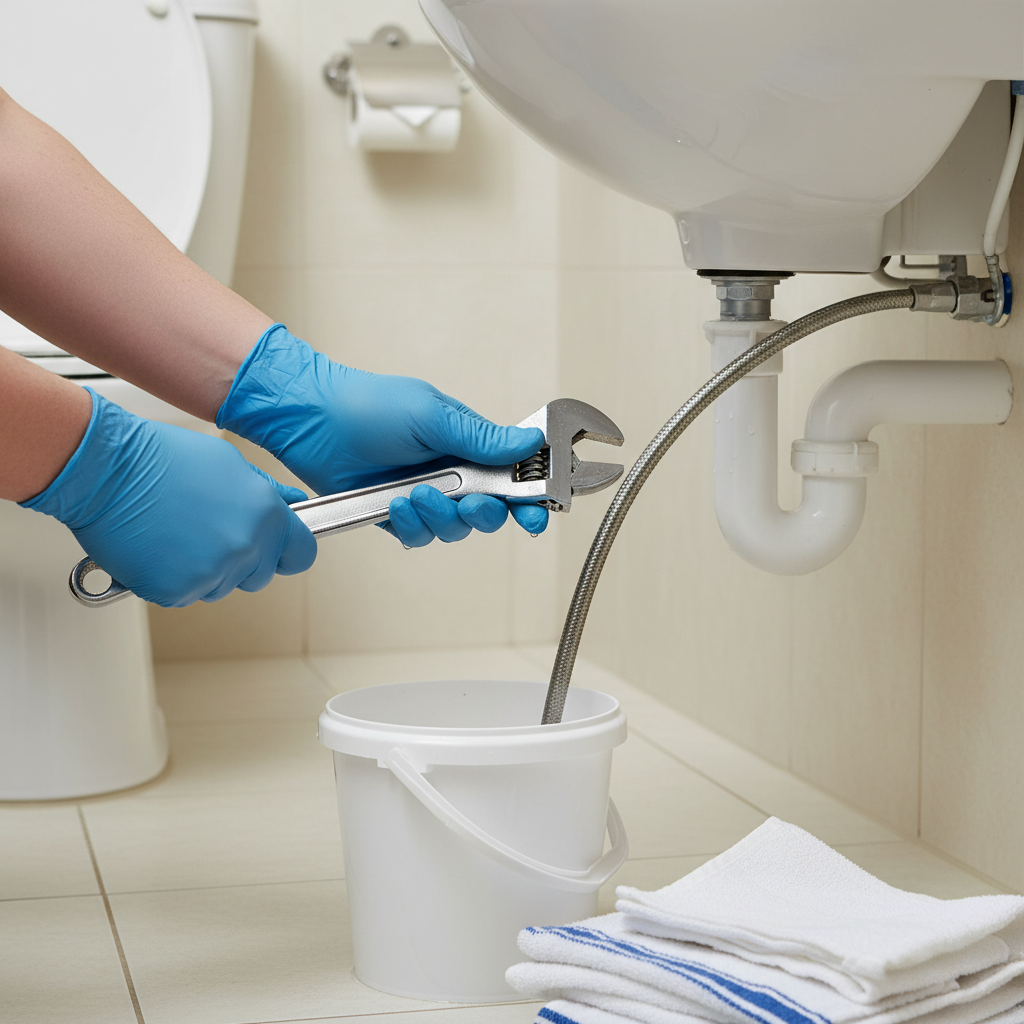
- Adjustable Wrench: For loosening and tightening nuts on the supply line and fill valve.
- Screwdriver (Flathead and/or Phillips): May be needed for some fill valve models or to adjust float arms.
- Sponge and Towels: For soaking up any spilled water and keeping your workspace dry.
- Bucket: To catch residual water when disconnecting the supply line or removing the fill valve.
- Gloves: For hygiene and protection.
- Replacement Parts: Depending on your diagnosis, this could be a new fill valve kit (highly recommended as they are usually universal and come with all necessary seals), specific washers or O-rings, or a new flexible supply line.
- Wire Brush or Old Toothbrush: For cleaning mineral buildup.
DIY Guide: How to Fix a Leaking Toilet Tank Valve
Once you’ve diagnosed the problem, it’s time to roll up your sleeves. Follow these steps carefully:
Step 1: Safety First – Shut Off the Water Supply
This is the most critical first step. Locate the shut-off valve on the wall or floor near the base of your toilet (it’s usually a small knob or handle). Turn it clockwise until the water flow completely stops. Flush the toilet to drain most of the water from the tank. You may need to hold the flush handle down for a few seconds to fully empty it. Use a sponge to soak up any remaining water in the tank and bowl.
Step 2: Re-Tighten Connections (Initial Troubleshooting)
Before replacing any parts, sometimes a simple tightening can solve the issue:
- Supply Line Connection: Using your adjustable wrench, gently tighten the nut where the flexible supply line connects to the underside of the fill valve. Be firm but avoid overtightening, which can crack plastic components.
- Fill Valve Mounting Nut: Below the tank, where the fill valve stem passes through, there’s a large plastic nut. Try tightening this nut with your hand or the wrench.
Turn the water supply back on, let the tank fill, and carefully observe for any leaks. If the leak persists, proceed to the next steps.
Step 3: Adjust the Water Level (If Overflowing)
If your diagnostic showed the water level was too high and overflowing into the tube:
- Most modern fill valves have an adjustment screw or a clip on the float mechanism. Turn the screw or slide the clip to lower the float.
- Aim for the water level to be about 1 inch below the top of the overflow tube.
Flush the toilet several times after adjustment to ensure the water shuts off correctly at the new level. If it still overflows, the fill valve itself might be faulty and needs replacement.
Step 4: Replacing a Faulty Fill Valve
If tightening connections or adjusting the float didn’t stop the leak, a full fill valve replacement is often the most reliable solution. Modern fill valve kits are relatively inexpensive and designed for DIY installation.
- Disconnect the Supply Line: Place your bucket under the supply line connection. Use your adjustable wrench to loosen the nut connecting the flexible supply line to the fill valve stem. Have towels ready for any residual water.
- Remove the Old Fill Valve:
- Inside the tank, disconnect the small refill tube that runs from the top of the fill valve to the overflow tube.
- Beneath the tank, fully unscrew the large plastic mounting nut that holds the fill valve in place.
- Once the nut is removed, lift the old fill valve out of the tank.
- Clean the Opening: Use a sponge or paper towel to clean any mineral deposits or grime from the hole where the fill valve passes through the tank. A wire brush can help with stubborn buildup.
- Install the New Fill Valve:
- Carefully insert the new fill valve into the tank hole from the inside. Ensure the rubber washer that comes with the new valve is correctly seated on the threaded shaft on the inside of the tank.
- From underneath the tank, thread the large plastic mounting nut onto the fill valve stem. Hand-tighten it firmly, then give it an extra quarter-turn with your wrench. Be careful not to overtighten and crack the tank or the valve.
- Reconnect the small refill tube from the top of the new fill valve to the overflow tube. There’s usually a small clip to secure it.
- Reconnect the Supply Line: Attach the flexible water supply line to the threaded stem of the new fill valve. Hand-tighten the nut, then use your wrench for a final snug turn. Again, avoid overtightening.
- Restore Water and Test:
- Slowly turn the water supply shut-off valve counter-clockwise to restore water flow to the toilet.
- Observe the tank as it fills. Check for any leaks around the new fill valve’s connections, both inside and outside the tank.
- Once the tank is full, flush the toilet several times to ensure everything is working correctly and that the fill valve shuts off completely without leaking or running.
When to Call a Professional Plumber
While many toilet tank valve leaks are manageable DIY projects, there are situations where calling a professional plumber is the wisest course of action:
- Persistent Leaks: If you’ve followed all the steps and the leak persists, or a new leak appears, a plumber can accurately diagnose more complex issues.
- Unsure of the Cause: If you can’t identify the source of the leak or are uncomfortable with the internal workings of your toilet, a pro can quickly pinpoint the problem.
- Cracked Porcelain: If you suspect a crack in the toilet tank or bowl (which can sometimes be mistaken for a valve leak), replacement is typically required, and this is best handled by an expert.
- Water Pressure Issues: If you suspect high water pressure is contributing to your plumbing problems, a plumber can install a pressure reducing valve (PRV) for your entire home.
- Multiple Fixture Problems: If you’re experiencing leaks or issues with other plumbing fixtures, it might indicate a larger problem with your home’s plumbing system.
- Lack of Tools or Time: Sometimes, the best DIY is knowing when to call for help. If you lack the necessary tools or simply don’t have the time, a plumber offers a convenient solution.
Preventative Maintenance for a Leak-Free Toilet
A little proactive care can save you a lot of hassle and expense down the road. Here’s how to keep your toilet’s fill valve in top condition:
- Regular Inspection: Every few months, take off the toilet tank lid and visually inspect the components. Look for signs of wear, rust, or mineral buildup. Check for a proper water level.
- Avoid Harsh Chemical Cleaners: These can degrade rubber and plastic components inside the tank. Use gentler, toilet-safe cleaners or natural alternatives.
- Monitor Water Pressure: If you notice strong surges or consistently high water pressure, consider having a plumber check and potentially adjust your home’s water pressure regulator.
- Replace Aging Components Proactively: Toilet fill valves typically last 5-10 years. If your toilet is older and you notice any minor issues, consider replacing the fill valve before it becomes a major leak.
- Clean Mineral Buildup: If you have hard water, periodically cleaning visible mineral deposits with white vinegar can extend the life of your toilet’s internal components.
- Check for “Phantom Flushes”: If your toilet occasionally refills itself without anyone flushing, it’s a sign of a slow leak, usually from the flapper but sometimes related to the fill valve’s inability to maintain pressure. Address it promptly.
Frequently Asked Questions About Leaking Toilet Tank Valves
Q: Can I ignore a small toilet tank leak?
A: No, it’s highly recommended to fix even a small leak promptly. Small leaks can waste hundreds of gallons of water per month, leading to higher utility bills, and over time, they can cause significant water damage to your bathroom floor, subfloor, and even the ceiling below.
Q: How long does a toilet fill valve last?
A: On average, a toilet fill valve lasts between 5 to 10 years, depending on water quality, usage frequency, and the quality of the valve itself. Hard water can significantly shorten its lifespan due to mineral buildup.
Q: Is it hard to replace a toilet fill valve?
A: Replacing a toilet fill valve is considered a moderately easy DIY project for most homeowners. The process involves turning off the water, disconnecting a few nuts, and installing the new part. Most modern fill valve kits come with clear instructions. If you’re comfortable with basic hand tools, you can likely do it yourself.
Q: What’s the difference between a fill valve and a flush valve leak?
A: A fill valve leak typically involves water continuously entering the tank (and often overflowing into the bowl) or dripping externally from the valve connections. A flush valve leak (often from a worn flapper) occurs when water leaks directly from the tank into the bowl, even when the fill valve has properly shut off. Both result in a running toilet, but the source differs.
Q: Will a leaking toilet damage my floor?
A: Yes, absolutely. A persistent external leak from the toilet tank valve can saturate your bathroom floor, leading to wood rot, warped flooring, mildew, and mold growth in the subfloor. This can cause costly structural damage if left unaddressed.
Conclusion
A leaking toilet tank valve is more than just an annoyance; it’s a clear signal that a component within your toilet requires attention. By understanding the common causes, learning how to accurately diagnose the problem, and following our step-by-step DIY guide, you can confidently tackle most fill valve issues yourself. Remember the importance of turning off the water supply first and not overtightening connections. If at any point you feel out of your depth or the leak persists, don’t hesitate to call a professional plumber. With a little preventative maintenance and timely repairs, you can ensure your toilet operates efficiently, saving water, money, and preventing potential damage to your home.

