There’s nothing quite as frustrating in the kitchen as trying to cook and finding your gas stove has a low flame. Whether you’re gently simmering a delicate sauce or struggling to bring water to a boil, a weak burner can turn a simple meal into a culinary challenge. A consistent, properly sized flame is crucial for effective cooking, providing the right heat distribution and control. When your gas stove isn’t performing as it should, it’s not just an inconvenience; it can also be a sign of underlying issues that might need attention. Understanding the common culprits behind a diminished flame and knowing how to address them can save you time, money, and culinary headaches.
Understanding the Anatomy of Your Gas Stove Flame
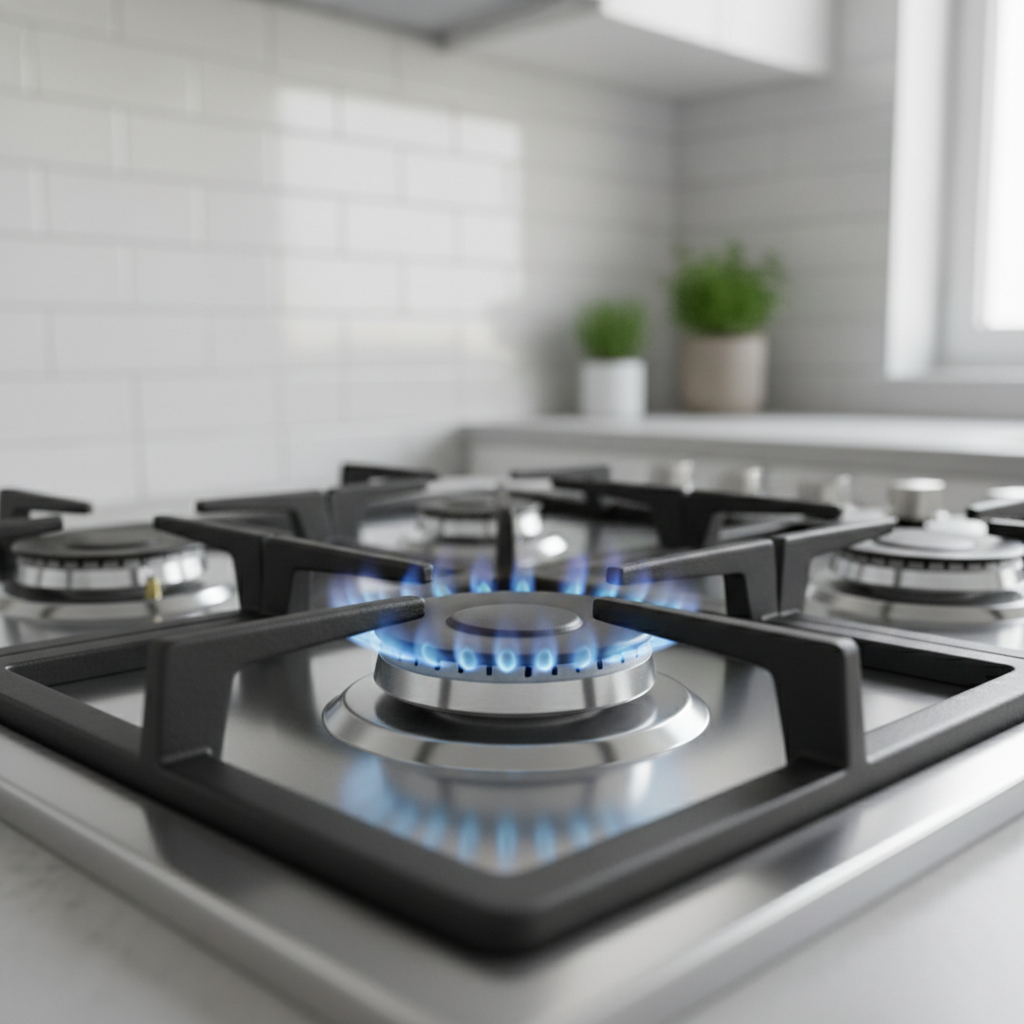
Before diving into troubleshooting, it’s helpful to understand what a healthy gas stove flame looks like. A normal gas flame should be predominantly blue, with a small, barely visible inner cone of darker blue or green, and sometimes a very slight orange tip. It should be stable, even, and proportional to the burner’s setting. A flame that is weak, yellow, erratic, or lifting off the burner indicates a problem. A healthy low flame, specifically, should be a small but steady blue flicker, consistent across all burner ports, allowing for precise temperature control.
Common Reasons Your Gas Stove Might Have a Low Flame
Several factors can contribute to a weak or inconsistent flame on your gas stove. Pinpointing the exact cause is the first step toward finding a solution. Here are some of the most frequent reasons:
1. Clogged Burner Ports
This is by far the most common reason for a low flame. Over time, food spills, grease, and debris can accumulate in the tiny holes (ports) around the burner head where the gas mixes with air and ignites. When these ports are blocked, gas flow is restricted, leading to a weak or uneven flame.
2. Issues with the Gas Supply Line
- Partially Closed Gas Valve: The main gas shut-off valve for your stove, or even for your entire home, might not be fully open.
- Kinked or Damaged Gas Line: A flexible gas line connecting your stove to the wall supply can become kinked or damaged, impeding gas flow.
- Low Gas Pressure: Problems with your home’s gas regulator or the utility’s main supply can lead to overall low gas pressure, affecting all gas appliances.
3. Air in the Gas Line
Especially after a gas line has been disconnected for maintenance or if a new appliance is installed, air can get trapped in the line. This air needs to be purged before a consistent gas flow can be established, leading to sputtering or weak flames initially.
4. Faulty Pressure Regulator
Every gas stove has a pressure regulator, either built-in or externally connected, that ensures a steady and safe gas pressure to the burners. If this regulator is malfunctioning, it might be supplying insufficient gas pressure, resulting in a low flame. Sometimes, simply resetting it can help.
5. Loose or Obstructed Orifice
The orifice is a small brass or metal fitting located beneath the burner base, containing a tiny hole through which gas flows into the burner. If this orifice is loose, clogged, or has the wrong size (e.g., if the stove was converted from natural gas to propane or vice versa incorrectly), it can restrict gas flow and cause a low flame.
6. Faulty Igniter or Pilot Light (Older Models)
While modern gas stoves use electronic igniters, older models rely on a continuous pilot light. If the pilot light is weak, dirty, or frequently extinguished, it might not properly ignite the gas across the entire burner, leading to a weak flame. For electronic igniters, a faulty igniter itself typically prevents ignition altogether, but a very weak spark could potentially lead to partial ignition and a low flame.
7. Venturi Tube Issues
The venturi tube is where gas mixes with air before reaching the burner ports. If this tube is obstructed by debris or spiderwebs, it can disrupt the gas-air mixture, leading to an inefficient, weak, or yellow flame.
Troubleshooting and DIY Fixes for a Low Flame
Before calling a professional, there are several simple troubleshooting steps and DIY fixes you can attempt. Always prioritize safety when working with gas appliances.
Step 1: Check the Gas Supply
- Verify Main Gas Valve: Locate the main shut-off valve for your stove (usually behind or beneath it) and ensure it’s fully open. Also, check your home’s main gas shut-off valve.
- Test Other Burners: If only one burner has a low flame, the issue is likely isolated to that burner. If all burners are affected, the problem is probably with the main gas supply or regulator.
- Check Other Gas Appliances: If other gas appliances (like your furnace or water heater) are also experiencing issues, it points to a broader gas supply problem from your utility company.
Step 2: Clean the Burner Heads and Ports
This is often the most effective solution for a single burner’s low flame.
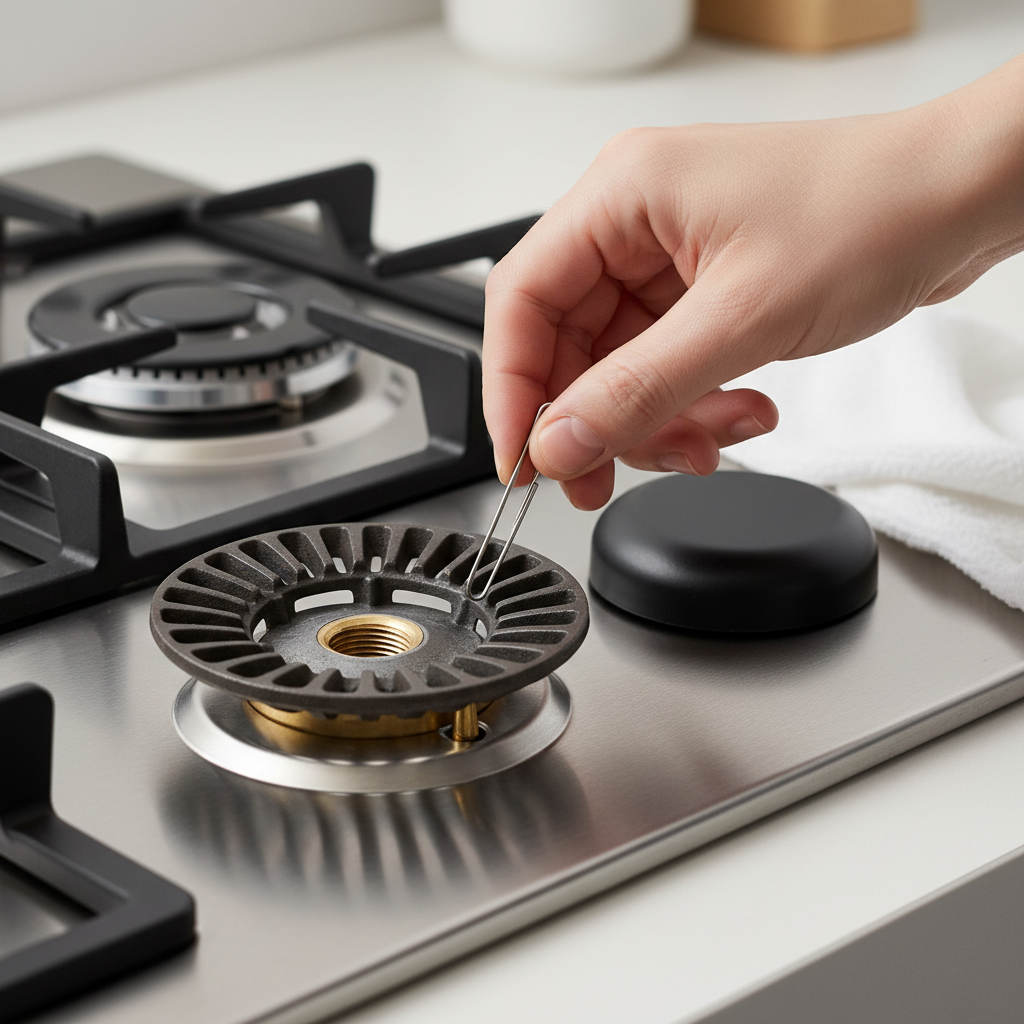
- Ensure Safety: Turn off the gas supply to the stove and allow the burners to cool completely.
- Remove Burner Components: Carefully lift off the burner grates, burner caps, and burner heads.
- Inspect for Clogs: Look for any visible food debris, grease, or carbon buildup in the burner ports (the tiny holes around the perimeter of the burner head).
- Clean Thoroughly:
- Use a stiff brush or a damp cloth with mild soap to clean the surface of the burner head and cap.
- For stubborn clogs in the ports, use a thin wire (like a paperclip or a needle from a sewing kit) to gently clear each hole. Be very careful not to enlarge the holes.
- You can also soak the burner heads and caps in warm, soapy water for 20-30 minutes to loosen baked-on grime. Rinse them thoroughly.
- Dry Completely: Ensure all components are completely dry before reassembling. Moisture can interfere with ignition.
- Reassemble and Test: Place the burner heads and caps back correctly and turn the gas supply back on. Test the burner.
Step 3: Clear the Orifice and Venturi Tube
If cleaning the burner ports doesn’t resolve the issue, the obstruction might be deeper.
- Ensure Safety: Turn off the gas supply and allow the stove to cool.
- Remove Burner Components: After removing the burner head and cap, you’ll see the burner base or body. Beneath this, you’ll find the gas orifice (a small brass fitting).
- Check the Orifice: Use a can of compressed air to blow out any debris that might be in the orifice. Alternatively, a very fine wire (like a strand from a wire brush) can be used to gently clear the orifice hole. Do NOT use anything that could enlarge or damage the orifice.
- Inspect the Venturi Tube: This is the tube that carries the gas-air mixture to the burner. Use a flashlight to look for any obstructions, like spiderwebs or insect nests, and clear them with a long, flexible brush or compressed air.
- Reassemble and Test.
Step 4: Purge Air from the Gas Line
If you’ve recently installed a new stove or had gas line work done, air might be trapped in the line. This usually resolves itself after a few minutes of running the burners. If a burner sputters or takes a long time to ignite, simply keep trying to light it (with proper ventilation) until a steady flame appears. If the issue persists across all burners, it’s less likely to be air and more likely a gas supply problem.
Step 5: Reset the Pressure Regulator
Some external gas regulators have a reset button. If your stove’s flame is consistently low across all burners and other gas appliances are fine, locate your stove’s pressure regulator (it might be behind the stove or part of the gas line connection) and see if there’s a reset mechanism. Consult your stove’s manual for specific instructions on locating and resetting it. This is less common for internal regulators.
When to Call a Professional for a Low Flame
While many low-flame issues can be resolved with DIY efforts, certain situations warrant calling a qualified appliance technician or a gas service professional. Do not hesitate to call if:
- Persistent Low Flame: You’ve tried all troubleshooting steps, but the flame remains weak across one or all burners.
- Gas Leak Suspected: If you smell gas, hear a hissing sound, or experience any symptoms of gas poisoning (dizziness, nausea, fatigue), immediately turn off the gas supply, evacuate your home, and call your gas company or emergency services from a safe distance.
- Yellow or Orange Flames: While a very slight orange tip can be normal, a predominantly yellow or orange flame indicates incomplete combustion, which can produce carbon monoxide. This is a serious safety hazard.
- No Improvement After Cleaning: If cleaning the burner ports and orifice doesn’t help, the problem might be more complex, such as a faulty gas valve or regulator.
- Uncertainty or Discomfort: If you’re uncomfortable working with gas appliances or unsure about any step, it’s always best to err on the side of caution and call a professional.
- Stove Conversion Issues: If your stove was recently converted from natural gas to propane (or vice-versa) and you’re experiencing flame issues, the conversion might not have been done correctly, possibly involving incorrect orifice sizes or regulator settings.
Safety First: Important Considerations When Working with Gas Stoves
Working with natural gas or propane requires extreme caution. Always keep the following in mind:
- Turn Off Gas Supply: Before performing any maintenance or repair, always turn off the gas supply to your stove.
- Ensure Ventilation: If you smell any gas, ensure the area is well-ventilated.
- Avoid Open Flames: Never use an open flame (like a match or lighter) to check for gas leaks. Use a soap and water solution, looking for bubbles.
- Carbon Monoxide Detector: Ensure you have a functioning carbon monoxide detector in your home, especially if you use gas appliances. Carbon monoxide is an odorless, colorless, and deadly gas. You can learn more about carbon monoxide safety from reputable sources like Good Housekeeping.
- Follow Manual Instructions: Always refer to your stove’s owner’s manual for specific cleaning and maintenance instructions.
The Importance of a Proper Low Flame for Cooking and Efficiency
Beyond the frustration, a properly functioning low flame is essential for various cooking tasks and overall kitchen efficiency:
- Precise Temperature Control: A good low flame allows you to simmer delicate sauces, melt chocolate without burning, or keep food warm without overcooking. Without it, you risk scorching or uneven cooking.
- Energy Efficiency: An inefficient flame, especially one that is yellow or lifting, indicates incomplete combustion, meaning your stove is wasting gas and not providing optimal heat.
- Safety: As mentioned, an improper flame can produce carbon monoxide. A healthy blue flame ensures efficient and safe combustion.
- Consistent Results: For consistent culinary results, you need a stove that responds reliably to your heat settings. A reliable low flame is just as important as a high flame.
Conclusion
A low flame on your gas stove can be a minor annoyance or a symptom of a more serious issue. By systematically troubleshooting the common causes – from clogged burner ports to gas supply problems – you can often restore your stove to full functionality. Always prioritize safety, and don’t hesitate to seek professional help if you’re uncomfortable, suspect a gas leak, or can’t resolve the problem yourself. With a little care and attention, your gas stove can continue to be a reliable workhorse in your kitchen, providing you with perfect flames for every culinary endeavor.
FAQs About Low Flames on Gas Stoves
Q: Is a yellow or orange flame dangerous?
A: A predominantly yellow or orange flame indicates incomplete combustion, which can produce carbon monoxide. Carbon monoxide is a colorless, odorless, and highly toxic gas. While a very slight orange tip on a blue flame can sometimes be normal, a distinctly yellow or orange flame (especially if it’s accompanied by sooting or a strange odor) is a serious safety concern and should be addressed immediately. Turn off the burner and call a professional.
Q: How often should I clean my gas stove burners?
A: The frequency depends on how often you cook and how prone you are to spills. As a general rule, a light cleaning of burner caps and grates should be done weekly or bi-weekly. A deeper cleaning of burner heads and ports should be done every 1-3 months, or whenever you notice a decline in flame quality or consistency.
Q: Can I adjust the flame size on my gas stove?
A: Most gas stoves have an adjustable valve beneath each burner knob that allows for fine-tuning the low flame setting. This adjustment typically requires a small screwdriver. However, this adjustment only refines the lowest setting and won’t fix problems caused by clogs or gas supply issues. Always consult your stove’s manual before attempting any internal adjustments.
Q: Why are all my burners experiencing a low flame?
A: If all burners on your stove have a low flame, the problem is likely with the main gas supply to the stove, rather than individual burners. This could be due to a partially closed main gas valve, low gas pressure from your utility, or a faulty gas pressure regulator for the appliance. Check your main gas valve first, and if the issue persists, consider calling a professional or your gas company.
Q: Can a low flame waste gas?
A: Yes, in a way. If the low flame is due to incomplete combustion (e.g., a yellow flame), it means that the gas isn’t burning efficiently, and you’re not getting the maximum heat output for the gas consumed. While a physically small but blue flame uses less gas, an inefficient large flame can be wasteful and produce less effective heat.

