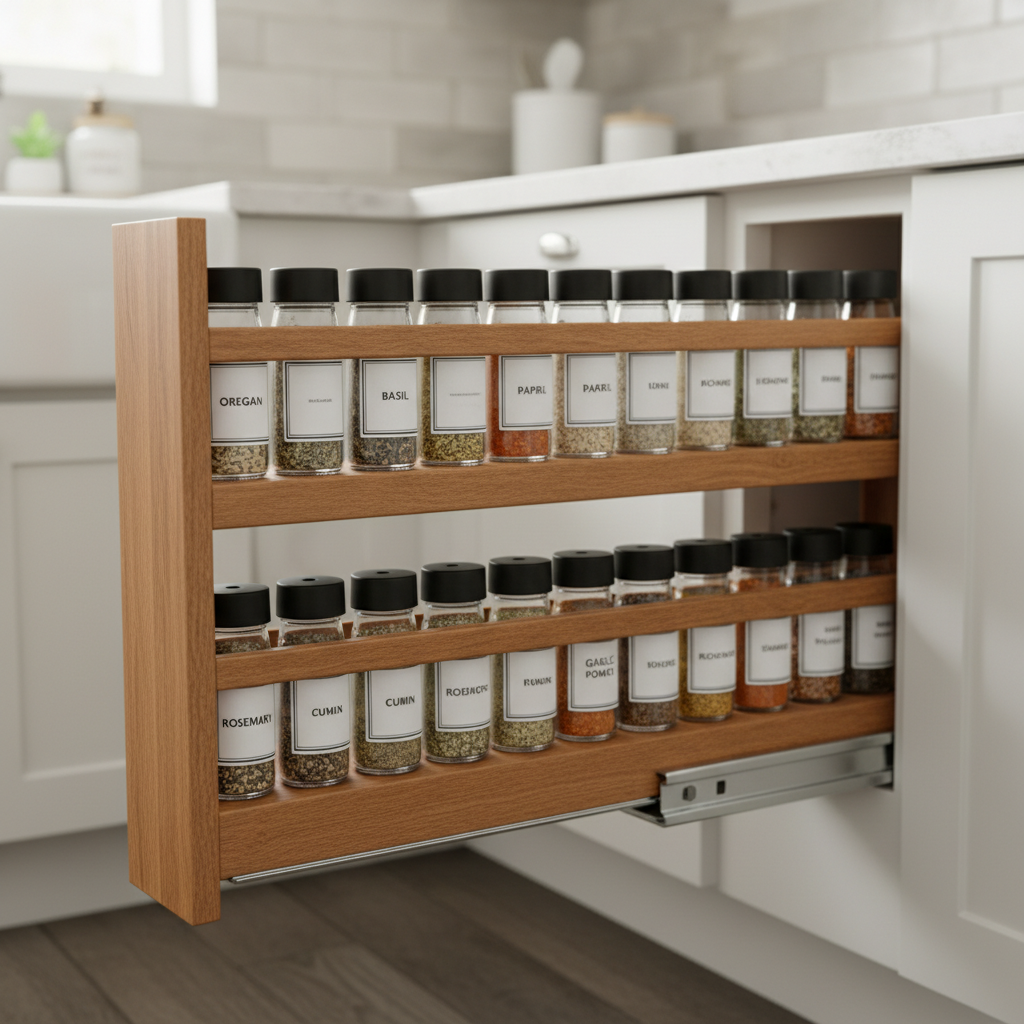
If you’re anything like me, a small kitchen can often feel like a constant battle against clutter. Especially when it comes to spices. You know the drill: digging through a dark cabinet, knocking over jars, and inevitably finding that long-lost paprika from three years ago. It’s frustrating, inefficient, and honestly, a little disheartening when you’re trying to enjoy cooking. That’s exactly why I decided to take matters into my own hands and embark on a project that truly changed my tiny kitchen: building a DIY pull-out wooden spice rack.
I remember feeling intimidated at first. Woodworking? Me? But after years of wishing for more organized kitchen space, I knew I had to try. And let me tell you, it was one of the most rewarding home improvement projects I’ve ever tackled. Not only did it solve my spice chaos, but it also added a beautiful, custom touch to my kitchen. If I can do it, you absolutely can too!
Why a Pull-Out Spice Rack is a Game Changer for Small Kitchens
Before diving into the “how-to,” let’s chat about the “why.” Small kitchens often suffer from two major problems: limited counter space and deep, dark cabinets that become black holes for anything stored past the front row. Traditional spice racks take up precious counter space or don’t utilize vertical cabinet space efficiently. This is where a pull-out rack shines.
- Ultimate Accessibility: No more digging! Just pull the rack out, and every single spice jar is visible and within easy reach. This saves time and prevents you from buying duplicates.
- Space Maximization: It transforms a narrow, often underutilized cabinet space (like that skiy one next to the stove or fridge) into a highly functional storage unit.
- Organization Heaven: Once you have a designated, easily accessible spot, maintaining organization becomes a breeze. You’ll actually *want* to put things back where they belong.
- Aesthetic Appeal: A custom wooden rack looks infinitely better than flimsy plastic organizers or scattered jars. It adds a touch of bespoke craftsmanship to your kitchen.
My own small kitchen had one of those awkward 9-inch wide cabinets next to the oven. It was barely used because anything put inside disappeared immediately. Now, it’s the proud home of my spice collection, and honestly, it sparks joy every time I open it.
Plaing Your DIY Spice Rack: Measure Twice, Cut Once (Literally!)
This phase is critical. Trust me, I learned this the hard way on a previous project where I eyeballed a measurement and ended up with a wonky shelf. Don’t be me!
Accurate Measurements are Your Best Friend
Grab a tape measure and a notepad. Here’s what you need to record:
- Cabinet Opening Width: Measure the exact width of the cabinet opening. From this, you’ll need to subtract the width of your drawer slides (typically 1/2 inch to 1 inch per side, so 1-2 inches total) to get the maximum width for your spice rack box.
- Cabinet Depth: Measure from the very front edge of the cabinet frame to the back wall. This will determine the depth of your pull-out unit.
- Cabinet Height: Measure the internal height. This will tell you how many shelves you can comfortably fit and the overall height of your rack. Consider any fixed shelves above or below.
Remember to account for any hinges, pipes, or other obstructions inside the cabinet. You want your new rack to glide smoothly without hitting anything.
Material Selection & Tools
For my rack, I opted for lightweight but sturdy plywood (1/2 inch thick). Pine boards would also work well. You’ll also need:
- Wood Glue: Essential for strong joints.
- Wood Screws: Various sizes for assembly and attaching slides.
- Drawer Slides: Full-extension slides are a must for complete access. Make sure they match your depth measurement.
- Saw: A miter saw is ideal for precise cuts, but a circular saw or even a handsaw with a guide will work.
- Drill/Driver: For pre-drilling holes and driving screws.
- Clamps: Very helpful for holding pieces in place while glue dries or screws are driven.
- Measuring Tape, Pencil, Square: For accuracy.
- Sandpaper: For a smooth finish.
- Optional: Wood stain or paint, clear coat (polyurethane) for protection.
My Journey: Step-by-Step Construction (It’s Easier Than You Think!)
Once you have your measurements and materials, the real fun begins! Here’s how I put mine together:
1. Cut Your Pieces
Based on your measurements, cut the following from your chosen wood:
- Base: One piece (width determined by opening minus slide width, depth by cabinet depth).
- Sides: Two pieces (height by cabinet height, depth by cabinet depth).
- Shelves: Several pieces (width same as base, depth slightly less than side pieces to allow for face frame or personal preference).
- Optional Front/Back pieces: For a more enclosed box look.
I always label my pieces as I cut them – “left side,” “base,” “shelf 1,” etc. – to avoid confusion.
2. Assemble the Frame
I started by attaching the two side pieces to the base. I used wood glue for strength and then pre-drilled holes before driving screws to prevent splitting. Ensure everything is square as you go. Clamps were my best friend here, holding everything snugly while I worked.
3. Add the Shelves
This is where you decide your spice jar height. I measured my tallest spice jar and added an inch or so for clearance. I marked the shelf positions on the inside of the side pieces, again using glue and screws. For a cleaner look, you can dado joints or use shelf pins if you want adjustable shelves (a bit more advanced, but worth it!). I opted for fixed shelves for simplicity.
4. Install the Drawer Slides
This is the most crucial step for smooth operation. I attached one part of each slide to the bottom outer edge of my newly built wooden box, making sure they were perfectly parallel. Then, I attached the other part of the slides to the inside bottom of my cabinet, again ensuring they were level and parallel. This is where patience pays off. A slight misalignment can cause the rack to stick or wobble. A handy tip: use thin spacers (like washers or scraps of wood) under the cabinet-mounted slide to ensure the rack clears the bottom lip of your cabinet opening.
5. Finishing Touches
Once the rack was installed and sliding smoothly, I removed it for sanding. I sanded all edges and surfaces smooth, starting with a coarser grit and finishing with fine-grit sandpaper. Then came the exciting part: staining! I chose a dark walnut stain to match other wooden elements in my kitchen, followed by a few coats of clear polyurethane for durability and easy cleaning. Let each coat dry thoroughly before applying the next.
Once everything was dry, I reinstalled the rack, loaded it up with my organized spices, and stood back to admire my handiwork. The feeling of accomplishment, combined with the sheer joy of easily finding my cardamom, was truly wonderful!
Making It Your Own: Customization Ideas
This isn’t just a generic build; it’s *your* build! Here are some ideas to personalize your pull-out spice rack:
- Adjustable Shelves: If you have various height jars, consider drilling shelf pin holes to allow for adjustable shelf heights.
- Labels: Apply uniform labels to your spice jars. It looks fantastic and makes finding what you need even quicker.
- Decorative Front: Instead of just a plain wooden front, you could add a small handle, a decorative trim piece, or even paint a design.
- Integrate Other Storage: If your cabinet is wider, you could create a section for small bottles of oils or vinegars, or even a narrow slot for knives.
Beyond Spices: Other Uses for Your Pull-Out Wonder
The beauty of this design is its versatility. Once you’ve mastered the technique, you might find yourself eyeing other cluttered spaces. Imagine:
- A pull-out for small caed goods in your pantry.
- Under-sink pull-outs for cleaning supplies.
- A narrow pull-out for baking extracts and sprinkles.
- In a bathroom, for toiletries or hair products.
The possibilities are endless once you realize how much space a well-designed pull-out can save!
Tips for a Smooth DIY Experience
- Don’t Rush: Take your time with measurements and assembly. Rushing leads to mistakes.
- Safety First: Always wear safety glasses when cutting or drilling.
- Watch Tutorials: If you’re unsure about a step (like installing drawer slides), search for videos online. Visual guides are incredibly helpful.
- Test Fit: Before driving all your screws, do a dry fit to ensure pieces align correctly.
- Start Simple: Don’t try to make it overly complicated with fancy joinery if you’re a begier. Basic glue and screws are perfectly strong.
Building this pull-out spice rack was more than just a home project for me; it was a journey of learning and empowerment. It proved that even with limited space and a humble set of tools, you can create functional, beautiful solutions that genuinely improve your daily life. My kitchen feels so much more organized and enjoyable now, and finding that perfect spice for my cooking has never been easier.
So, if you’re wrestling with a small kitchen and a spice collection that’s gotten out of hand, I highly encourage you to give this DIY project a try. You’ll be amazed at what you can achieve, and the satisfaction of cooking in an organized, beautiful space is truly priceless.


