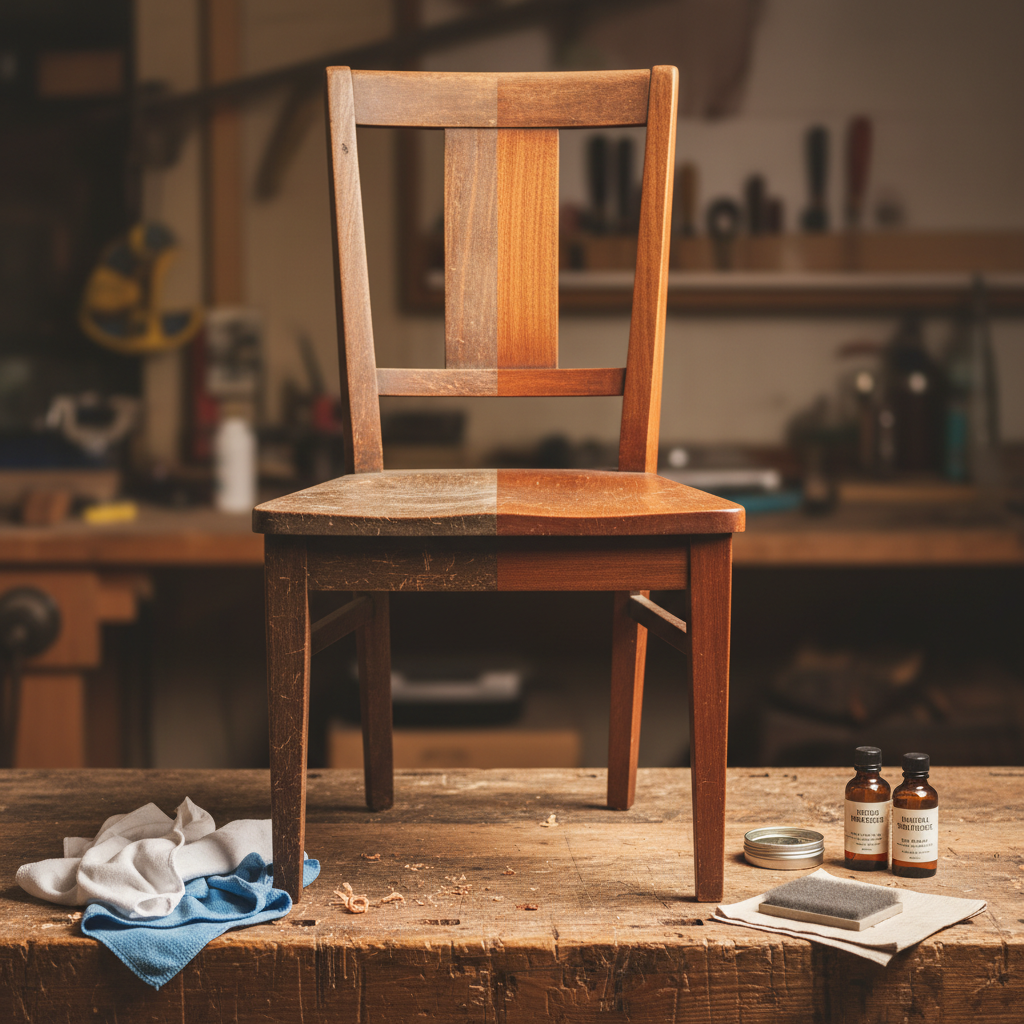
There’s something truly magical about an antique wooden chair, isn’t there? Each scratch, every worn edge, tells a story of generations past. They aren’t just pieces of furniture; they’re heirlooms, whispers from history, and a tangible coection to craftsmanship that often feels lost today. When you inherit or find one of these beauties, the natural inclination might be to “fix” it by completely stripping it down and starting fresh. Trust me, I’ve been there, thinking that’s the only path to revival.
But what if I told you there’s a different, often more rewarding, way? A way that preserves the very soul of the chair, its original patina, and that unique finish that time alone can create. My journey into furniture restoration taught me that sometimes, the best “fix” is the gentlest one. This article is your guide to bringing your beloved antique wooden chairs back to life without ever touching a stripping chemical. We’ll dive deep into methods that clean, nourish, and protect, letting the chair’s original character shine through, not covering it up.
Why Gentle Restoration? Preserving the Chair’s Soul
Before we even pick up a cloth, let’s talk about *why* you might choose not to strip an antique finish. It boils down to one word: authenticity. That original finish, whether it’s shellac, varnish, or lacquer, has developed a unique patina over decades, sometimes centuries. This isn’t just dirt; it’s the subtle darkening, the way light plays on the surface, the character that only age can bestow. Stripping removes all of that, taking away a significant part of the chair’s historical value and charm. It’s like repainting a classic car a new color – it might look shiny, but it’s no longer original.
I’ve seen countless pieces stripped down, and while some are beautifully refinished, many lose that unmistakable “antique” feel. The wood often looks too new, too perfect, lacking the depth and warmth that the original, age-worn finish provided. Our goal here isn’t to make your chair look brand new, but to make it look its best *as an antique* – loved, cared for, and still telling its story.
Is Your Chair a Candidate for Gentle Revival?
Not every antique chair is suited for this no-strip approach. It’s important to be honest in your assessment. This method works wonders for chairs where:
- The original finish is mostly intact, even if it’s dull, dirty, or has minor scratches.
- There are minor surface imperfections like water rings, light scuffs, or general grime build-up.
- The wood itself is structurally sound, or has only minor, repairable loose joints.
When might you need to consider more aggressive methods? If the finish is completely flaking off in large areas, heavily alligator-skied, or significantly damaged by heat, chemicals, or deep gouges, a full refinish might be unavoidable. Similarly, if the chair is structurally unsound with broken parts that require extensive reconstruction, addressing those issues often precedes any finish work.
But for the vast majority of antique chairs simply suffering from neglect and time, gentle restoration is not only possible but preferable. Trust your instincts – if the chair still feels “solid” and its finish, despite its flaws, looks like it wants to come back to life, it’s likely a perfect candidate.
Gathering Your Gentle Arsenal: Tools and Materials
One of the beauties of this method is that you don’t need a workshop full of specialized tools. Here’s what I typically have on hand:
- Clean, Soft Cloths: Microfiber cloths are excellent for cleaning and buffing. Have plenty on hand!
- Mineral Spirits: Your primary cleaning agent. It’s gentle on most finishes but effective at dissolving grime.
- Denatured Alcohol: Use with extreme caution and sparingly! It’s excellent for dissolving shellac and can help with certain marks, but it can also ruin other finishes quickly if left on too long.
- 0000 Steel Wool: The finest grade. Used incredibly gently for light abrasion and working in restorers.
- Wood Cleaner/Restorer: Products like Howard Restor-A-Finish are lifesavers. They help to re-amalgamate existing finishes and blend minor scratches. Choose a color that matches your wood.
- Good Quality Paste Wax: Carnauba or beeswax based. This is your protective topcoat and provides a beautiful, soft sheen.
- Wood Glue: High-quality wood glue (like Titebond Original) for any joint repairs.
- Clamps: Essential for holding glued joints securely while they dry.
- Small Syringe (optional): Great for injecting glue into loose joints.
- Soft Bristle Brush: For dusting intricate carvings.
- Safety Gloves and Ventilation: Always work in a well-ventilated area and protect your hands.
The Step-by-Step Gentle Restoration Process
Ready to embark on this rewarding journey? Let’s go through it stage by stage.
Step 1: Thorough Cleaning – The Foundation
This is where it all begins, and honestly, you’ll be amazed at the difference just cleaning can make. Many “damaged” finishes are simply obscured by decades of dirt, grease, and old polish residue.
- Dusting: Start with a dry, soft cloth or a soft-bristle brush to remove all loose dust and cobwebs. Get into every crevice.
- Mineral Spirits Bath: Dampen a clean cloth with mineral spirits (don’t soak it, just damp). Wipe down a small section of the chair. You’ll likely see a surprising amount of grime come off. Continue with fresh cloths until no more dirt is appearing on your cloth. Mineral spirits are generally safe for most finishes and will remove wax buildup, oils, and general dirt without dissolving the original finish. Let it dry completely.
- Deep Cleaning (Optional, if needed): For exceptionally stubborn grime, some restorers use a very mild soap solution (like a drop of dish soap in warm water), but I generally prefer to stick with mineral spirits as it’s less likely to introduce water into the finish or wood. If you use soap, wipe *immediately* with a clean, damp (water only) cloth, then dry thoroughly.
Step 2: Addressing Minor Repairs – Stabilizing the Structure
Before you get to the finish, ensure the chair is sound. There’s no point in having a beautiful finish on a wobbly chair.
- Tighten Loose Joints: Gently wiggle the chair to identify any loose rungs, stretchers, or legs. For joints that aren’t completely separated, you might be able to inject wood glue using a small syringe directly into the joint. For completely separated joints, carefully disassemble, scrape off old glue, apply new wood glue, and clamp securely.
- Patience is Key: Let glue dry completely, typically 24 hours, before moving on. Resist the urge to rush!
Step 3: Revitalizing the Finish – The Magic Happens
Now for the truly transformative part! This is where you bring depth and luster back to the existing finish.
- Applying Wood Restorer: This is where products like Howard Restor-A-Finish shine. Choose a color that matches your wood (e.g., “Dark Walnut” for darker woods, “Mahogany,” “Neutral”). Apply the restorer liberally with a clean cloth, working in the direction of the grain. Let it sit for 5-10 minutes, allowing it to penetrate and re-amalgamate the existing finish.
- Working It In (Gently): Using a fresh, clean cloth (or very fine 0000 steel wool for more textured or stubborn areas, always with the grain and very lightly!), gently rub the restorer into the surface. This helps to blend in minor scratches and scuffs and bring out the wood’s natural color. You’ll see the dullness disappear and the finish come alive.
- Addressing Stubborn Marks:
- White Rings/Watermarks: For lighter rings, the restorer alone might do the trick. For more stubborn ones, a very tiny amount of denatured alcohol on a cloth, dabbed *quickly* and *lightly* on the ring, then immediately wiped off, can sometimes dissolve the mark. Practice in an inconspicuous area first, as denatured alcohol can quickly strip finishes if not used carefully. Alternatively, some commercial ring removers work well.
- Deeper Scratches: While restorers will blend many, deeper scratches might require a touch-up pen or stain marker that matches the wood color. Apply sparingly and wipe immediately to blend.
- Wipe Off Excess: Crucially, after working in the restorer, use a clean, dry cloth to thoroughly wipe off *all* excess. You don’t want a sticky residue. Buff gently.
Step 4: Nourishing and Protecting – The Grand Finale
Once the restorer has done its job and the chair looks revitalized, it’s time to protect and enhance its new glow.
- Apply Paste Wax: Take a small amount of good quality paste wax (carnauba or beeswax based is excellent) on a clean cloth. Apply a thin, even coat over the entire chair, again, working with the grain. Allow it to haze over for 15-20 minutes.
- Buff to a Sheen: With a fresh, clean, and dry cloth, buff the waxed surface vigorously. You’ll see a beautiful, soft, protective sheen emerge. This wax layer not only adds luster but also offers a layer of protection against dust and moisture.
Step 5: Addressing Upholstery (If Applicable)
If your chair has upholstered elements, this is a separate project. You might consider professional cleaning, or if the fabric is beyond repair, a full re-upholstery job. For simple cleaning, a gentle fabric cleaner or upholstery brush might suffice, but always test in a hidden area first.
Common Pitfalls and How to Avoid Them
Even with gentle methods, a few missteps can occur. Here’s how to avoid them:
- Impatience: Restoring antiques is a slow, deliberate process. Rushing steps (especially drying times for glue or restorers) can lead to subpar results.
- Over-saturating: Too much product, especially mineral spirits or denatured alcohol, can cause issues. A damp cloth is key, not a dripping one.
- Not Testing: Always, always test any product on an inconspicuous area (like the underside of a leg) first. Finishes vary wildly on antique pieces.
- Harsh Abrasives: Never use anything more abrasive than 0000 steel wool, and even that should be used sparingly and with light pressure.
The Joy of Preservation
There’s a unique satisfaction that comes from looking at an antique chair you’ve gently restored. It’s not just about making it look better; it’s about honoring its past, respecting the original craftsmanship, and extending its life for future generations. You haven’t erased its history; you’ve simply helped it tell its story more clearly.
This method has giveew life to countless pieces in my own home, each one retaining its unique character and the warmth that only an original finish can provide. Give it a try. You might just find that the most beautiful restoration is the one that treads most lightly.


