Ever found yourself listening back to your latest mix, only to hear a muddy bass, ringing highs, or simply a lack of clarity that just doesn’t sound “right”? You tweak, you adjust, you re-mix, but the problem persists. If this sounds familiar, you’re not alone! Many aspiring producers and musicians fall into the trap of upgrading expensive microphones and plugins, only to neglect the most critical component of their setup: the room itself.
Your room’s acoustics can make or break your sound. Without proper treatment, even the best gear will struggle to give you an accurate representation of your audio. The good news? You don’t need a professional studio designer or a massive budget to make a significant improvement. Installing acoustic panels in your home studio is one of the most impactful DIY projects you can undertake, and trust me, it’s much easier than you might think!
I remember my own journey, battling frustrating echoes and boomy bass in my small spare bedroom. It felt like I was mixing in a cave! After countless hours of research and a leap of faith, I decided to tackle acoustic panel installation myself. The transformation was astounding. Suddenly, my mixes translated better, my vocals sounded clearer, and my entire creative process became more enjoyable and efficient. This guide is born from that experience, designed to help you achieve similar results without the guesswork.
Why Even Bother with Acoustic Panels? (The “Why” Before the “How”)
Before we dive into hanging things on your walls, let’s quickly understand why acoustic panels are so crucial. Imagine throwing a ball against a hard wall; it bounces right back. Sound waves behave similarly. In an untreated room, sound waves bounce off every hard surface – walls, ceiling, floor, desk, windows – creating a chaotic symphony of reflections.
-
Flutter Echo: This is that aoying “ping-pong” sound you get when sound rapidly reflects between two parallel hard surfaces. It makes vocals sound thin and can be very distracting.
-
Reverb/Room Modes: While some natural reverb is pleasant, too much uncontrolled reverb makes everything sound washed out and unclear. Room modes (or standing waves) are specific frequencies that get amplified or canceled out in certain parts of your room, leading to a boomy bass in one spot and no bass in another.
-
Inaccurate Monitoring: All these reflections mean that what you’re hearing from your studio monitors isn’t truly what’s being produced. You’re hearing your speakers and the room’s influence. This leads to mixes that sound great in your studio but terrible everywhere else.
Acoustic panels, specifically broadband absorbers, are designed to absorb these sound reflections, reducing echoes and taming unruly frequencies. They help create a “drier,” more accurate listening environment, allowing you to hear your music more clearly and make better mixing decisions.
Plaing Your Attack: Assessing Your Room
First things first, let’s figure out where your room needs help. This isn’t rocket science, but a little plaing goes a long way!
The “Clap Test” and “Mirror Test”
-
Clap Test: Stand in different spots in your studio and clap your hands sharply. Listen carefully. Do you hear a distinct “ring” or “zing” after the clap? That’s flutter echo. Do you hear a long, washed-out decay? That’s excessive reverb. This simple test gives you a good initial feel for your room’s acoustic problems.
-
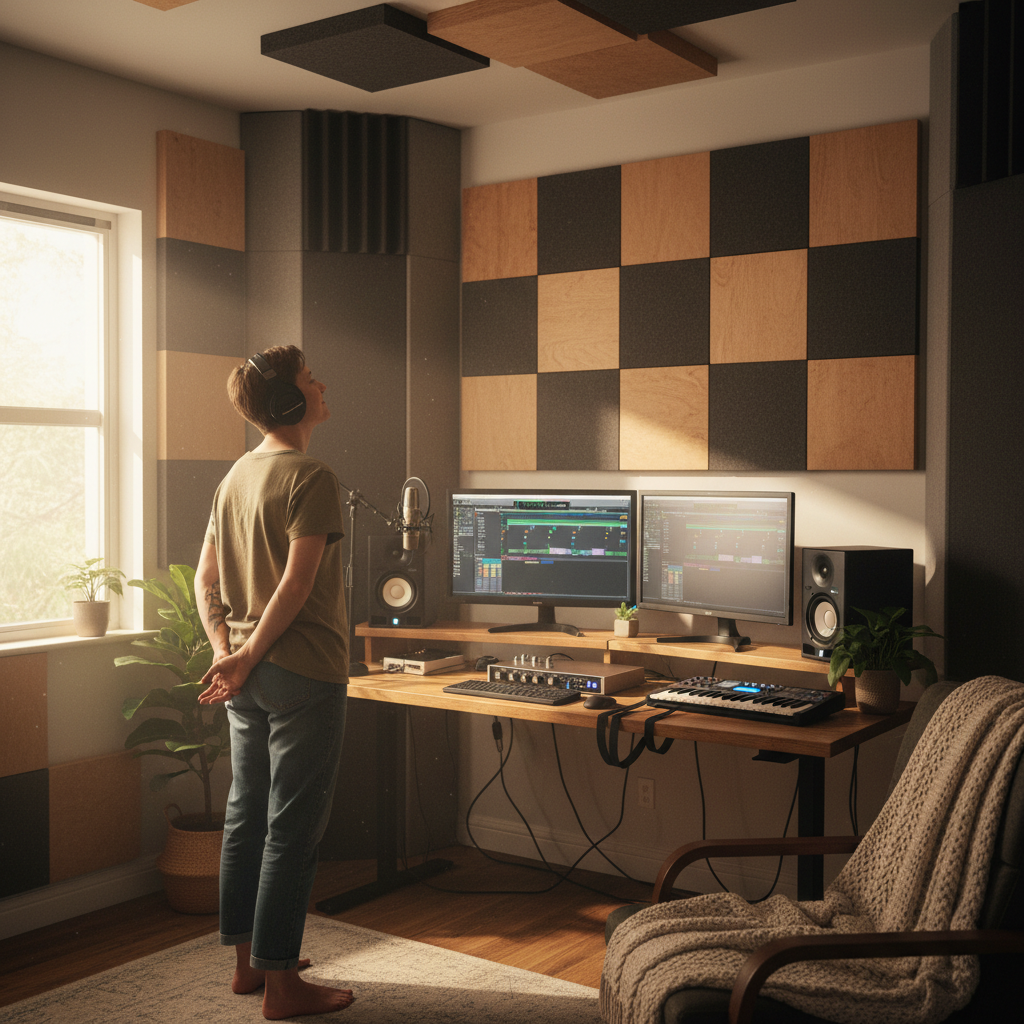
Mirror Test: This is crucial for identifying “first reflection points.” Sit in your mixing position. Have a friend move a mirror along the wall between you and your speaker. Wherever you can see the reflection of your speaker in the mirror, that’s a first reflection point. Mark these spots! Do this for both speakers and for side walls, the ceiling, and even the wall behind you. These are prime locations for acoustic panels.
Understanding Your Needs: Broadband Absorbers vs. Bass Traps
-
Broadband Absorbers: These are your typical wall panels. They absorb a wide range of frequencies, particularly mid-to-high frequencies. Most of your panels will be these.
-
Bass Traps: Low frequencies (bass) are notoriously difficult to control and tend to build up in room corners. Bass traps are thicker, denser panels, often wedge-shaped or built into corners, specifically designed to absorb lower frequencies. If your room has a boomy bass, bass traps are essential.
A good starting point for most home studios is to focus on first reflection points (side walls, ceiling), the wall behind your monitors, and if possible, some bass traps in the corners closest to your listening position.
Gathering Your Arsenal: Tools and Materials
You don’t need a workshop full of fancy equipment. Most of these items you might already own or can easily borrow/buy.
Essential Tools:
-
Tape Measure: For accurate placement.
-
Pencil: For marking.
-
Level: Crucial for straight and professional-looking installation.
-
Drill: For mounting hardware.
-
Stud Finder: If you want to mount into studs for maximum security (recommended for heavier panels). Drywall anchors work fine for lighter panels.
-
Safety Gear: Gloves, eye protection, and a dust mask are a must if you’re handling raw insulation for DIY panels, or even just for drilling.
Your Acoustic Panels:
You can buy pre-made acoustic panels (which I highly recommend for ease of installation and guaranteed performance) or you can build them yourself using rock wool/mineral wool, wood frames, and fabric. Either way, once they’re built or purchased, the installation process is largely the same.
Mounting Hardware Options:
This is where the rubber meets the road. There are several popular methods, each with its pros and cons:
-
Z-Clips: My personal favorite for a clean, secure, and professional look. One part attaches to the wall, the other to the back of the panel, and they interlock. They allow the panel to sit slightly off the wall, which can sometimes improve absorption.
-
Impaling Clips: These are metal spikes that mount to the wall. The panel is then “impaled” onto the spikes. Simple and effective for lighter panels, but less secure for heavy ones and you have to be precise.
-
French Cleats: Similar to Z-clips but often used for heavier items. Two interlocking angled strips of wood (or metal). Can be DIY-made or purchased.
-
Rotary Wall Hooks/Picture Hangers: For very lightweight panels, simple picture hanging hardware can work. However, they’re not as stable or professional-looking as other options.
For bass traps, especially corner-mounted ones, you might need different hardware. Some bass traps come with built-in stand-offs, or you might need to build a simple wooden frame to secure them in the corner.
The Installation Process: Step-by-Step (Where the Magic Happens!)
Alright, let’s get those panels up! Remember, take your time, measure twice, drill once.
Step 1: Mark Your Spots
Based on your mirror test and general room assessment, use your tape measure and pencil to mark the exact locations where each panel will go. For first reflection points, aim to center the panel roughly at ear height when you’re in your mixing position. For ceiling panels, center them above your head. Use your level to ensure your marks are perfectly straight – this is key for a clean look.
If you’re using Z-clips or French cleats, you’ll mark the line for the wall-mounted cleat/clip. If using impaling clips, you’ll mark the individual clip positions.
Step 2: Install Wall-Mounted Hardware
Using your drill, carefully attach the wall-mounted part of your chosen hardware. If you’re drilling into drywall, use appropriate drywall anchors (toggle bolts for heavier panels, expanding plastic anchors for lighter ones). If you’re lucky enough to hit a stud with your stud finder, even better – screw directly into the stud for maximum security.
For Z-clips/French cleats, ensure the wall-mounted piece is perfectly level. For impaling clips, space them evenly to support the panel’s weight.
Step 3: Attach Panel-Mounted Hardware (If Applicable)
If your panels don’t come with pre-attached hardware, you’ll need to secure the other half of your Z-clips or French cleats to the back of your panels. Measure carefully to ensure they align perfectly with the hardware on the wall. Lay the panel face down on a clean, soft surface to avoid damage.
Step 4: Mount Your Panels!
Carefully lift your acoustic panel and align the panel-mounted hardware with the wall-mounted hardware. Gently lower and slide it into place. You should feel it lock securely. Give it a gentle tug to ensure it’s firm. If it wiggles, something might not be aligned or secure enough.
Step 5: Tackle Those Bass Traps (Corner Installation)
Bass traps are often installed in the corners of your room. The easiest way for many DIYers is to simply place them standing upright in the corners. However, for a more permanent and effective solution, you can mount them. Some bass traps come with pre-drilled holes for screws or specific corner mounting hardware. Others might require you to build a simple wooden frame in the corner to which you can attach the trap. The goal is to place them in the tri-corners (where two walls and the ceiling meet) and vertical corners of the room, especially the ones closest to your listening position.
Step 6: Repeat and Refine
Continue this process for all your plaed panel locations. Once they’re all up, step back and admire your work. But more importantly, listen!
Fine-Tuning Your Sound: Post-Installation Tips
Installation isn’t just about getting panels on the wall; it’s about optimizing your listening environment. Take some time to critically listen to your room after installation.
-
Listen to Reference Tracks: Play some professional tracks you know well. Do they sound clearer? Is the bass tighter? Are the high frequencies less harsh?
-
Move Panels Slightly: Acoustic treatment is sometimes an iterative process. If you feel a certain area could be better, try moving a panel a few inches up, down, left, or right. Even small adjustments can make a difference.
-
Consider Diffusers: Once you’ve absorbed reflections, you might find the room too “dead.” This is where diffusers come in, scattering sound waves to maintain liveliness without creating harsh echoes. They are often placed on the wall behind the listening position.
Common DIY Pitfalls and How to Avoid Them
-
Ignoring Bass Frequencies: This is perhaps the biggest mistake. You can cover every wall with broadband panels, but if you don’t address the bass, your mixes will still suffer. Bass traps are crucial.
-
Over-Treatment: While rare in home studios, it’s possible to make a room too “dead” by using too many absorbent panels without any diffusion. If your room sounds uaturally dry and lifeless, you might have overdone it. Start with first reflection points and corners, then add more as needed.
-
Poor Placement: Randomly sticking panels on walls won’t yield optimal results. Prioritize first reflection points, the wall behind your monitors, and corners for bass traps.
-
Neglecting the Ceiling: Don’t forget the ceiling! It’s often a major source of reflections. A cloud panel above your mixing position can make a huge difference.
-
Safety First: When handling insulation materials (if making your own panels), always wear gloves, a mask, and eye protection. Small fibers can be irritating.
Conclusion
Installing acoustic panels in your home studio is one of the most rewarding DIY projects you can undertake. It directly impacts the quality of your sound, your mixing accuracy, and ultimately, your creative output. While it might seem daunting at first, breaking it down into manageable steps, as we’ve done here, makes it totally achievable.
Trust me, the feeling of hearing your music with newfound clarity, free from the acoustic anomalies of your room, is incredibly satisfying. It’s an investment in your craft that pays dividends far beyond the cost and effort. So, grab your tools, get plaing, and transform your echo chamber into a professional-sounding mixing haven. Your ears (and your future mixes) will thank you!
